LetsDefend — AS-REP Challenge Walkthrough
Investigating Domain Controller Logs and Endpoint Artifacts Using Event Log Explorer and PECmd.

Image Credit: https://app.letsdefend.io/challenge/as-rep-challenge
Introduction:
Welcome to my weekly walkthrough! If you’ve stumbled across this blog while looking for a detailed guide to the AS-REP challenge from LetsDefend, you’re in the right place.
This challenge pairs nicely with two others in the series, and there’s some overlap in approach. If you like this topic, check out:
LetsDefend - LDAP Enumeration Challenge Walkthrough
LetsDefend - Golden Ticket Challenge Walkthrough
Challenge Scenario:
A network security team received alerts from a Domain Controller (DC) indicating that a user was making unusual requests for Kerberos tickets, which is not typical for their role. Given that this behavior aligns with potential reconnaissance or lateral movement within the network, the security team escalated the issue to a senior investigator. The investigator has been tasked with analyzing the provided DC and workstation logs to trace the attacker’s movements, determine the source of the anomaly, and understand how the attacker gained access and what actions they might have taken inside the network.
For this challenge, we’re putting on our incident response hats. We’ve got suspicious Kerberos ticket requests, alerts from the responding DC, and a set of artifacts from the user’s workstation. It’s up to us to shed light on what happened and why.
From the DC’s Windows Security Event Log, we’ll use Event Log Explorer to filter and correlate the attacker’s authentication activity. The goal is to determine what technique was used and confirm whether AS-REP roasting is in play. Once we’ve wrapped the DC review, we’ll pivot to workstation artifacts, including the client security event logs and Windows Prefetch files, to fully map out the attack.
If this is all new to you, don’t worry. By the end, you’ll have a solid understanding and repeatable approach for spotting Active Directory attacks like AS-REP roasting using just a domain controller’s security log — and then expanding the picture with endpoint artifacts. Time to go hunting for a needle in the haystack of logs — let’s go!
And if you find this walkthrough helpful — whether it levels-up your skills, gets you over a stumbling block, or just gives you a clearer view of the blue team side of incident response — please give it a clap and consider following me for more content like this.
Thanks for reading and going on this investigation with me!
AS-REP Primer:
Before we jump too far into the investigation, let’s lay some groundwork and do a quick recap of what an AS-REP attack is in the context of a domain controller. This will help us contextualize the investigation as we move through it.
In an Active Directory environment, modern authentication is handled using Kerberos. We don’t need to go terribly in-depth, since there are excellent resources for deeper dives if you want to explore it more fully. The idea is that when a client in an Active Directory domain needs to access a resource or log in to a server, an authentication flow takes place using Kerberos. Microsoft has clear visuals in its Learn documentation for how that exchange works:
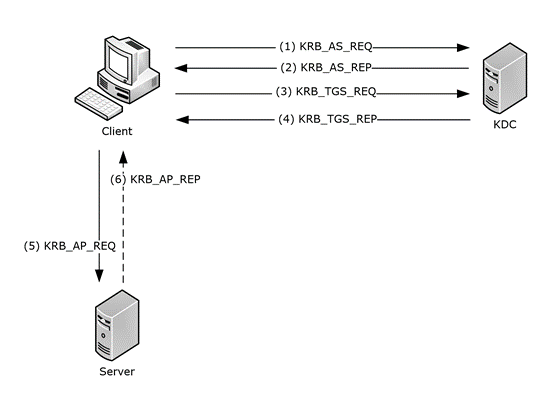
The AS-REQ and AS-REP are the first steps in the Kerberos authentication process. AS-REP roasting becomes possible when an account has Kerberos pre-authentication disabled. With pre-authentication enabled, the user’s AS-REQ includes a timestamp encrypted with their password hash. The domain controller must decrypt that timestamp before it will issue an AS-REP containing a TGT.
When an account doesn’t require this pre-authentication, attackers can just send an AS-REQ, snag the AS-REP, and then brute-force the encrypted data offline to expose credentials. This tactic is what’s called an AS-REP Roasting attack, which MITRE ATT&CK classifies under Steal or Forge Kerberos Tickets: AS-REP Roasting (T1558.004).
MITRE describes it like this:
Adversaries may reveal credentials of accounts that have disabled Kerberos preauthentication by Password Cracking Kerberos messages. For each account found without preauthentication, an adversary may send an AS-REQ message without the encrypted timestamp and receive an AS-REP message with TGT data which may be encrypted with an insecure algorithm such as RC4.
Not good! But understanding this flow is exactly what we need as we move into the investigation.
MITRE also provides helpful detection guidance. It recommends monitoring for patterns such as:
Detects AS-REP roasting attempts by monitoring for Kerberos AS-REQ/AS-REP authentication patterns where preauthentication is disabled (Event ID 4768 with Pre-Auth Type 0). Correlates these requests with subsequent service ticket activity (Event ID 4769) and anomalies such as requests using weak RC4 encryption (etype 0x17).
In other words, by combining these telemetry points and applying them to our investigation, we can quickly spot AS-REP roasting activity and scope the attack. Let’s give it a shot!
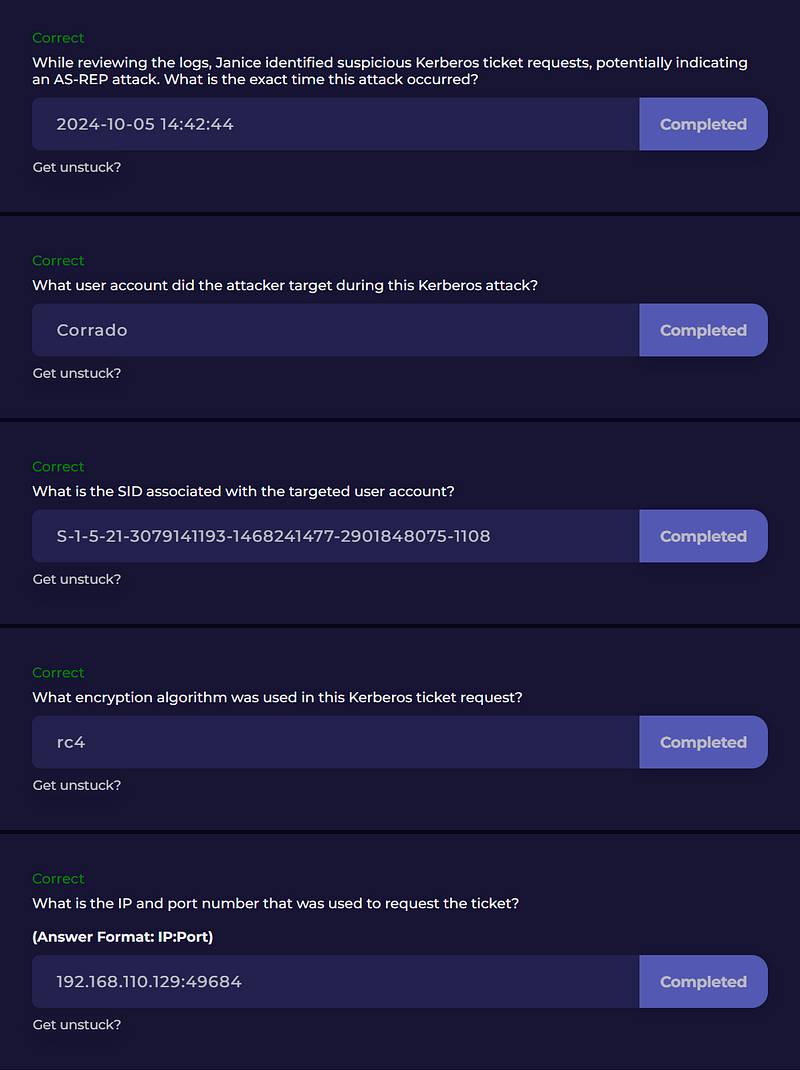
Questions 1€“5:
While reviewing the logs, Janice identified suspicious Kerberos ticket requests, potentially indicating an AS-REP attack. What is the exact time this attack occurred?
What user account did the attacker target during this Kerberos attack?
What is the SID associated with the targeted user account?
What encryption algorithm was used in this Kerberos ticket request?
What is the IP and port number that was used to request the ticket?
Now that we’ve gotten a grasp of the theory behind an AS-REP attack, let’s put it into practice and jump into the challenge. After extracting the contents of AS-REP.7z, you’ll see two folders: Corrado, which contains the compromised workstation artifacts, and DC, which contains the domain controller logs.
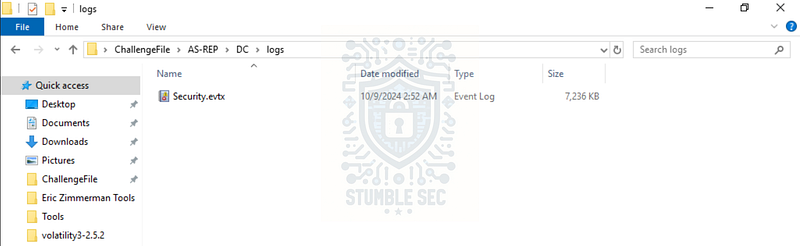
Overview of the challenge artifacts
Since we’re investigating an AS-REP attack, we’ll need to focus on TGT ticket requests (Event ID [4768](https://learn.microsoft.com/en-us/previous-versions/windows/it-pro/windows-10/security/threat-protection/auditing/event-4768)), which are only available on a domain controller. The first artifact we need to examine is the DC’s Security.evtx log. You can open it with Windows Event Viewer, or you can use Event Log Explorer, a third-party utility that significantly speeds up log analysis. Because Event Log Explorer is already included in the LetsDefend analysis environment, that’s what I’ll be using in this walkthrough.
Once you have the log open in Event Log Explorer, press the filter button in the top toolbar. In the filter window, search for Ticket Granting Ticket request events (Event ID 4768) where PreAuthType = 0. This applies what we learned directly from the MITRE ATT&CK detection strategy, reduces the log noise, and highlights requests for accounts where pre-authentication is disabled.
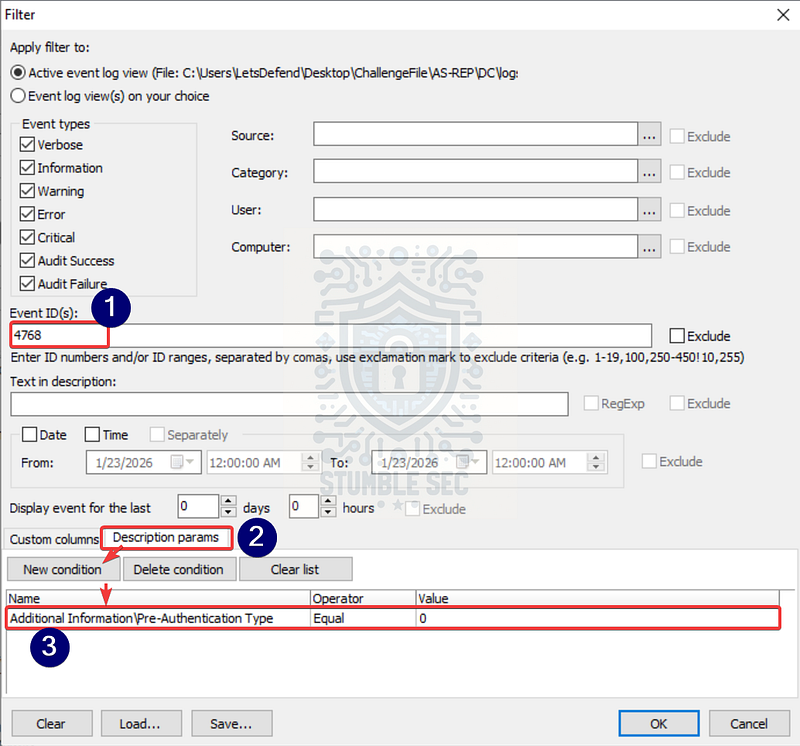
Event Log Explorer: Filtering TGT requests without pre-authentication
With the filtered results in front of us, the next step is to find the event matching the third parameter of the MITRE detection rule: a Ticket Encryption Type associated with a weak legacy algorithm such as RC4 (0x17). Scanning through the events, you’ll notice one entry that stands out because its Ticket Encryption Type field differs from the others.
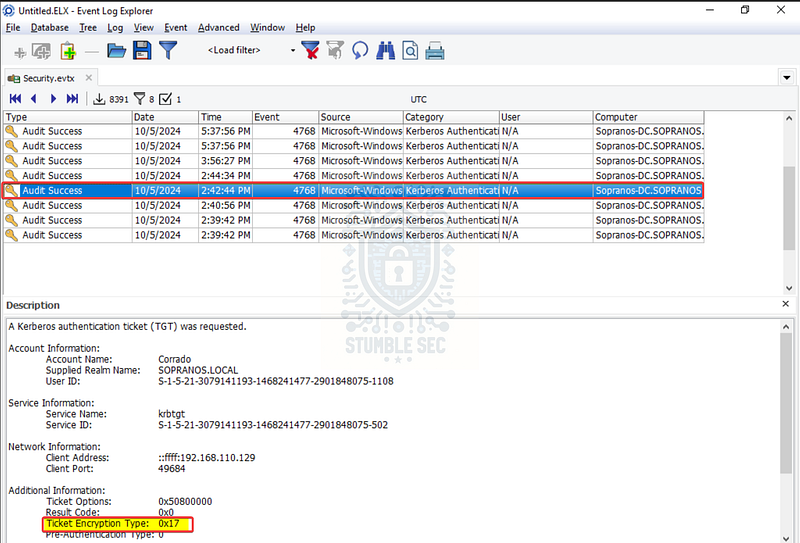
Event Log Explorer: Identifying a request using weaker encryption
Now that we’ve identified this event, we have all the information needed to answer the first five questions:
- When the attack occurred (remember to convert your answer to UTC!)
- Which user account was targeted
- The Security ID (SID) associated with that account
- The encryption algorithm used in the Kerberos request
- The IP address and port number the attacker used to request the ticket
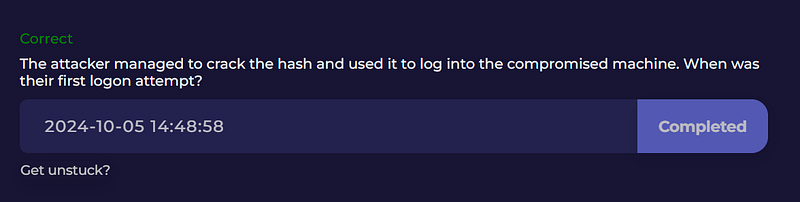
Question 6: The attacker managed to crack the hash and used it to log into the compromised machine. When was their first logon attempt?
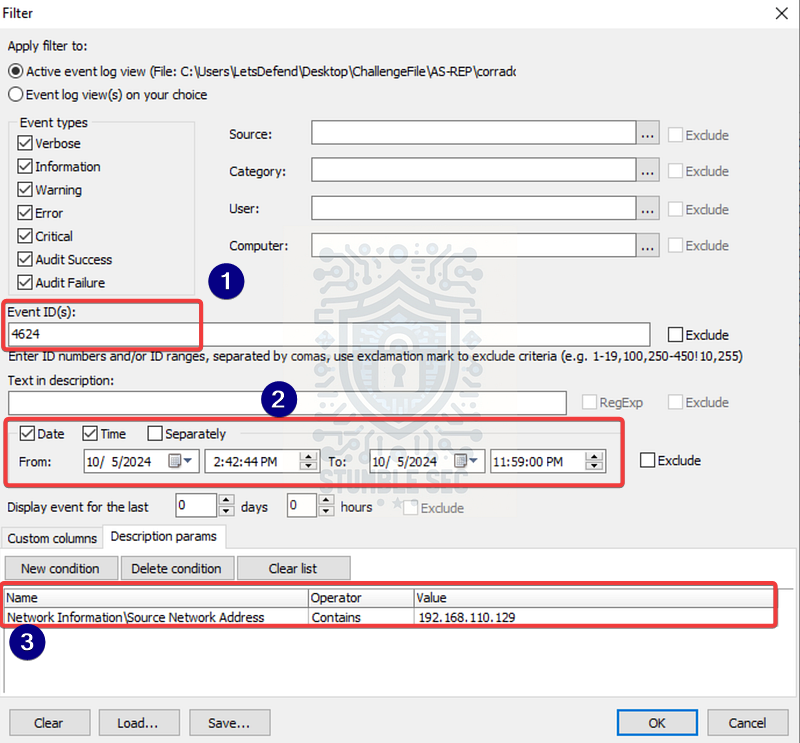
Now that we’ve identified the suspicious AS-REP in the domain controller logs, it’s time to pivot to our second artifact: the Security.evtx file from Corrado’s workstation. This log will help us spot the attacker’s first login attempt after cracking the hash obtained through the initial AS-REP Roasting activity.
Load the workstation’s Security.evtx file in Event Log Explorer. This time, filter for successful logons (Event ID [4624](https://learn.microsoft.com/en-us/previous-versions/windows/it-pro/windows-10/security/threat-protection/auditing/event-4624)) on the device. To make the search more efficient, adjust the time window to only include events that happened after the suspicious AS-REP request. In this challenge, that means everything after 10/5/2024 2:42:44 PM and through the end of the day (10/5/2024 11:59:00 PM).
Since we already identified a source IP address in Question 5 associated with the AS-REP activity, we can add that address as a custom field in the filter. This dramatically reduces our noise floor and helps us zero in on the attacker’s follow-up actions.
Event Log Explorer: Filtering successful logon events from the suspicious source IP
Let’s start by looking at the earliest matching result. Even though the filter is showing only logins from the source IP we associated with the AS-REP traffic, there are several red flags in the event details that suggest malicious activity. These include:
- A
Logon Typeof3, meaning a Network logon requested over SMB, WinRM, or another remote protocol - An
Account NameofANONYMOUS LOGON - A
Logon GUIDof{00000000-0000-0000-0000-000000000000}, which is expected for anonymous or unauthenticated network connections
These characteristics strongly suggest that this is the attacker’s first attempt to access the machine using the cracked credential.
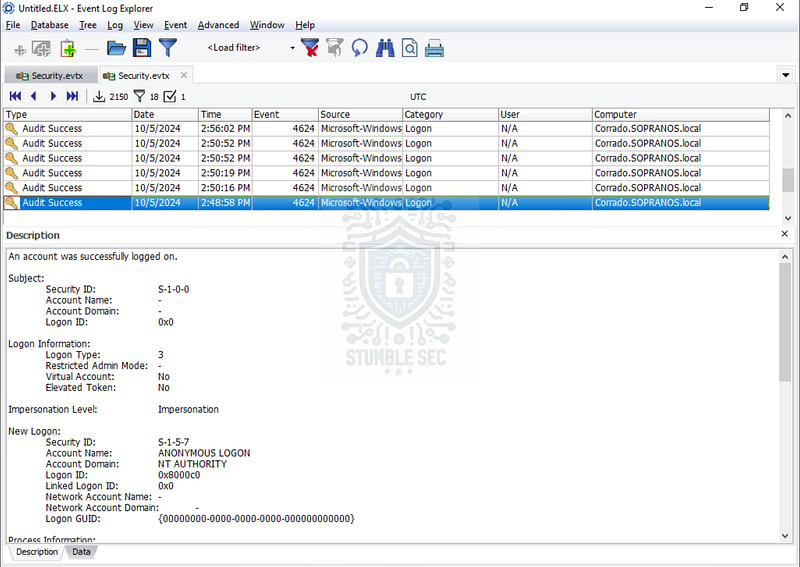
Event Log Explorer: First suspicious network logon tied to the attacker’s source IP
Questions 7 & 8:
Once inside, the attacker began exploring the system. What was the first command they executed?
When did the attacker execute this command exactly?
Our next task is to figure out the first command the attacker ran once they gained access to Corrado’s workstation. To do that, we’ll pivot away from the event logs and turn to a third forensic artifact: Windows Prefetch files. You can find them in the following directory:
C:\Users\LetsDefend\Desktop\ChallengeFile\AS-REP\corrado\prefetch
Rather than reinvent the wheel on describing these artifacts, I’ll pull from Magnet Forensics, who explain it much better than me:
Prefetch files are great artifacts for forensic investigators trying to analyze applications that have been run on a system. Windows creates a prefetch file when an application is run from a particular location for the very first time. This is used to help speed up the loading of applications. For investigators, these files contain some valuable data on a user’s application history on a computer.
So, the idea is that if we can parse these files, we can identify which executable the attacker launched first. As-is, though, the files aren’t meant to be read directly, so we need a way to convert them into something usable…
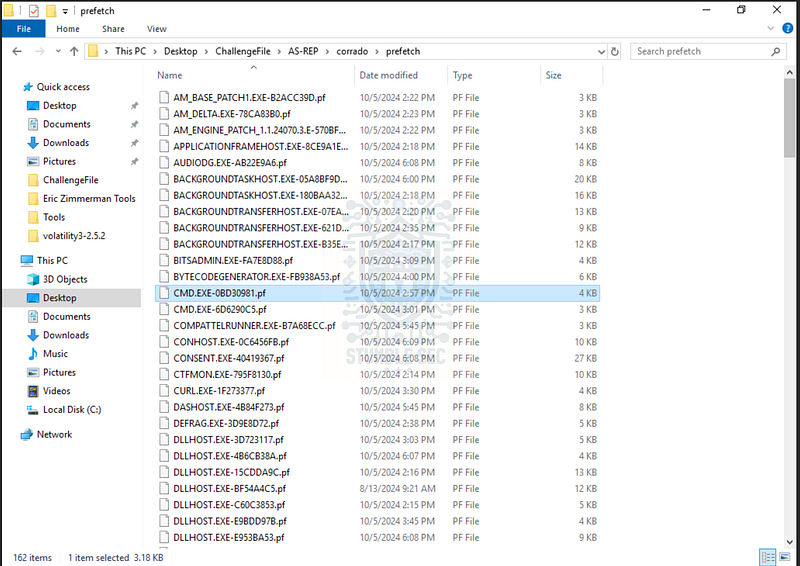
The contents of the prefetch folder
Enter PECmd, one of the many tools in Eric Zimmerman’s suite. It’s built to parse the prefetch logs and it’s already loaded in the analysis environment, so we just need to run it from PowerShell. Here’s an example command where we tell PECmd to parse the prefetch directory and output to a CSV called investigation.csv:

.\PECmd.exe -d “C:\Users\LetsDefend\Desktop\ChallengeFile\AS-REP\corrado\prefetch" –csv C:\Users\LetsDefend\Desktop\ChallengeFile\ –csvf investigation.csv
Once the CSV is generated, open it with another Zimmerman tool, Timeline Explorer, which lets us sort and filter the parsed data.
Inside Timeline Explorer, filter on the Last Run column so we can start building a timeline. From the earlier questions, we know the attacker first logged in at 2024-10-05 14:48:58, so we’ll focus on entries right after that time. With the rows sorted, look at the Executable Name column and we’ll see the first commands run by the attacker.
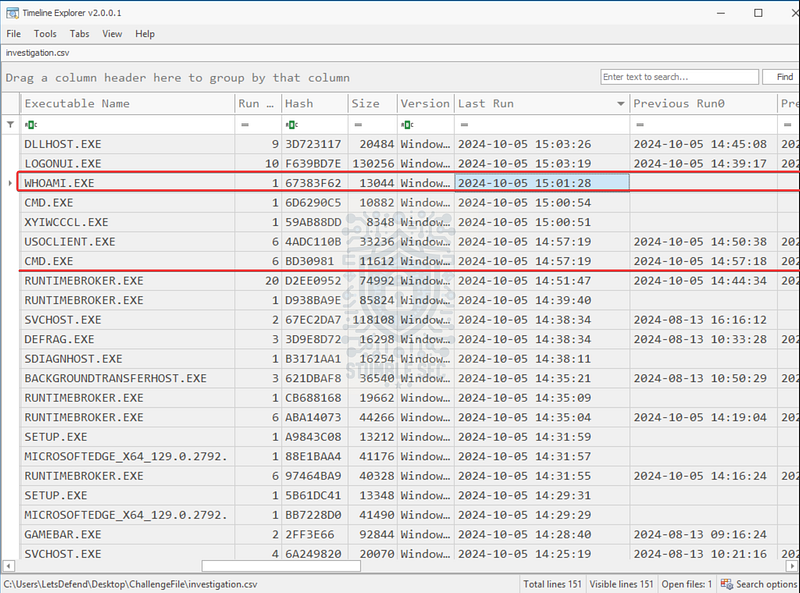
Timeline Explorer: Identifying the first command the attacker used to explore the system
Now, Question 7 is slightly open to interpretation. It mentions that “the attacker began exploring the system,“so we can reasonably assume it’s asking for the first discovery-related command. In this dataset, that command is whoami.exe. This aligns with MITRE ATT&CK T1033 (System Owner/User Discovery) and is a common early step for attackers who want to confirm what account they compromised and what privileges they have.
The great thing is that now that we’ve identified the command, we can also answer Question 8 by pulling the exact timestamp from the Last Run column in Timeline Explorer. That gives us the precise moment the attacker executed whoami.exe.
Conclusion:
How fun was that! A huge thank you to LetsDefend for dropping these awesome classic Active Directory attack challenges.
This one was a great chance to revisit Kerberos fundamentals and sharpen incident response skills. Instead of juggling a dozen artifacts, we focused on the Windows Security Event Logs and used Event Log Explorer to piece together what went down.
Along the way, we identified AS-REP roasting in DC logs (Event ID 4768 with PreAuthType = 0 and RC4 0x17), confirmed the attacker’s first successful logon on the endpoint (Event ID 4624, Logon Type = 3, ANONYMOUS LOGON, null GUID), and then used Windows Prefetch parsed with PECmd and reviewed in Timeline Explorer to surface whoami.exe as the first discovery command and grab the exact execution time.
I chose this challenge to continue the series and to brush up on Windows IR and refresh on Kerberos misconfigurations like missing pre-authentication. Even in a cloud-heavy world, techniques like enumeration, ticket abuse, and lateral movement still show up in real incidents. Knowing how to spot them fast from DC telemetry and validate on the host is table stakes for any blue teamer. Awesome stuff.
Thanks for your support and partnering on this investigation. If you found this walkthrough helpful — please give it a clap and consider following me! Your feedback is invaluable, and it pumps me up to support your security journey. Remember, cybersecurity is a team sport, and we’re in this together!
Until next week’s challenge — stay curious and be safe out there!

Tools & References:
Challenge Link: https://app.letsdefend.io/challenge/as-rep-challenge
Event Log Explorer: https://eventlogxp.com/
Eric Zimmerman’s Tools: https://ericzimmerman.github.io/#!index.md
**Microsoft Learn — " # "
Kerberos Network Authentication Service (V5) Synopsis” :** https://learn.microsoft.com/en-us/openspecs/windows_protocols/ms-kile/b4af186e-b2ff-43f9-b18e-eedb366abf13
MITRE ATT&CK — Steal or Forge Kerberos Tickets: AS-REP Roasting (T1558.004): https://attack.mitre.org/techniques/T1558/004/
**Microsoft Learn — " # "
4768(S, F): A Kerberos authentication ticket (TGT) was requested” **: https://learn.microsoft.com/en-us/previous-versions/windows/it-pro/windows-10/security/threat-protection/auditing/event-4768
**Microsoft Learn — " # "
4624(S): An account was successfully logged on” :** https://learn.microsoft.com/en-us/previous-versions/windows/it-pro/windows-10/security/threat-protection/auditing/event-4624
**Magnet Forensics Blog — " # "
Forensic Analysis of Prefetch files in Windows" :** https://www.magnetforensics.com/blog/forensic-analysis-of-prefetch-files-in-windows/
MITRE ATT&CK — System Owner/User Discovery (T1033): https://attack.mitre.org/techniques/T1033/