LetsDefend — MemLoot Challenge Walkthrough
Windows Memory Forensics with Volatility 3: Ransomware Detection, Process Analysis, and Network Artifact Discovery.

Image Credit: https://app.letsdefend.io/challenge/memloot
Introduction:
Welcome to my weekly walkthrough! If you’ve stumbled across this blog while looking for a detailed guide to the MemLoot blue team challenge from LetsDefend, you’re in the right place. This one goes all in on memory analysis, where volatile artifacts living in RAM can tell a story even when disk evidence is long gone.
For this challenge, we’re putting on our incident response hats and investigating a ransomware alert on a newly provisioned workstation. After some scary activity was detected, including file encryption and a ransom note, the system was isolated from the network. The user reported downloading and installing what they believed was legitimate software shortly before everything went off the rails. Our mission is to validate that story and figure out exactly what happened.
Fortunately, we’re provided with a memory dump from the affected system, which gives us everything we need to begin reconstructing the attack. Using Volatility 3, we’ll analyze running processes, identify file paths, uncover network artifacts, and reveal the ransomware’s behavior directly from memory. Along the way, we’ll correlate process trees, execution timestamps, encrypted file indicators, and outbound connections to build a clear picture of what went down.
I’ll walk you through each stage, explaining what we’re doing so you can develop your own workflow for approaching similar incidents in the real world. By the end, you’ll have a solid sense of how to use Volatility to pivot from suspicious executables to network infrastructure and confidently piece together an attack chain hiding inside RAM. Let’s go!
And hey, if you find this walkthrough helpful, whether it helps you level up your memory forensics skills, gets you over a stumbling block, or just serves as a useful reference, consider following me for more weekly deep dives.
Thanks for reading and going on this investigation with me!
Challenge Scenario:
We are reporting a ransomware attack on a workstation belonging to a new employee.
The machine was isolated from the network after unusual activity was detected, including file encryption and the appearance of a ransom note.
The employee mentioned that they had recently downloaded and installed software, believing it to be a legitimate application. Shortly after, critical files became inaccessible, and a ransom message appeared.
We are providing you with a memory dump to help identify the cause of the ransomware infection and determine how the attack was executed
Question 1: Identify the suspicious executable running in memory.
Let’s kick off this investigation by opening the ChallengeFile folder, which contains the artifact we’ll be examining: MemLoot.vmem.
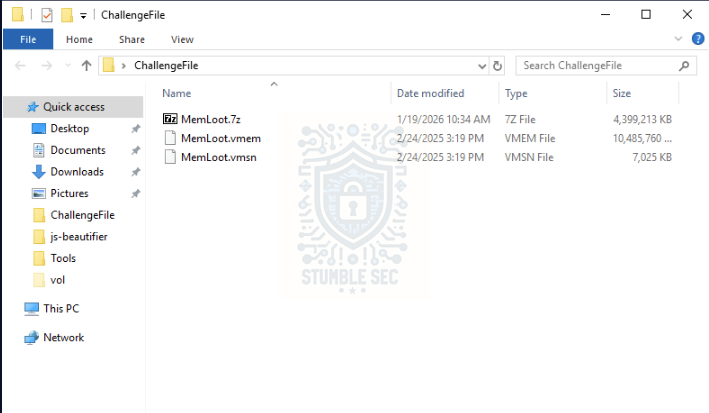
Overview of the challenge artifacts
You might be asking yourself what a .vmem file actually is and how we’re supposed to read it. That’s exactly the point of this challenge. A .vmem file is a virtual memory dump from a VMware virtual machine, capturing a snapshot of its virtual RAM at a specific point in time. Memory images like this are rich forensic artifacts that let us dig into evidence such as running processes, loaded modules, injected code, and even fragments of network activity.
To explore the memory image, we’ll use Volatility 3, the modern version of the popular memory forensics framework described as “the world’s most widely used framework for extracting digital artifacts from volatile memory (RAM) samples.“I’ll refer to it simply as Volatility from this point forward. This tool is already installed on the LetsDefend virtual machine, so we’re good to go.
To get started, open Volatility from the pinned shortcut on the taskbar.
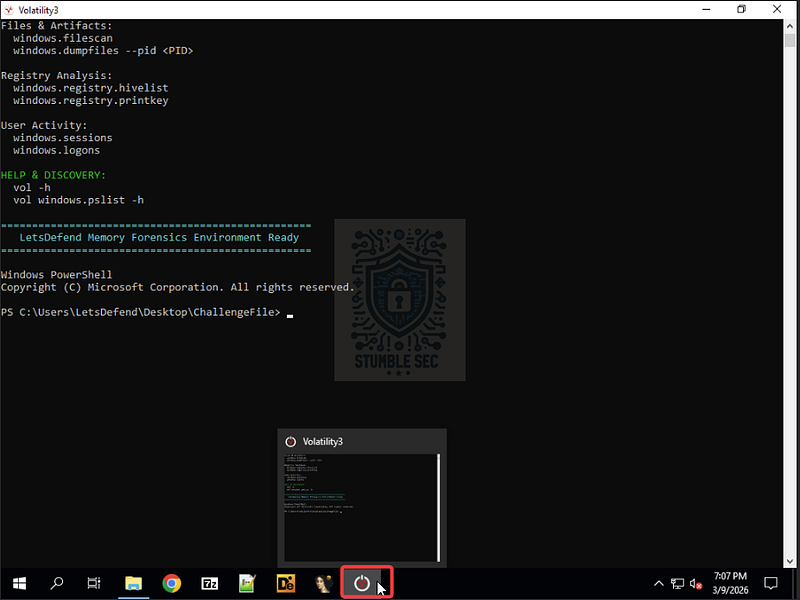
Launching Volatility
Once it’s open, a quick pro tip if you’re still getting comfortable with Volatility is to review the built-in help, which lists supported plugins and usage details:
vol -h
Looking back at our objective for Question 1, we need to identify a suspicious executable running on the compromised host. From Volatility’s help output, we can see that the windows.pslist plugin is a solid starting point. It enumerates processes that were active in memory at the time the snapshot was captured.
Let’s give it a try:
vol -f .\MemLoot.vmem windows.pslist
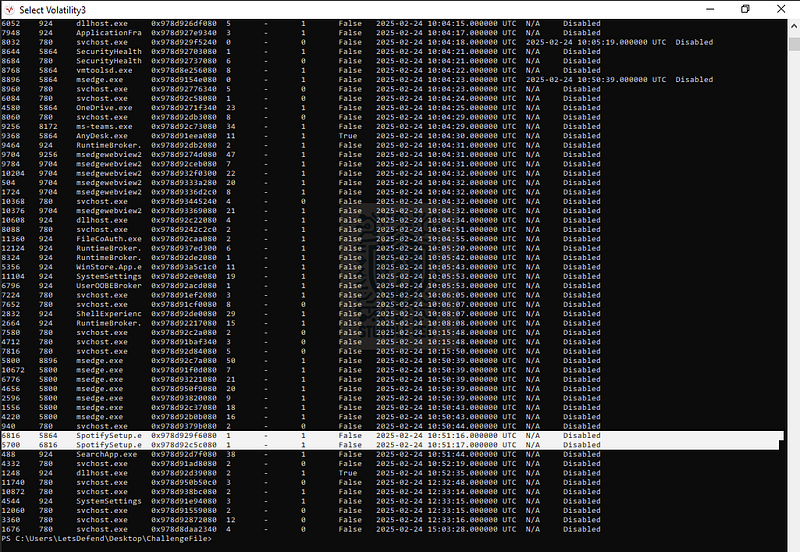
Volatility: Identifying the suspicious executable
Once the output loads, we can start examining the process list. Depending on your familiarity with Windows internals, some process names will look immediately normal, while others may feel just a bit off. If you ever stumble here, a reliable reference is the SANS Hunt Evil cheat sheet, which helps quickly distinguish expected Windows process from anomalous ones.
Now let’s tie this back to the scenario. We’re told that “the employee mentioned that they had recently downloaded and installed software, believing it to be a legitimate application.“One process that immediately stands out is SpotifySetup.exe, which neatly fits into the scenario.
At this stage, we’ve got a strong lead and a suspicious file potentially masquerading as a familiar app.

Question 2: What is the full path of the malicious file?
Now that we’ve identified the suspicious executable, it’s time to dig a little deeper and determine the full path of the file on disk.
To do this, we’ll pivot away from windows.pslist and instead leverage the windows.pstree module. While windows.pslist gives us a flat view of running processes, _windows.pstree_ helps us understand parent€“child relationships and often includes additional context, such as the executable path, when it’s available in memory.
A clean way to narrow our focus is to apply some pattern matching to the output. Think of this as a rough equivalent to grep on Linux. Since we’re running Volatility on Windows, we can pipe the output directly into the PowerShell Select-String cmdlet and filter for references to our suspicious binary, SpotifySetup.exe.
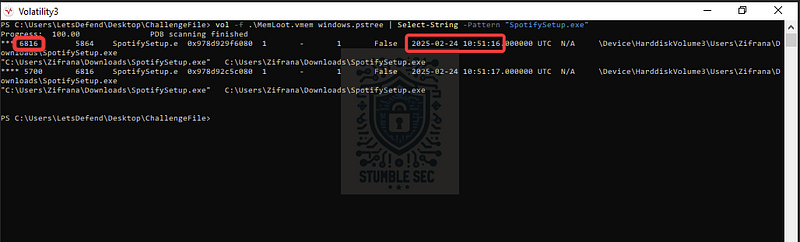
vol -f .\MemLoot.vmem windows.pstree | Select-String -Pattern “SpotifySetup.exe”
Running this command and filtering the results reveals the full path of the executable on the original host’s disk:
C:\Users\Zifrana\Downloads\SpotifySetup.exe
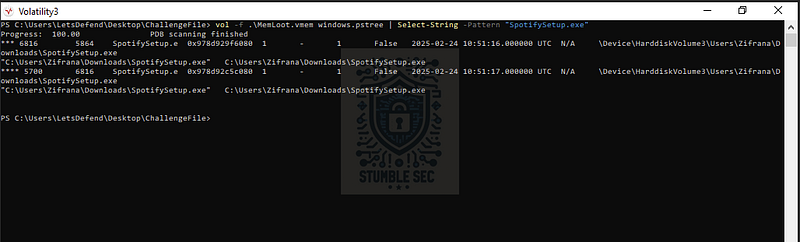
Volatility: Uncovering the malicious file path using windows.pstree
This makes sense given the scenario. The employee mentioned downloading what they believed was legitimate software, and the Downloads directory is a common staging point for exactly that kind of activity. At this point, we’ve confirmed not only the suspicious process name, but also where it lived on disk, giving us valuable context for how the ransomware likely made its way onto the system.

Questions 3 & 4:
What is the PID of the malicious file?
When was the malicious file executed?
One of the nice bonuses of using windows.pstree instead of stopping at windows.pslist is that we get access to more contextual details than just a process name and hierarchy. In addition to showing us where the executable lived on disk, the output also exposes the process ID (PID) and the creation timestamp for that process.
That gives us everything we need to answer Question 3 and Question 4 without introducing any new commands.
Volatility: Uncovering the malicious file PID and executed timestamp using windows.pstree
At this point, we’ve established not just what executable ran and where it came from, but also when it entered execution and how it appeared in the process tree. With those answers in hand, we’re in good shape to move into deeper analysis.


Question 5: What is the real name of the malicious file?
Continuing our analysis of the malicious SpotifySetup.exe, we now need to determine the real name of the file, not just the display name used to lure a victim into launching it.
To do that, we’ll take advantage of an optional argument available in Volatility‘s windows.pslist module. The --dump option allows us to extract the in-memory contents associated with a specific process so that we can perform offline analysis.
Volatility: Dumping the contents of the malicious process
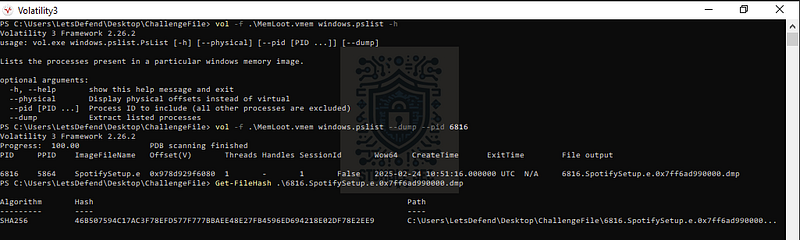
Using the PID we identified earlier, we can run:
vol -f .\MemLoot.vmem windows.pslist –dump –pid 6816
This command produces a .dmp file containing the dumped memory for that process. While this isn’t the same as the original executable copied directly from disk, it can be enough to extract useful metadata that survives in memory.
For that analysis, we’ll use ExifTool, a widely used metadata inspection utility. ExifTool is already installed in the Tools folder of the LetsDefend environment, which makes it convenient. We can point it directly at the dumped file like this:
.\exiftool.exe -f “C:\Users\LetsDefend\Desktop\ChallengeFile\6816.SpotifySetup.e.0x7ff6ad990000.dmp”
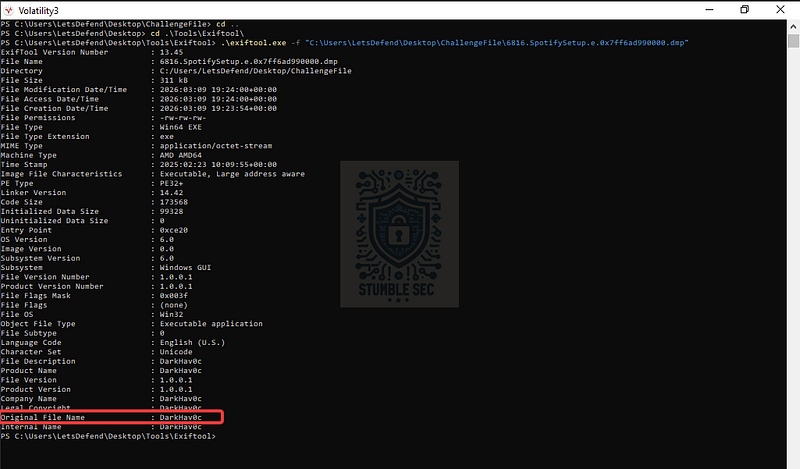
ExifTool: Identifying the Original File Name
Reviewing the output, the Original File Name field sticks out. Instead of anything resembling Spotify, the value is listed as DarkHav0c.
That’s a far spookier name than the one presented to the user and a strong indicator that the executable was masquerading as legitimate software. At this point, the gap between the file’s display name and its embedded metadata helps confirm that we’re dealing with a trojanized installer rather than an accidental false positive.

Question 6: What file extension does the ransomware use after encryption?
Now that we’ve collected a solid amount of information about the file itself, let’s shift focus toward understanding how it operates. We’ve already established that this binary behaves like ransomware, and one of the most visible indicators of successful encryption is the file extension appended to victim files.
To identify that extension, we’ll start by returning to the user path we discovered back in Question 2 and build outward from there. This time, we’ll rely on Volatility‘s windows.filescan plugin, which searches memory for file objects that may still be referenced by the operating system.
For a little peek behind the curtains, this step gave me some trouble.
My first instinct was to filter the output down to the user’s directory using pattern matching. I tried piping the results through findstr to look at everything under \Users\Zifrana\:
vol -f .\MemLoot.vmem windows.filescan | findstr “\Users\Zifrana"
I also tried exporting the output to a text file, hoping that it would make it easier to sift through:
vol -f .\MemLoot.vmem windows.filescan > filescan.txt
Unfortunately, neither approach turned up anything useful. The exported output was truncated, and the filtered results didn’t surface any meaningful indicators related to encrypted files.
At that point, there was only one option left. Manual mode.
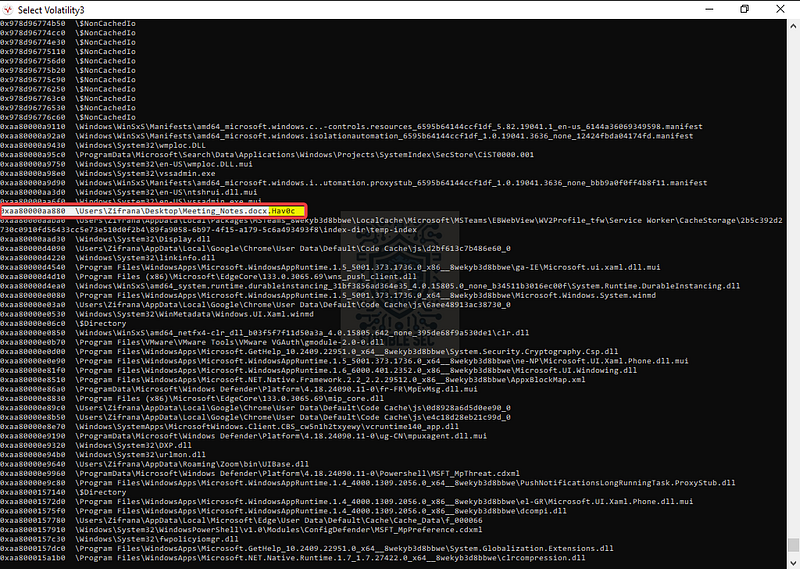
vol -f .\MemLoot.vmem windows.filescan
Letting the full file scan stream directly to the terminal isn’t elegant, and it takes a loooooong time to run, so be patient: Maybe you’ll spot something interesting as it zips by…
Volatility: Locating the needle in the haystack
Finally, once it completes, we can start to scroll up through the output. Thankfully, we don’t have to go too far before we stumble across a familiar file extension, .Hav0c.
That extension gives us our answer for Question 6 and provides another strong indicator tying the observed activity back to the malicious binary we’ve been analyzing.

Question 7: Identify the IP address and port the ransomware attempted to communicate with.
To tackle Question 7, we’re going to pivot to another Volatility module: windows.netscan. This plugin scans memory for network artifacts, including active and recently closed connections, IP addresses, and associated ports.
Our goal here is to identify network activity tied specifically to the malicious binary, SpotifySetup.exe.
To make that easier, we’ll run the module and redirect its output to a text file. This gives us the flexibility to quickly search through the results using a text editor rather than manually scrolling through terminal output. In the example below, the results are written to a file named netscan.txt:
vol -f .\MemLoot.vmem windows.netscan > netscan.txt
Once that command completes, we can open netscan.txt in a tool like Notepad and use its built-in search functionality. Press Ctrl + F, search for SpotifySetup, and jump to the first matching entry.
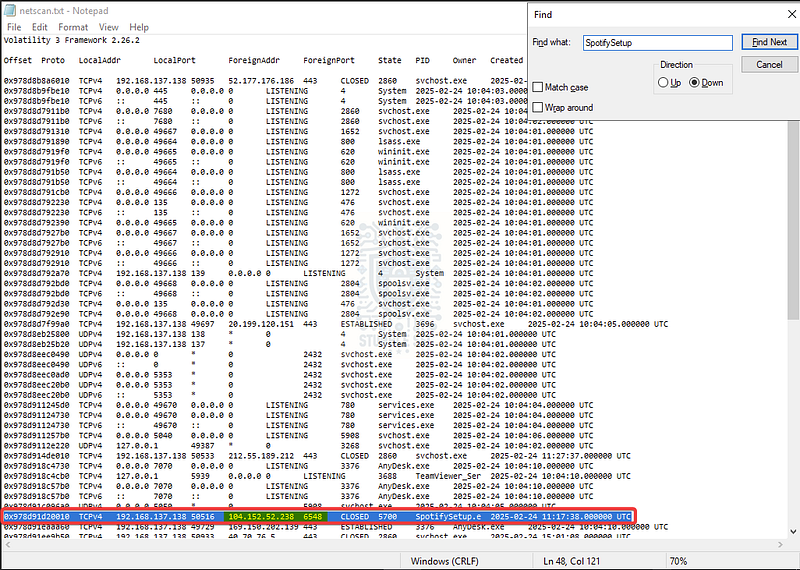
Notepad: Analyzing the output of Volatility’s windows.netscan
From that entry, we can see that SpotifySetup.exe established an outbound connection to a ForeignAddr of 104[.]152[.]52[.]238 over ForeignPort 6548.
This is a nice find because it gives us visibility into the attacker’s external infrastructure like a potential command and control address. It’s also great for defensive purposes, such as blocking the indicator or pivoting into threat intelligence to discover more related activity.

Questions 8 & 9:
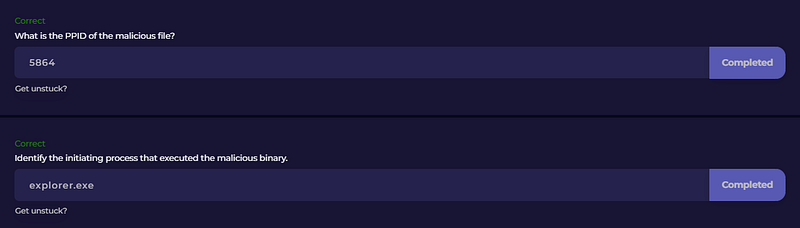
What is the PPID of the malicious file?
Identify the initiating process that executed the malicious binary.
Finally, we’ve made it to the last two questions, and fittingly, they take us right back to where this investigation began.
To answer Question 8 and Question 9, we need to revisit the windows.pslist output from Question 1 and take a closer look at how SpotifySetup.exe was launched.
Within the process listing, we can identify the parent process ID (PPID) associated with the malicious binary. The PPID for SpotifySetup.exe is 5864.
![]()
Volatility: Identifying the malware PPID with windows.pslist
With that, we can tighten our focus and determine which process was responsible for launching the ransomware. A quick way to do that is to search the process list for the matching PID:
vol -f .\MemLoot.vmem windows.pslist | findstr “5864”

Volatility: Uncovering the PPID
Voilà ! That search reveals that process 5864 maps directly to explorer.exe, the Windows shell. Since explorer.exe is responsible for handling user-initiated actions like double-clicking files or executing programs, this confirms the user’s story of good, ole social engineering, where the employee reported downloading and installing what they believed to be legitimate software.
Now that we’ve gotten everything scoped, let’s close out this investigation!
Conclusion:

How fun was that! A big thank you to LetsDefend for another awesome challenge.
This week’s investigation was a great starting point into practical memory forensics, giving us a firsthand look at how ransomware activity can be reconstructed using volatile artifacts alone. From identifying a suspicious executable in memory, to uncovering its true name, spotting encrypted files, and finally surfacing outbound network connections, this challenge showcased just how much visibility RAM can provide during incident response. Pretty cool, right?
As we worked through the memory dump, we were rebuilding the attack chain one artifact at a time. Each question flowed naturally into the next, and the investigation felt logical and intuitive as we pivoted between process listings, file scans, and network artifacts using Volatility. For me, a structured approach makes it especially satisfying, since you’re not just answering questions, you’re reinforcing how real incident response workflows come together. Love it!
I picked this challenge because while I’ve used Volatility plenty of times, I hadn’t tried it on Windows before and wanted to see how different it felt compared to Linux. On top of that, opportunities to practice memory analysis in the real world don’t come up often. It can be intimidating at first, but challenges like this help make it click and let you get your reps in. Practice really does make perfect.
Thanks for your support and partnering on this investigation. If you found this walkthrough helpful — please give it a clap and consider following me! Your feedback is invaluable, and it pumps me up to support your security journey. Remember, cybersecurity is a team sport, and we’re in this together!
Until next week’s challenge — stay curious and be safe out there!

Tools & References:
Challenge Link: https://app.letsdefend.io/challenge/memloot
GitHub — Volatility 3: https://github.com/volatilityfoundation/volatility3
Volatility Command Reference: https://github.com/volatilityfoundation/volatility/wiki/Command-Reference#netscan
SANS Hunt Evil Poster: https://www.sans.org/posters/hunt-evil
ExifTool: https://exiftool.org/