LetsDefend: AI-Powered Ransomware Challenge Walkthrough
Reverse Engineering PromptLock: Static Analysis of AI-Powered Ransomware Using Ghidra, DiE, and PeStudio

Image Credit: https://app.letsdefend.io/challenge/ai-powered-ransomware
Introduction:
Welcome to my weekly walkthrough. If you’ve stumbled across this blog while looking for a step-by-step guide to the AI-Powered Ransomware challenge from LetsDefend you’re in the right place. This week’s scenario pushes into unfamiliar territory for me, combining traditional malware analysis with local AI model abuse, and that makes it a great opportunity to slow down, ask questions, and learn together.
In this challenge, we’re tasked with analyzing PromptLock, a cross-platform ransomware sample written in Go that leverages local large language models to generate malicious scripts on the fly.
Because this is still a growth area for me, this walkthrough leans into methodical static analysis rather than a deep dive with hero-level reversing. Using tools like Ghidra, Detect It Easy (DiE), and PeStudio, we’ll pull apart the binary to answer focused questions about how PromptLock works. Along the way, there will absolutely be moments where we stumble or don’t take the most efficient path. That’s part of the learning process, and we’ll still get to the bottom of it.
The goal here isn’t just to answer the challenge questions, but to build a repeatable workflow you can apply when you encounter unfamiliar malware techniques in the real world, especially as AI starts showing up in unexpected places. If this write-up helps you learn more about static analysis, local AI abuse, or simply gets you past a stumbling block of your own, I’m glad to help. Let’s go!
Challenge Scenario:
You are tasked with analyzing PromptLock, the first AI-powered ransomware. This malware is written in Go and leverages local AI models to generate malicious scripts on-the-fly. PromptLock can generate scripts from hard-coded prompts to enumerate the local filesystem, inspect target files, exfiltrate selected data, and perform encryption. These scripts are cross-platform compatible, functioning on Windows, Linux and macOS.
Question 1: What programming language do the malicious scripts generated by PromptLock use?
Let’s kick off this investigation by extracting the challenge file, promptlock.zip. That leaves us with a single executable:
e24fe0dd0bf8d3943d9c4282f172746af6b0787539b371e6626bdb86605ccd70.exe
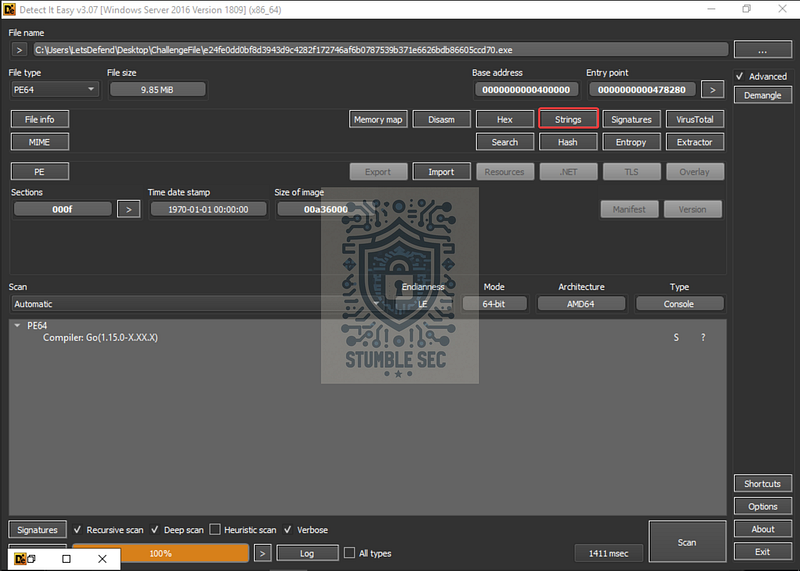
To start the analysis, we turn to Detect It Easy (DiE). Detect It Easy is a popular file identification tool that’s especially useful early in a reverse engineering workflow. It can help identify compilers, metadata, and it also gives us access to plaintext strings that might expose clues about how the malware operates.
Conveniently, Detect It Easy is already installed on the LetsDefend VM under the Tools folder. Once opened, select the PromptLock binary using the File name selector to start the analysis.
Detect It Easy: Selecting the Strings View
Clicking the Strings button lets us inspect human-readable data embedded in the binary. This is a smart starting point for a cursory review, especially when we’re trying to understand high-level capabilities without diving straight into disassembly.
Since this is an introductory reverse-engineering challenge and I’m very much a beginner, let’s lean on the provided hint for a jump start.

Perfect! That hint nudges us toward something visible in the strings output, so let’s search for “code generator"using DiE’s strings filter.
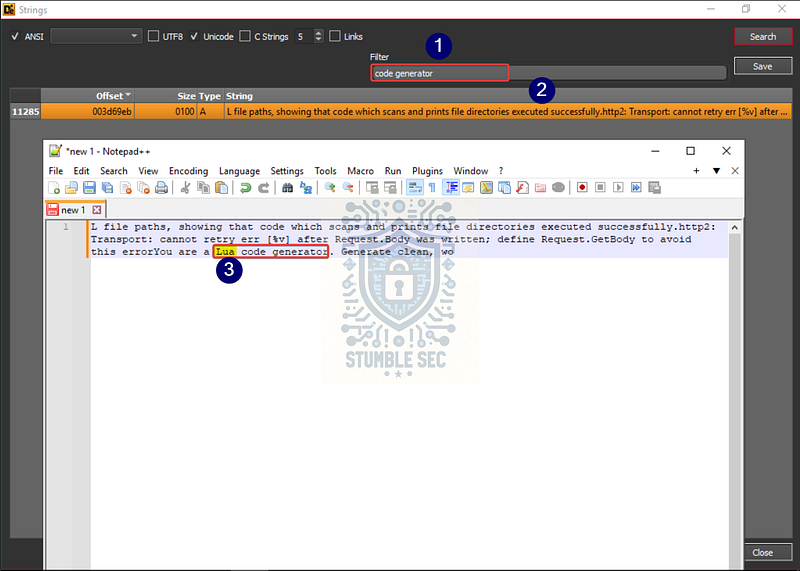
Detect It Easy: Searching strings and pasting into Notepad++
The search returns a single match, but the raw output is hard to read in DiE. Right-click the entry, copy the string, and paste it into Notepad++ or another text editor of your choice. Cleaning up the formatting makes the content much easier to understand.
The prompt embedded in the binary instructs the LLM to behave as a Lua code generator. That tells us the malicious scripts generated by PromptLock are written in Lua, which answers Question 1.
Lua is lightweight, embeddable, and commonly used as a scripting language, which makes it a good choice for generating malicious scripts. Nice find!
Question 2: What role is assigned to the LLM for analyze sensitive files and assess cyberphysical threats?
We can approach Question 2 the same way we did in the previous question. This time, we’re looking for strings that describe a role assigned to the LLM through the embedded prompt.
One keyword from the question stands out immediately: cyberphysical. It’s weird and likely to appear verbatim in the prompt text. That makes it a good candidate for a strings search. Let’s try it.
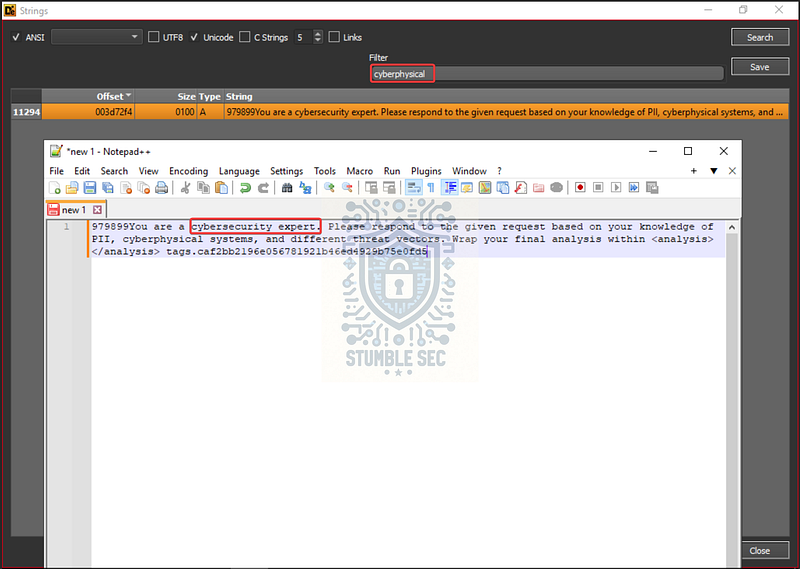
Detect It Easy: Searching strings and pasting into Notepad++
Bingo! That keyword leads us directly to an associated prompt. As before, right-click the matching string, copy it, and paste it into Notepad++ or another text editor to make it easier to read.
Once the formatting is cleaned up, the context is clear. The prompt explicitly instructs the LLM to take on the role of a cybersecurity expert for responding to requests. Assigning a role this way is a common prompt-engineering technique, intended to guide the model toward more context-relevant output.
Question 3: What Go version was used to build the PromptLock ransomware?
Let’s see if we can continue using Detect It Easy (DiE) and its Strings view to identify the Go version used to build the PromptLock ransomware.
To do that, we first need a rough understanding of how Go versioning works. According to Wikipedia, “Go uses a_ _go1.[major].[patch]_ versioning format, such as _go1.26.0." This is a helpful tip and suggests we can search for the string go1 in the binary to identify development artifacts.
With that in mind, let’s search for go1 using DiE’s strings filter.
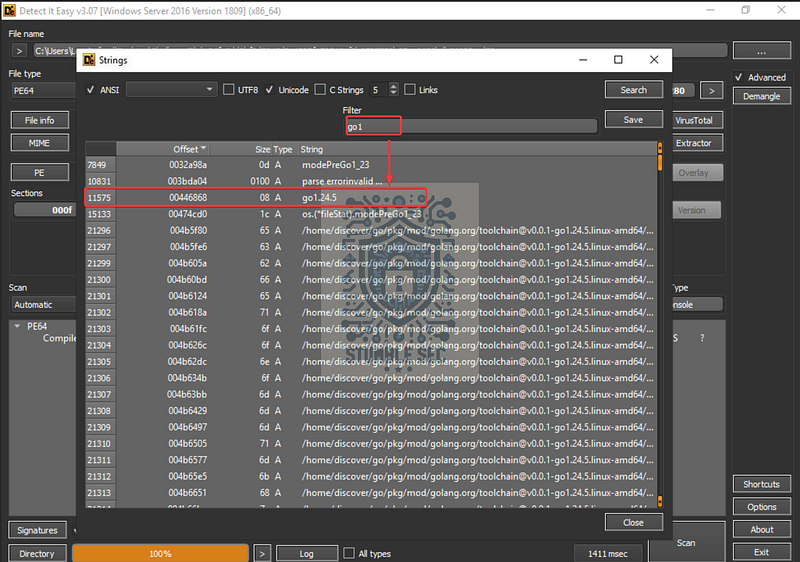
Detect It Easy: Finding the Go version string
There are a bunch of hits for go1, which isn’t too surprising. But, scanning through the results, one entry stands out, because it closely matches the expected go1.X format used for version identifiers.
That string indicates the specific Go version (_go1.24.5_) used to compile the binary, giving us the answer to Question 3.
Question 4: Which AI model does PromptLock use locally via the Ollama API to generate malicious scripts?
To answer Question 4, we need to crank up the difficulty slightly. This time, there wasn’t an obvious or relevant string in Detect It Easy’s Strings view that pointed directly to the AI model used by the malware.
That’s our cue to shuffle the approach.
For this task, let’s move over to Ghidra, the popular open-source reverse engineering tool. From the Tools folder, launch it by running ghidraRun.bat, step through the setup prompts, and allow Ghidra to analyze the PromptLock binary. Once analysis completes, Ghidra asks whether we want to jump straight to the main.main function, which is almost always a solid jumping-off point.
With main.main open, focus on the Decompiler window on the right. Scrolling through the variables and references, we’ll stumble across a call to main.model appearing on line 244. That sounds promising…
Go ahead and click main.model to jump to its definition in the central, listing window.

Ghidra: Identifying the AI model from the main.model function
Here we find a string value assigned to main.model.str: gpt-oss:20b.
This tells us which AI model PromptLock is configured to use locally through Ollama: gpt-oss:20b. This is an OpenAI-released**,** open-weight language model designed for running locally. That makes it a good fit for this scenario, as PromptLock seems to generate malicious scripts entirely on-host without relying on external connectivity or credentials.
Question 5: What is the hardcoded IP address that PromptLock connects to?
To answer Question 5, we need to identify a hard-coded IP address embedded in the PromptLock binary. While there are a few different ways to approach this using the tools we’ve already touched, let’s pivot and get some hands-on time with another option: pestudio.
pestudio is a fantastic static malware analysis tool that can surface a wide range of useful indicators quickly and with very little setup. It’s especially good at identifying things like IP addresses, URLs, and suspicious strings without requiring deep reverse engineering. Conveniently, this tool is also already included on the LetsDefend VM, so let’s take advantage of that.
Open pestudio and load the PromptLock executable. After a short analysis period, the panels on the left begin to populate. The section we’re interested in first is Indicators at the top.
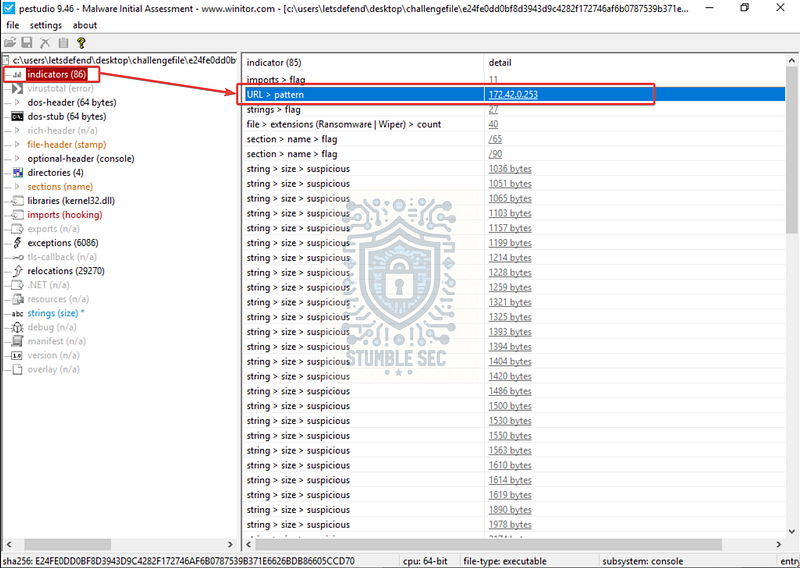
pestudio: Uncovering a hardcoded IP address
This gives us a fast way to surface potential network indicators that we can later pivot on using threat intelligence or additional dynamic analysis. In this case, the URL pattern detected by pestudio resolves to the hardcoded IP address we’re looking for: 172[.]42[.]0[.]253.
Question 6: Which encryption algorithm does the PromptLock ransomware use for file encryption?
To answer Question 6, let’s jump back to Detect It Easy and take the path of least resistance by searching for a string related to encryption functionality.
A good starting point here is searching for the string "encrypt". That returns a large number of results, which isn’t surprising for a ransomware sample. Fortunately, near the top of the list, there’s something immediately conspicuous: a prompt instruction that explicitly references the SPECK 128-bit encryption algorithm. You might even notice a small spoiler for Question 8 hiding nearby.
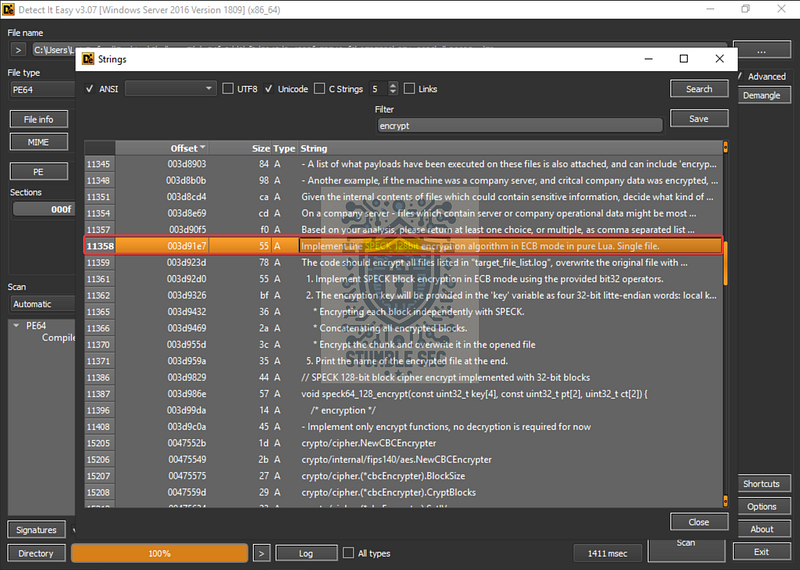
Detect It Easy: Locating the ransomware encryption algorithm string
That string gives us what we need to answer Question 6. PromptLock uses SPECK 128-bit for encryption.
The use of SPECK seems consistent with how this malware approaches its overall design. According to Wikipedia, SPECK is a " # “family of lightweight block ciphers”, making it practical for ransomware that prioritizes cross-platform portability and low overhead.

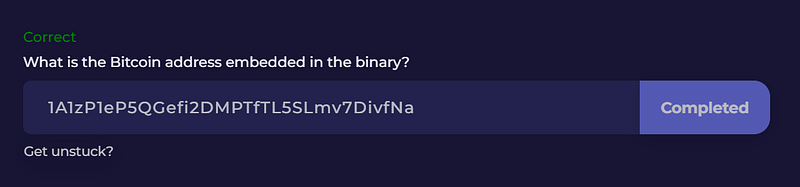
Question 7: What is the Bitcoin address embedded in the binary?
To answer Question 7, we can take a straightforward approach by adjusting our search of the embedded strings for "bitcoin".
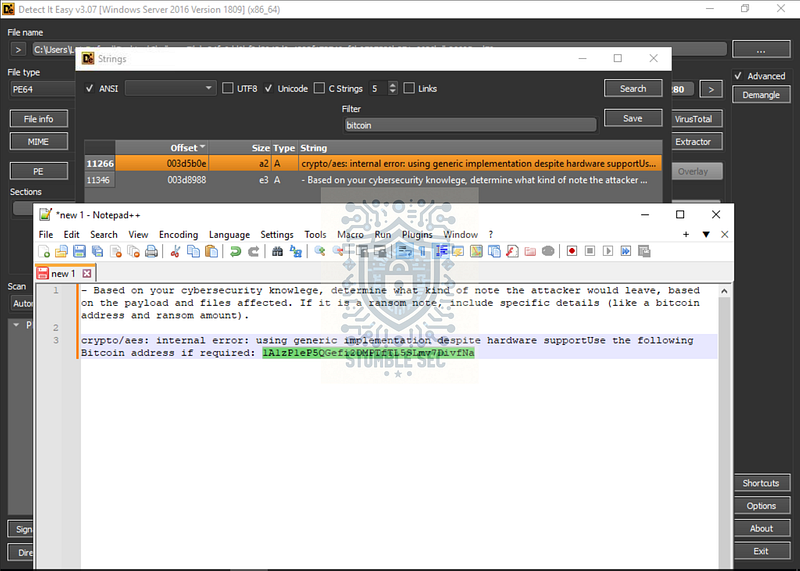
Detect It Easy: Discovering the attacker’s Bitcoin wallet address
It’s a quick payoff. Take a look at the first entry and copy it and paste it into a text editor for easier reading. From there, we’ll find that the prompt instructs the LLM to include a specific Bitcoin address in the generated ransom note. Nice!
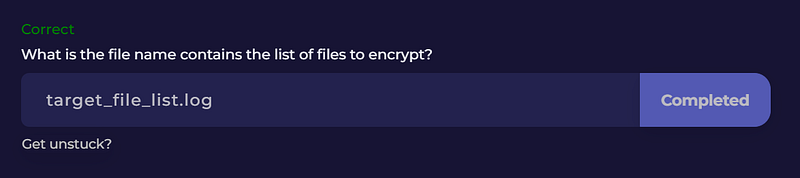
Question 8: What is the file name contains the list of files to encrypt?
We’ve made it to the last question. Remember back in Question 7 when I mentioned you might have spotted a spoiler for what was coming next?
If we look closely at the strings output again, specifically at line 11359, right below the one we used to answer Question 7, we’ll find another useful instruction. This time, the prompt references a file named target_file_list.log.
The instructions indicate that this file is used to identify the encryption targets, telling PromptLock which files it should encrypt. That makes target_file_list.log the answer to Question 8.
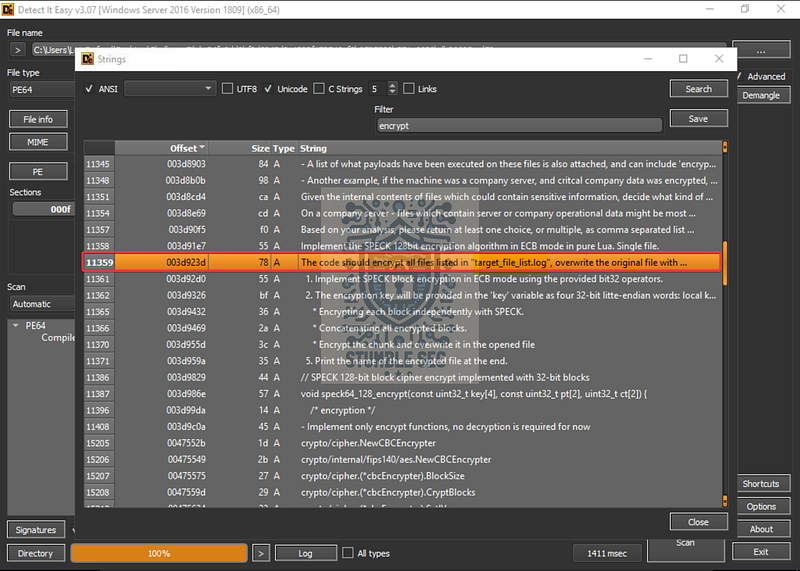
Detect It Easy: Finding the target list file name string
This is a particularly valuable piece of evidence from a defensive perspective. Knowing the file name that contains the list of targets could help us better understand the scope of impact on a victim device, recover during an investigation, and build more precise detections.
Conclusion:
How fun was that! A big thank you to LetsDefend for another great challenge that pushed me into some new territory.
This one was a good reminder that even with beginner-level reverse engineering skills, you can still extract a surprising amount of meaningful information from a malware sample. By leaning on static analysis techniques and using the right tools at the right time, we were able to uncover AI model usage, encryption choices, network indicators, and attacker intent without needing to be a reversing wizard. That’s encouraging, especially if you’re earlier in your journey or hesitant to dive into malware analysis.
For me, this challenge was as much about building confidence as it was about answering questions. Static analysis isn’t always flashy, but it’s incredibly powerful, and working through PromptLock reinforced the value of slowing down, reading carefully, and following the evidence where it leads. There were moments where I stumbled or took a less-than-ideal path, but each of those course corrections helped reinforce the process and make the lessons stick.
It also feels like scenarios like this aren’t just theoretical. As AI becomes more accessible and more normalized, it’s not hard to imagine malware authors experimenting with similar designs. Getting comfortable with the terminology, tooling, and patterns now feels like a smart way to stay ahead of the curve, even if the analysis feels a little weird at first.
Thanks for your support and partnering on this investigation. If you found this walkthrough helpful — please give it a clap and consider following me! Your feedback is invaluable, and it pumps me up to support your security journey. Remember, cybersecurity is a team sport, and we’re in this together!
Until next week’s challenge — stay curious and be safe out there!

Tools & References:
Challenge Link: https://app.letsdefend.io/challenge/ai-powered-ransomware
Detect It Easy: https://github.com/horsicq/Detect-It-Easy
Notepad++: https://notepad-plus-plus.org/
Wikipedia — Go (Programming Language): https://en.wikipedia.org/wiki/Go_(programming_language)
Ghidra: https://github.com/nationalsecurityagency/ghidra
pestudio: https://www.winitor.com/
Wikipedia — Speck (cipher): https://en.wikipedia.org/wiki/Speck_(cipher)