
Introduction:
Welcome to my weekly walkthrough! If you’ve stumbled across this blog while looking for a detailed guide to the Hidden Backdoor blue team challenge from LetsDefend, you’re in the right place.
This challenge is rated HARD by the authors, but don’t let that scare you off. Whether you’re building your digital forensics skills or already have some investigations under your belt, this challenge does a great job of walking us through the process of reconstructing an attack from a collection of host-based artifacts.
For this challenge, we’re investigating a suspicious file named NotionSetup.exe discovered on a senior developer’s workstation. Our job is to determine how the file got on the system, what happened after it was executed, and whether it was part of a larger attack chain.
Fortunately, we’re provided with a triage image from the affected system. Using artifacts such as the Master File Table (MFT), Chrome History, Windows Prefetch, BITS Client Event Logs, and the USN Journal, we’ll piece together a timeline of events and follow the evidence wherever it takes us.
Throughout the investigation we’ll lean heavily on Eric Zimmerman’s forensic tools, along with Event Log Explorer, VirusTotal, and a few native Windows utilities. More importantly, we’ll practice one of the most valuable skills in DFIR: correlating multiple artifacts to confidently build our timeline and frame our conclusions.
Since this challenge is a higher difficulty level, I won’t stop to explain every tool in depth since you’ll already be familiar with them. Instead, I’ll focus on the investigative process, the artifacts that matter, and the reasoning behind each pivot. The goal isn’t just to get the right answers but to build the mindset needed to tackle similar investigations in the real world.
Sounds like fun, right? Let’s go!
Thanks for reading and going on this investigation with me!
This write-up is for educational purposes only. All intellectual property related to the challenge belongs to the respective owners [LetsDefend]
Challenge Scenario:
A senior developer at AINokhba Enterprises discovered an unfamiliar file named “NotionSetup.exe” on their workstation. Curious and concerned, they executed the file, but nothing appeared to happen. Fearing that something might be wrong, they immediately reported the incident to the company’s security team.
Your task is to analyze a triage image from the senior developer’s machine to determine how the file ended up on their system and what actions, if any, were triggered by executing it.
Question 1: Can you determine the exact domain from which “notion-setup.exe” was downloaded? (site.com)
Let’s jump right into our investigation! From the ChallengeFile folder on the desktop, extract hiddenbackdoor.7z which leaves us with the folder C. This archive contains the Windows artifacts we’ll use throughout the investigation.
 Overview of the challenge file artifacts
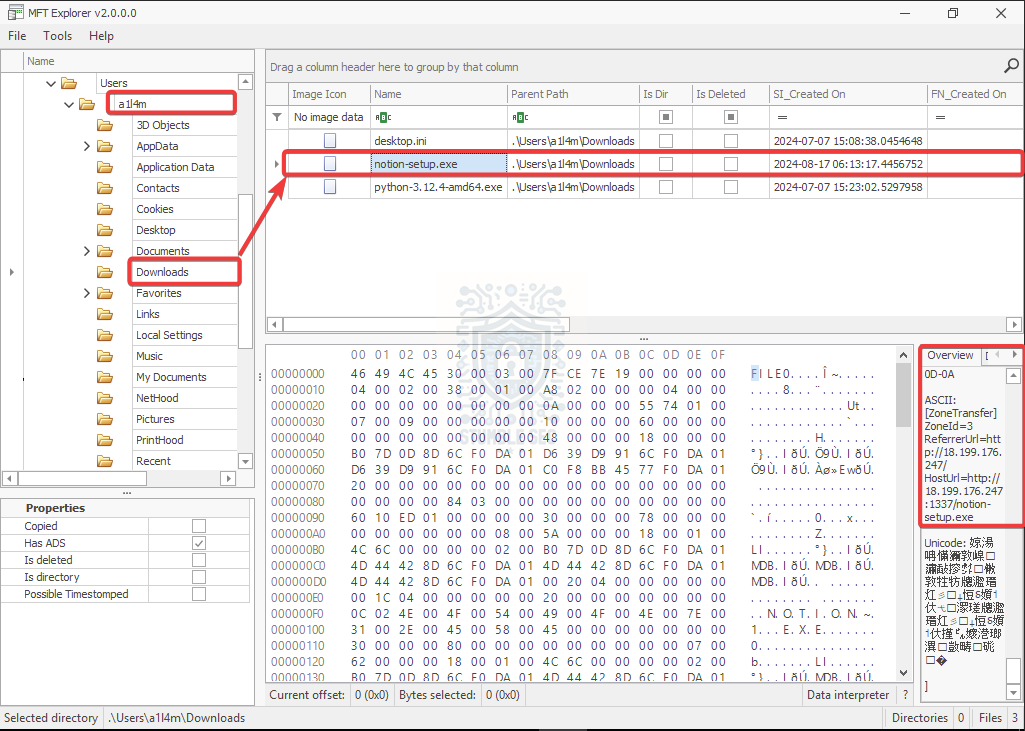
The first step is identifying the exact domain from where notion-setup.exe was downloaded. A natural starting point is the Master File Table (MFT). While the Mark of the Web (MotW) itself is stored as an alternate data stream (Zone.Identifier) attached to the file, tools like Eric Zimmerman’s MFTExplorer can surface that metadata through the file’s MFT record.
To access the MFT, we’ll need a specialized tool such as MFTExplorer (GUI) or MFTECmd (command line). For illustrative purposes, I’ll use MFTExplorer, which is already loaded on the LetsDefend VM at:
C:\Users\LetsDefend\Desktop\Tools\Eric Zimmerman Tools\MFTExplorer\MFTExplorer.exe
Once the tool is open, navigate to File > Load MFT and select the $MFT file from the challenge artifacts. This will take awhile to load, so sit back and relax.
After loading, navigate to the download directory of the user a1l4m and locate notion-setup.exe. In the record overview, look for the [ZoneTransfer] metadata, specifically the ReferrerURL.
 MFT Explorer: Identifying the notion-setup.exe download
There’s a small problem here. The value retrieved is an IP address rather than a domain, which doesn’t fully answer the question. This might indicate a direct IP-based download, a redirect, or CDN usage, or so we’ll need to pivot to another artifact to enrich the data and turn up the domain.
A logical next step is to review the browser history and correlate the timestamp from the MFT with browser activity. For this, we can use DB Browser for SQLite to check out the local browser cache database artifacts. This tool is also available in the tools directory:
C:\Users\LetsDefend\Desktop\Tools\DB.Browser.for.SQLite-v3.13.0-win64\DB Browser for SQLite.exe
Open it up and select Open Database, and navigate to the Google Chrome history file:
C:\Users\LetsDefend\Desktop\ChallengeFile\C\Users\a1l4m\AppData\Local\Google\Chrome\User Data\Default\History
Make sure to change the file type filter to All Files so the database appears.
NOTE: If you’re ever unsure where Chrome stores specific artifacts, the Chrome Browser History Examiner — User Guide from Foxton Forensics is an excellent resource to bookmark.
With the History database open, select the downloads table, and right-click the row to select “Browse Table”.
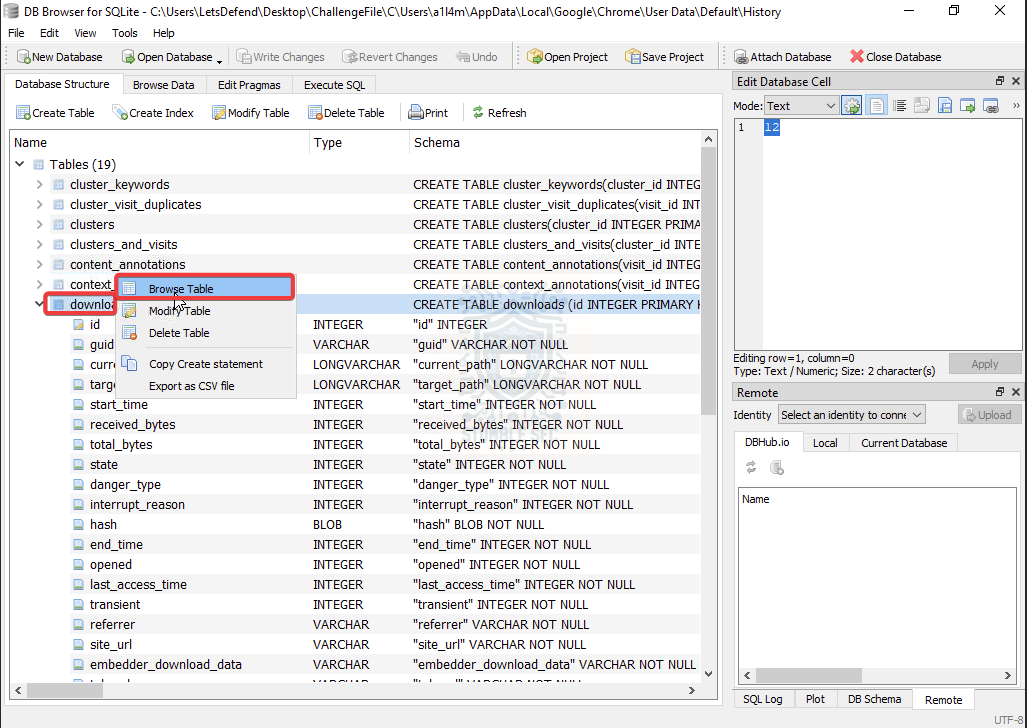 DB Browser: Locating the downloads table in the History database
Bingo! There’s only a single entry, and it corresponds to notion-setup.exe. Reviewing the referrer column reveals the domain used to download the file: https://globalnewshub.com
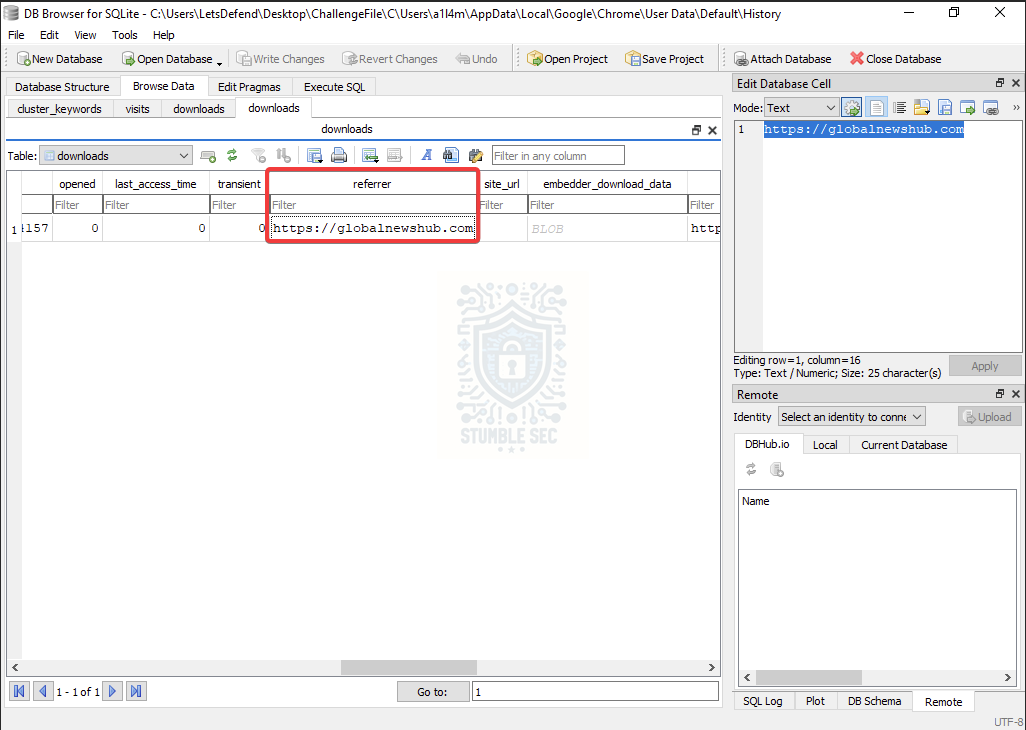 DB Browser: Identifying the referrer URL of the suspicious binary

Question 2: It appears that the site the developer visited was compromised by attackers who embedded a silent downloader in the code. Which MITRE technique ID describes this method of attack? (Answer Format: TXXXX)
To answer Question 2, we can reference the MITRE ATT&CK knowledge base and map what we’ve observed to a known initial access technique.
In this case, we learn that the developer appears to have visited a legitimate website that had been compromised. During normal browsing activity, malicious code on the site silently triggered the download of notion-setup.exe without user interaction.
After reviewing the available initial access techniques, the best fit is, Drive-by Compromise (T1189) MITRE describes this technique as:
*Adversaries may gain access to a system through a user visiting a website over the normal course of browsing. Multiple ways of delivering exploit code to a browser exist (i.e., Drive-by Target)
*A legitimate website is compromised, allowing adversaries to inject malicious code Script files served to a legitimate website from a publicly writeable cloud storage bucket are modified by an adversary Malicious ads are paid for and served through legitimate ad providers (i.e., Malvertising) Built-in web application interfaces that allow user-controllable content are leveraged for the insertion of malicious scripts or iFrames (e.g., cross-site scripting)
In our scenario, the evidence suggests the developer simply visited the site, and the downloader was triggered silently. That pattern strongly matches Drive-by Compromise, where exploitation or payload delivery occurs as part of routine browsing activity.

Question 3: The injected script managed to download a file without the developer’s knowledge. What is the full URL of the file that was downloaded during the browsing session?
Now that we’ve identified the domain notion-setup.exe came from and the MITRE technique used to deliver it, we can move on to identifying the full URL of the file.
Remember when we used Eric Zimmerman’s MFTExplorer before pivoting to browser artifacts in Question 1? This is where that little stumble comes in handy.
To answer Question 3, let’s revisit the metadata we identified earlier in MFTExplorer. Specifically, the [ZoneTransfer] information includes the HostURL, which provides the full URL path of the downloaded file: http://18.199.176.247:1337/notion-setup.exe
MFT Explorer: Identifying the notion-setup.exe download URL
This gives us a much more robust indicator than the domain alone. Having the full URL is especially useful when building out indicators of compromise (IOCs), as it allows for more targeted blocking, enrichment, and threat intelligence lookups.
It also reinforces the earlier finding. While the browser history pointed us to the referring domain, the MFTExplorer artifact helps confirm the exact resource that was retrieved during the session.

Question 4: When was the file downloaded to the developer’s system? (Answer format: YYYY-MM-DD HH:MM: SS)
Fortunately, we already have this information from analyzing the MFT entry for the file.
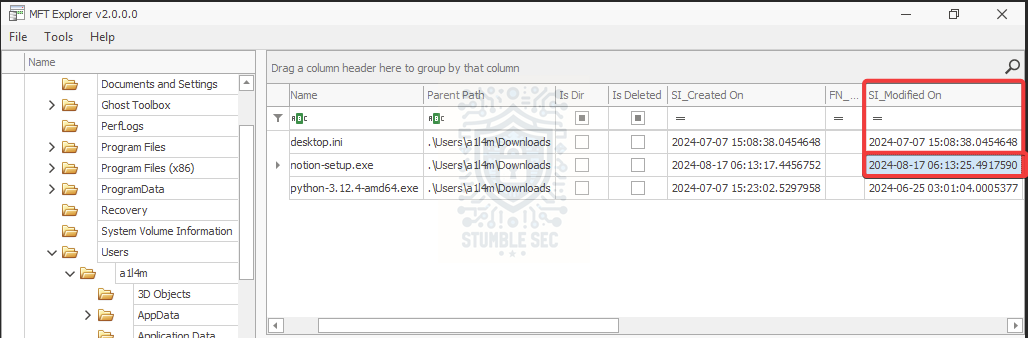
Using MFTExplorer, we can review the timestamp columns associated with notion-setup.exe. In this case, the SI_Modified timestamp provides a reliable indicator of when the file was written to disk, which often aligns with the download event.
 MFT Explorer: Identifying the notion-setup.exe download URL
By locating the file’s entry and reviewing the SI_Modified column, we’ve identified the download time: 2024-08-17 06:13:25
This timestamp gives us a precise point in time for when the file landed on the system, which is handy for timeline reconstruction and correlating related artifacts like the browser history, or file execution events.

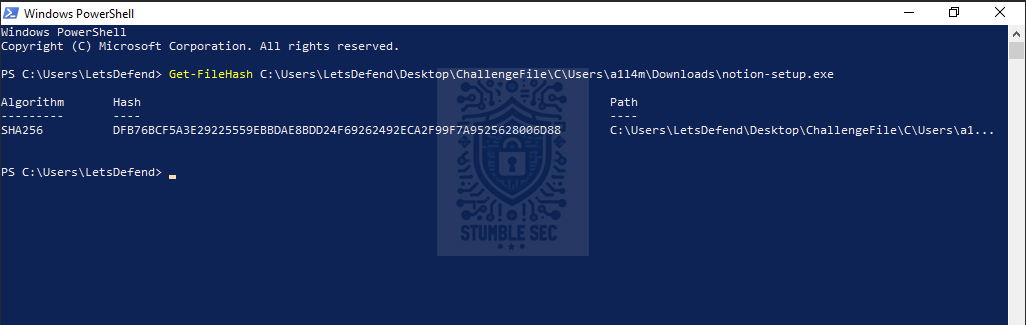
Question 5: What is the hash value of “notion-setup.exe”? (SHA256)
While we’ve already gathered a ton of useful information about the file from MFTExplorer, we can’t retrieve the file’s SHA256 hash from that output alone. To calculate the hash, we can take a straightforward approach and use PowerShell in the LetsDefend VM, since the binary exists within the challenge artifacts.
Open PowerShell and run the following command: Get-FileHash C:\Users\LetsDefend\Desktop\ChallengeFile\C\Users\a1l4m\Downloads\notion-setup.exe
 PowerShell: Collecting the file hash of the suspicious notion-setup.exe
This cmdlet produces the SHA256 hash by default and the resulting hash is:
DFB76BCF5A3E29225559EBBDAE8BDD24F69262492ECA2F99F7A9525628006D88
Keep this handy as the hash is a unique fingerprint of the exact file. It might be important later if we need to perform some lookups of this sample across any intelligence platforms.

Question 6: Can you find out the exact time when “notion-setup.exe” was last executed on their system? (YYYY-MM-DD HH:MM:SS)
For the next task, we need to identify the exact time this binary was executed on the developer’s system. To do that, we’ll pivot away from the Master File Table (MFT) and examine another valuable forensic artifact: Windows Prefetch.
The value of Prefetch files is explained well by Magnet Forensics:
Prefetch files are great artifacts for forensic investigators trying to analyze applications that have been run on a system. Windows creates a prefetch file when an application is run from a particular location for the very first time. This is used to help speed up the loading of applications. For investigators, these files contain some valuable data on a user’s application history on a computer.
Let’s put that into practice! For this challenge, the Prefetch artifacts can be found in:
C:\Users\LetsDefend\Desktop\ChallengeFile\C\Windows\Prefetch
But, if you browse the directory, you’ll quickly notice that Prefetch files aren’t exactly human-readable. To parse them, we’ll leverage another excellent Eric Zimmerman tool, PECmd, which is already installed on the LetsDefend VM.
To unleash the tool, open PowerShell and run the following command to parse the Prefetch files and export the results to a CSV:
.\PECmd.exe -d "C:\Users\LetsDefend\Desktop\ChallengeFile\C\Windows\Prefetch\" --csv "C:\Users\LetsDefend\Desktop" --csvf pecmd.csv
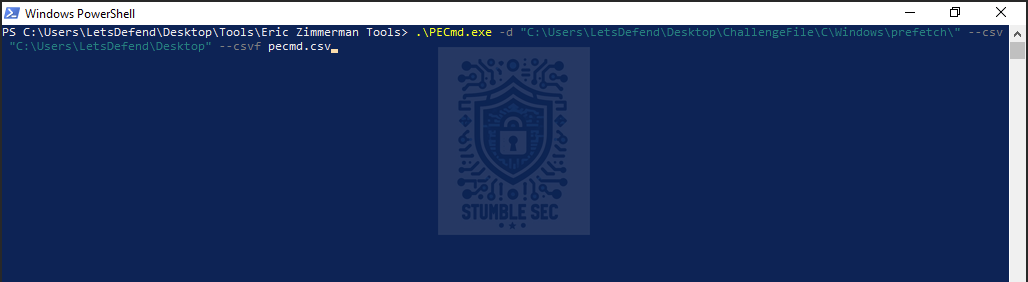 PowerShell: Using PECmd on the prefetch artifact
After the command completes, we’ll have a new file named pecmd.csv. To analyze the results, we’ll pivot to another Zimmerman tool, Timeline Explorer. Timeline Explorer is a powerful CSV viewer with awesome filtering capabilities. Open Timeline Explorer from the tools directory and load our new file, pecmd.csv.
In the Source Filename column, filter for: notion-setup.exe
This should return a single result. From there, scroll across to the Last Run column to identify the most recent execution time recorded by the Prefetch artifact.
This gives us the next key event in our timeline and provides the answer to Question 6.
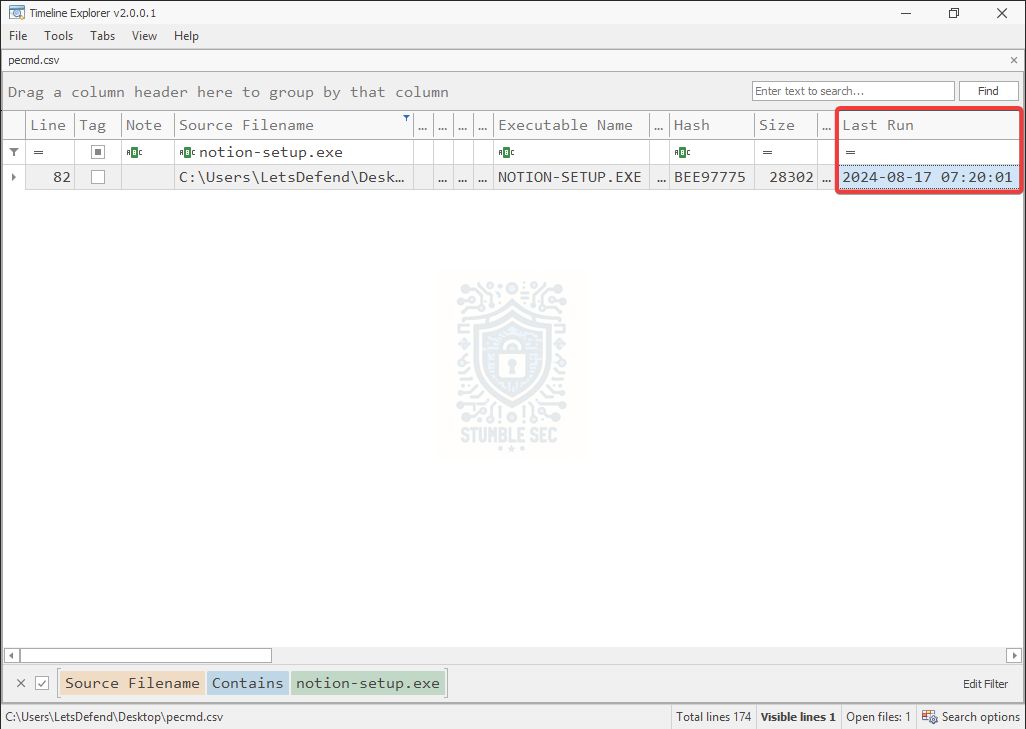 Timeline Explorer: Identifying the Last Run timestamp of notion-setup.exe

Question 7: It seems that “notion-setup.exe” was just the first step. The malware tried to connect to another URL to download the second stage. What is the URL it attempted to contact?
Uh-oh, it seems like notion-setup.exe was only the first stage. The malware attempted to retrieve a second-stage payload after execution. Let’s pivot off what we already know and see what else we can uncover.
A good place to start is the Windows Event Logs. The logs are located in: C:\Users\LetsDefend\Desktop\ChallengeFile\C\Windows\System32\winevt\Logs
The first log we’ll investigate is Microsoft-Windows-Bits-Client%4Operational.evtx
Why start there? At this point, we’re looking for evidence of a follow-on download attempt. Normally, I’d love to have something like Sysmon available, but since we don’t, we need to focus on Windows artifacts that attackers commonly abuse. Two good candidates are PowerShell logs and Background Intelligent Transfer Service (BITS) activity.
MITRE ATT&CK documents this technique as BITS Jobs (T1197):
Adversaries may abuse BITS jobs to persistently execute code and perform various background tasks. Windows Background Intelligent Transfer Service (BITS) is a low-bandwidth, asynchronous file transfer mechanism exposed through Component Object Model (COM).[1][2] BITS is commonly used by updaters, messengers, and other applications preferred to operate in the background (using available idle bandwidth) without interrupting other networked applications. File transfer tasks are implemented as BITS jobs, which contain a queue of one or more file operations.
Now that we know which log we want to analyze, we just need a tool to work with it.
While we could open the event log with the built-in Windows Event Viewer, let’s take the opportunity to go hands-on with another tool included on the LetsDefend VM: Event Log Explorer. It’s a powerful third-party event log analysis utility that makes sorting, filtering, and reviewing large volumes of events much easier.
Open Event Log Explorer and load: Microsoft-Windows-Bits-Client%4Operational.evtx
Since we already know when notion-setup.exe was executed from the previous question, we have a solid timeframe to work from. Let’s focus on events occurring around that timestamp and see what stands out.
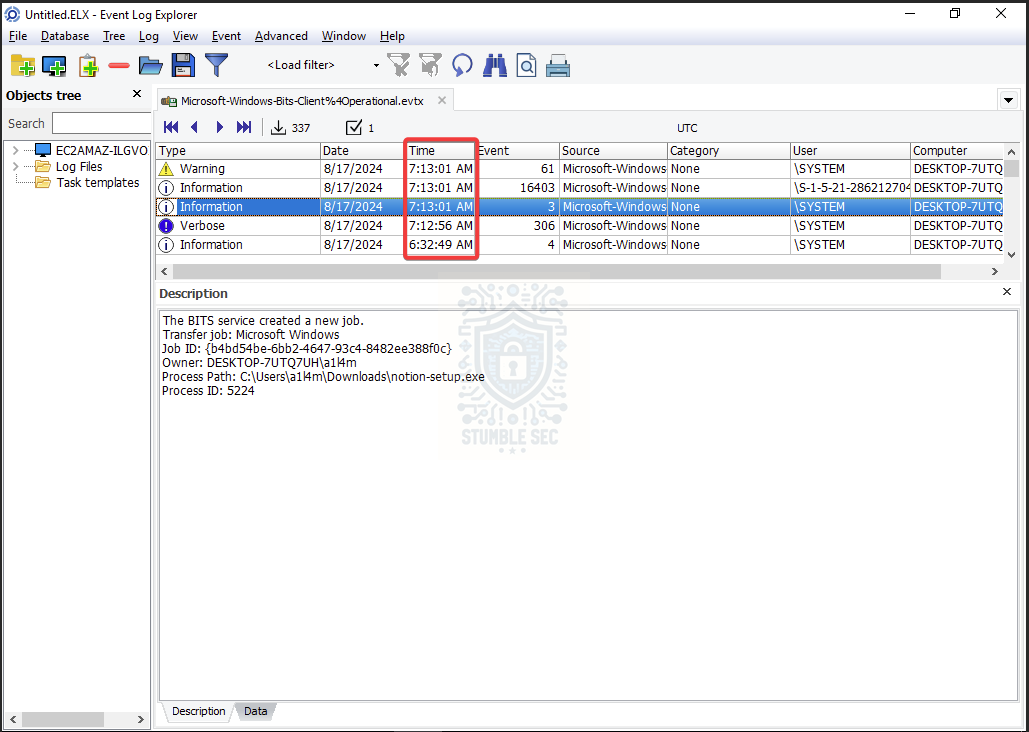 Event Log Explorer: Focusing on the BITS Client log during the range of the attack
Nice! Looking at the highlighted events, we can see evidence that notion-setup.exe created a BITS job shortly after execution. That’s a strong indicator that the malware was attempting to retrieve additional content from an external source. The next event in the sequence reveals the URL associated with that job.
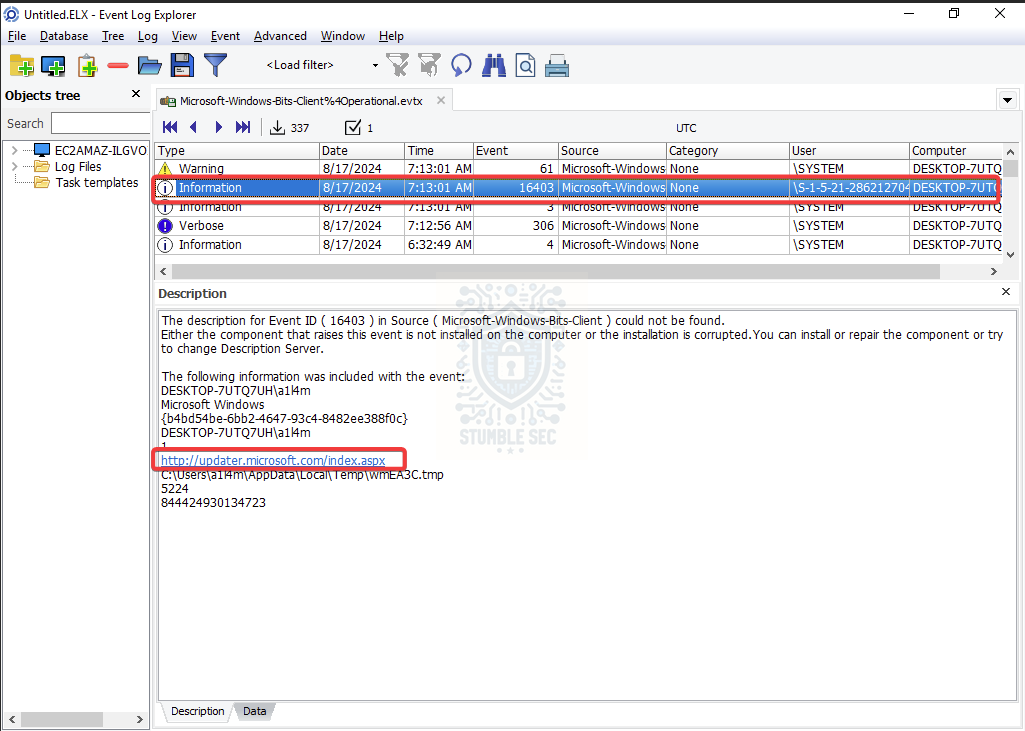 Event Log Explorer: Identifying the URL used by the second stage
This gives us another valuable IOC and helps extend our attack timeline beyond the initial download and execution of notion-setup.exe. It also reinforces why correlating artifacts across multiple data sources is so important. The browser history told us how the first-stage payload arrived, Prefetch showed us when it last executed, and the BITS logs reveal what the malware attempted to do next.

Question 8: During the investigation, you discover that the second stage of the malware writes data to a specific file on the system. What is the name of this file and its full path?
Importantly, we learned from the BITS Client logs that the activity occurred at 7:13:01 AM. That gives us another point on our timeline and a very specific timestamp to pivot from.
This time, we’ll need to parse a different artifact: the USN Journal. The USN Journal is part of the NTFS file system and maintains a record of file system activity, including file creation and modification events. That makes it a great source for correlating the BITS activity we identified with files that were actually written on disk.
To parse the USN Journal, we’ll use Eric Zimmerman’s MFTECmd, the command-line counterpart to MFTExplorer that we used earlier.
Open PowerShell and run the command below to generate a CSV file called, journal.csv.
.\MFTECmd.exe -f "C:\Users\LetsDefend\Desktop\ChallengeFile\C\$Extend\$J" --csv "C:\Users\LetsDefend\Desktop\" --csvf journal.csv
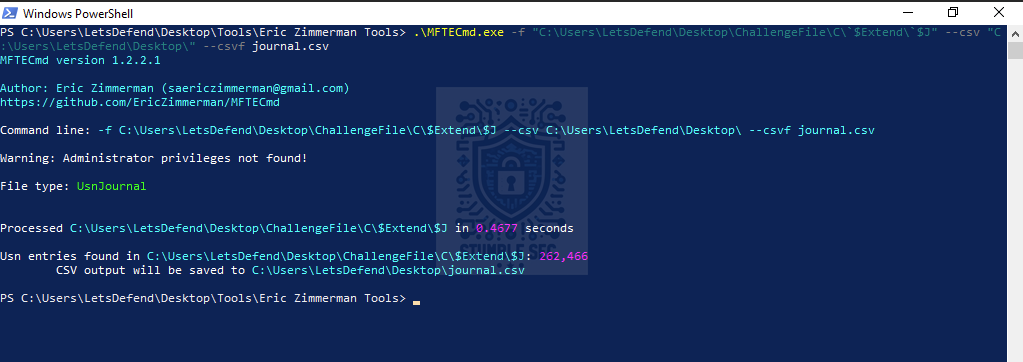 PowerShell: Using MFTECmd to parse the USN Journal
Once the command completes, open journal.csv in Timeline Explorer.
Now, we can focus on events occurring at the same time as the BITS activity identified in Question 7. By filtering around the 7:13:01 AM timeframe, we can quickly narrow the results and look for files that may have been created or modified as part of the second-stage download process.
One of the temporary files aligns with a filename already identified from the BITS events, but another .tmp file stands out: BITEA82.tmp
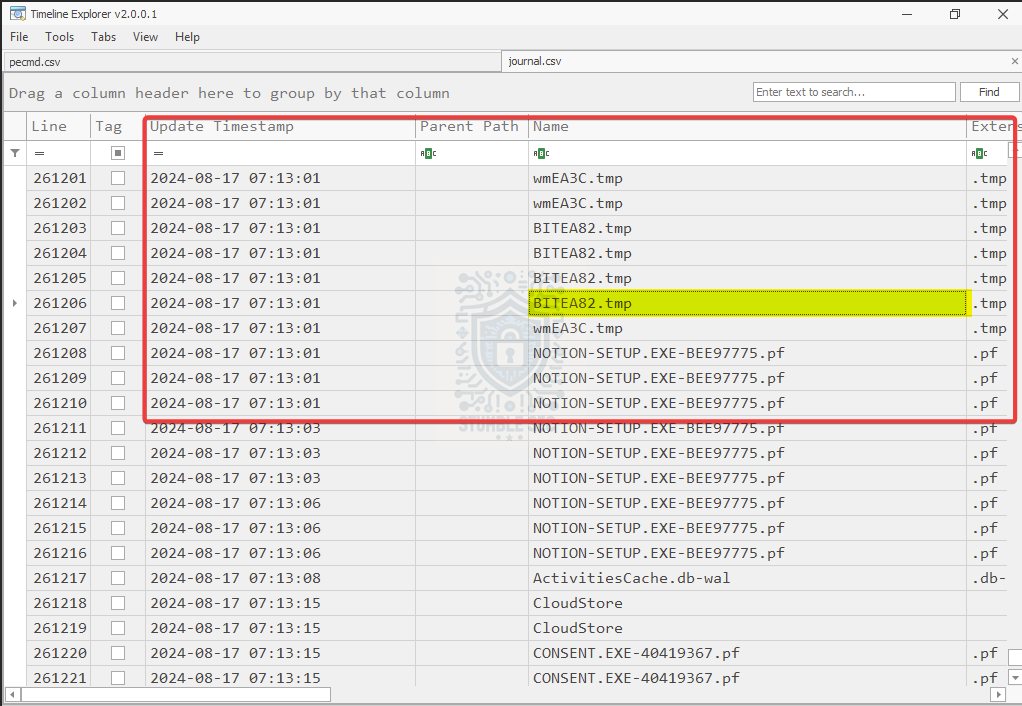 Timeline Explorer: Identifying the second stage dropped file
That filename appears at the exact time we’re interested in, making it a strong candidate for the file written by the second stage.

Question 9: What is the name of the malware family?
We’ve made it to the last question. Now let’s tie all of this together!
One step we skipped back in Question 5, but is generally a good habit during an investigation, is checking external threat intelligence sources for any suspicious binaries we identify. Up to this point, we’ve focused primarily on host-based artifacts to build our timeline and understand what happened on the system. Now it’s time to enrich those findings with external threat intelligence.
Let’s take the SHA256 hash we collected for notion-setup.exe and pivot over to VirusTotal to see what the broader security community already knows about the file:
https://www.virustotal.com/gui/file/dfb76bcf5a3e29225559ebbdae8bdd24f69262492eca2f99f7a9525628006d88
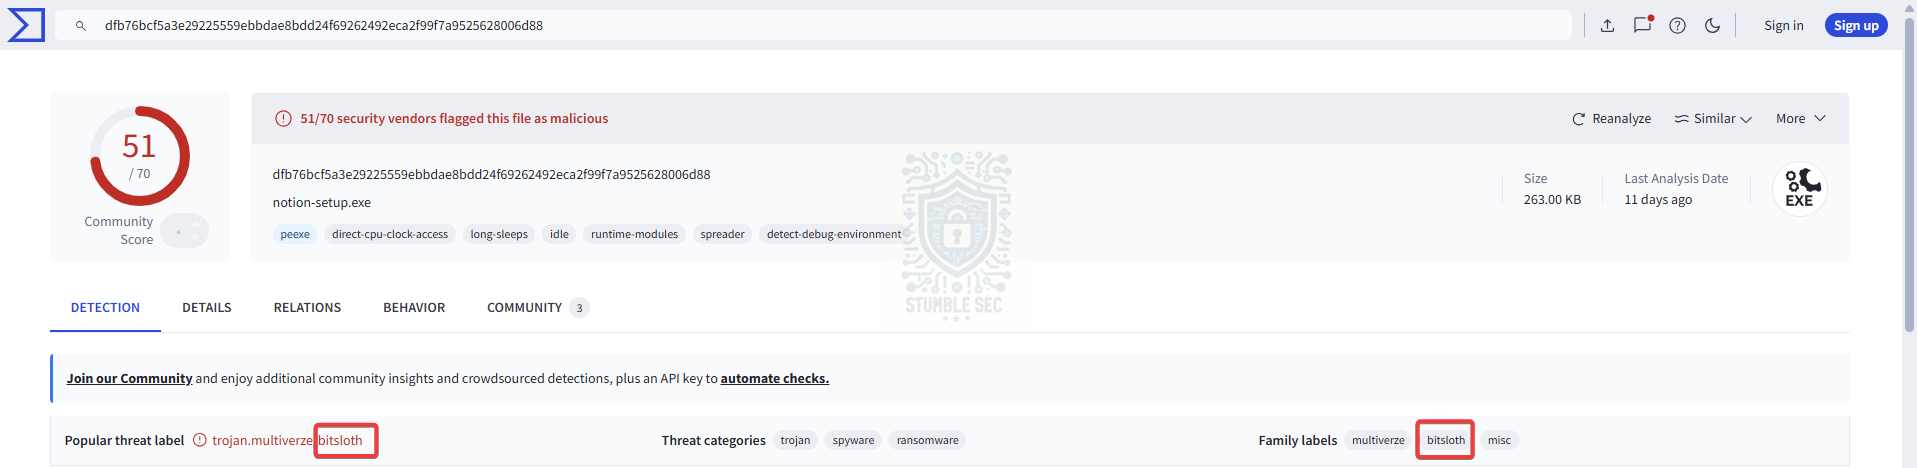 VirusTotal: Identifying the malware family from the collected hash
Reviewing the analysis results, we can see that multiple vendors associate the sample with the BITSloth malware family.
This finding pairs nicely with what we’ve already uncovered during the investigation. Back in Question 7, we identified evidence of the malware creating a BITS job to attempt retrieval of additional content. That’s important because BITSloth is known for abusing the Windows Background Intelligent Transfer Service (BITS) for command-and-control and file transfer operations.
By correlating the behavioral evidence from our forensic artifacts with external threat intelligence, we can increase our confidence in the identification. Nice work, now let’s wrap up this investigation!

Conclusion:

How fun was that! A big thank you to LetsDefend for another awesome challenge.
What I enjoyed most about this challenge was how effectively it demonstrated just how much information can be recovered from endpoint artifacts when you know where to look. Starting with a single suspicious executable, we were able to reconstruct an entire attack timeline by correlating data from the Master File Table (MFT), Chrome History, Windows Prefetch, BITS Client Event Logs, the USN Journal, and external threat intelligence sources.
If there was one major takeaway from this investigation, it’s that endpoint artifacts always tell a story. Individually, each artifact only gave us a piece of the puzzle. The browser history helped us identify where the file came from. The MFT provided more download details. Prefetch showed execution activity. The BITS logs revealed a second-stage download attempt, and the USN Journal helped us connect that activity to files written on disk. Individually, those findings were interesting. Together, they allowed us to reconstruct the attack chain with a much higher degree of confidence.
One thing this challenge also reminded me of is how important regular practice is. While I’ve worked with all of these artifacts and tools before, I still found myself checking documentation and refreshing my memory on command syntax. For me, digital forensics is very much a “use it or lose it” skill. The more time that passes between investigations, the easier it is to forget a command-line switch, an artifact location, or a useful analysis technique. Challenges like this are a great way to keep those skills sharp and reinforce patterns that might prove invaluable during a real incident.
I chose this week’s challenge because I wanted another opportunity to practice timeline reconstruction and artifact correlation. It ended up being exactly the kind of investigation I enjoy most. Each answer naturally led to the next question, and every question added another piece to the story. By the end, we had progressed from a suspicious download to malware attribution, all through endpoint artifact analysis.
Thanks for working through this investigation with me. Hopefully, this walkthrough helps you get past a stumbling block or gives you a few ideas you can apply in your own analysis.
Remember, cybersecurity is a team sport, and we’re in this together! Until next week’s challenge — stay curious and be safe out there.

Tools & References:
Challenge Link: https://app.letsdefend.io/challenge/hidden-backdoor
Eric Zimmerman’s Tools: https://ericzimmerman.github.io/
DB Browser for SQLite: https://sqlitebrowser.org/
Foxton Forensics - Browser History Examiner - User Guide: https://www.foxtonforensics.com/browser-history-examiner/chrome-history-location
MITRE ATT&CK — Drive-by Compromise (T1189): https://attack.mitre.org/techniques/T1105/
Magnet Forensics - “Forensic Analysis of Prefetch files in Windows”: https://www.magnetforensics.com/blog/forensic-analysis-of-prefetch-files-in-windows/
Microsoft Learn - Background Intelligent Transfer Service: https://learn.microsoft.com/en-us/windows/win32/bits/background-intelligent-transfer-service-portal
MITRE ATT&CK — BITS Jobs (T1197): https://attack.mitre.org/techniques/T1197/
Event Log Explorer: https://eventlogxp.com/
VirusTotal - notion-setup.exe sample: https://www.virustotal.com/gui/file/dfb76bcf5a3e29225559ebbdae8bdd24f69262492eca2f99f7a9525628006d88
Malpedia - BITSloth: https://malpedia.caad.fkie.fraunhofer.de/details/win.bitsloth