TryHackMe — Boogeyman 3 Challenge Walkthrough
A Domain Forensic Investigation using Kibana
Image Credit: https://tryhackme.com/r/room/boogeyman3
Introduction:
Have you feared the return of the Boogeyman?
If not, you’ve stumbled on the right blog! Welcome to my weekly walkthrough. This is a comprehensive walkthrough of the Boogeyman 3 challenge from TryHackMe, the third in a series of capstone challenges for their SOC Level 1 learning path. This challenge is a digital forensics and incident response (DFIR) engagement for the final showdown with a fictional threat actor called the Boogeyman.
If you want to catch up on how we got here, check out my walkthroughs of Boogeyman 1 & Boogeyman 2 first.
TryHackMe — Boogeyman 1 Challenge Walkthrough
TryHackMe — Boogeyman 2 Challenge Walkthrough
To unmask the Boogeyman this time_,_ we’re all about hunting through logs within Kibana, part of the Elastic Stack, to figure out how the latest attack unfolded against an organization compromised by this persistent, shadowy threat actor. Doesn’t sound so scary, right?
Now let’s grab our flashlights and shine a light on the Boogeyman’s latest tactics, techniques, and procedures. I don’t want to ruin any of the surprises, so this walkthrough is spoiler-free, but please use it as a reference and enjoy! Thanks for reading along!
Challenge Link: https://tryhackme.com/r/room/boogeyman3
Challenge Scenario:
Due to the previous attacks of Boogeyman, Quick Logistics LLC hired a managed security service provider to handle its Security Operations Center. Little did they know, the Boogeyman was still lurking and waiting for the right moment to return.
In this room, you will be tasked to analyse the new tactics, techniques, and procedures (TTPs) of the threat group named Boogeyman.
Without tripping any security defences of Quick Logistics LLC, the Boogeyman was able to compromise one of the employees and stayed in the dark, waiting for the right moment to continue the attack. Using this initial email access, the threat actors attempted to expand the impact by targeting the CEO, Evan Hutchinson.
Question 1: What is the PID of the process that executed the initial stage 1 payload?
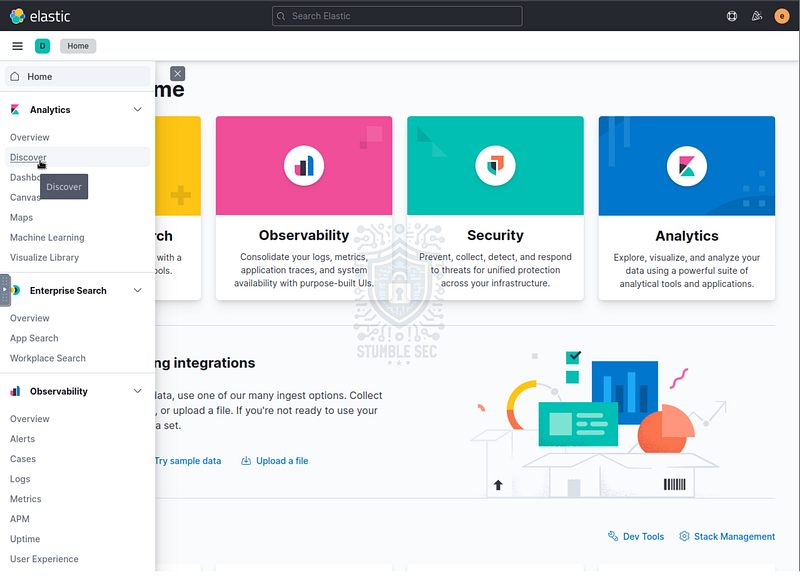
First things first. After starting the lab environment, enter the Elastic web console and navigate to the Analytics > Discover module. This dashboard is where we’ll be exploring the logs within the winlogbeat index_._
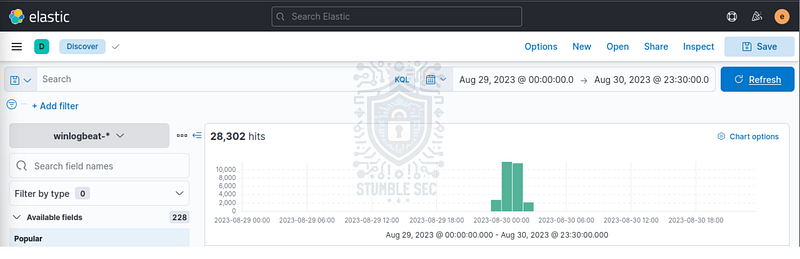
Once we get into our dashboard, we’ll have to adjust the time filters to view the logged events during the time of the incident. Fortunately, the security team reported to us that “the incident occurred between August 29 and August 30, 2023” so we can narrow the scope by modifying the dates in the time selection field.
We’ll filter the first date/time, selecting Absolute and setting the start date to August 29th, 2023, at 0:00 and the end date of August 30th, 2023, at 23:30. This selection gives us all the logs ingested during the incident.
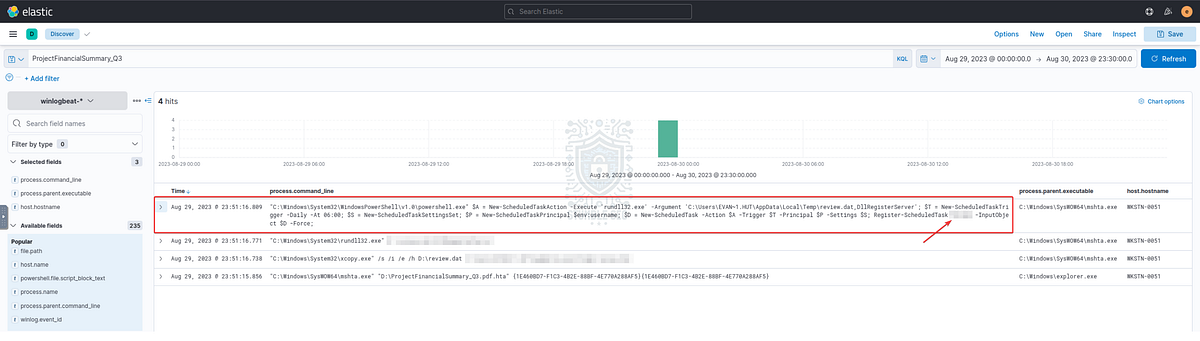
Now that we have the time period set, where do we start? Well, remember from the scenario that the initial access method was a spear phishing email that had an attachment executed by the CEO, Evan Hutchinson. The security team discovered that the attachment was an ISO file containing a “PDF” file — ProjectFinancialSummary_Q3.pdf.
We saw from the triage that Windows Explorer displayed this is an HTML application (HTA), not a PDF. So, we’re potentially looking for malicious Mshta code execution activity. But let’s start broadly and simply search for the file name by entering it into the search bar at the top of the window.
This will produce 4 events for us to review. Let’s start with the first event with the oldest time stamp. As we suspected, we see our parent file spawning mshta.exe to handle the file along with the corresponding ProcessId that we’ll need to answer Question 1.
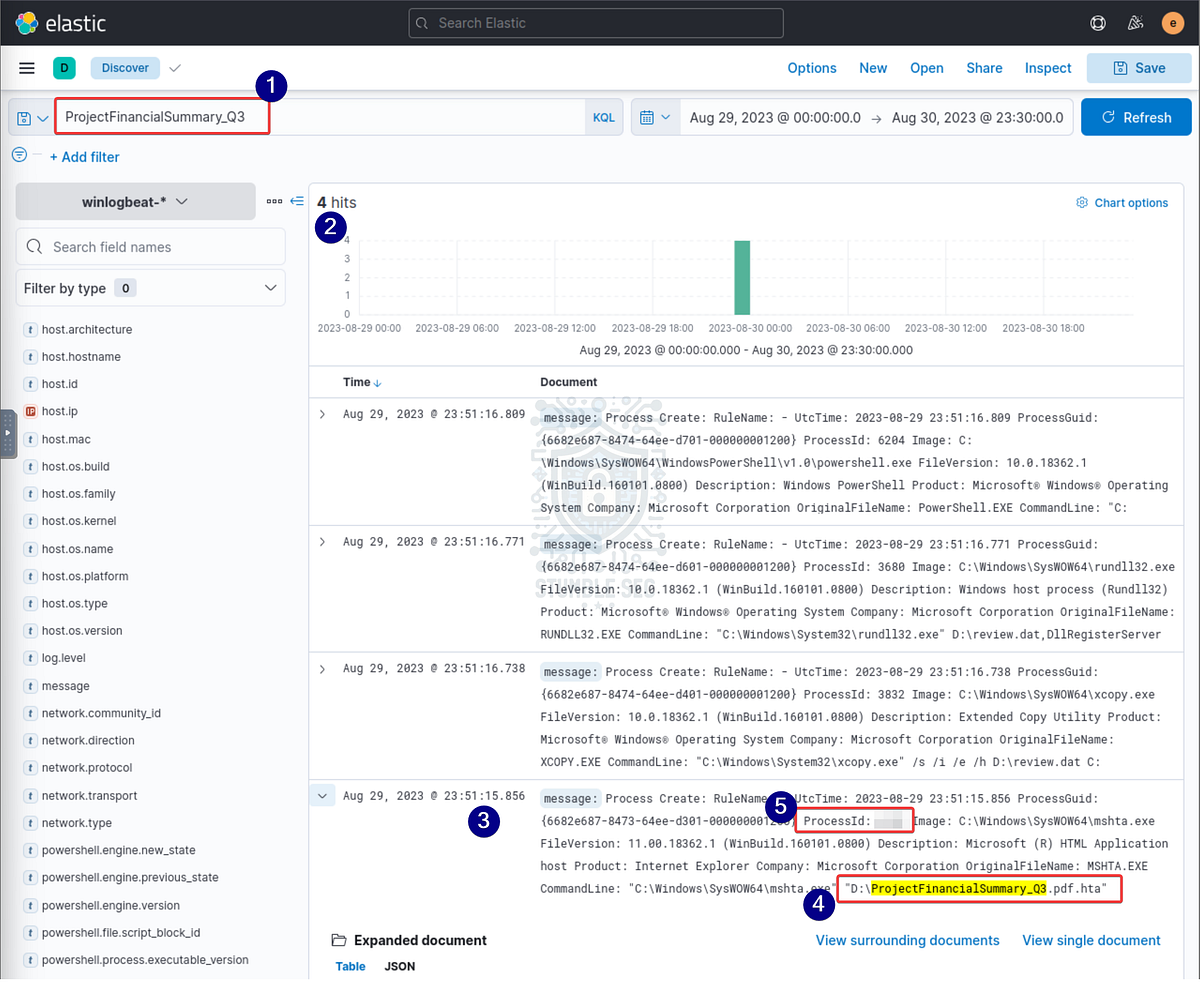
Before we submit our answer, note the hostname, host IP address, and username of the CEO’s compromised workstation. This will help us stay organized as we follow the attack.
WKSTN-0051 / 10.10.155.159 / evan.hutchinson

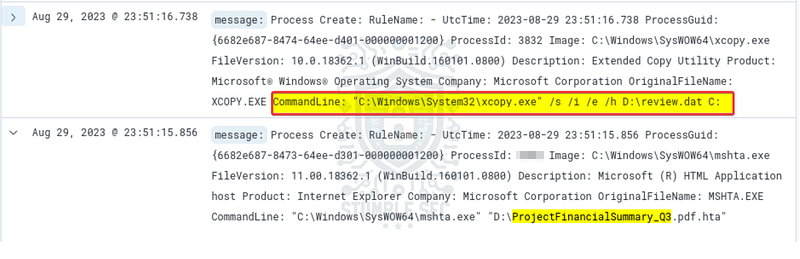
Question 2: The stage 1 payload attempted to implant a file to another location. What is the full command-line value of this execution?
Now, let’s focus on the next event in the list. We see evidence of [xcopy](https://learn.microsoft.com/en-us/windows-server/administration/windows-commands/xcopy) activity which can be used to move files around the system.
Since we’re interested in the full command to understand what file was copied and to which destination, let’s make some adjustments to our dashboard and toggle some columns within our table instead of expanding the event. This will allow us to see the full process.command_line field easily and have a cleaner view moving forward.
To do this, search the Available fields column on the left-hand side and press the + button to add the process.command_line field as a column.
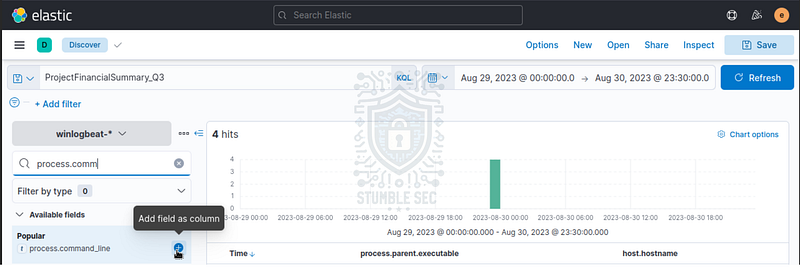
You’ll notice in the screenshots below that I also added the process.parent.executable and host.hostname fields as columns too, making it far easier to see the sequence of events at a glance.
Now, revisiting the second event with this view, we’ll see the full command-line value for the [xcopy](https://learn.microsoft.com/en-us/windows-server/administration/windows-commands/xcopy) activity, revealing that the attacker moved a file from the ISO to a temporary directory on WKSTN-0051.

Question 3: The implanted file was eventually used and executed by the stage 1 payload. What is the full command-line value of this execution?
Continuing through the timeline, let’s look at the third event. Analyzing the command line, we see [rundll32](https://learn.microsoft.com/en-us/windows-server/administration/windows-commands/rundll32) executed to register a DLL within the ISO.


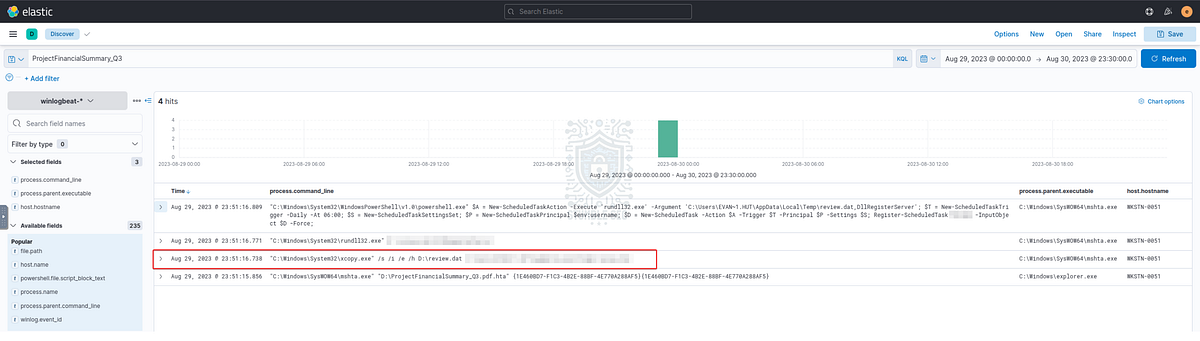
Question 4: The stage 1 payload established a persistence mechanism. What is the name of the scheduled task created by the malicious script?
Next, examine the last of the four events. By focusing on the process.command_line column, we can see that PowerShell is used to create a new Scheduled Task for persistence. This task executes [rundll32](https://learn.microsoft.com/en-us/windows-server/administration/windows-commands/rundll32) to register the file transferred to WKSTN-0051 via [xcopy](https://learn.microsoft.com/en-us/windows-server/administration/windows-commands/xcopy) from Question 2.
Examining the Register-ScheduledTask parameter, we’ll find the name of the task in the command:

Question 5: The execution of the implanted file inside the machine has initiated a potential C2 connection. What is the IP and port used by this connection? (format: IP:port)
Since we’re out of events to analyze in the current search, we need to pivot and expand our scope. Since we know from the last question that the attacker is leveraging PowerShell, let’s try narrowing our search for that. Fortunately for us, Quick Logistics LLC, had deployed Sysmon on the CEO’s workstation which gives us an advantage.
Searching for PowerShell.exe and querying Sysmon Event ID 3 for “t_he network connection event logs TCP/UDP connections on the machine_” might help find some clues leading us to uncover the command and control (C2) connection.
First, we’ll input the search.
powershell.exe and event.provider : “Microsoft-Windows-Sysmon” and event.code : “3”
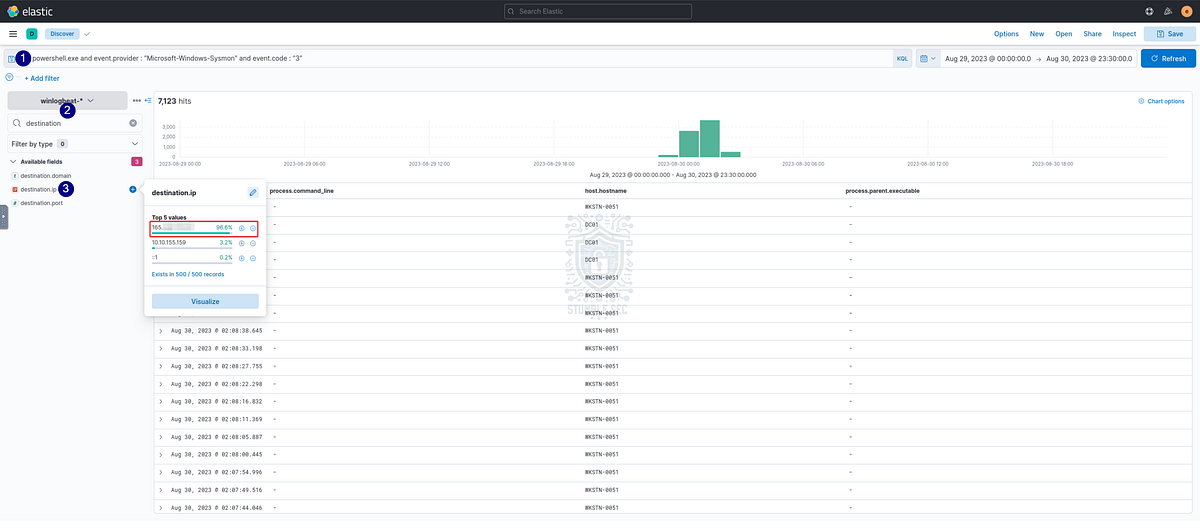
Then, enter destination.ip into the search field names box and click the field name. This will show us the top 5 values across the logs. Notice that there are three IP addresses: One is the CEO’s workstation, another is the IPv6 local loopback, and the top result is an external IP. The external IP is present in the overwhelming majority of the searched PowerShell logs. It’s suspicious that a compromised workstation would connect to an external IP address over PowerShell.
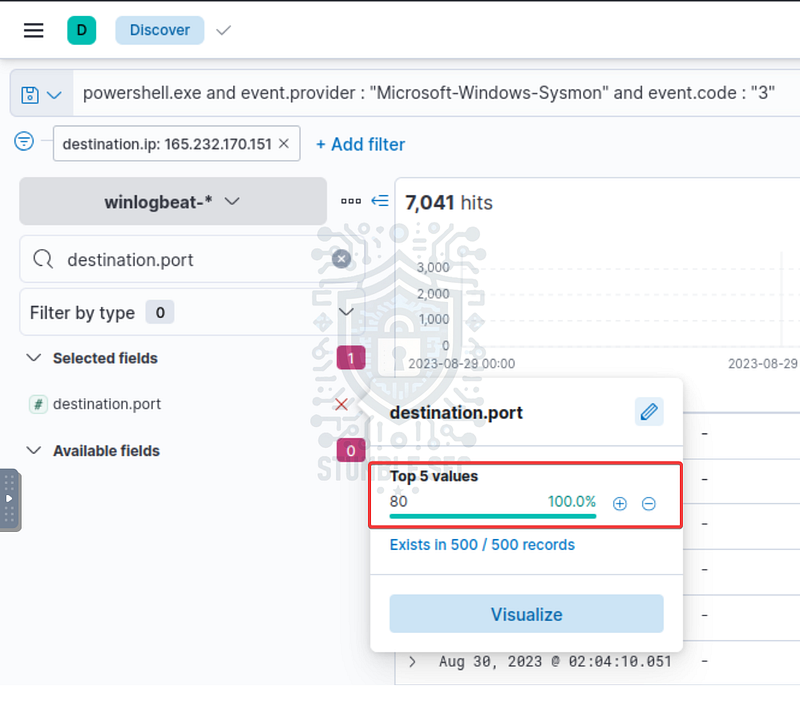
For the second half of the question, we can check the destination.port field to find the port number. Since there is only one entry, we don’t need to look any further. Now we have both the IP Address and Port of the C2 connection.

Question 6: The attacker has discovered that the current access is a local administrator. What is the name of the process used by the attacker to execute a UAC bypass?
Now that we’ve identified the C2 server, we need to understand how the attacker escalated privileges and bypassed user account control (UAC). Recall from Question 2 that the stage 1 payload leveraged xcopy to implant a file onto the CEO’s workstation?
Let’s search for the implanted file, review.dat, to understand what other actions were performed. Right away we’ll see some discovery activity including whoami and net.exe commands used to enumerate local group membership and the associated permissions. But that’s not what we’re interested in. Notice another odd executable in the list for the Windows Features on Demand Helper. This seems out of place, doesn’t it?
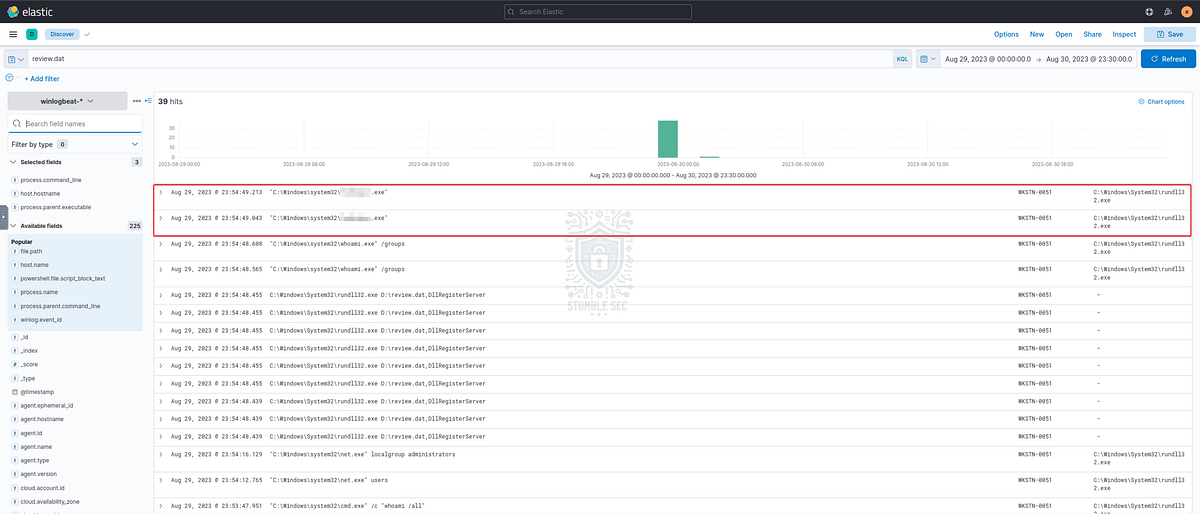
Let’s research on MITRE ATT&CK to understand if this executable can be abused to bypass UAC. With a quick search, we’ll land on the page for the technique Abuse Elevation Control Mechanism: Bypass User Account Control (T1548.002) where we find the note below with a reference link:

MITRE ATT&CK: https://attack.mitre.org/techniques/T1548/002/
For additional intelligence, let’s explore the reference link from Red Canary where we’ll learn that the executable can be abused to achieve a UAC bypass:
Processes launched by
[REDACTED].exerun with elevated administrative privileges without requiring a User Account Control prompt.
This means the attacker abused the legitimate binary to execute processes as an administrator without the user account control dialogue to interfere.
Since we have discovered a known method of abusing the Features on Demand Helper binary to bypass UAC combined with the evidence that this technique was used on compromised device, we’ve found the answer to Question 6.

Question 7: Having a high privilege machine access, the attacker attempted to dump the credentials inside the machine. What is the GitHub link used by the attacker to download a tool for credential dumping?
Now, we’ll need to discover what tool the attacker downloaded onto the victim’s device from GitHub. Jumping back to the search bar, let’s search for something broad like github.com, then refine our scope, filtering the host.ip field for the CEO’s workstation (10.10.155.159 / WKSTN-0051).
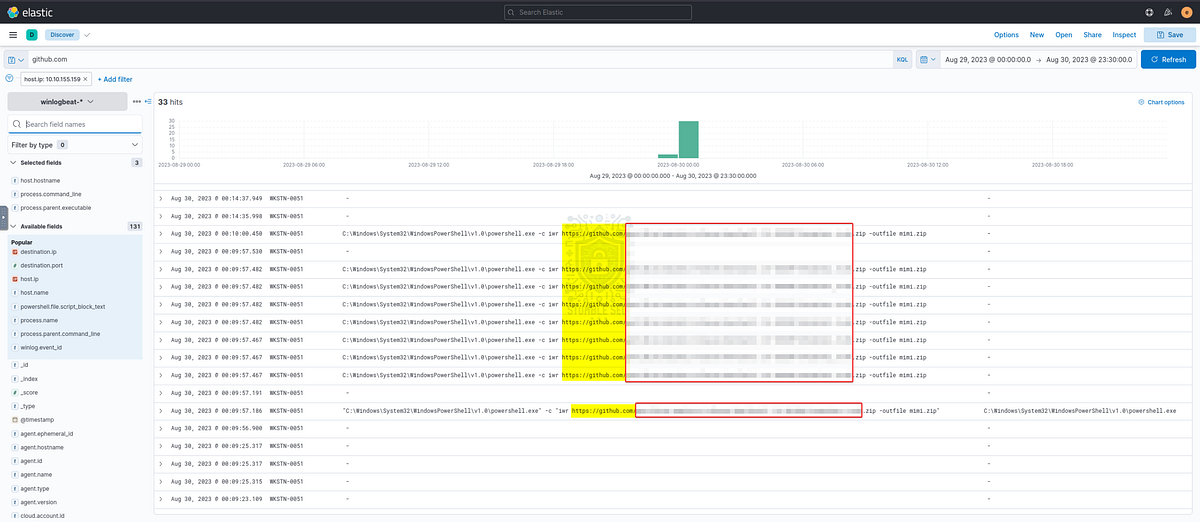
The search reveals that the attacker downloaded the very famous credential dumping tool, Mimikatz — not good! Let’s press forward to determine what the attacker was able to access.

Question 8: After successfully dumping the credentials inside the machine, the attacker used the credentials to gain access to another machine. What is the username and hash of the new credential pair? (format: username:hash)
Now that we’ve discovered the attacker downloaded Mimikatz, let’s continue analyzing the logs from the CEO’s workstation focusing on the executable name of the tool inside the mimi.zip archive — mimikatz.exe.
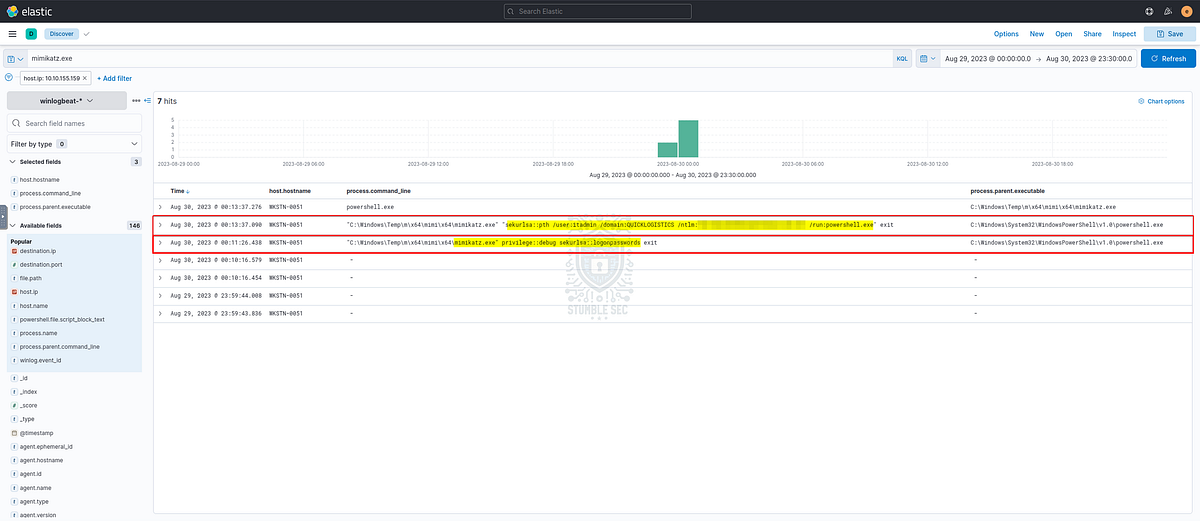
Mimikatz activity on WKSTN-0051
Here we’ll observe that Mimikatz dumps the credentials for users recently logged-on to the workstation (sekurlsa::logonpasswords) exposing their password hashes. Next, the attacker performs a Pass the Hash (sekurlsa::pth ) using the NTLM hash of one of the exposed administrative users — itadmin .

Question 9: Using the new credentials, the attacker attempted to enumerate accessible file shares. What is the name of the file accessed by the attacker from a remote share?
So, let’s do a quick recap. We know that the attacker compromised Evan, the CEO’s, workstation with a spear-phishing attachment. Then, the stage 1 payload performed a variety of activities to establish a foothold including using PowerShell to create persistence mechanisms, abusing living off the land binaries to elevate privileges, and dumping privileged OS credentials after downloading Mimikatz from GitHub. Now we’ll need to find what file shares the attacker found and accessed.
Based on what we know about the attacker’s tactics, techniques, and procedures (TTPs) it’s likely that they would need to download additional tools to perform file sharing enumeration in the environment.
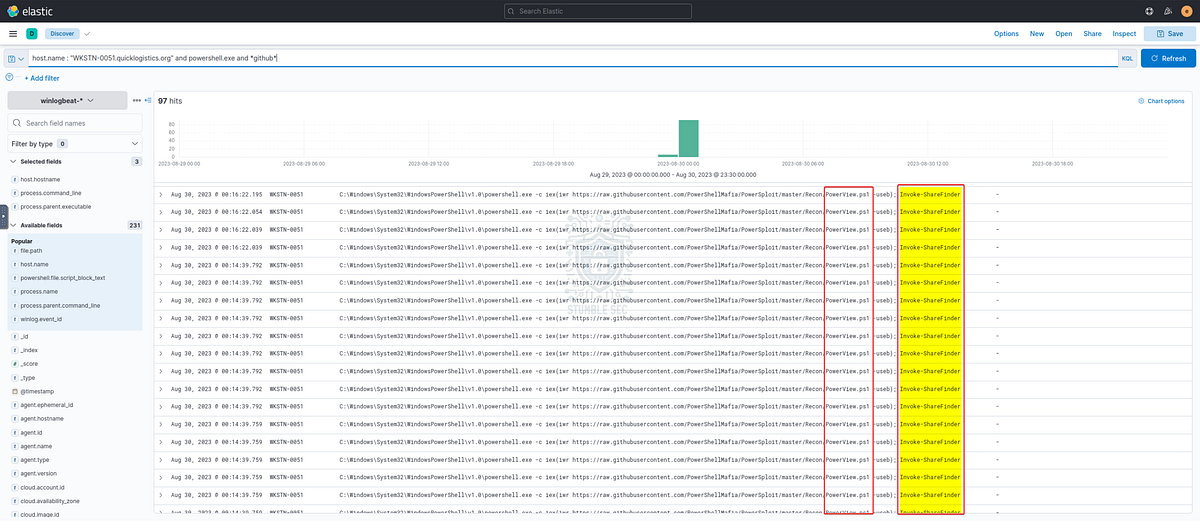
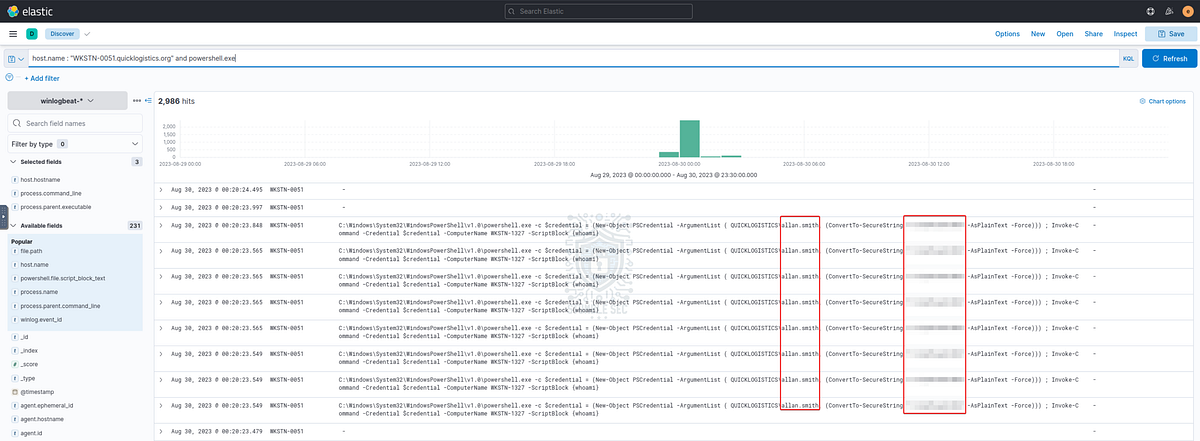
Let’s test this theory by first filtering all events from the CEO, Evan’s, device — WKSTN-0051.quicklogistics.org. Then, we’ll narrow the search further starting with the attacker’s known technique of using PowerShell to download tools from GitHub. For this, we’ll format a query that specifies the CEO’s workstation in the host.name field and matches all fields for the term PowerShell and a wildcard search for GitHub.
host.name : “WKSTN-0051.quicklogistics.org” and powershell.exe and github
Right away, there’s something interesting. We’ll see that PowerShell downloaded PowerView.ps1 , a network reconnaissance tool**,** then runs the [Invoke-ShareFinder](https://attack.mitre.org/techniques/T1018/) cmdlet to discover accessible file shares within the domain.
This discovery brings us one step closer by answering the how, but we still need to determine what was accessed. Let’s modify the original query, removing the GitHub wildcard, and zoom-out to all PowerShell activities from this workstation.
host.name : “WKSTN-0051.quicklogistics.org” and powershell.exe
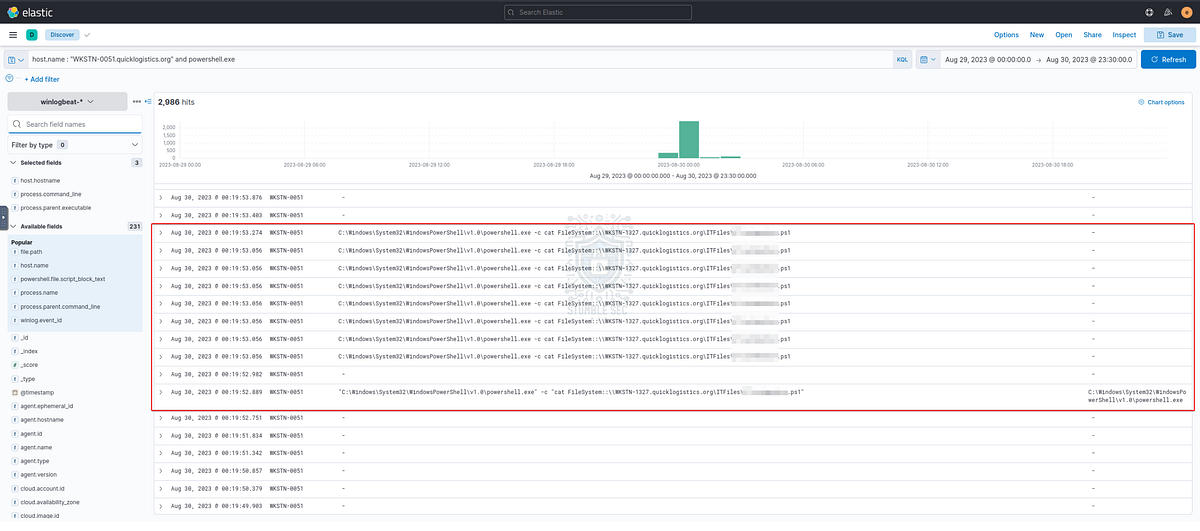
Bingo! We see that the attacker discovered a file share on WKSTN-1327 hosting an automation script where credentials are potentially stored to enable automation. Then, using the cat command, the attacker prints the output of this script to the console giving them access to the password within.

Question 10: After getting the contents of the remote file, the attacker used the new credentials to move laterally. What is the new set of credentials discovered by the attacker? (format: username:password)
Sticking with our current search parameters, scroll up through the newer events in the timeline. Shortly, we’ll stumble upon the series of events below showing that the attacker remotely used the newly discovered credentials for allan.smith to move laterally, executing code on a second workstation.

Question 11: What is the hostname of the attacker’s target machine for its lateral movement attempt?
From the previous two steps in the analysis, we’ve already determined the hostname and user account targeted for lateral movement. Let’s check our work and move forward with the investigation.

Question 12: Using the malicious command executed by the attacker from the first machine to move laterally, what is the parent process name of the malicious command executed on the second compromised machine?
Now we’ll switch our scope to the workstation targeted for lateral movement from the last question. To do this, we’ll zoom out focusing on the Microsoft-Windows-Sysmon events again and searching Sysmon Event ID 1 or process creation events. Since we are looking for a parent/child process used for lateral movement, let’s start here and see what we find.
host.hostname : “WKSTN-1327” and event.provider : “Microsoft-Windows-Sysmon” and event.code : “1”
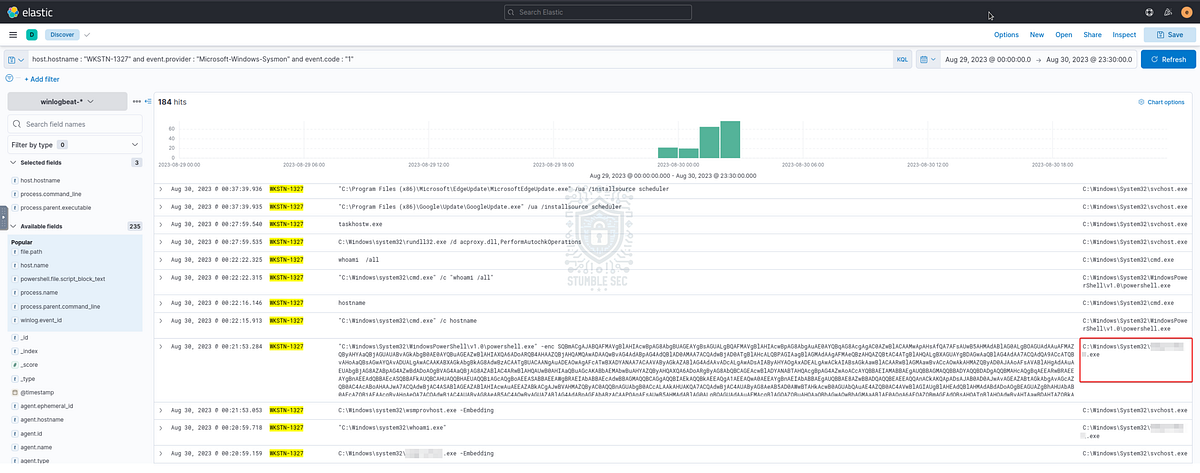
Excellent! Notice the encoded PowerShell command and that the timestamp follows directly after the use of the credentials from WKSTN-0051 ? The process.parent.executable of the PowerShell process is what we’ll need to answer Question 12.

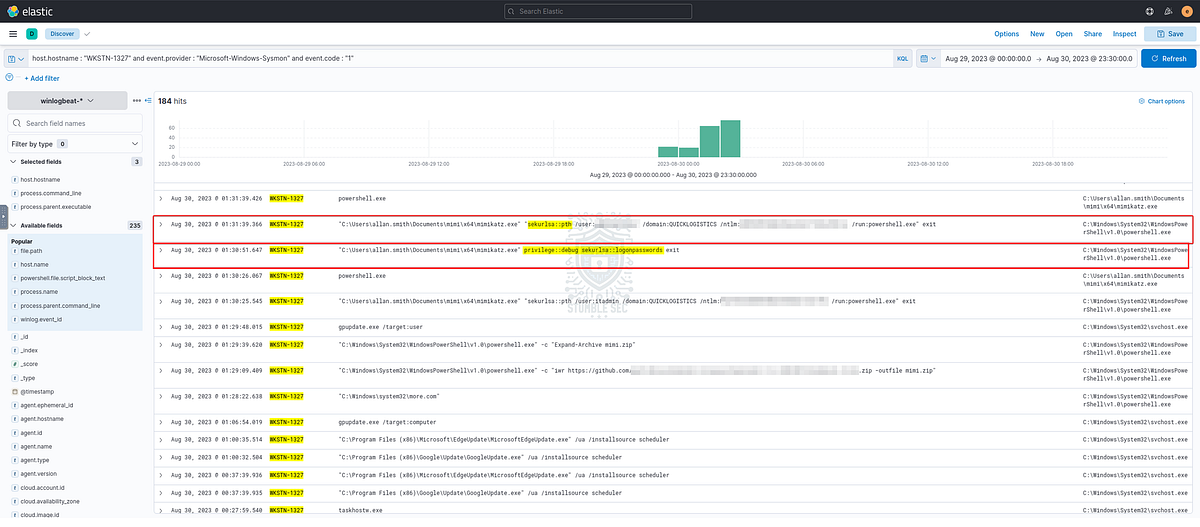
Question 13: The attacker then dumped the hashes in this second machine. What is the username and hash of the newly dumped credentials? (format: username:hash)
Staying within our current filters, we’ll see that once the attacker is connected, they perform the same patterns of system discovery as on the first workstation, including downloading Mimikatz to dump credentials on the second compromised workstation.
![]()
In addition to exposing the previous credentials we found back in Question 8 again, the attacker also discovers another set of administrative credentials, which may include Domain Admin privileges.

Question 14: After gaining access to the domain controller, the attacker attempted to dump the hashes via a DCSync attack. Aside from the administrator account, what account did the attacker dump?
Keep scrolling to the newer events following the administrator account credential dump, we see the attacker performed a Pass the Hash again using the new domain admin NTLM hash to access environment’s domain controller, following-up with a DCSync attack.
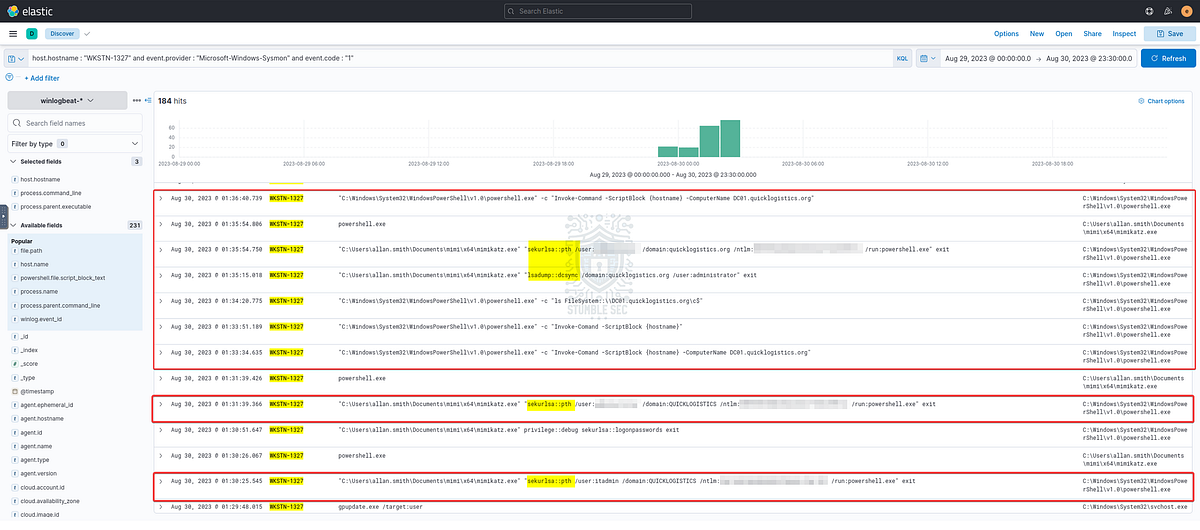
This gives us a good idea of where to look next. To confirm, let’s adjust our query again focusing on events from DC01 to see the full story.
host.hostname : “DC01” and event.provider : “Microsoft-Windows-Sysmon” and event.code : “1”
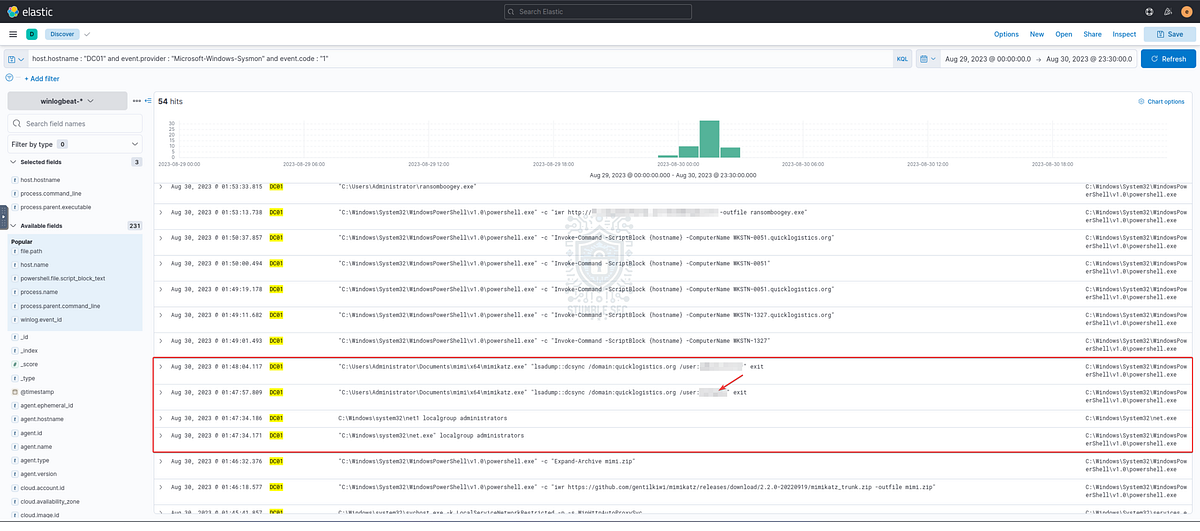
Once again, we’ll see familiar TTPs including system/user discovery and downloading Mimikatz. By performing a DCSync attack the attacker accesses the account credentials from the previous question and another new set of credentials.

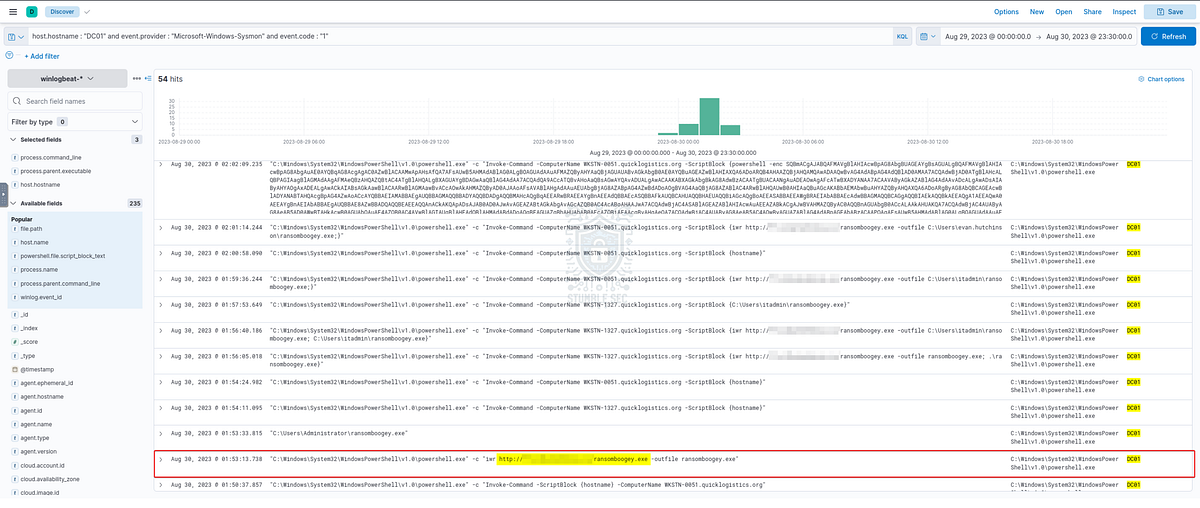
Question 15: After dumping the hashes, the attacker attempted to download another remote file to execute ransomware. What is the link used by the attacker to download the ransomware binary?
Now that the attacker has achieved domain dominance, we can see that a few minutes later, the attacker downloads a ransomware binary from a remote server. This is the URL needed to answer Question 15.
To be thorough and fully scope the impact of the incident, let’s make a quick adjustment to our filters to understand if the ransomware binary was also executed after download.
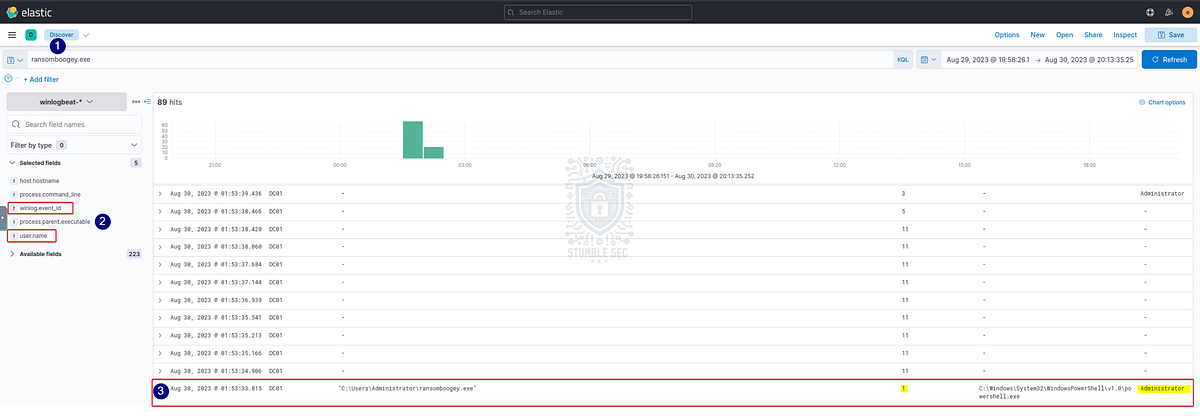
In the search bar, we’ll enter the name of the executable, ransomboogey.exe. But we also want to understand what user accounts were used for execution and the winlog.event_id to understand if the file was executed. For this just select the user.name and winlog.event_id fields to add them to our dashboard.
First, we’ll see that the binary is executed (Sysmon Event ID 1) on DCO1 by Administrator.
Shortly after, we see that the ransomware is created (Sysmon Event ID 11), but not executed on the CEO’s workstation, WKSTN-0051.
![]()
Finally, we’ll determine that the ransomware binary was executed on WKSTN-1327 by itadmin.
![]()
Whew! Now that we have fully answered all the questions and have built a solid understanding of how the latest Boogeyman attack unfolded, let’s wrap up this investigation!

Conclusion:
The third time’s the charm! We’ve come to the end of our frighteningly fun investigation of Boogeyman 3, facing the Boogeyman for the final time. Using our forensic skills in ELK, we learned that the Boogeyman infected CEO’s device through a spear phishing email with a malicious attachment. Then, they performed a variety of activities to establish a foothold including leveraging PowerShell to create persistence and command and control, abusing living off the land binaries to elevate privileges, dumping privileged credentials with Mimikatz, performing discovery in the environment, moving laterally, and achieving domain dominance before finally deploying ransomware. While it was a scary incident, we successfully traced the Boogeyman’s activities and now, let’s wrap this investigation — Quick Logistics LLC’s nightmare is over!
A huge thank you to TryHackMe for the excellent part III of the Boogeyman series. This challenge was the perfect way to end the year and the awesome SOC Level 1 learning path! As usual for this series, I was truly impressed with the details and narrative of this room. This one felt closer to a real-world simulation exercise than others I have completed and it really pushed me to level-up my skills in Elastic. It was really engaging to see how the Boogeyman changed tactics, techniques, and procedures between the three rooms and the stakes felt real for the fictional organization! Let’s hope we never have to deal with Boogeyman again.
Thanks for the support and going through this investigation with me. Remember, if you found this walkthrough helpful don’t forget to give it a clap! Your feedback really is invaluable and helps fuel my commitment to support your journey in the security community. Cybersecurity is a team sport and we’re in this together!
Until next week’s challenge — stay curious and be safe out there!
Tools & References:
MITRE ATT&CK: System Binary Proxy Execution: Mshta (T1218.005): https://attack.mitre.org/techniques/T1218/005/
Microsoft Learn — xcopy: https://learn.microsoft.com/en-us/windows-server/administration/windows-commands/xcopy
Microsoft Learn — rundll32: https://learn.microsoft.com/en-us/windows-server/administration/windows-commands/rundll32
MITRE ATT&CK: Scheduled Task/Job: Scheduled Task (T1053.005): https://attack.mitre.org/techniques/T1053/005/
Microsoft Learn — Sysmon: https://learn.microsoft.com/en-us/sysinternals/downloads/sysmon
MITRE ATT&CK: https://attack.mitre.org/
MITRE ATT&CK: Abuse Elevation Control Mechanism: Bypass User Account Control (T1548.002): https://attack.mitre.org/techniques/T1548/002/
MITRE ATT&CK: OS Credential Dumping (T1003): https://attack.mitre.org/techniques/T1003/
MITRE ATT&CK: Mimikatz (S0002): https://attack.mitre.org/software/S0002/
MITRE ATT&CK: Remote System Discovery (T1018): https://attack.mitre.org/techniques/T1018/
MITRE ATT&CK: Use Alternate Authentication Material: Pass the Hash ( T1550): https://attack.mitre.org/techniques/T1550/002/
MITRE ATT&CK: OS Credential Dumping: DCSync (T1003.006): https://attack.mitre.org/techniques/T1003/006/