TryHackMe — Warzone 2 Room Walkthrough
A Second Network Packet Capture Investigation Using Brim/Zui, Network Miner, and VirusTotal.

Image Credit: https://tryhackme.com/room/warzonetwo
Introduction:
Welcome to my weekly walkthrough! If you’ve stumbled across this blog while looking for a detailed guide to the Warzone 2 room from TryHackMe, you’re in the right place. This challenge is the second in a series of fantastic rooms aimed at introducing you to forensic network packet analysis using some lesser-known tools.
If you want to follow along in order, you can start with the Warzone 1 room first:
TryHackMe — Warzone 1 Room Walkthrough
Challenge Scenario:
You work as a Tier 1 Security Analyst L1 for a Managed Security Service Provider (MSSP). Again, you’re tasked with monitoring network alerts.
An alert triggered: Misc activity, A Network Trojan Was Detected, and Potential Corporate Privacy Violation.
The case was assigned to you. Inspect the PCAP and retrieve the artifacts to confirm this alert is a true positive.
In this challenge, we’re stepping back into the shoes of a Security Analyst at an MSSP, monitoring network traffic alerts for one of your customers when suddenly, an alert fires from their IDS/IPS. We’re given a network packet capture file, a PCAP, and need to quickly determine if this is a true positive by analyzing the artifacts within the traffic.
Now that you’ve already got some experience, you might guess what’s in our toolkit for this investigation. We’ll be busting out Brim again to process, search, and analyze the PCAP, and then pivoting to Network Miner for a file analysis. We’ll also enrich our findings by consulting VirusTotal to add context to any indicators of compromise (IOCs) we discover.
I’ll walk through each step clearly, and avoid spoiling the answer. By the end, you’ll have a solid understanding of how to approach similar investigations in the wild. Sounds like fun, right? Let’s get into it!
And if you find this walkthrough helpful — whether it levels-up your skills, gets you over a stumbling block, or just gives you a clearer view of the blue team — please give it a clap and consider following me for more content like this.
Thanks for reading and going on this investigation with me!
Question 1: What was the alert signature for A Network Trojan was Detected?
Once in our analysis environment, let’s get acquainted with our toolset so we can start forming a plan. You’ll find everything we need in the Tools folder on the Desktop.
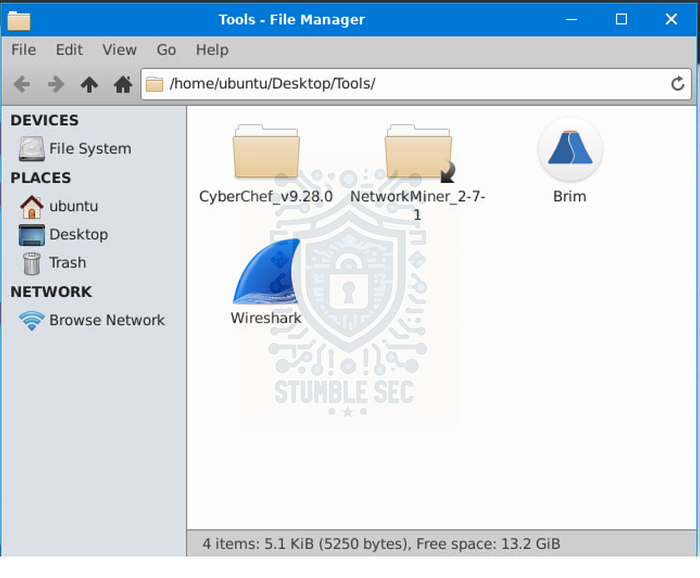
Contents of the Tools Folder
To answer Question 1, we’re searching for an alert signature. So, our first stop will be to use Brim (now called Zui) because it has the ability to use Suricata intrusion detection rules to help quickly identify threats or malicious traffic within the packet capture.
Go ahead and launch it — and speaking of packet captures, once Brim is open, load the challenge file Zone2.pcap , and wait for it to process the capture file.

Brim: Loading Zone2.pcap
Once the file is loaded, let’s get an overview of the Suricata rule hits detected in the network traffic. Select the Zone2.pcap file, click Suricata Alerts by Category under the Queries header, and review the displayed alert categories.
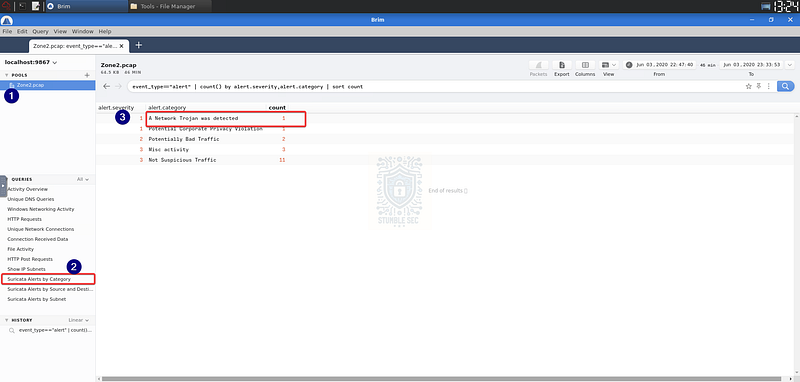
Brim: Overview of Suricata Alerts by Category
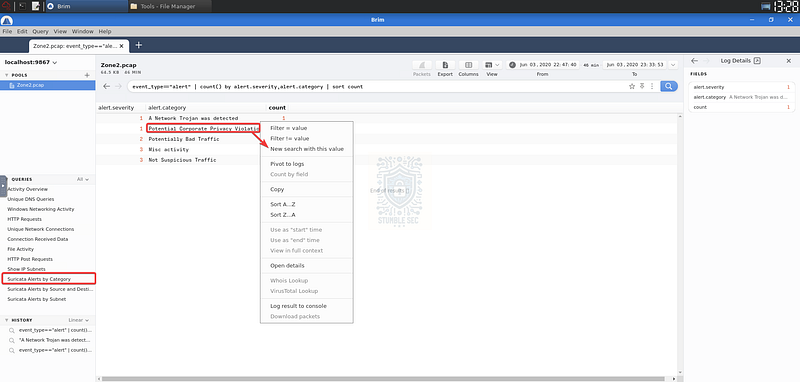
We’re going to focus on a Network Trojan was detected since that’s what the question is asking about. Our next step is to find the alert signature for this category.
To do this, right-click the a Network Trojan was detected row and select New search with this value.
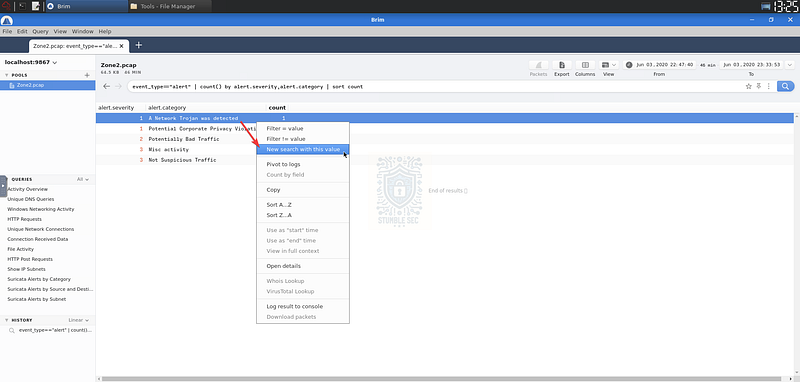
Brim: Selecting New search with the a Network Trojan was detected value.
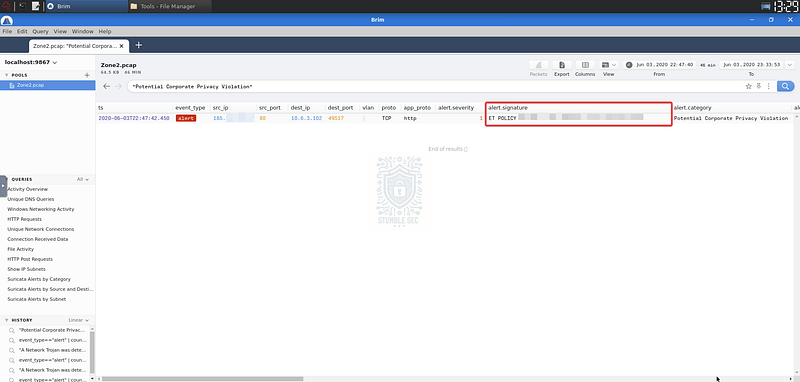
This selection adjusts the query to display packets matching the Suricata rule — and more importantly, it reveals the details we need to answer Question 1 under the alert.signature column.
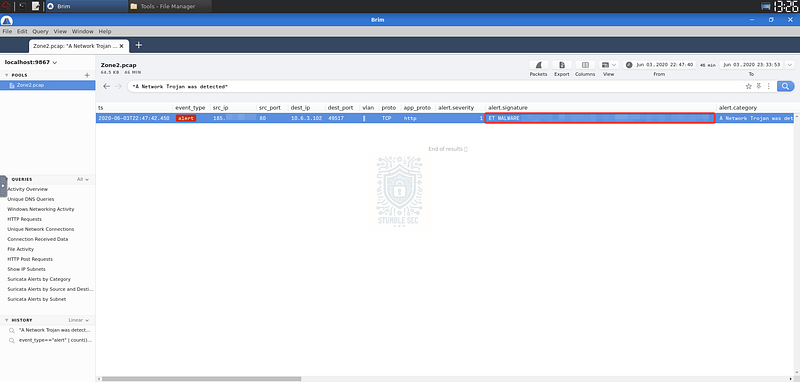
Brim: Identifying the alert signature

Question 2: What was the alert signature for Potential Corporate Privacy Violation?
Our next task is to determine the alert signature for a second alert category: Potential Corporate Privacy Violation.
For this, we’ll simply perform the same process we used in Question 1 — select New search with this value for the Potential Corporate Privacy Violation category.
Brim: Selecting New search with the a Potential Corporate Privacy Violation value.
This time, we’ll see a different alert.signature value compared to Question 1.
Brim: Identifying the alert signature.

Question 3: What was the IP to trigger either alert? Enter your answer in a defanged format.
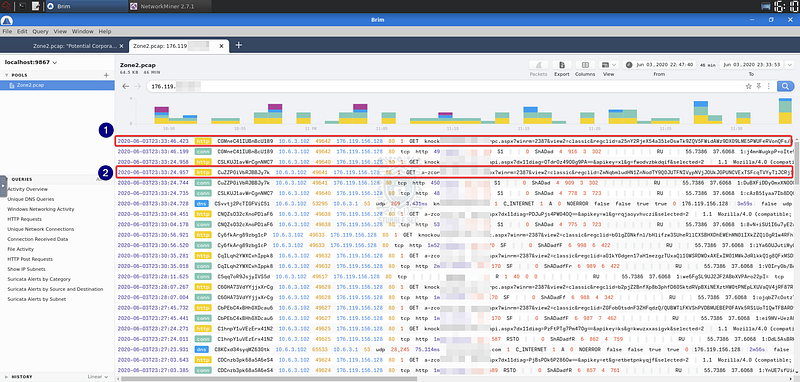
Answering Question 3 requires us to determine the IP address that triggered either alert. The wording is a bit confusing, but we’re looking for the source IP address (src_ip) associated with the HTTP file download. Either alert will display the same information.
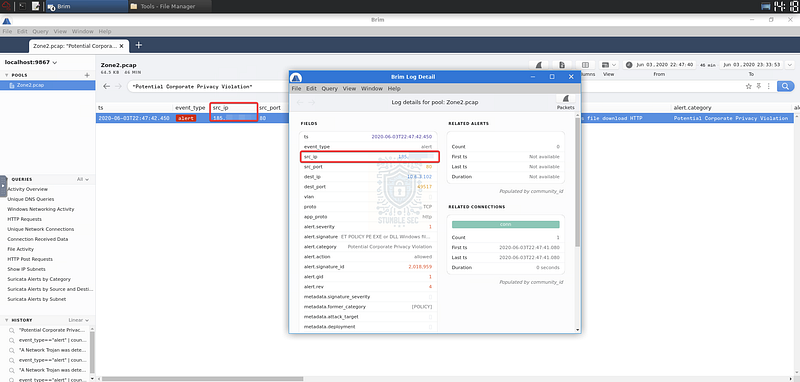
Brim: Identifying the source IP of the alert
Before we can submit the answer, we need to defang the IP address. This is a common practice to ensure that malicious IPs and URLs aren’t accidentally clicked or activated. While this is easy to do manually, let’s work a little smarter and use CyberChef for the task.
The offline version of CyberChef is included in the Tools folder, but the online version works just as well. To defang the source IP address:
- Open CyberChef.
- Select the Defang IP Addresses operation.
- Paste the source IP address into the Input field.
And voilà — we have the defanged IP address.

Question 4: Provide the full URI for the malicious downloaded file. In your answer, defang the URI.
Now that we’ve identified a suspicious IP address, we can pivot our search and focus on that address. To do this, simply open a new tab in Brim and enter the IP address to view the results.
Without any additional filtering, you’ll see that the first result with the notice label contains the full URL of a downloaded .cab file.
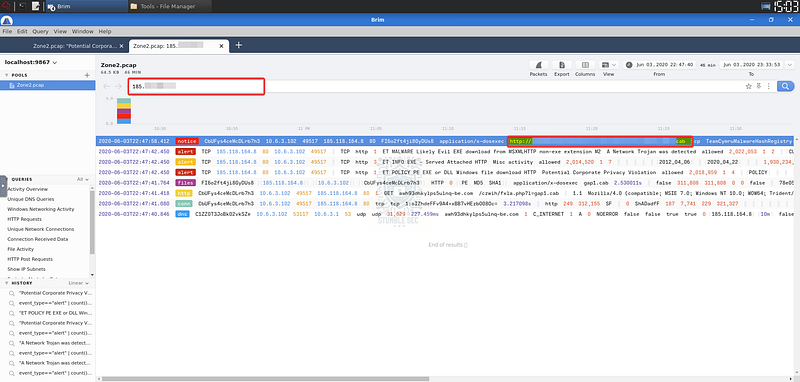
Brim: Finding the URL of the malicious download
Once again, before we submit the answer, we’ll need to hop into CyberChef to defang the URL.
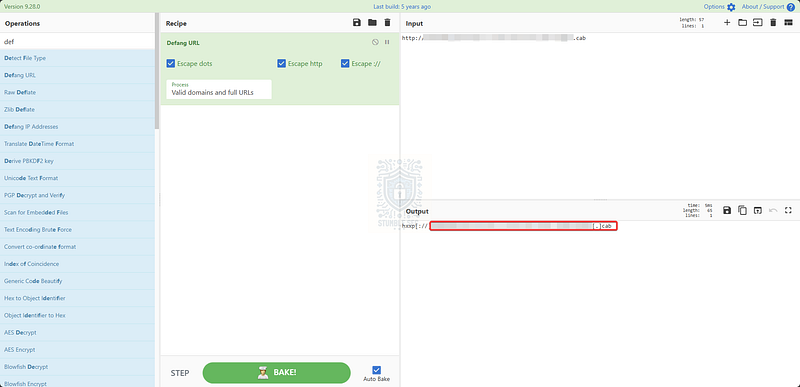
CyberChef: Defanging the URL of the malicious download

Question 5: What is the name of the payload within the cab file?
To answer Question 5, we’ll turn our attention to examining the malicious .cab file we identified in the last question. For this job, we’re going to make a quick detour in our tooling and swap over to Network Miner, also contained in the Tools folder on the Desktop.
Open up Network Miner and load the Zone2.pcap. This is where Network Miner shines — it can easily parse, identify, and categorize various elements within the network traffic streams, including reassembling files. This will make determining the contents of the .cab file much easier.
Let’s put this into practice and select the Files tab. The top entry filename might look familiar — this is the .cab file we’re looking for.
Now, a quick note on .cab files: they’re short for cabinet files, a native Windows archive format used to compress and bundle files, often for software installation. That makes them a perfect disguise for attackers trying to sneak payloads past defenses. If you stumble across one in a network capture, it may be worth a closer look.
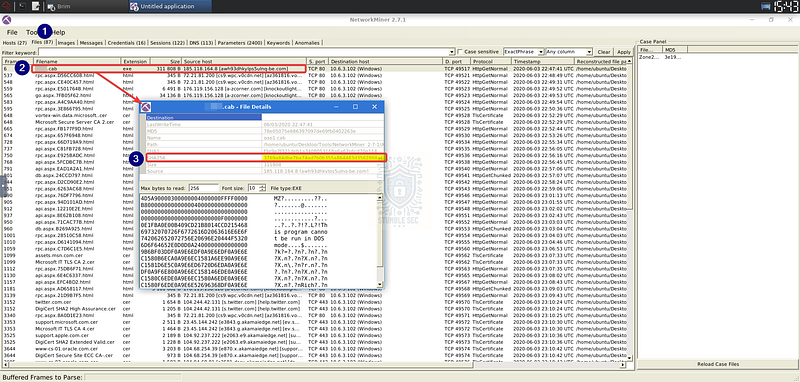
Network Miner: Grabbing the file hash of the malicious file
Rather than do any analysis directly on the file, we’ll pivot out to VirusTotal to check if this sample has been submitted to the platform before. For this, we’ll need the hash of the .cab file, which we can get by double-clicking the entry in Network Miner and copying the SHA256 hash.
Now that we have the file hash, use your web browser outside of the TryHackMe VM (since it doesn’t have direct internet access) and navigate to https://virustotal.com. Submit the copied file hash into the search box to see the results.
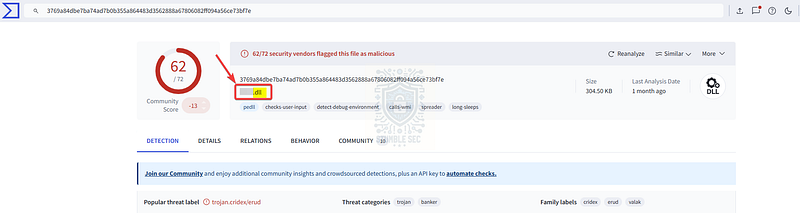
https://www.virustotal.com/gui/file/3769a84dbe7ba74ad7b0b355a864483d3562888a67806082ff094a56ce73bf7e
Immediately, we’ll see that nearly all vendors on the platform have marked this file as malicious. But what we’re interested in is the file name field below the hash — this tells us the payload name within the .cab file and is what we’ll need to answer Question 5.

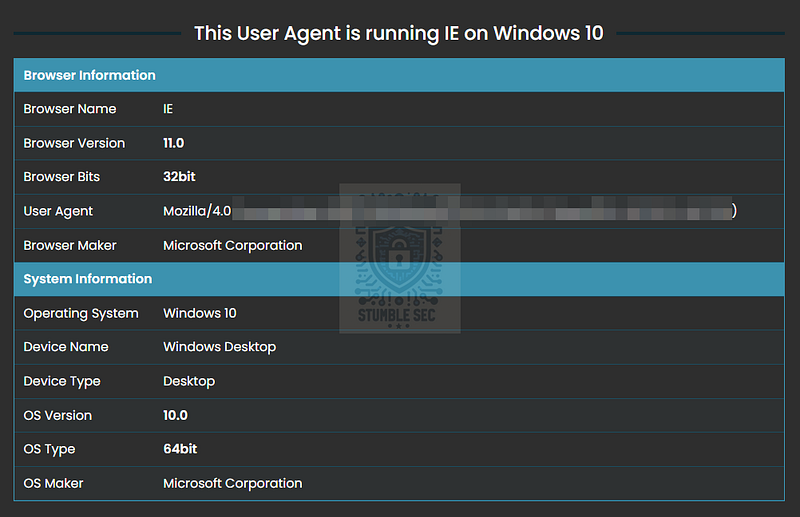
Question 6: What is the user-agent associated with this network traffic?
Question 6 requires us to determine the user-agent string associated with the network traffic. In legitimate use cases, these strings help identify the client browser or application connecting to a resource over HTTP. They can sometimes give us clues about the origin of a request, but unfortunately, they’re also easily spoofed, so we’ll treat them as hints, not hard evidence.
We can perform this task in either Network Miner or Brim. For the purposes of this walkthrough, I’ll demonstrate using Brim.
Since we already have the search open for the source IP of the malicious traffic, we’ve got a head start. Remember how I mentioned user-agent strings apply to HTTP traffic? Focus on the row labeled http — this is where we’ll find the user_agent string.
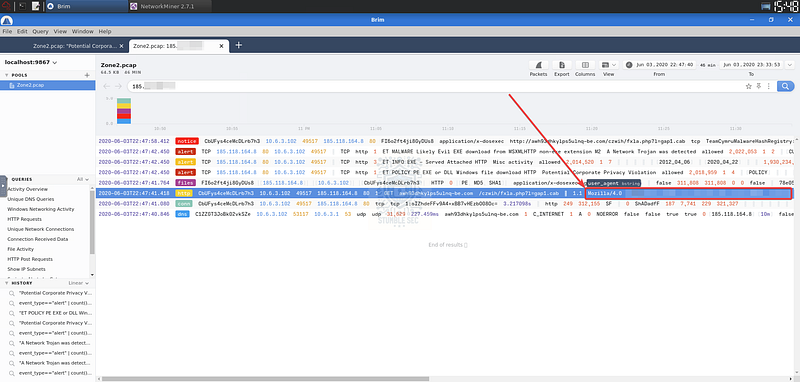
This long string tells us a bit about the browser and operating system the victim used to retrieve the malicious .cab file. While deeper analysis is out of scope for this challenge, it’s a fun side activity to plug the string into a User Agent Lookup tool and see what you can learn. For example:
https://www.whatismyip.net/tools/user-agent-lookup.php

Question 7: What other domains do you see in the network traffic that are labelled as malicious by VirusTotal? Enter the domains defanged and in alphabetical order. (format: domain[.]zzz,domain[.]zzz)
Now that we’ve gotten some additional context about the request, it’s time to return to our hunt for suspicious domains. This process combines the data in Brim with threat intelligence from VirusTotal.
First, we’ll leverage Brim’s Unique DNS Queries page to determine all of the DNS requests in the traffic. You’ll find this query under the Queries menu.
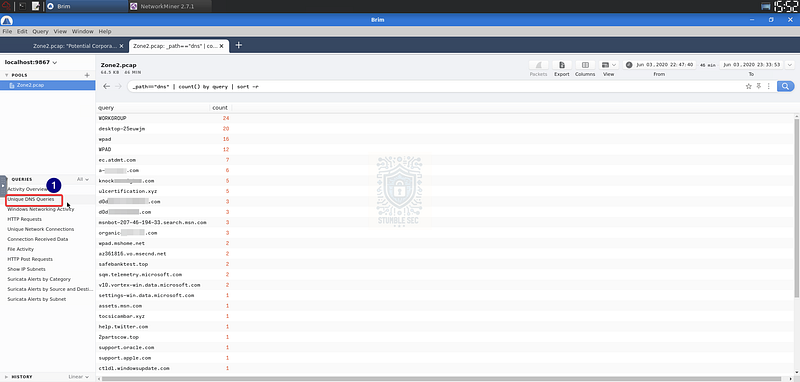
Brim: Viewing Unique DNS Queries
This will list out all of the DNS requests. Yikes — there are quite a few domains.
So, let’s head back to our VirusTotal search for the .cab file hash. Press the Relations tab and turn your attention to the Contacted Domains section. Here, we’ll find several domains contacted by this binary, complete with their own detection ratings.
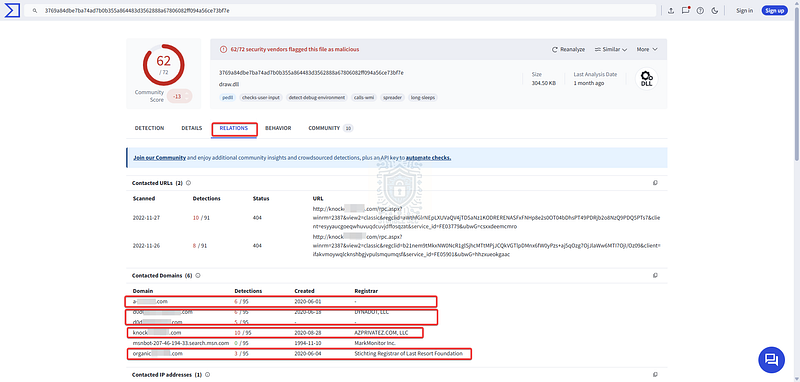
VirusTotal: Contacted Domains under Relations tab
Focusing on the ones flagged as malicious, we can correlate them with the results back in Brim.
Notice a problem? We’ve got more than two entries matching — but the question only wants two.
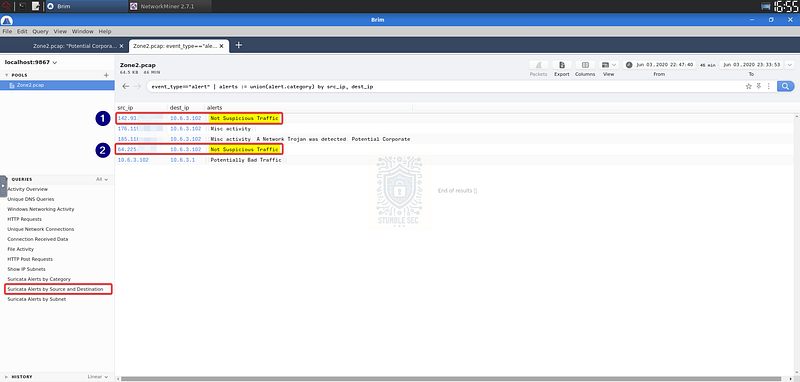
No problem! Let’s filter this down further by using the Suricata Alerts by Source and Destination tab. We’ve already analyzed the two labeled Potentially Bad Traffic and A Network Trojan was detected.
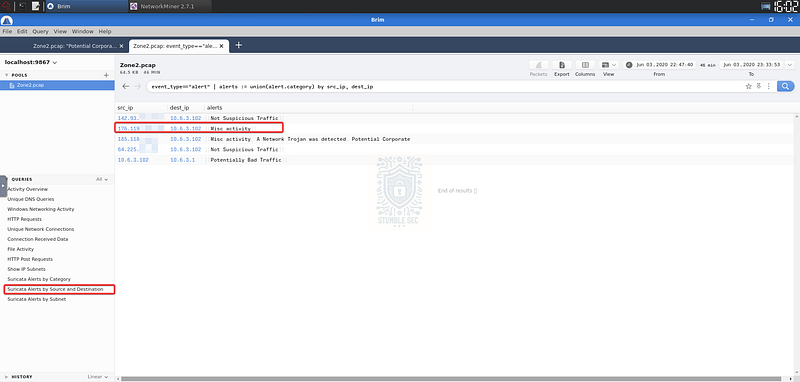
Brim: Filtering by Misc activity alert
Instead, we’ll check the one with the alert field labeled Misc activity and perform a new search.
Brim: Identifying the malicious domains
This returns results for the IP associated with Misc activity, where we can find two domains that were also present in the DNS queries and flagged as malicious on VirusTotal. Correlating the results from these three views gives us high confidence in answering Question 7.
Now all we need to do is defang them in CyberChef again and put them in alphabetical order.

Question 8: There are IP addresses flagged as Not Suspicious Traffic. What are the IP addresses? Enter your answer in numerical order and defanged. (format: IPADDR,IPADDR)
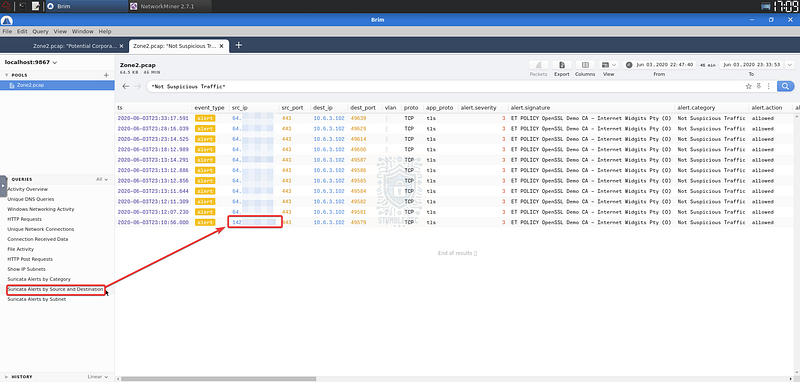
Back to the Suricata Alerts by Source and Destination tab. Question 8 asks us to analyze the alert tag Not Suspicious Traffic. Fortunately, the information is readily available, and we can quickly identify the IP addresses associated with this tag.
Brim: Identifying IP addresses with the “Not Suspicious Traffic” tag.
As before, once we’ve located the IPs, we’ll head over to CyberChef. Paste the IPs into the input window in numerical order, apply the Defang IP Address operation, and you’ll have them formatted correctly for submission.

Question 9: For the first IP address flagged as Not Suspicious Traffic. According to VirusTotal, there are several domains associated with this one IP address that was flagged as malicious. What were the domains you spotted in the network traffic associated with this IP address? Enter your answer in a defanged format. Enter your answer in alphabetical order, in a defanged format. (format: domain[.]zzz,domain[.]zzz,etc)
Let’s dig into some analysis of the IP addresses marked as Not Suspicious Traffic from the previous question and validate the results.
We’ll start by searching for the first IP — the one beginning with 64. This will show us all associated log entries, but it’s a bit unwieldy to sort through. To make things easier, we can apply some filtering and focus on entries with a server_name tag, which helps us narrow down any associated domain names.
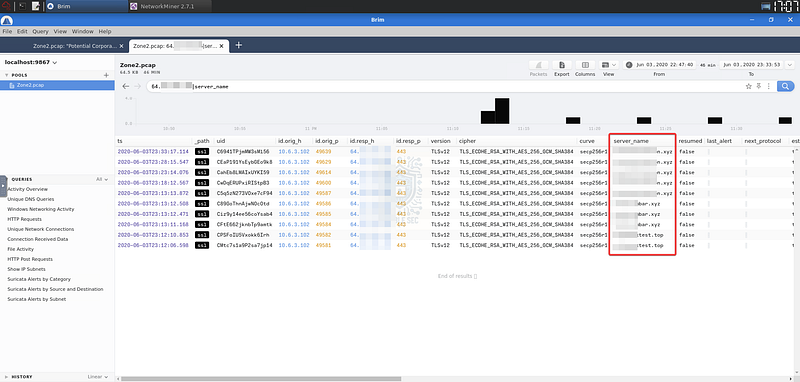
Brim: Surfacing domain names associated with an IP address
This gives us three distinct domains associated with this IP address in the PCAP.
Let’s jump back over to VirusTotal and search the IP address, navigating to the Relations tab. Take a look at the Passive DNS Replication area — notice anything interesting?
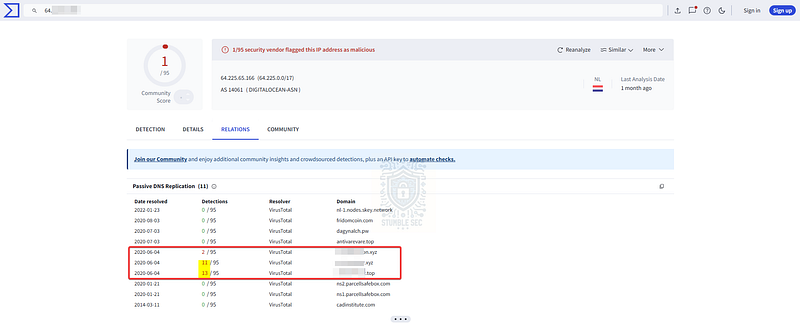
VirusTotal: Correlating domain names with threat intelligence
All three domains we surfaced in Brim also appear in the VirusTotal entry, complete with indicators of malicious activity. It turns out this IP is more suspicious than we originally believed.

Question 10: Now for the second IP marked as Not Suspicious Traffic. What was the domain you spotted in the network traffic associated with this IP address? Enter your answer in a defanged format. (format: domain[.]zzz)
We’ve made it to the last question! Our final objective is to analyze the second IP we found in Question 8 labeled Not Suspicious Traffic.
Brim: The second IP address labeled “Not Suspicious Traffic”
Then, we’ll perform the same steps we did for Question 9 — search the IP address and filter the entries for the server_name tag. Once we have the results, there’s only a single domain listed. That’s the one we need to wrap up this investigation.
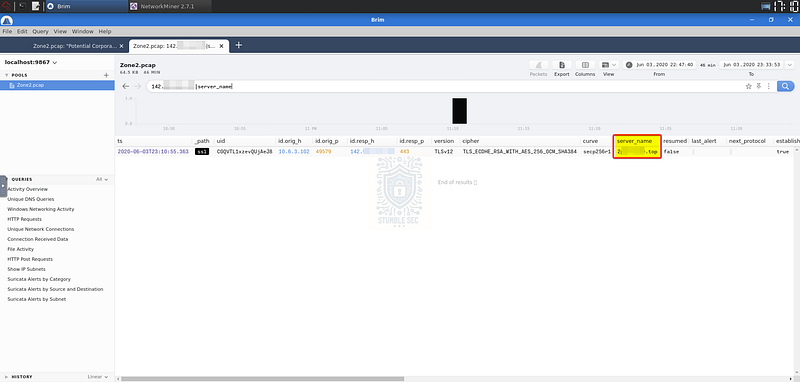
Brim: Surfacing domain names associated with a second IP address
Before you defang the answer, if you’re curious, you can check this result on VirusTotal as well. At the time of this writing, this domain does indeed appear to be not suspicious. That’s a good reminder to always cross-check your results to make a more informed determination about a threat.
It also serves as a reminder that indicators of compromise, like domains, are easy for a threat actor to change. Timely threat intelligence can make all the difference!

Conclusion:
How fun was that! A big thank you to TryHackMe for the part two of this fun and realistic challenge.
By once again analyzing the PCAP file containing suspicious network traffic using Brim and Network Miner, and enriching our findings with VirusTotal, we successfully identified several malicious IP addresses and domains associated with a threat actor. Then we determined what files were downloaded from the malicious infrastructure and learned more about the threat. Putting all the evidence together, we can confirm the alert as a true positive and move on to the containment phase.
I chose this weekly challenge to spend more hands-on time with Brim/Zui and the awesome Suricata rules built in. I also really appreciate the immense capabilities of Network Miner — I’m always impressed by how easy it is to use, and how much depth it offers particularly for quick file analysis and reassembly. In the real world, I’ve used both tools numerous times to visualize data in a PCAP and uncover information that was time-consuming and difficult to find using other tools. It’s absolutely worth keeping in the kit.
Thanks for your support and partnering on this investigation. If you found this walkthrough helpful, don’t forget to give it a clap! Your feedback really is invaluable, and it pumps me up to support your security journey. Remember, Cybersecurity is a team sport and we’re in this together!
It’s a Warzone out there, stay curious and be safe!

Tools & References:
Challenge Link: https://tryhackme.com/room/warzonetwo
Brim/ZUI: https://zui.brimdata.io/
Network Miner: https://www.netresec.com/?page=NetworkMiner
VirusTotal: https://www.virustotal.com/
CyberChef: https://gchq.github.io/CyberChef/
WhatIsMyIP — User Agent Lookup: https://www.whatismyip.net/tools/user-agent-lookup.php