
Introduction:
Welcome to my weekly walkthrough! If you’ve stumbled across this blog while looking for a detailed guide to the Snapped Phish-ing Line blue team challenge from TryHackMe, you’re in the right place.
This scenario drops us into a quickly escalating incident at SwiftSpend Financial, where multiple users got hit with suspicious phishing emails and some even got hooked by the lure and submitted their credentials. Not good! Our job is to analyze the phishing emails, check out the attachments, determine how this phishing kit operates, and scope the affected users.
This challenge focuses heavily on phishing email analysis and incident triage fundamentals. To help us on our investigation we’ll pivot between tools like CyberChef, VirusTotal, and a few native utilities within the lab VM to inspect email headers, analyze malicious attachments, extract artifacts from a phishing kit, and identify attacker infrastructure.
What makes this challenge especially valuable is how it mirrors real-world workflows. I’ll walk through each step clearly, and by the end, you’ll have a solid understanding of how to approach similar investigations in the field. Sounds like fun, right? Let’s go!
Challenge Scenario:
As a member of the IT department at SwiftSpend Financial, you are responsible for assisting employees with technical concerns. What initially appeared to be a routine day quickly escalated when multiple employees across different departments reported receiving a suspicious email. Several users noted unusual characteristics in the message, and unfortunately, some had already submitted their credentials and were no longer able to access their accounts. With the potential for a wider compromise, the incident has been escalated for investigation. Your task is to analyze the available evidence, determine the scope of the attack, and uncover how the adversary operated.
Objectives
Analyze the provided email samples to identify key artifacts
Investigate phishing URLs to understand redirection
Retrieve and examine the phishing kit used in the attack
Use CTI tools to gather intelligence on the adversary
Analyze the phishing kit to uncover additional indicators
Questions 1 & 2:
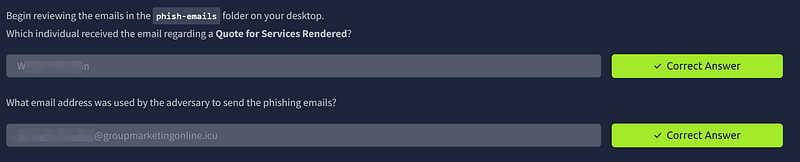
1. Begin reviewing the emails in the phish-emails folder on your desktop.
Which individual received the email regarding a Quote for Services Rendered?
2. What email address was used by the adversary to send the phishing emails?
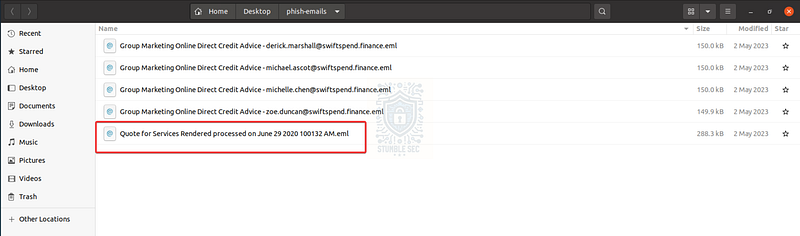
Let’s kick off our investigation. Our first objective is to analyze the provided email samples and identify key artifacts. Open the phish-emails folder on the desktop of the THM VM. You’ll find several phishing email samples in this directory.
The first file to review is: Quote for Services Rendered processed on June 29 202 100132 AM.eml
This file contains the email header information needed to answer both Question 1 and Question 2.
 Overview of the phishing artifacts
There are a couple of ways to approach this. We can open the .eml file in a mail client like Thunderbird, which is already installed on the VM, or we can rely on CyberChef to review the mail headers. CyberChef is also available from Desktop/Tools/CyberChef, or as a handy bookmark in the VM’s Firefox instance.
For this walkthrough, I’ll show both methods.
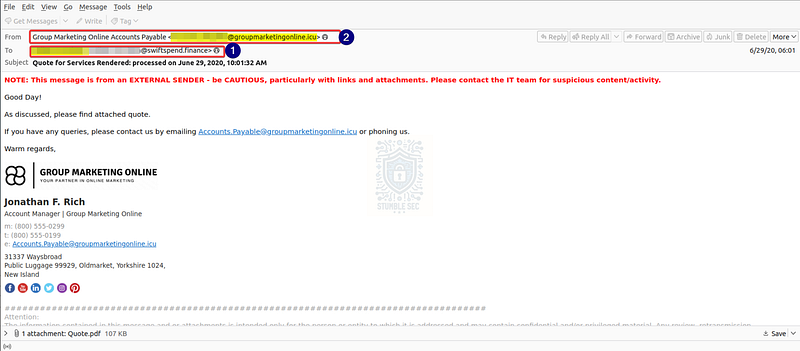 Thunderbird: Identifying the from and to addresses of the phishing email
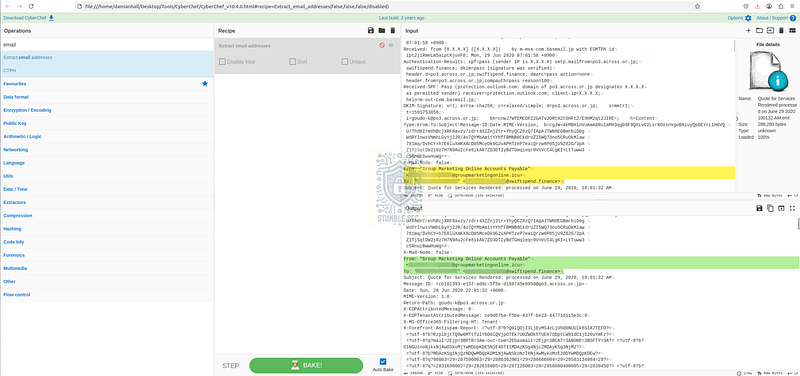 CyberChef: Identifying the from and to addresses of the phishing email
While this is a simple check, getting comfortable with mail headers that aren’t visible in a mail client’s simplified view is a helpful exercise as you build experience in phishing triage.
Questions 3 & 4:
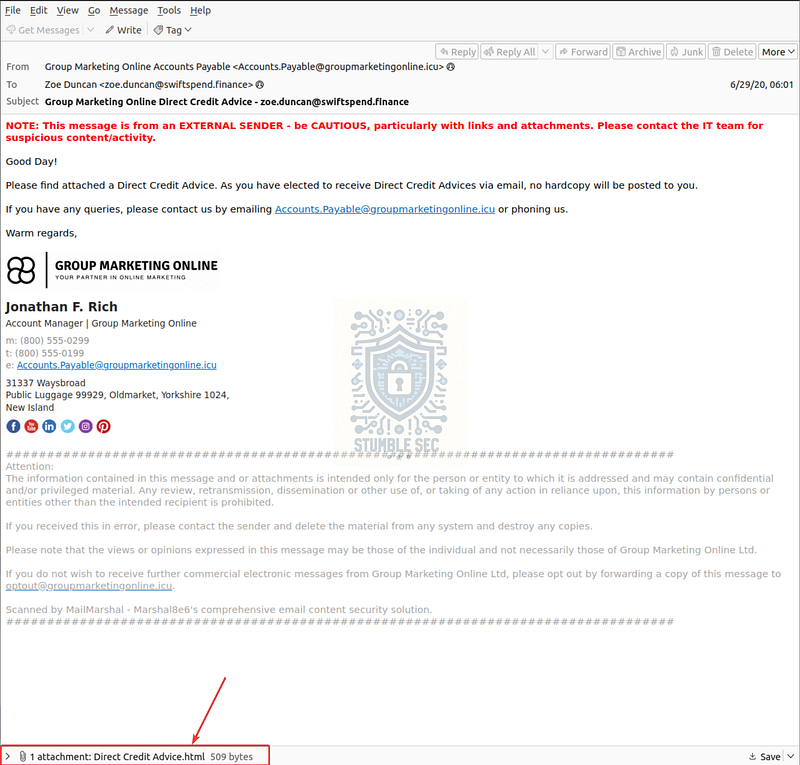
3. Investigate the attachment in the email addressed to Zoe Duncan.
What is the root domain of the redirection URL found within the file?
4. Open the attachment in your VM web browser.
Which company is the login page impersonating?
Moving right along to Question 3 and Question 4, we’ll need to review a second phishing email from the phish-emails folder. This time, we’re looking for the one that’s addressed to Zoe Duncan:
Group Marketing Online Direct Credit Advice - zoe.duncan@swiftspend.finance.eml
We’re interested in analyzing the attachment: Direct Credit Advice.html. For simplicity, let’s download the attachment directly from the message.
 Thunderbird: Downloading the attachment for Zoe Duncan
Sure, we could simply open the attachment, but a more controlled way to assess the file is to use CyberChef to analyze it. Drag the malicious HTML attachment we downloaded from Thunderbird into a new input tab in CyberChef. While the file is readable as-is, we can speed up analysis by applying the Extract URLs operation. This parses the file and displays only URLs identified in the file, which simplifies review versus manually picking them out.
 CyberChef: Extracting the URL from the phishing attachment
This approach allows us to quickly identify both the root domain and the URL used in the phishing attachment. It also gives a strong indication of which brand is being impersonated as the lure, even without visiting the phishing page directly.
Since Question 4 asks us to open the attachment, open it up to see how everything appears to the victim when rendered in the web browser. Right away we’ll see the obvious branding of the company the phishing kit is impersonating:
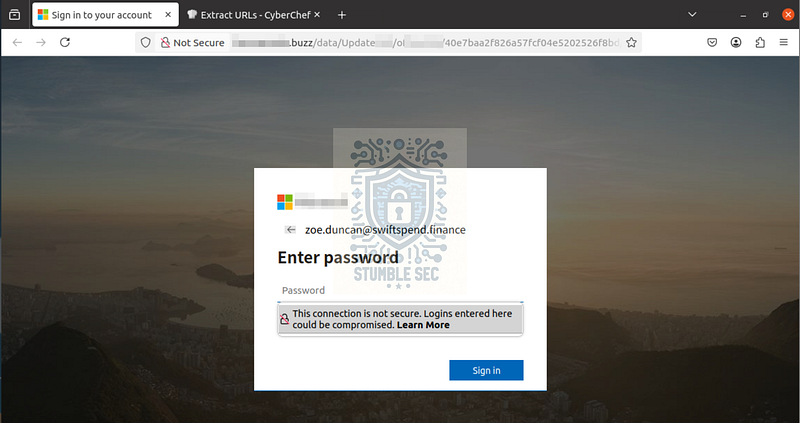 Firefox: The phishing landing page

Questions 5 & 6:
5. Let’s check if the attacker left any files exposed on the same website.
Navigate to the /data directory.
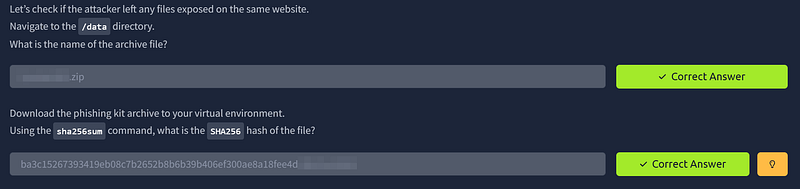
What is the name of the archive file?
6. Download the phishing kit archive to your virtual environment.
Using the sha256sum command, what is the SHA256 hash of the file?
Now, this question might feel a bit confusing at first. You might be wondering how we’re able to access the URL, since the lab environment typically doesn’t allow full internet access. There’s a clue in the hosts file, which maps an IP address to the phishing domain, allowing us to access it within the lab environment.
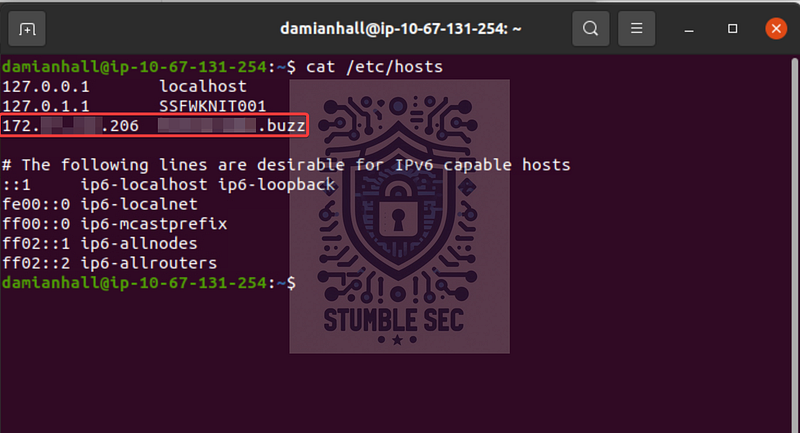 Terminal: Checking the /etc/hosts file
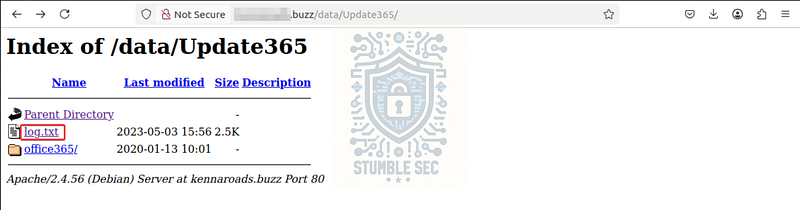
So, jump back to Firefox and enter the URL we found in Question 3. From there, we just need to make a small adjustment to the phishing URL and append /data to it, to navigate to the directory where the .zip file is hosted.
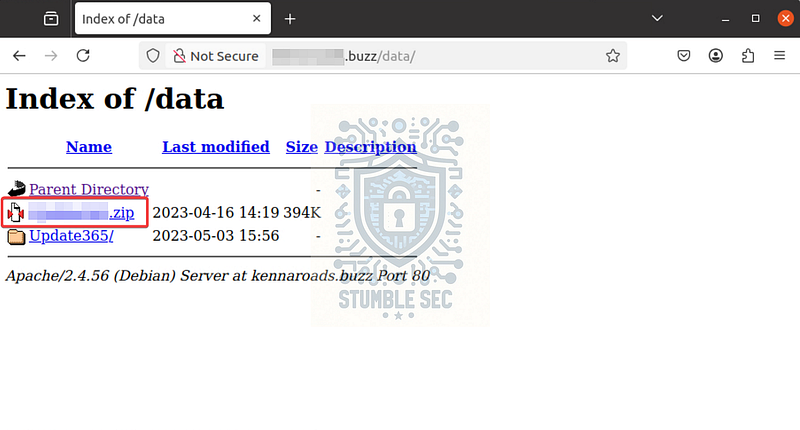 Firefox: The index of the /data subdirectory
Now that we’ve found it, we’ll download the archive, then use the sha256sum command from the terminal to calculate the SHA256 hash of the phishing kit.
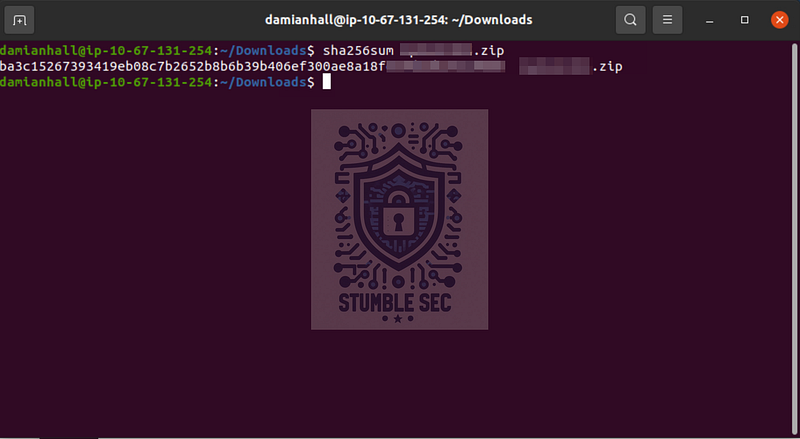 Terminal: Calculating the SHA256 hash of the phishing kit archive
By locating the file and grabbing the kit’s file hash, we can pivot and gather additional threat intelligence. This helps add context to the investigation and may reveal whether this kit has been observed in other campaigns.
Questions 7 & 8:
7. Investigate the file hash from the previous question using VirusTotal (opens in new tab).
Aside from phishing, what other threat category is assigned to the ZIP archive?
8. Review the VirusTotal Details page for the phishing kit.
How many files are contained within the archive?
With the hash of the phishing kit in our hands, a solid next step is to identify what additional context and intelligence we can gather. For this task, we’ll use VirusTotal. Since the lab VM has limited internet access, this step requires a browser outside of the lab environment (like on your local machine).
Navigate to *VirusTotal* and paste the SHA256 hash from Question 6 into the search bar which lets us to check out the platform’s analysis results if the sample has already been submitted.
In this case, we’re in luck, the sample has already been analyzed so we don’t need to wait for the scanning to complete. Locate the Threat Categories section to determine how the file has been classified. Aside from phishing, there are two additional categories listed. We’re interested in the first of those categories to answer Question 7.
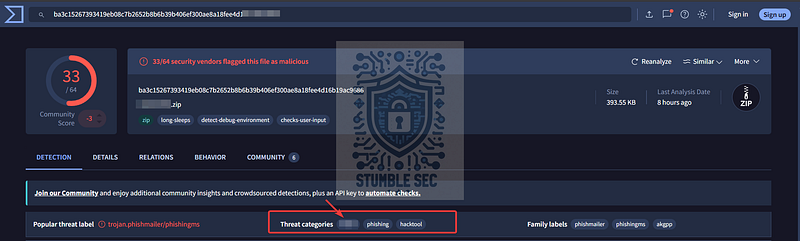 https://www.virustotal.com/gui/file/ba3c15267393419eb08c7b2652b8b6b39b406ef300ae8a18fee4d16b19ac9686
Next, we can review the high-level details about the archive’s contents, like the number of files contained in it. To do this, navigate to: Details → Bundle Info → Contents Metadata → Contained Files
This section shows how many files are packaged within the archive, which answers Question 8.
 VirusTotal: Identifying the number of files contained in the archive
Question 9: Let’s see if the attacker has exposed any captured credentials.
Navigate to the /data/Update365/ directory and investigate the log file.
What is the email address of the user who submitted their credentials more than once?
Next up, we’ll bounce back to Firefox to analyze the log file hosted on the phishing site. Navigate to the /data/Update365 directory of the phishing domain. There, we’ll find the log.txt file, which appears to contain credentials captured by the phishing kit.
 Firefox: Accessing the log.txt file on the phishing domain
Open log.txt. The file is fairly small, so we can quickly perform a manual review by looking for duplicate entries in the email field.
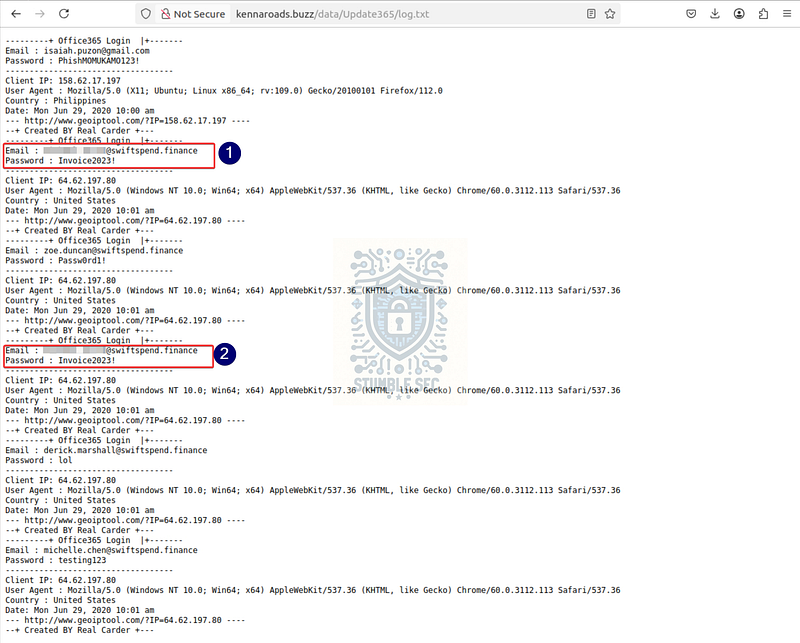 Contents of the log file
In a real-world scenario, log files would likely be much larger. To work more efficiently, we can extract email addresses and identify duplicates using CyberChef. Copy the contents of the log file and paste them into CyberChef. From there, apply the Extract email addresses operation, followed by Sort, to quickly surface the duplicates. This approach helps scale the analysis by reducing those manual checks.
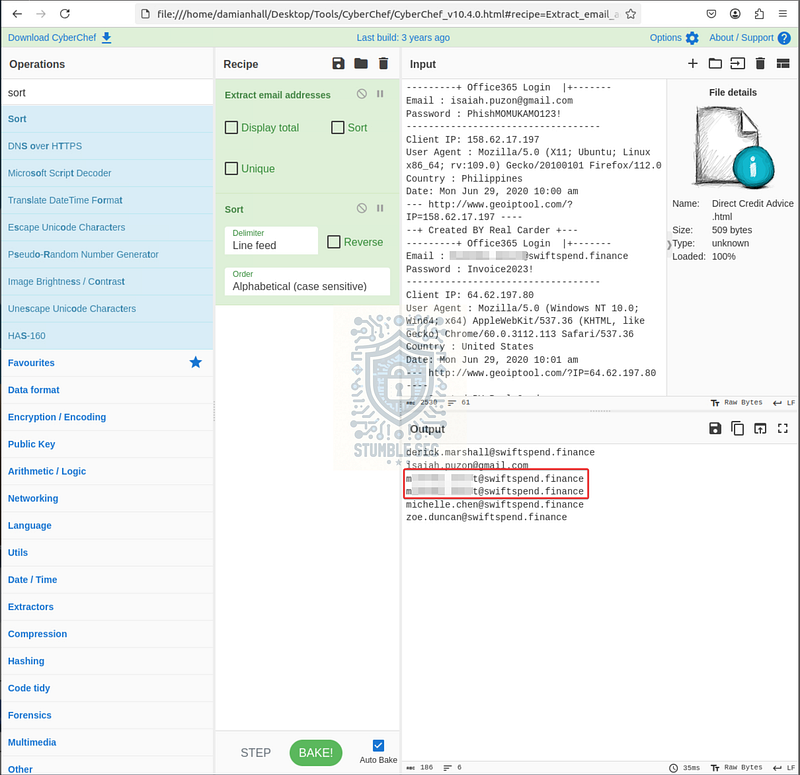 CyberChef: Analyzing the contents of the log.txt file
Using either method, we’ve identified a single user who submitted their credentials more than once. This suggests the user attempted to log in repeatedly after the first submission.
Sounds like this user might need double the training :D

Question 10: Extract the phishing kit archive and locate the submit.php file.
What email address is used by the adversary to collect compromised credentials?
To answer Question 10, extract the phishing kit ZIP file that we downloaded in Question 6 and locate the submit.php file found at:
/home/damianhall/Downloads/Update365/office365/Validation/submit.php
Once you’ve got it, drop the file into CyberChef. As before, we can use the Extract email addresses operation to quickly identify any email addresses embedded in the script.
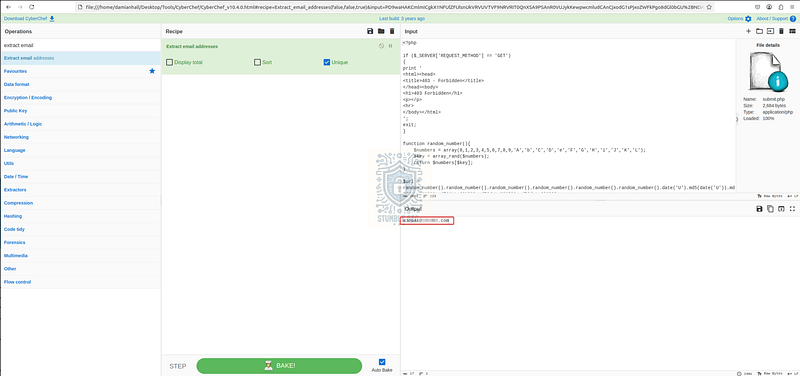 CyberChef: Extracting email addresses from submit.php
In this case, there is only a single result. This strongly suggests we’ve identified the address used by the attacker to collect the compromised credentials.

Question 11: Return to the phishing URL and locate the flag.txt file.
Using CyberChef (opens in new tab) to decode the flag, what is the secret value?
Finally, we’ve made it to the grand finale, which has us searching the phishing site for flag.txt. Since we don’t have enumeration tools like DirBuster or OWASP ZAP available in the VM, we’ll take a manual approach to hunt for the flag.
A logical starting point is to revisit the directories we already know exist, such as:
/data/data/Update365/data/Update365/office365
From there, we can try appending flag.txt to these paths.
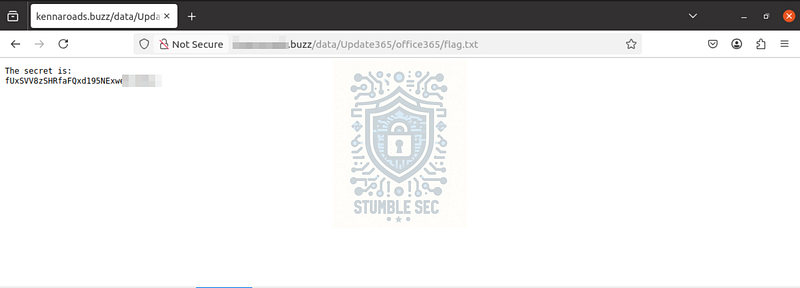 Firefox: Locating the flag.txt file through manual enumeration
Hey, that worked! We’ve found the flag. One last hurdle remains: the contents of the file appear to be obfuscated…
No problem. We just need to do some light decoding using CyberChef.
Copy the contents of flag.txt into a new input window in CyberChef and apply the From Base64 operation. This gets us closer, but the output still isn’t readable. Next, add the Reverse operation to reveal the final flag.
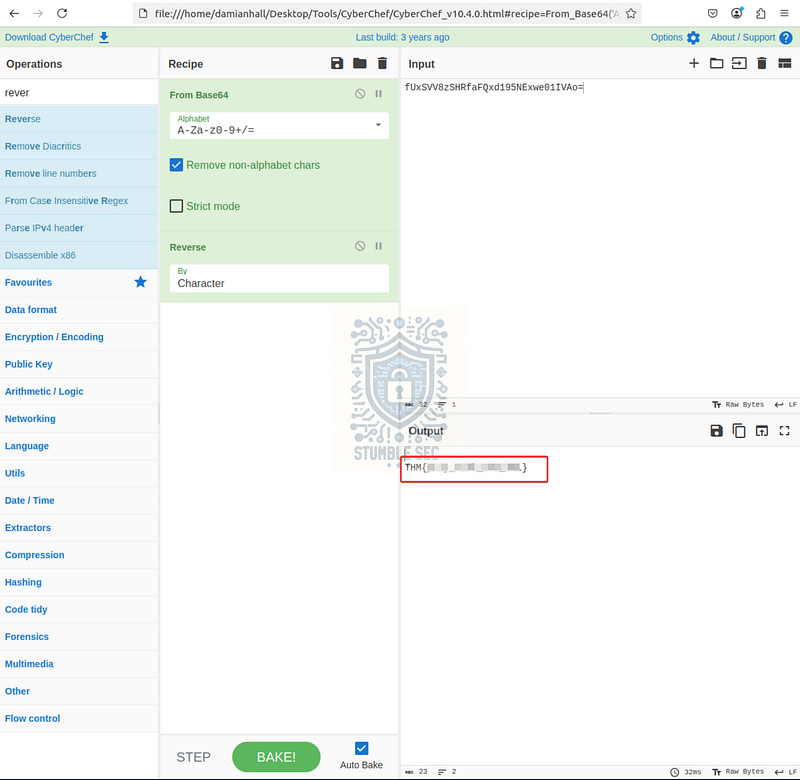 CyberChef: Decoding the obfuscated flag
Nice job! Now let’s wrap up this investigation.

Conclusion:
How fun was that! A big thank you to TryHackMe for another awesome challenge.
This investigation gave us a practical look at how phishing campaigns operate and can be triaged, from the initial email lure all the way through credential harvesting and exposed attacker infrastructure.
Along the way, we reviewed email headers, analyzed malicious attachments, identified attacker-controlled infrastructure, and even dug into a phishing kit to uncover how credentials were being collected. Each step built on the last, which made the investigation feel both structured and realistic. What I liked most about this challenge is how closely it mirrors real-world workflows and gives a small peek behind the curtains of the kit.
One of the biggest takeaways for me is how effective CyberChef can be during investigations. Even for relatively simple tasks like extracting URLs, parsing email addresses, or decoding content, CyberChef significantly speeds up analysis. Instead of manually picking through data, we’re able to quickly isolate what matters and move on to the next lead. Small efficiency gains like that add up quickly, especially in larger investigations.
Thanks for working through this investigation with me. Hopefully this walkthrough helps you get past a stumbling block or gives you a few ideas you can apply in your own analysis.
Remember, cybersecurity is a team sport, and we’re in this together! Until next week’s challenge — stay curious and be safe out there.

Tools & References:
Challenge Link: https://tryhackme.com/room/snappedphishingline
VirusTotal: https://www.virustotal.com/
CyberChef: https://gchq.github.io/CyberChef/