TryHackMe — Traverse Challenge Walkthrough
Investigating and Restoring a Compromised Web Application Using a Web Browser, OWASP ZAP, and Postman
Image Credit: https://tryhackme.com/room/traverse
Introduction:
Welcome to my weekly walkthrough! If you’ve stumbled across this blog searching for a comprehensive guide to the Traverse challenge from TryHackMe, you’re in the right spot. This challenge is a fantastic deep dive into investigating a compromised web application — let’s check out the scenario below.
Challenge Scenario:
Bob is a security engineer at a firm and works closely with the software/DevOps team to develop a tourism web application. Once the website was moved from QA to Production, the team noticed that the website was getting hacked daily and wanted to know the exact reason. Bob consulted the blue team as well but has yet to be successful. Therefore, he finally enrolled in the Software Security pathway at THM to learn if he was doing something wrong.
It sounds like we’ve got our work cut out for us to get Bob and his team back on track. But unlike Bob, we’ve already completed the Software Security pathway — and this challenge is one of its capstones, tying together all the key concepts. That means we’re well equipped to tackle this challenge. We’ll explore topics like the OWASP Top 10, SSDLC, Dynamic Application Security Testing, and more.
To accomplish this, we’ll leverage our knowledge of web applications and use tools like OWASP ZAP and Postman to complete our objectives. Sounds like fun, right? Let’s get into it!
In the spirit of learning, this write-up is spoiler-free_._ But, if you find this walkthrough helpful — whether it levels-up your skills, gets you over a stumbling block, or serves as a handy reference — please give it a clap and consider following me for more content like this.
Thanks for reading and going on this investigation with me!
Question 1: What type of encoding is used by the hackers to obfuscate the JavaScript file?
Let’s kick off this investigation by spinning up the challenge virtual machine and launching your TryHackMe AttackBox.
Our first task is to determine what encoding is used to obfuscate the JavaScript file. To do this, open the Firefox browser from the AttackBox and navigate to the URL for the challenge. Once the page loads, we’ll see that the website has been defaced with a message from the attacker — uh oh!
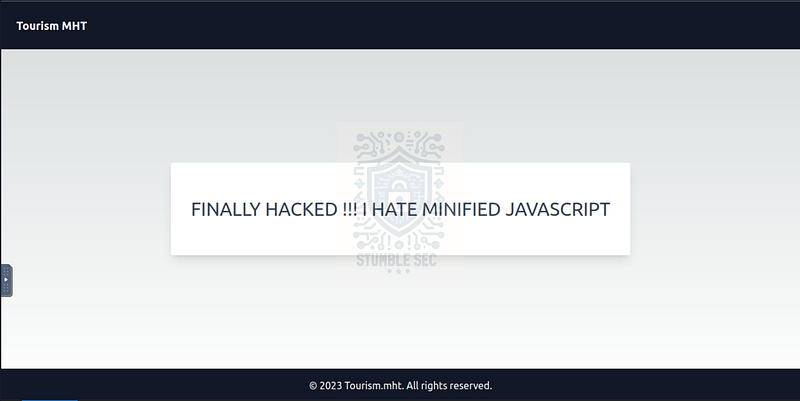
Browser: Navigating to the defaced web site
For our purposes, we’ll need to leverage the browser’s Developer Tools to identify any JavaScript files loaded by the website and see if we can find anything suspicious. First, press F12 to load up the developer tools.
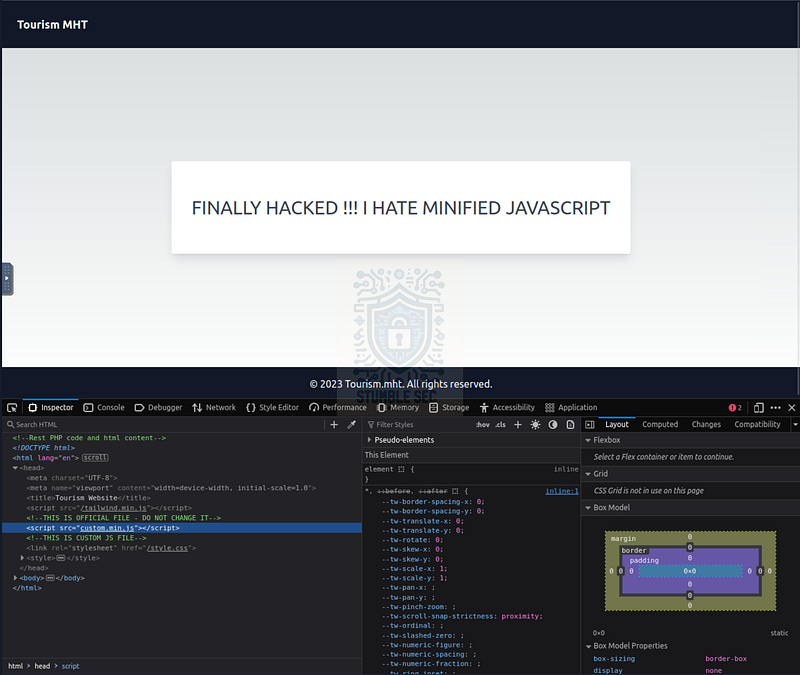
Browser: Using developer tools to identify JavaScript loaded by the page
On the Inspector tab, we’ll discover two commented JavaScript files, but the one we’re interested in is custom.min.js, indicated by the comment “THIS IS CUSTOM JS FILE.“Let’s flip over to the Network tab of the developer tools. Select the JS filter to help us quickly locate the two scripts. Then, select the custom.min.js file and click the Response tab.
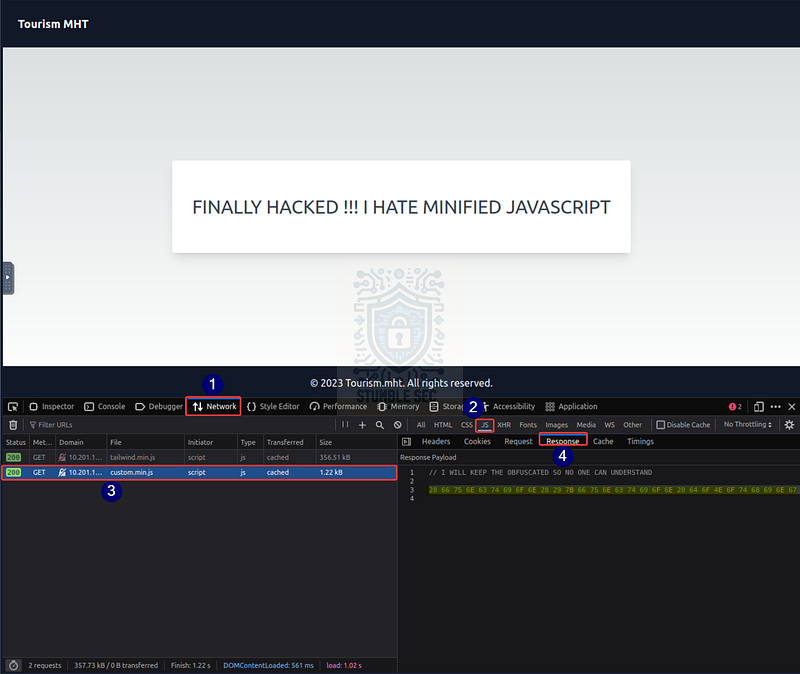
Browser: Identifying the encoded JavaScript payload
Within the response payload, we can see a suspicious comment likely left by the attacker. Right below it, we see that the payload is obfuscated. Based on the format, we can determine the encoding.
Since this walkthrough doesn’t contain spoilers, you’ll have to figure out which common encoding method is used on your own. We’ll confirm this in Question 2 once we start decoding operations.

Question 2: What is the flag value after deobfuscating the file?
Now that we’ve identified the encoded payload, our next objective is to decode it and uncover the flag hidden within. We can accomplish this by leveraging CyberChef, which is conveniently bookmarked in the AttackBox’s Firefox browser.
After opening CyberChef, paste the encoded payload into the input window. Since we already know the type of encoding from Question 1, we’ll need to add the “From [Redacted]” operation to the recipe.
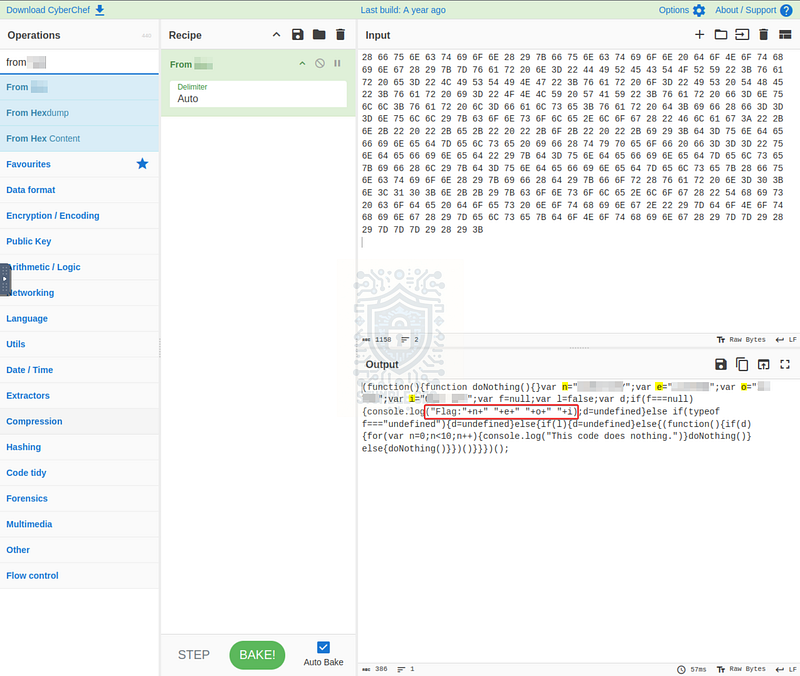
CyberChef: Decoding the JavaScript payload
Once the operation completes, look for a function resembling ("Flag: "+n+" "+e+" "+o+" "+i). This is our clue. All we need to do now is refer to the variables n, e, o, and i. Each one is assigned a dictionary word. When we combine them, we get the flag — and a hint to continue our investigation.

Question 3: Logging is an important aspect. What is the name of the file containing email dumps?
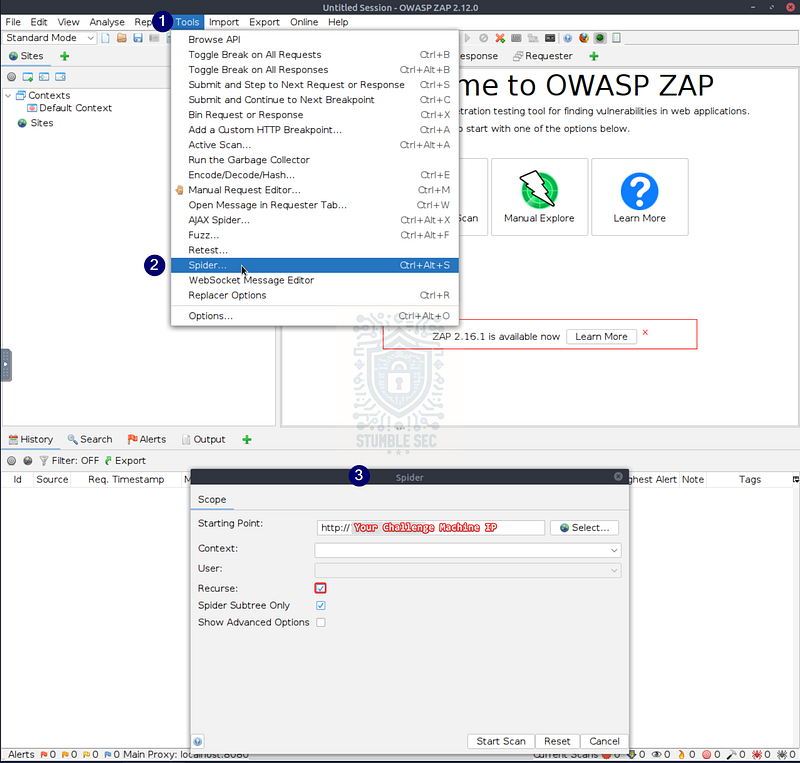
To answer Question 3, we need to map any additional URLs on the compromised web application — specifically any resource that could contain email dumps.
For this challenge, we’ll leverage the Spider capabilities of the OWASP ZAP tool**,** which was covered in the Dynamic Application Security Testing room of the Software Security module. For context, according to the ZAP documentation, the Spider is:
A tool that is used to automatically discover new resources (URLs) on a particular Site. It begins with a list of URLs to visit, called the seeds, which depends on how the Spider is started. The Spider then visits these URLs, it identifies all the hyperlinks in the page and adds them to the list of URLs to visit and the process continues recursively as long as new resources are found.
So, the idea is that by leveraging the Spider, we can automatically discover new resources and not have to manually hunt through the browser — awesome! Let’s try it out.
First, press the Tools menu and select Spider. Once the Spider’s Scope window opens, add your Challenge Machine IP to the starting point field, tick the recurse option, and press Start Scan.
ZAP: Configuring the Spider
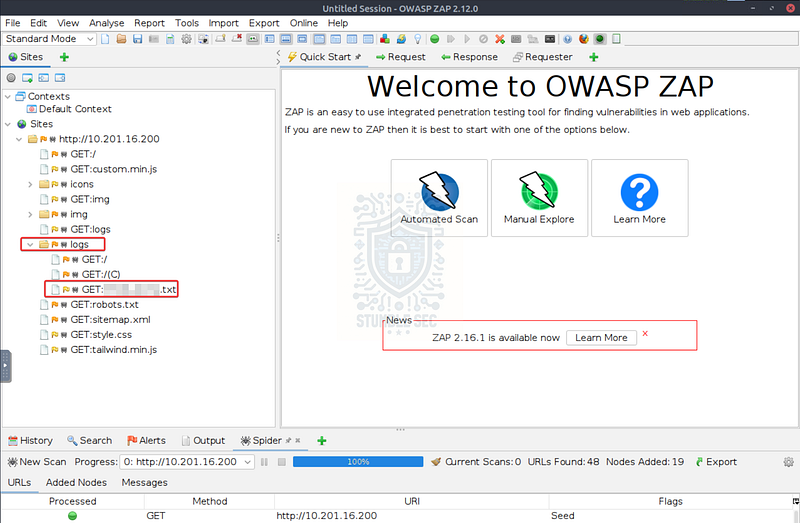
Once the enumeration finishes, we’ll be able to see all the discovered resources in the left-hand column. Since we’re looking specifically for logs, expand the logs node. Notice the .txt file? This is the file containing the email dumps that we’re searching for.
By using ZAP’s Spider capability, we’ve quickly identified this file.
ZAP: Reviewing the Spider results

Question 4: The logs folder contains email logs and has a message for the software team lead. What is the name of the directory that Bob has created?
Now that we’ve discovered the URL of the email logs, we can right-click the entry from ZAP and select “Open URL in Browser.” This will open the resource in your web browser so we can read the contents.
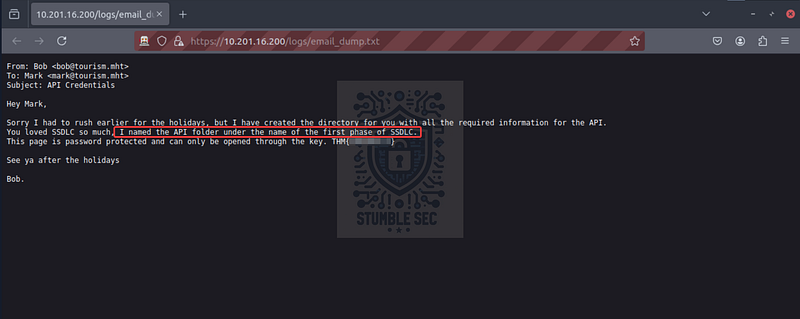
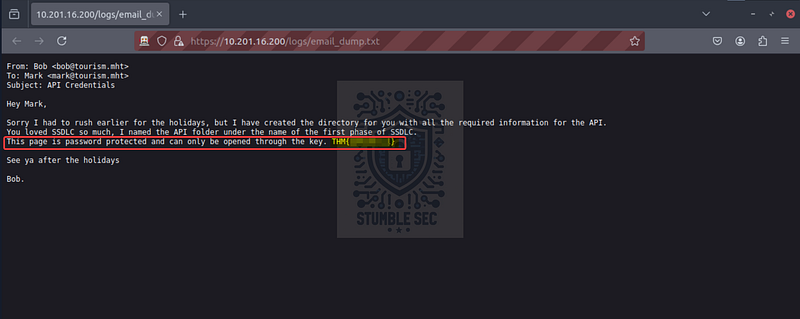
Browser: The contents of email_dump.txt
Inside email_dump.txt, we’ll find a message from Bob sent to Mark, the software team lead. It contains a clue pointing to the location of a directory Bob created. He mentions: “I named the API folder under the name of the first phase of the SSDLC.“So, what is the first phase of the SSDLC? This was covered in the SSDLC room of the TryHackMe Software Security module. We just need to refer back to the Phases of Secure Software Development Life Cycle diagram to determine the name of the folder Bob created, containing the API documentation.
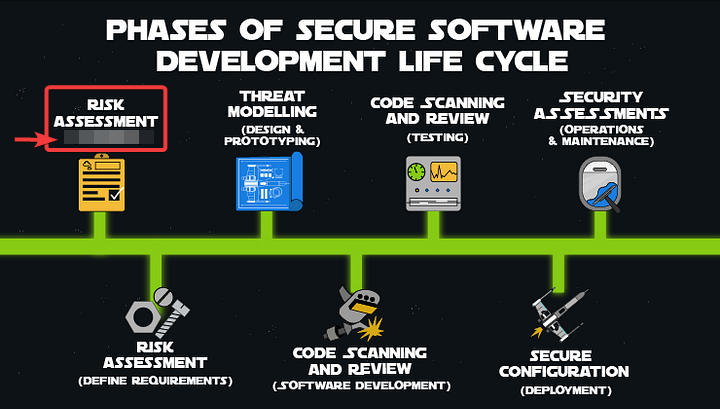
Image Credit: https://tryhackme.com/room/securesdlc

Question 5: What is the key file for opening the directory that Bob has created for Mark?
Another handy clue that Bob left for Mark in his email is the key to accessing the page contents — thanks, Bob!
Browser: Identifying the password in email_dump.txt
Our next task is to use this password to access the API documentation. Let’s check it out!

Question 6: What is the email address for ID 5 using the leaked API endpoint?
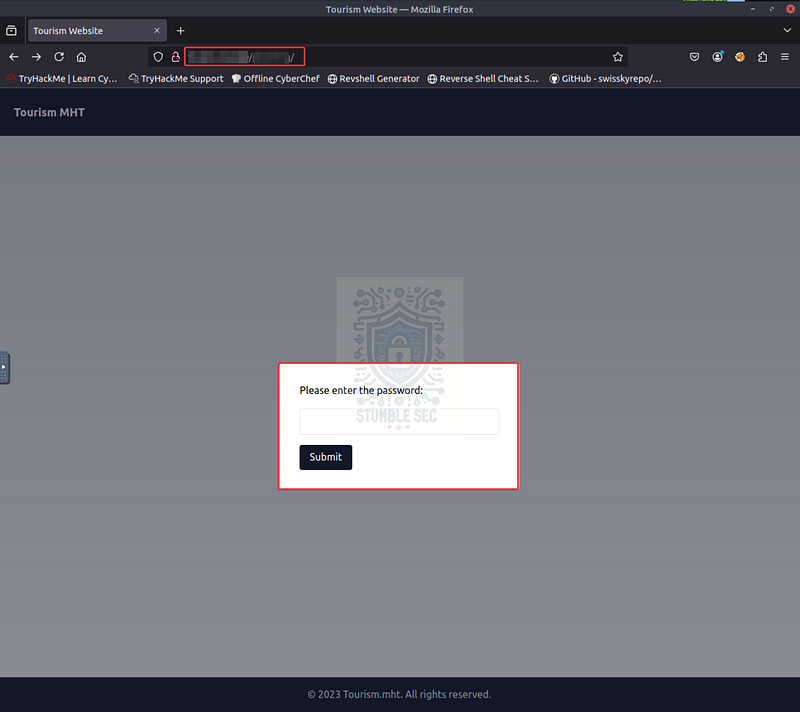
Now that we’ve identified the URL and key to access the API documentation in the last two questions, let’s navigate to it in the browser:
http://
Upon accessing the page, we’ll be challenged for a password — this is where we can use the credential we found in Question 5.
Browser: Accessing the API Documentation
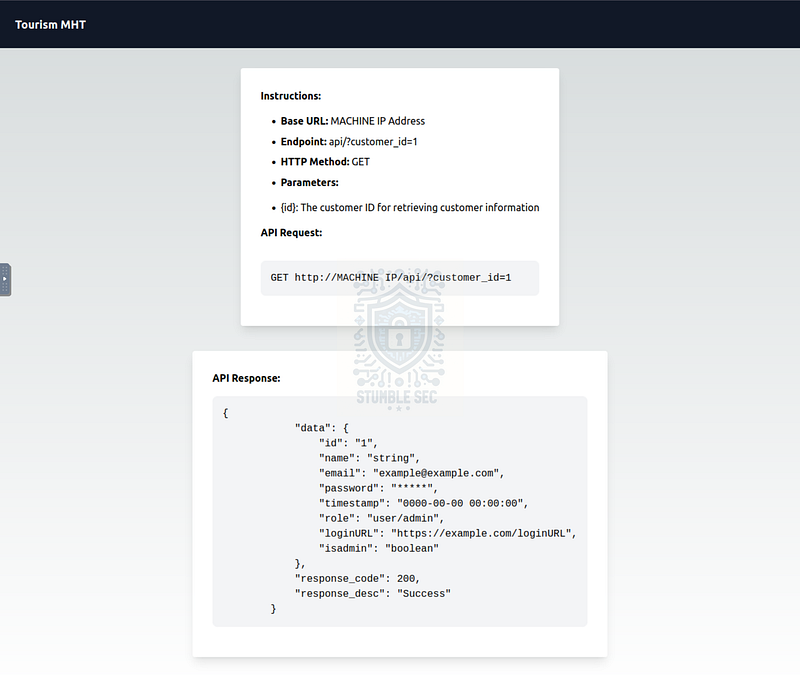
Now that we’ve accessed the page, we can check out the API documentation, which gives us detailed instructions on how to query specific customers by ID — awesome!
Browser: Accessing the API documentation
So, we have API documentation, but how do we actually query these customer IDs? For this task, we’ll switch to the application Postman, an all-in-one API platform. Postman is pre-installed on the THM AttackBox, with a shortcut located in /root/Desktop/Tools/Web.
Go ahead and open Postman. Here’s how we’ll build our query using Bob’s API documentation as a reference:
- Set the HTTP Method to
GET - Input the URL of your challenge machine:
http://<YOUR CHALLENGE IP>/api - Set the Query Parameters:
KEY = customer_idVALUE = 5
- Press
Send
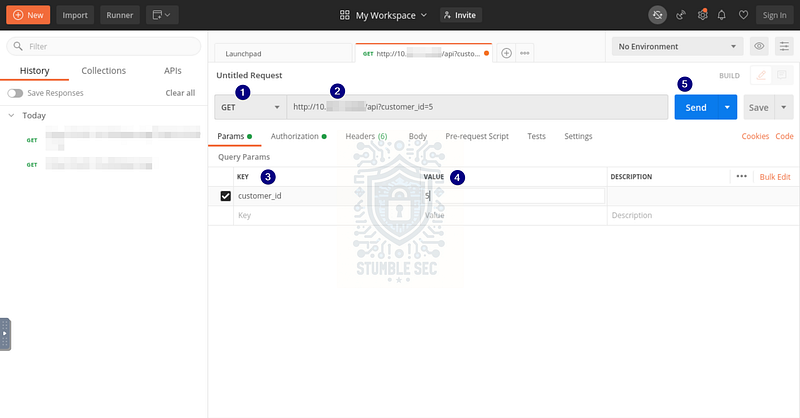
Postman: Building the API query
This will create a request that matches the requirements of the API documentation and allows us to query the web app for a customer ID of 5. Press Send to send the request.
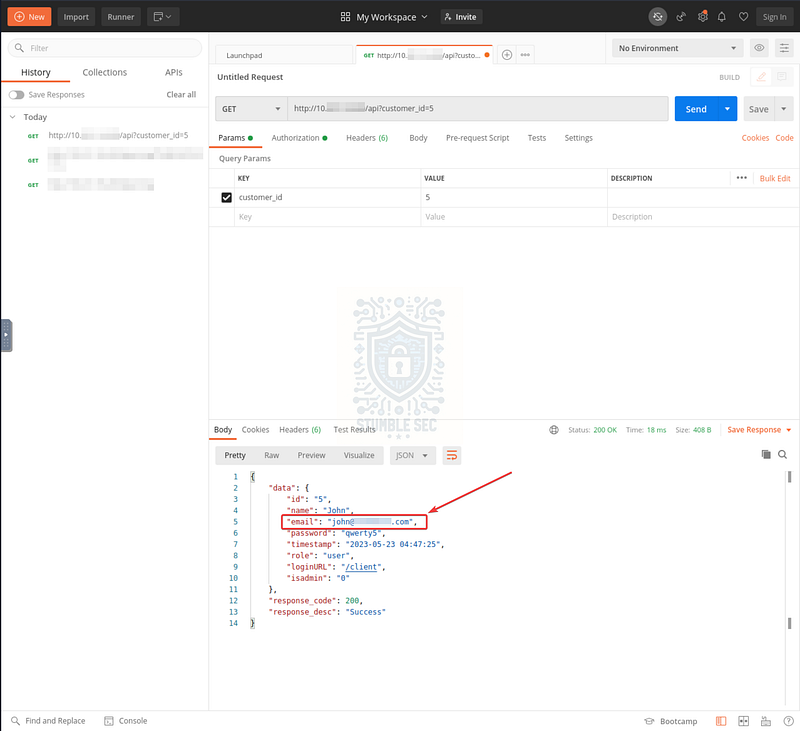
Postman: Identifying the email address of user ID 5
This will return the data for the user with ID 5, John, including his email address, which we need to answer Question 6.

Questions 7 & 8:
What is the ID for the user with admin privileges?
What is the endpoint for logging in as the admin? Mention the last endpoint instead of the URL. For example, if the answer is URL is tryhackme.com/admin — Just write /admin.
To answer Questions 7 & 8, we’ll need to first identify a user with the admin role, and then locate the login endpoint used to access administrative functions. We already know that John (a regular user) is ID 5, so we’ll start by changing the query VALUE and checking lower numbers like 1, 2, 3, 4, etc.
Eventually, our manual enumeration efforts pay off and we stumble upon the ID related to the admin role.
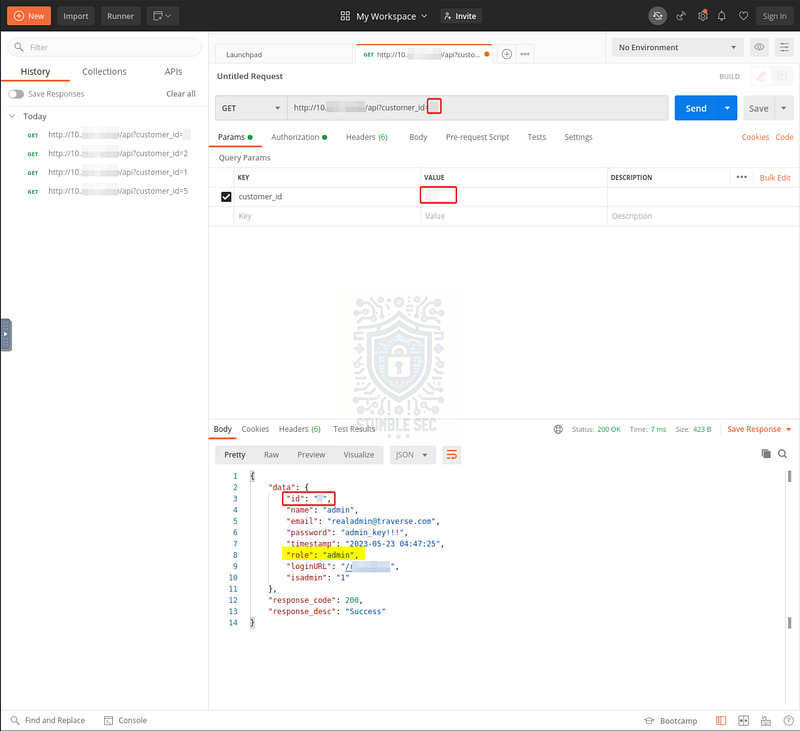
Postman: Identifying the admin user
Not only did we discover the admin user with our query, but we also uncovered the login endpoint used to access the administrative functions of the web app.

These are good reminders of how easily sensitive information can be disclosed without proper access controls. Lock it down!


Questions 9 & 10:
The attacker uploaded a web shell and renamed a file used for managing the server. Can you find the name of the web shell that the attacker has uploaded?
What is the name of the file renamed by the attacker for managing the web server?
For our next two tasks, we’re going to leverage the exposed credentials and login endpoint we found in Questions 7 & 8 to access the admin page through the browser.
Use your browser to connect to the endpoint and input the credentials when prompted.
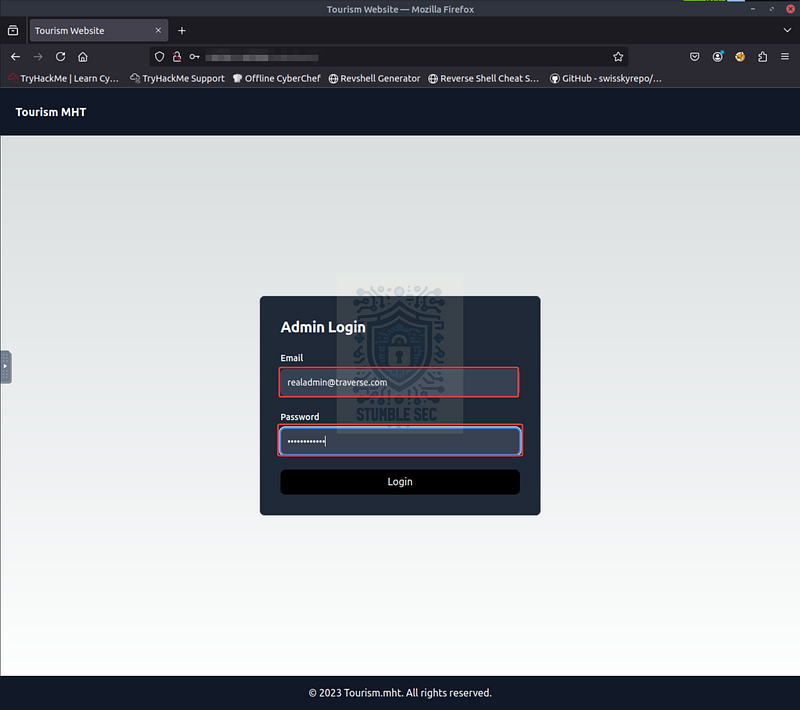
Browser: Accessing the admin login endpoint
Once we’ve gained access to the Admin Page, we’ll see that we have the ability to execute commands on the underlying server. For example, we have the Current Directory and System Owner commands. Executing each of them seems to trigger different system-level commands: pwd lists the current directory, and whoami lists the current user.
But what if there’s a way to execute additional commands from this same admin page?
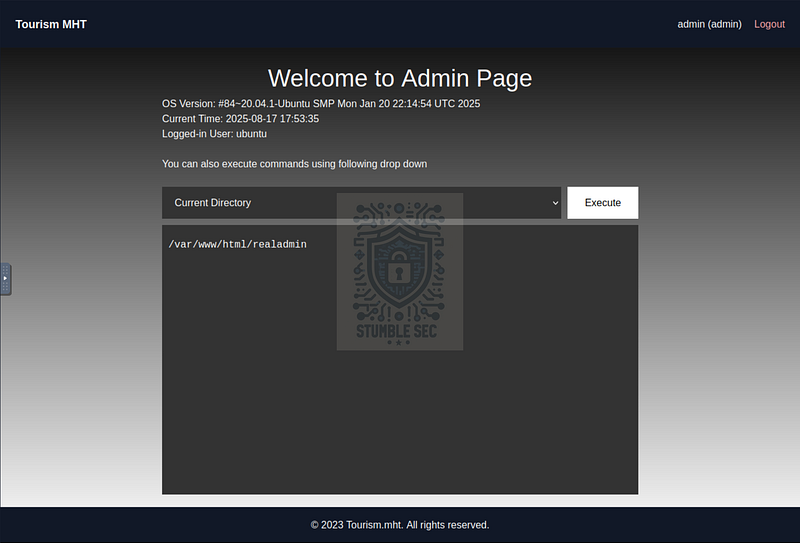
Browser: The Admin Page command execution interface
Let’s press F12 to open the browser’s developer tools again. This time, we’ll inspect the command input field. Notice anything interesting?
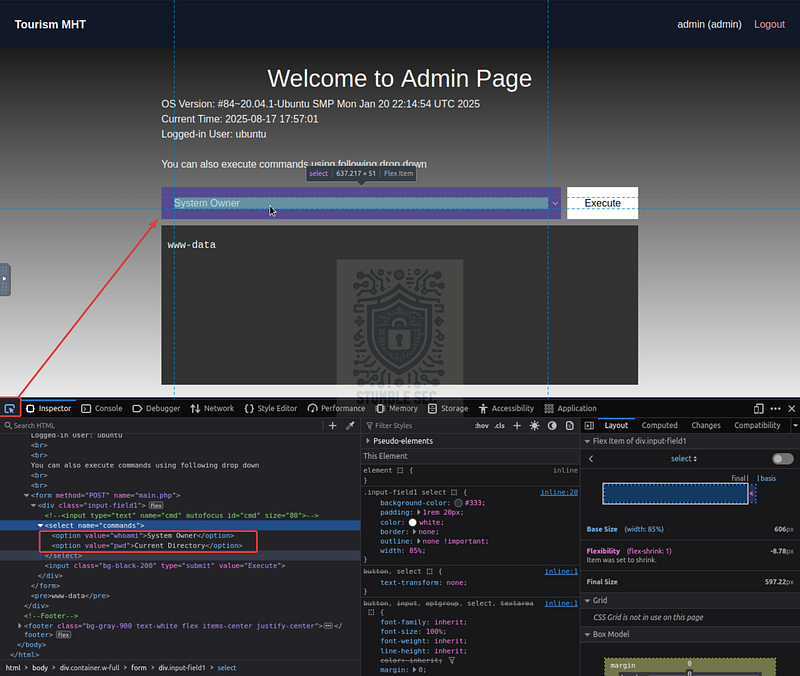
Browser: Inspecting the command execution elements
We can see that our theory was correct. The two available commands are simply executing whoami and pwd on the web server’s operating system. Let’s test if this field is vulnerable to command injection by adding an additional command.
To do this, right-click the <select name="commands"> tag and edit the HTML to add another command to list the contents of the current directory. For this example, we’ll use ls -la — who knows, maybe we’ll find the web shell.
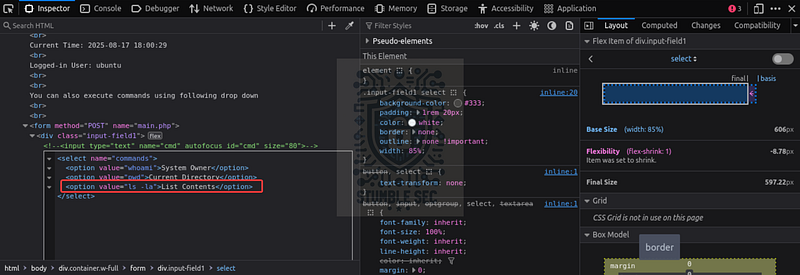
Browser: HTML Manipulation
Now that we’ve edited the HTML on the client side, let’s execute our new List Contents command.
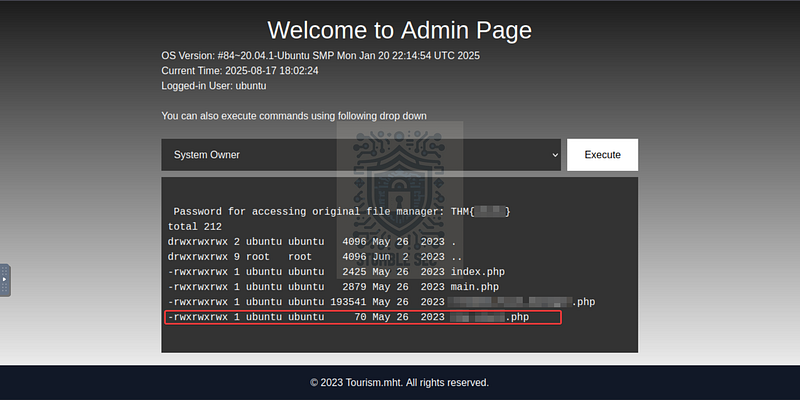
Bingo! By executing this command, we’ve successfully revealed the web server’s directory contents and uncovered some very valuable information, including the two file names we need to answer Questions 9 & 10. This confirms that the web application is vulnerable to command injection.
For additional context on this technique, check out the OWASP Top 10:2021 page. Here’s a quote from the TryHackMe OWASP Top 10–2021 room:
OWASP Top 10: 2021 — A04 — Command Injection: This occurs when user input is passed to system commands. As a result, an attacker can execute arbitrary system commands on application servers, potentially allowing them to access users’ systems.

Question 11: Can you use the file manager to restore the original website by removing the “FINALLY HACKED” message? What is the flag value after restoring the main website?
We’ve made it to our final objective — restoring the website to its original state before the hack. The cool part is that this task builds directly off the information we uncovered in Question 10 — specifically, the filename of the original file manager for this web app.
Navigate to the renamed URL from Question 10 to access the file manager. We’ll also need the password, which we also discovered after listing the web server contents with our ls -la command. This will allow us to log in and begin restoring the site.
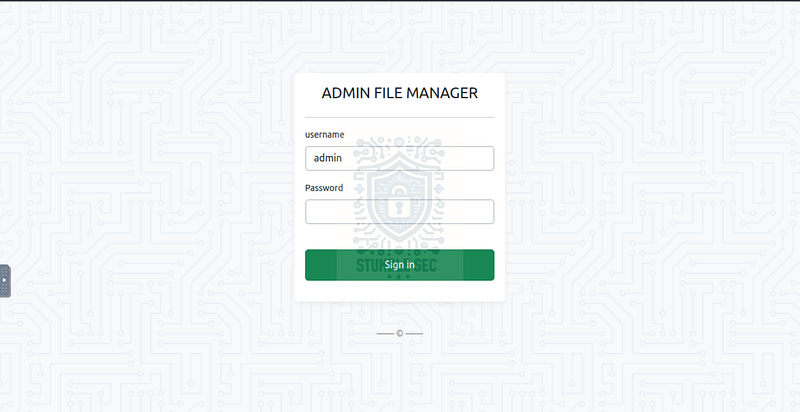
Browser: The Admin File Manager login page
Once inside the file manager, locate and open the index.php file with the Edit action.
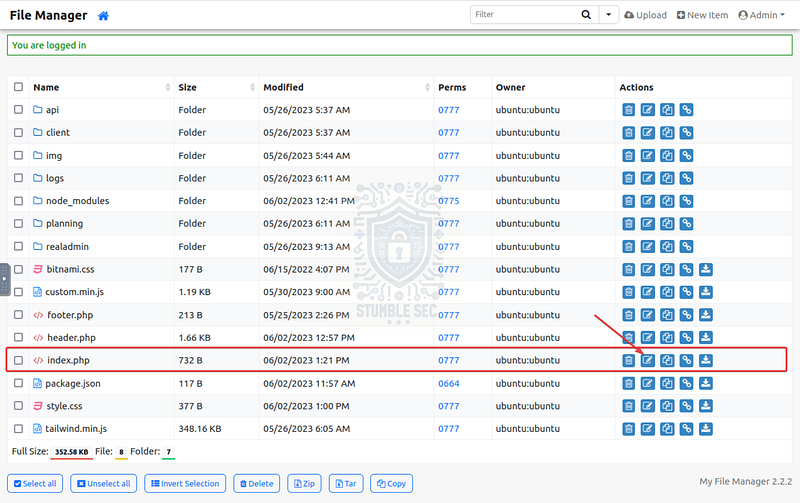
File Manager: Identifying the index.php file
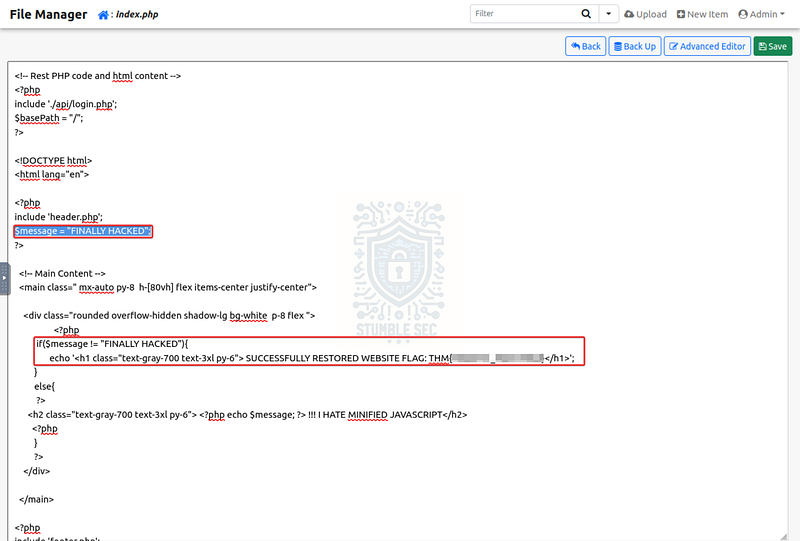
Inside the editor, we’ll see the message header “FINALLY HACKED.” Looking further down the PHP code, there’s a condition: if the $message variable does not equal “FINALLY HACKED”, the final flag will be displayed.
Let’s go ahead and remove the $message variable, save the file, and reload the web app’s home page.
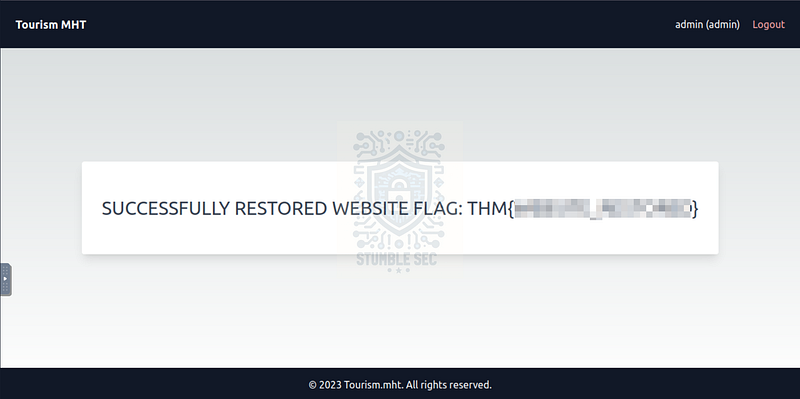
With the defacement removed, we’re rewarded with the final flag on the restored website. Great job! Now let’s wrap up this challenge.

Conclusion:
How fun was that! A big thank you to TryHackMe for another awesome challenge.
This challenge was a great capstone for the Software Security module and tied together so many concepts covered in the content. It offered a realistic example of how layered vulnerabilities like exposed credentials, weak access controls, and command injection can compound into full web server compromise.
As we moved through the investigation, we not only followed the attacker’s trail but also restored the integrity of the web application. Of course, this is only a short-term fix, and Bob definitely has his work cut out for him to get this app properly locked down.
I chose this week’s challenge to start wrapping up the Security Engineer path and get some hands-on practice investigating compromised web applications while testing my knowledge of the Software Security modules. It was a rewarding experience as each question segued perfectly into the next, and the investigation felt linear and logical. As an added bonus, I’ve been using Postman more in my day job, so getting extra reps in was a real plus. Great stuff!
Thanks for your support and partnering on this investigation. If you found this walkthrough helpful, don’t forget to give it a clap! Your feedback really is invaluable, and it pumps me up to support your security journey. Remember, Cybersecurity is a team sport and we’re in this together!
Until next week’s challenge — stay curious and be safe out there!

Tools & References:
Challenge Link: https://tryhackme.com/room/traverse
CyberChef: https://gchq.github.io/CyberChef/
ZAP Proxy Documentation — Spider: https://www.zaproxy.org/docs/desktop/addons/spider/
Postman: https://www.postman.com/
OWASP Top 10 — A03 — Injection: https://owasp.org/Top10/A03_2021-Injection/