TryHackMe — Warzone 1 Room Walkthrough
A Network Packet Capture Investigation Using Brim/Zui, Wireshark, and VirusTotal.

Image Credit: https://tryhackme.com/room/warzoneone
Introduction:
Welcome to my weekly walkthrough! If you’ve stumbled across this blog searching for a comprehensive guide to the Warzone 1 room from TryHackMe, you’re in the right place. This challenge is a fantastic introduction to forensic network packet analysis — let’s check out the scenario below.
Challenge Scenario:
You work as a Tier 1 Security Analyst L1 for a Managed Security Service Provider (MSSP). Today you’re tasked with monitoring network alerts.
A few minutes into your shift, you get your first network case: Potentially Bad Traffic and Malware Command and Control Activity detected. Your race against the clock starts. Inspect the PCAP and retrieve the artifacts to confirm this alert is a true positive.
In this challenge, we’re stepping into the shoes of a Security Analyst at an MSSP, monitoring network traffic alerts for one of our customers when suddenly, an alert fires from their IDS/IPS — Uh-Oh! We collect a network packet capture file, or PCAP, and need to quickly determine if this is a true positive alert by analyzing the artifacts within the traffic.
Okay, deep breaths — what’s in our toolkit for this investigation? We’ll be busting out a couple of essential network packet analysis tools including Brim (now called ZUI) to process, search, and analyze the PCAP, and then pivoting to Wireshark for deep packet inspection. We’ll also enrich our findings by consulting VirusTotal to add context to any indicators of compromise (IOCs) we discover.
Sounds like fun, right? Let’s get into it!
In the spirit of learning, this walkthrough will be spoiler-free. But if you find it helpful — whether it levels-up your skills, gets you over a stumbling block, or serves as a handy reference — please give it a clap and consider following me for more content like this.
Thanks for reading and going on this investigation with me!
Question 1: What was the alert signature for Malware Command and Control Activity Detected?
Once in our analysis environment, let’s get acquainted with our toolset so we can start forming a plan. You’ll find everything we need in the Tools folder on the Desktop.
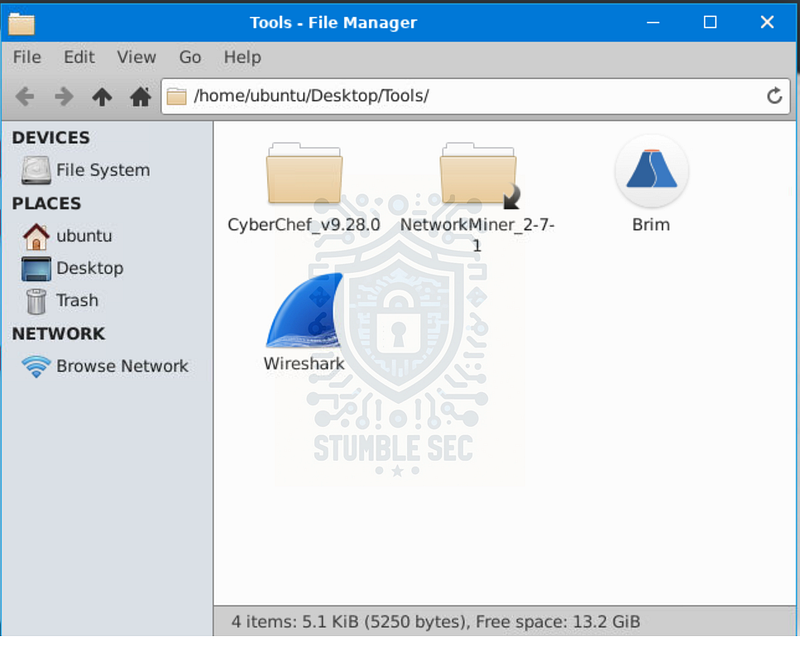
Contents of the Tools folder
To answer Question 1, we’re searching for an alert signature. So, our first stop will be to use Brim (now called Zui) because it has the ability to use Suricata intrusion detection rules to help quickly identify threats or malicious traffic within the packet capture.
Go ahead and launch it — and speaking of packet captures, once Brim is open, load the challenge file Zone1.pcap , and wait for it to process the capture file.
Once the file is loaded, let’s get an overview of the Suricata rule hits detected in the network traffic. Select the Zone1.pcap file, click Suricata Alerts by Category under the Queries header, and review the displayed alert categories.

Brim: Overview of Suricata Alerts by Category
We’re going to focus on Malware Command and Control Activity Detected since that’s what the question is asking about. Our next step is to find the alert signature for this category.
To do this, right-click the Malware Command and Control Activity Detected row and select New search with this value.
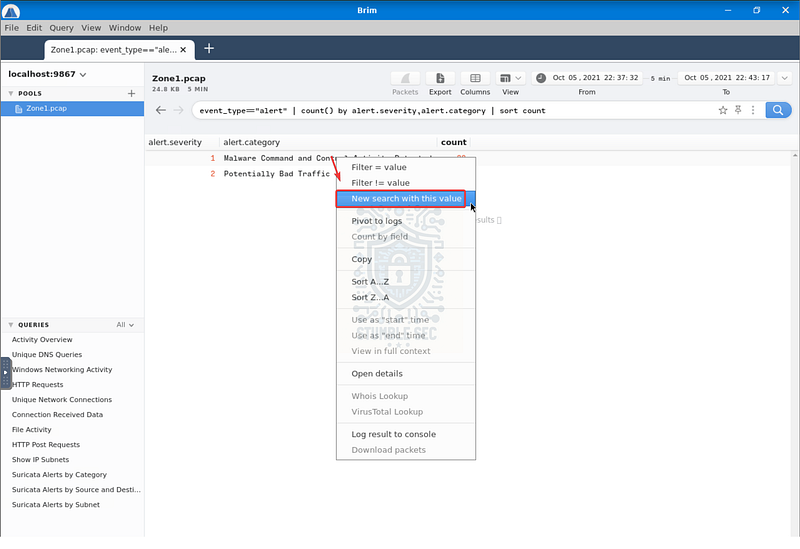
Brim: Selecting New search with the Malware Command and Control value.
This selection adjusts the query to display packets matching the Suricata rule — and more importantly, it reveals the details we need to answer Question 1 under the alert.signature column.
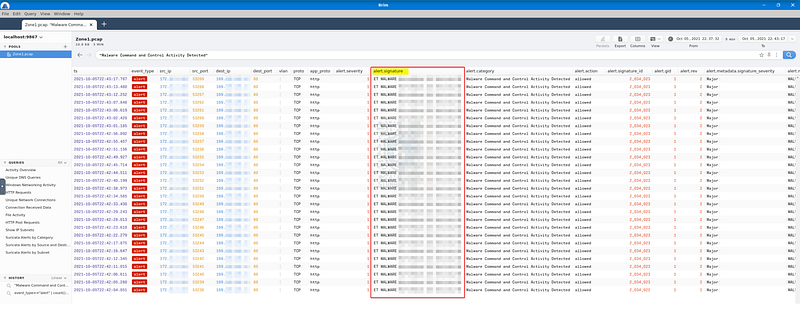
Brim: Identifying the alert signature.

Question 2: What is the source IP address? Enter your answer in a defanged format.
To answer Question 2, we need to determine the source IP address of the malware traffic. Fortunately, we can continue working in the same view we used in Question 1, this time focusing on the src_ip column, which contains — you guessed it, the source IP address.
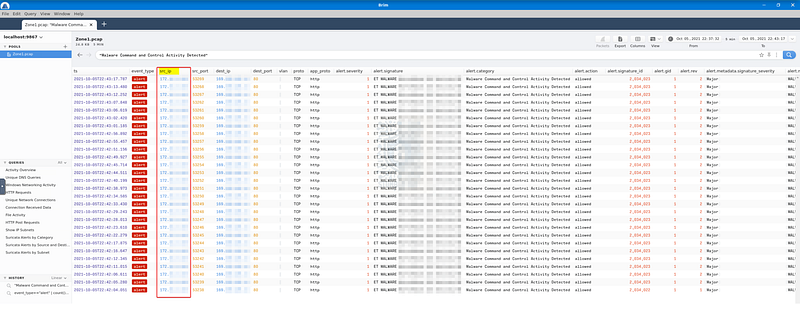
Brim: Identifying the source IP address of the malicious traffic
But before we can submit the answer, we need to defang the IP address. This is a common practice to ensure that malicious IPs and URLs aren’t accidentally clicked. While this is easy to do manually, let’s work a little smarter and use CyberChef for the task.
The offline version of CyberChef is included in the Tools folder, but the online version works just as well. To defang the source IP address:
- Open CyberChef.
- Select the Defang IP Addresses operation.
- Paste the source IP address into the Input field.
And voilà — we have the defanged IP address.
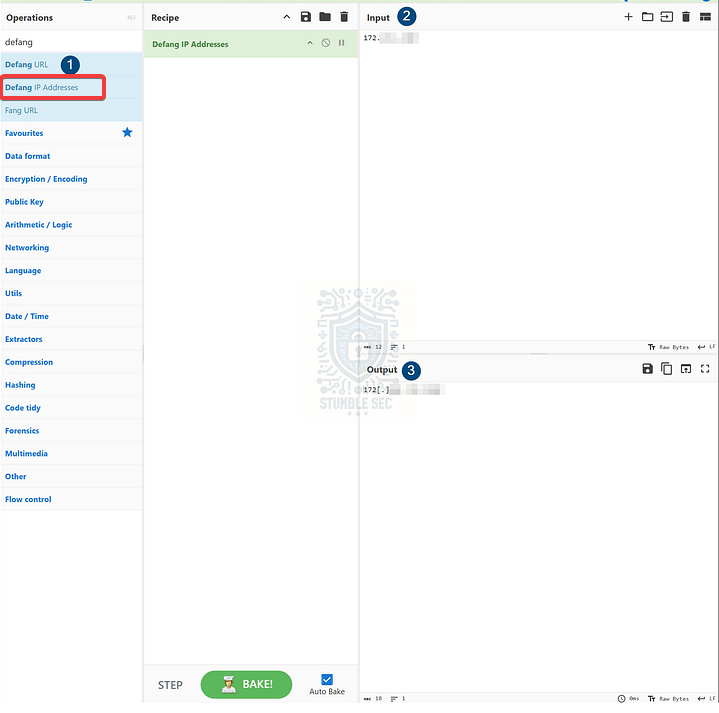
CyberChef: Defanging an IP address

Question 3: What IP address was the destination IP in the alert? Enter your answer in a defanged format.
To answer Question 3, we need to identify and defang the destination IP address of the malicious traffic. This process is exactly the same as in Question 2, except this time we’ll focus on the dest_ip column.
Once you’ve located the destination IP, open CyberChef, select the Defang IP Addresses operation, and paste the IP into the Input field to generate the defanged version.
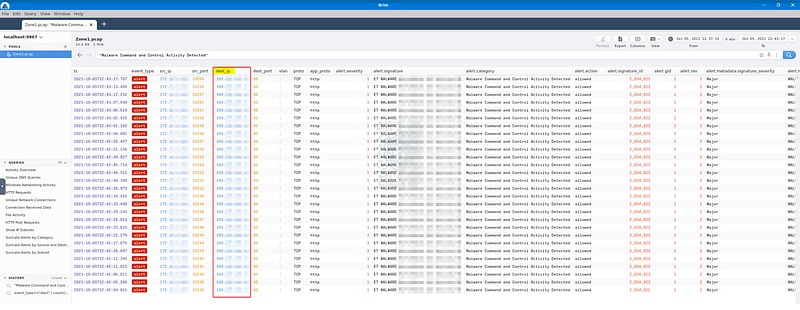
Brim: Identifying the destination IP address of the malicious traffic

Question 4: Still in VirusTotal, under Community, what threat group is attributed to this IP address?
The phrasing for Question 4 is a bit misleading. To uncover what threat group is attributed to the destination IP address we found in Question 3, we need to pivot out to VirusTotal, an online threat analysis and sharing platform, to look up more information from the community.
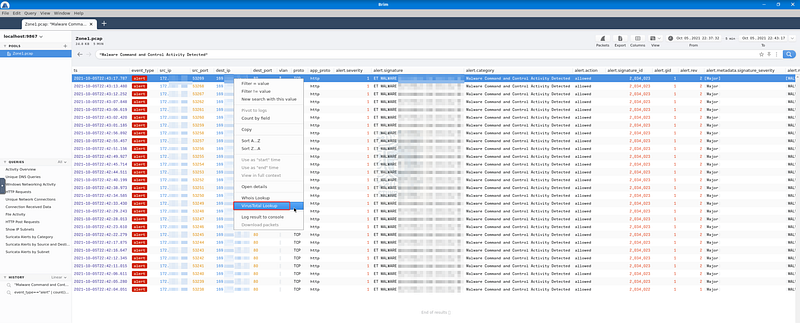
Brim: Performing a VirusTotal lookup
In a real-world scenario, some versions of Brim support right-click context menu integrations that allow you to pivot directly to VirusTotal for IP lookups. Since the THM analysis environment doesn’t have open web access, we can’t get to VirusTotal this way. Instead, we’ll copy the destination IP and navigate to VirusTotal in another web browser. Then, paste the IP into the search field.
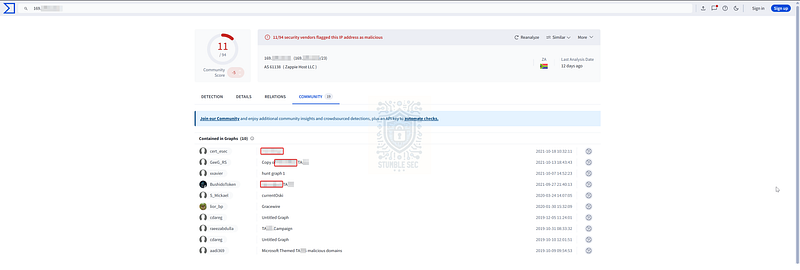
Once we’ve input the IP address, we’ll see that several providers flag it as malicious. Let’s turn to the Community tab to see if we can learn anything about the threat group attributed to this IP.
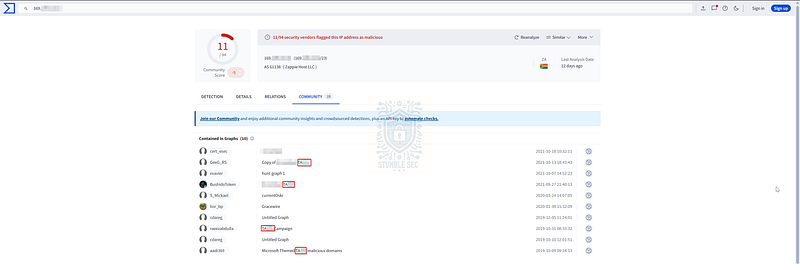
VirusTotal: Searching the malicious destination IP address
We’ll find that several community graphs include this IP address, and some mention a specific threat actor. Look for the tag with the TA prefix—this is the group we’re looking for. If you want more information about this threat group, check out the corresponding entry on MITRE ATT&CK: https://attack.mitre.org/groups/G0092/

Question 5: What is the malware family?
To answer Question 5, we now need to identify the name of the malware leveraged by the threat group. You may have already noticed the malware name in the alert.signature field from the Suricata alert in Brim, but we can cross-reference this by reviewing and confirming the VirusTotal community graph tags—nice!
VirusTotal: Identifying the malware family

Question 6: Do a search in VirusTotal for the domain from question 4. What was the majority file type listed under Communicating Files?
Question 6 is a bit confusing, since it seems like there is a missing step in the challenge. So far, we haven’t located a domain — only an IP address. That’s okay, though, we’ll adapt and try another approach.
Within our VirusTotal search page for the malicious IP address, navigate to the Relations tab and look at the Communicating Files section.
The question is tricky because the majority file type is Win32 EXE, but the expected answer format seems to match another communicating file type — this is the one we’re looking for. Not the most precise way of answering this, but it got the job done!
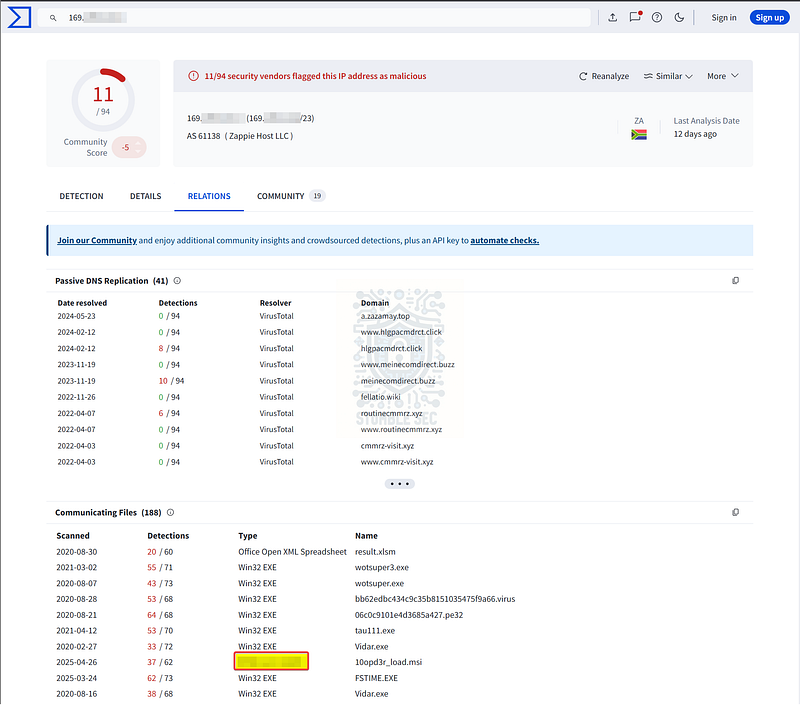
VirusTotal: Identifying communicating file types

Question 7: Inspect the web traffic for the flagged IP address; what is the user-agent in the traffic?
Okay, let’s return to Brim. Our next task is to search for the malicious destination IP we’ve been examining. To do this, enter the IP address into the search box and press ENTER.
There’s a lot of information to sift through, but let’s focus on the first three events — they contain all the data we’ll need.

Brim: Identifying a suspicious user agent in the traffic
Notice the second alert type for Suspicious User-Agent (REBOL)? Take a closer look at the following http event (the third entry)—we’ll find that this packet contains the suspicious user_agent string.
For reference, user agent strings are used to identify the client connecting to a web server and can help determine more information about the source of the traffic.

Question 8: Retrace the attack; there were multiple IP addresses associated with this attack. What were two other IP addresses? Enter the IP addressed defanged and in numerical order. (format: IPADDR,IPADDR)
For our next task, we’ll need to identify additional IP addresses associated with the attack, defang them, and submit them in numerical order. No problem!
The first step is to leverage Brim’s built-in HTTP Requests query from the Queries pane on the left-hand side of the window. This will filter individual http requests. From there, we’ll focus on the id.resp_h column, which represents the IP address of the external server that responded to each request. While the majority of the traffic is directed to the IP address we previously identified, a closer look toward the bottom of the list reveals a few new entries for us to analyze.
Brim: Identifying the additional IOCs
Searching each of these IPs on VirusTotal, and checking the Community tab again, we’ll discover that some of them are linked to the same malware family we identified back in Question 5. Give it a try! If you get stuck, I’ve included some spoiler links below.
VirusTotal VirusTotalwww.virustotal.com
VirusTotal VirusTotalwww.virustotal.com
Once we’ve confirmed the related IPs, we can jump over to CyberChef to defang them. Just remember when submitting your answer, the IPs must be in numerical order, with the lowest value first.

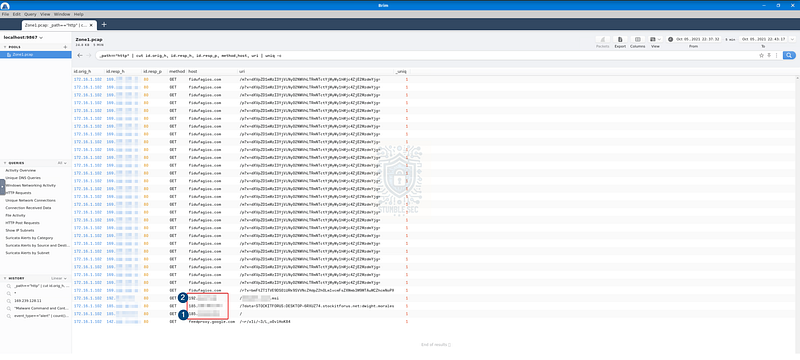
Question 9: What were the file names of the downloaded files? Enter the answer in the order to the IP addresses from the previous question. (format: file.xyz,file.xyz)
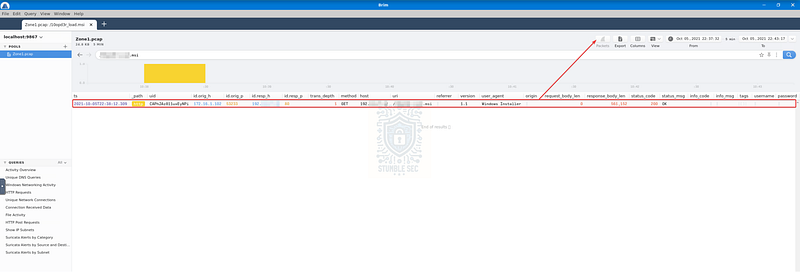
Keeping with our currently filtered HTTP Requests view in Brim, we can already identify the URI associated with the downloaded MSI file from the second IP address — jot this down, since it’ll be the second one listed in the answer format.
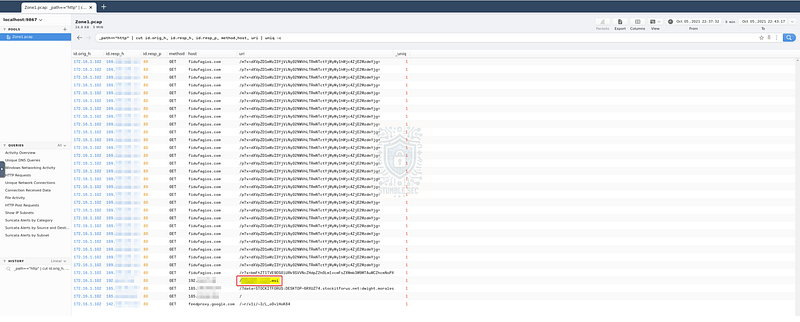
Brim: Identifying the file downloaded from the second IP address
To identify the “first” file, let’s pivot to another built-in Brim query: the File Activity query. This gives us a broader view of file-related events and helps us spot another MSI file downloaded from the first IP address we found in Question 8.
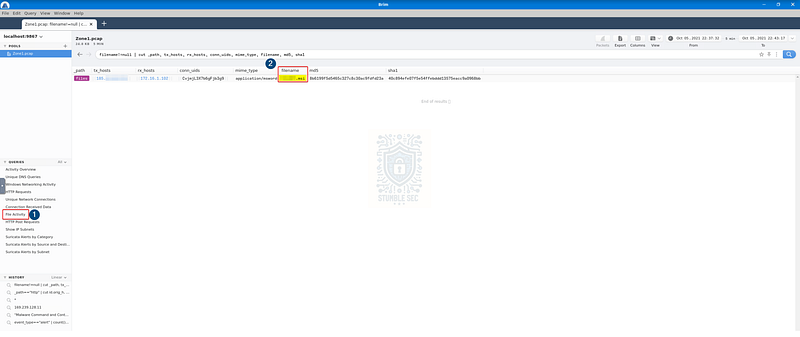
Brim: Identifying the downloaded file from the first IP address
Now that we’ve located both files, we can combine them to form our answer — just make sure to list them in the same order as the IPs from the previous question.

Question 10: Inspect the traffic for the first downloaded file from the previous question. Two files will be saved to the same directory. What is the full file path of the directory and the name of the two files? (format: C:\path\file.xyz,C:\path\file.xyz)
Now that we’ve identified two suspicious downloaded files, we need to determine where the artifacts were saved on disk. The question tells us there are two additional files saved in the same directory — but how do we discover this?
For this task, stick with our current Brim filter, then click the Packets button just above the search box to open the associated pcap in Wireshark. This will load the packets related to the file download from the first IP address — the one listed first in the answer to Question 9. Our goal is to review the TCP stream and look for clues about the download path and any other files written to the same location.

Brim: Pivoting from Brim to Wireshark
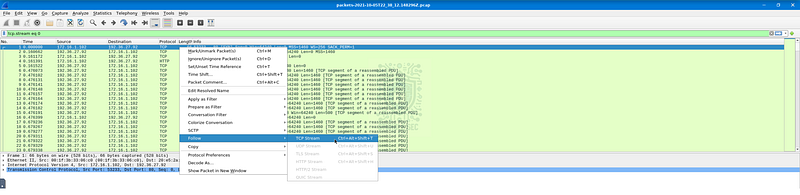
Once Wireshark is open, right-click the first packet in the list and select Follow > TCP Stream.
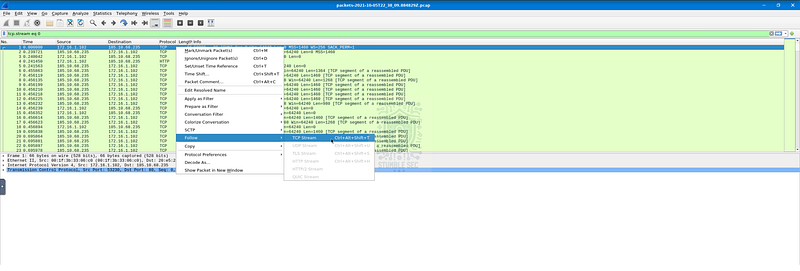
Wireshark: Opening the TCP Stream
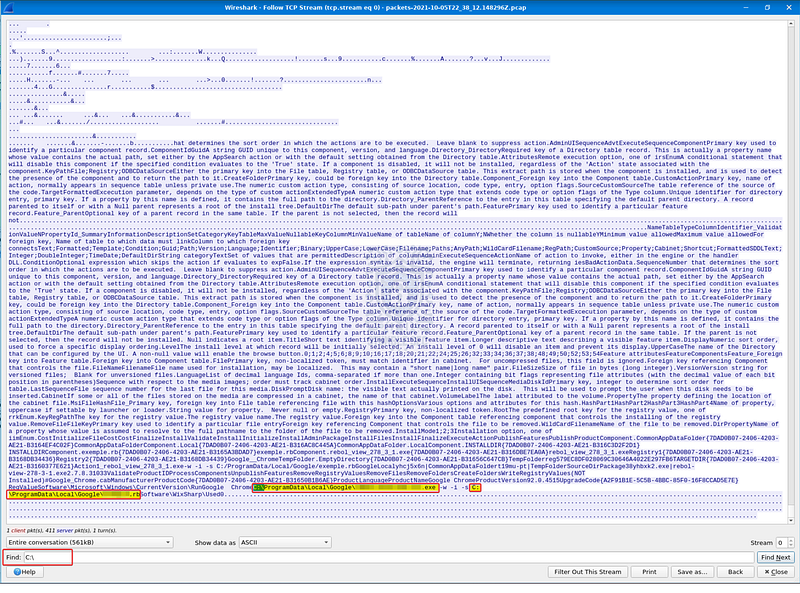
While there’s a lot of data to sift through, we can work a little smarter by using the find box to search for the common Windows drive letter C:\. This quickly reveals a file path.
Looking just next to that path, we’ll also spot a second .exe file. Since the question specifies that both files are saved in the same directory as the downloaded file, we can reasonably conclude these are the two files we’re after.
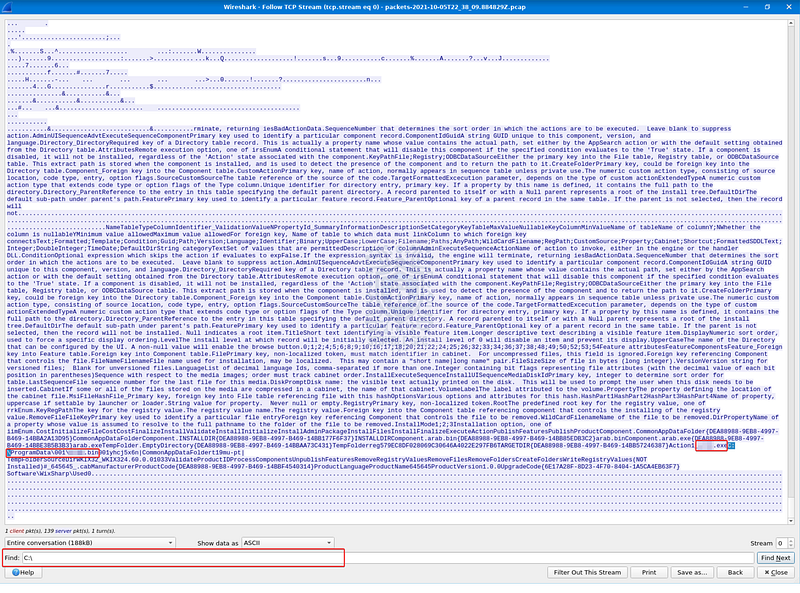
Wireshark: Identifying

Question 11: Now do the same and inspect the traffic from the second downloaded file. Two files will be saved to the same directory. What is the full file path of the directory and the name of the two files? (format: C:\path\file.xyz,C:\path\file.xyz)
For our last task, we’ll repeat the same process, this time inspecting the TCP stream for the MSI file downloaded from the second IP address we identified in Question 9.
Start by using Brim to search for the second file name. Once you have the result, click the Packets button to open the capture in Wireshark.
Brim: Searching the 2nd MSI file name
As before, right-click the first packet in the list and select Follow > TCP Stream to view the assembled data.
Wireshark: Opening the TCP Stream
With the stream open, use the find box to search for the C:\ drive letter again. This will help us quickly identify the full file path and the names of the two additional files stored in the same directory.
Now that we’ve identified the directories associated with both suspicious downloads, let’s submit our answers and wrap up this challenge!

Conclusion:
Done and done! By analyzing the PCAP file containing the suspicious network traffic using Brim and Wireshark, and enriching our findings with VirusTotal, we successfully identified several malicious IP addresses associated with a threat actor. Then we determined what files were downloaded from the malicious infrastructure and where they were saved on disk. Putting all of the evidence together, we can confirm the alert as a true positive and move on to the containment phase.
Now that we’ve uncovered the nature of the alert and completed our objectives, let’s close out this walkthrough of Warzone 1!
A big thank you to TryHackMe for another thrilling and realistic challenge. I chose this weekly challenge to spend more hands-on time with Brim/ZUI and the awesome Suricata rules built in. While Brim/ZUI doesn’t quite have the ubiquity of Wireshark, it’s an extremely impressive tool that’s beneficial to learn and get some practice with. In the real world, I’ve used this tool numerous times to visualize data in a PCAP and uncover information that was time-consuming and difficult to find using other tools — it’s worth keeping in the kit. Awesome stuff!
Thanks for your support and partnering on this investigation. If you found this walkthrough helpful, don’t forget to give it a clap! Your feedback really is invaluable, and it pumps me up to support your security journey. Remember, Cybersecurity is a team sport and we’re in this together!
If you liked this challenge and want to take on the second challenge, Warzone 2, I’ve got you covered with another walkthrough if you want to continue our investigation together.
TryHackMe | Warzone 2 | Room Walkthrough
Until next week’s challenge — stay curious and be safe out there!

Tools & References:
Challenge Link: https://tryhackme.com/room/warzoneone
Wireshark: https://www.wireshark.org/
Brim/ZUI: https://zui.brimdata.io/
Brim Data — “We’re renaming Brim to Zui”: https://www.brimdata.io/blog/brim-app-will-be-zui/
ZUI Docs — “Packet Captures”: https://zui.brimdata.io/docs/features/Packet-Captures#local-suricata-rules-folder
CyberChef: https://gchq.github.io/CyberChef/
VirusTotal: https://www.virustotal.com/
VirusTotal — Malicious Destination IP: https://www.virustotal.com/gui/ip-address/169.239.128.11
MITRE ATT&CK — TA505 (GA0092): https://attack.mitre.org/groups/G0092/
VirusTotal — Additional Malicious IP 1/2: https://www.virustotal.com/gui/ip-address/185.10.68.235/community
VirusTotal — Additional Malicious IP 2/2: https://www.virustotal.com/gui/ip-address/192.36.27.92/community