TryHackMe — Investigating Windows Challenge Walkthrough
A Windows endpoint forensic investigation using Event Viewer, PowerShell, and VirusTotal

Image Credit: https://tryhackme.com/room/investigatingwindows
Introduction:
If you’ve stumbled across this blog searching for a comprehensive walkthrough of the Investigating Windows challenge from TryHackMe, you’re in the right place. Welcome to my weekly walkthrough!
Investigating Windows is the first in a series of rooms within TryHackMe’s Investigating Windows module, and completing all three earns you a fancy badge on the platform. In the spirit of learning, this walk through will avoid spoilers. Since this is a FREE room, anyone can test their skills with Investigating Windows, perform the investigation along with me, and find the answers on their own as an entry point to Windows forensics.
In this scenario, we’re turned loose to investigate a compromised Windows endpoint and need to sleuth out how the attack unfolded. The tricky part? We’ll have no tools available to us, so we’ll hunt for the artifacts manually using the Windows Event Logs, Task Scheduler, Registry, and File Explorer. This is a great “back to basics” jumping-off point into digital forensics and incident response (DFIR) in the Windows world, with something interesting for all skill levels.
As we collect evidence, we’ll enrich our findings using MITRE ATT&CK, Microsoft Learn, and VirusTotal to add additional context and learn more about the attacker’s tactics and techniques. Sounds like fun, right? Let’s get into it!
And if you find this walkthrough helpful — whether it levels-up your skills, gets you over a stumbling block, or serves as a handy reference — please give it a clap and consider following me for more content like this.
Thanks for reading and going on this investigation with me!
Challenge Scenario:
A windows machine has been hacked, its your job to go investigate this windows machine and find clues to what the hacker might have done.
This is a challenge that is exactly what is says on the tin, there are a few challenges around investigating a windows machine that has been previously compromised.
Question 1: Whats the version and year of the windows machine?
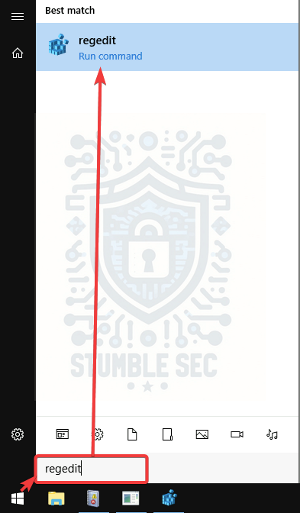
To kick off our investigation, we need to identify the operating system details of the compromised device. Specifically, we need to determine the Windows version. One approach is to use the winver command. This can be executed from the “Run” box, or the Command Prompt.
- Using the Run dialog box:
- Press
Win + Rto open the Run dialog box. - Type
winverand pressEnter.
- Using the Command Prompt:
- Open the Command Prompt by typing
cmdin the search bar and pressingEnter. - Type
winverand pressEnter.
The resulting output will display the below information, where we can collect the Windows version information for the environment.
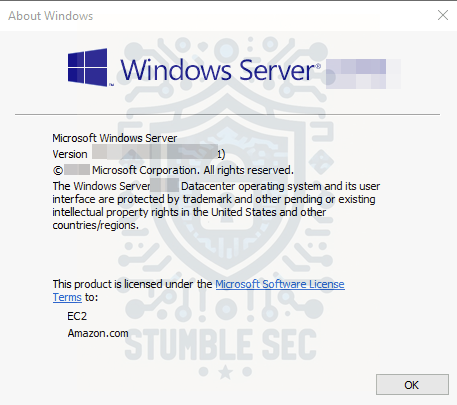
Winver Output

Question 2: Which user logged in last?
Now that we’ve identified the operating system version, we need to audit the logon activity for the system. For this walkthrough, we’ll use the Windows Event Log to query successful logon events, specifically filtering Event ID 4624 — “An account was successfully logged on.”
To do this:
- Open Event Viewer:
- Press the Windows Start button and type “Event Viewer.”
- Navigate to Security Logs:
- In the Event Viewer, expand “Windows Logs” and select “Security”.
- Filter for Logon Events:
- In the “Actions” pane on the right, click “Filter Current Log”.
- In the “Event IDs” field, enter “4624" and click “OK”.
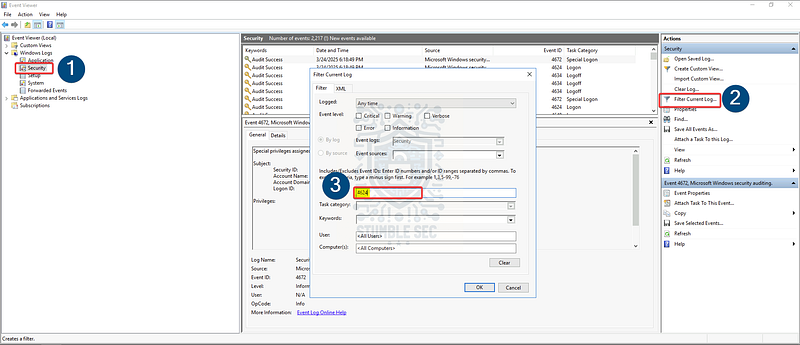
Filtering the Security Log for Event ID 4624
Now, the filtered log will display all successful logon events (Event ID 4624). Since the log is also capturing our Administrator login activity, scroll past the events for the current date to the previously logged date, 1/29/2021, to find the user logon activity before our session.
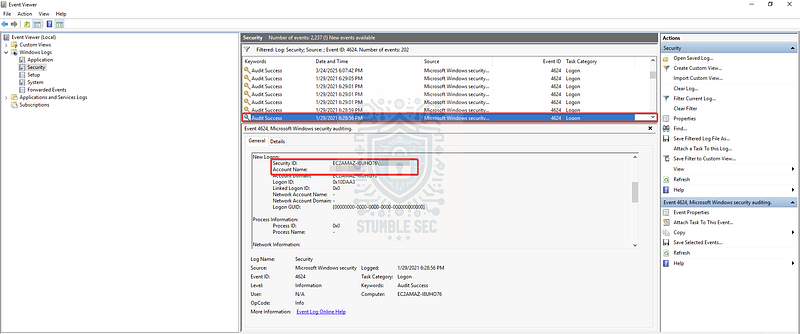
Identifying the last user logon session

Question 3: When did John log onto the system last?
Continuing to use our current filtering, we’ll use the “Find” function to locate the username John within the logs and determine the last date this user logged in to the system.
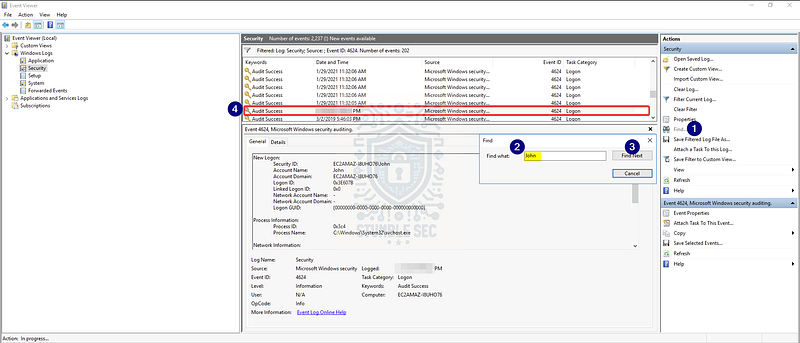
Identifying logon activity for the user John

Question 4: What IP does the system connect to when it first starts?
Now, let’s pivot away from the Windows Event Log and start to look for common persistence methods used by threat actors. The key to answering Question 4 is finding the IP address that the system connects to after it first starts.
With that in mind, we’ll check the Windows Registry Run Keys / Startup Folder (MITRE ATT&CK ID T1547.001). These methods allow a binary to execute on user login, creating persistence for the adversary.
According to MITRE ATT&CK, the relevant run keys can be found in the following locations:
HKEY_CURRENT_USER\Software\Microsoft\Windows\CurrentVersion\RunHKEY_CURRENT_USER\Software\Microsoft\Windows\CurrentVersion\RunOnceHKEY_LOCAL_MACHINE\Software\Microsoft\Windows\CurrentVersion\RunHKEY_LOCAL_MACHINE\Software\Microsoft\Windows\CurrentVersion\RunOnce
First, launch the Registry Editor:
Then, navigate to the keys referenced by MITRE ATT&CK. While examining HKEY_LOCAL_MACHINE\Software\Microsoft\Windows\CurrentVersion\Run, you may notice the string UpdateSvc. This string indicates a suspicious command connecting to an additional IP address.
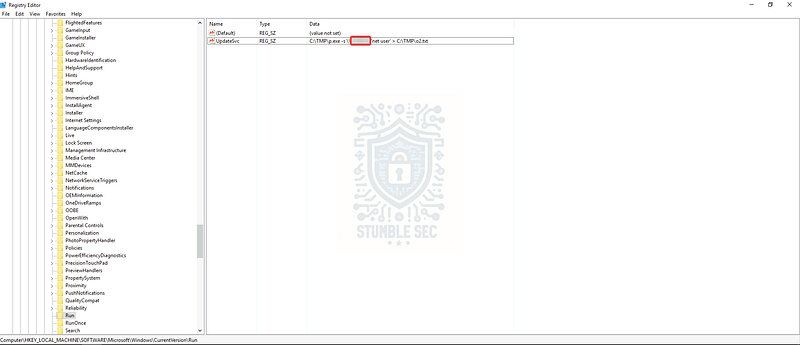
Identifying a suspicious run key in the registry
By analyzing these often-abused registry keys, we’ve found a method of persistence used by the threat actor and an IP address, or indicator of compromise (IOC).

Question 5: What two accounts had administrative privileges (other than the Administrator user)?
Next, we’ll need to determine which other accounts have local administrative permission on the system. To find out, we’ll query the local administrators group with PowerShell by executing the command below.
net localgroup administrators
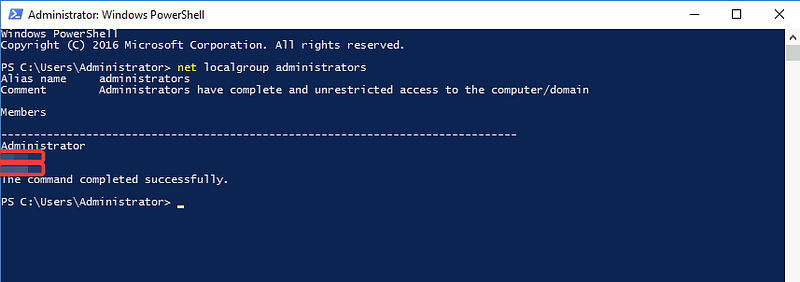
After running the command, we’ll discover that three accounts are members of this group including the Administrator account that we’re using.

Question 6, 7, 8:
Whats the name of the scheduled task that is malicious.
What file was the task trying to run daily?
What port did this file listen locally for?
The next step in our investigation is to search for a malicious scheduled task. By abusing the Windows Task Scheduler, a threat actor could create persistence by setting a malicious file to run at a specific time (T1053.005)
For this walkthrough, we’ll search for the malicious task using the command line tool schtasks, but the GUI Task Scheduler will work just as well if you prefer to explore it.
From PowerShell, use the [schtasks](https://learn.microsoft.com/en-us/windows-server/administration/windows-commands/schtasks) command to query the task scheduler library. We’ll see a couple of suspicious entries listed.
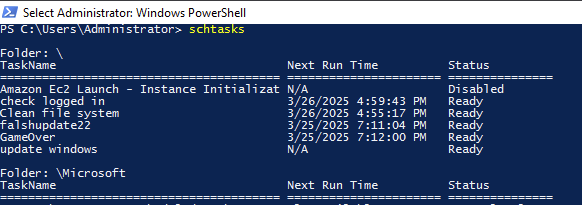
Using schtasks to list tasks
To get more information about each task, use the following syntax:
schtasks /query /FO LIST /V /TN “
Several tasks may look suspicious. For example, check the Clean file system task. Notice that its action is launch a PowerShell (.ps1) script, scheduled to run daily.

Using schtasks to query a task
Since we’re searching for a persistence technique and this specific task launches a file with a listening port, it matches the criteria of Questions 6,7, & 8. This is the malicious task we are searching for.
Question 9: When did Jenny last logon?
Now let’s return to gathering information about the other users on the system. We’ll pivot back to our PowerShell console to do this. Instead of querying a group like we did back in Question 5, we’ll query the Jenny user account directly to find the Last logon field.
To query the last logon time for Jenny, use the following command:
net user jenny
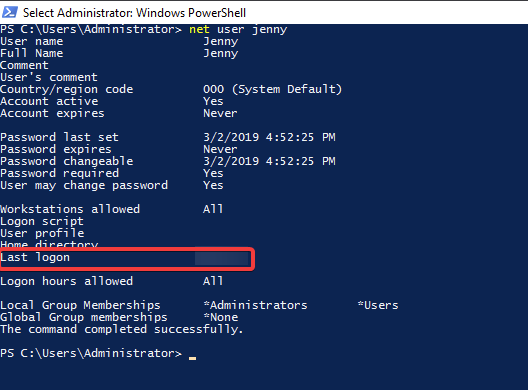
Identifying the “Last logon” for the user Jenny
By executing this command, we’ve figured out when Jenny last logged on to the system — nice!

Question 10: At what date did the compromise take place?
Based on the scheduled task trigger date, we can start to create a rough timeline of when the attack occurred. To take this a step further, let’s closely examine the directory storing the .ps1 file for the malicious task we found in Question 7: C:\TMP
Inside this directory, we’ll see a number of suspicious tools. All these files were staged in this folder on a specific date, which helps us pinpoint the date of compromise.
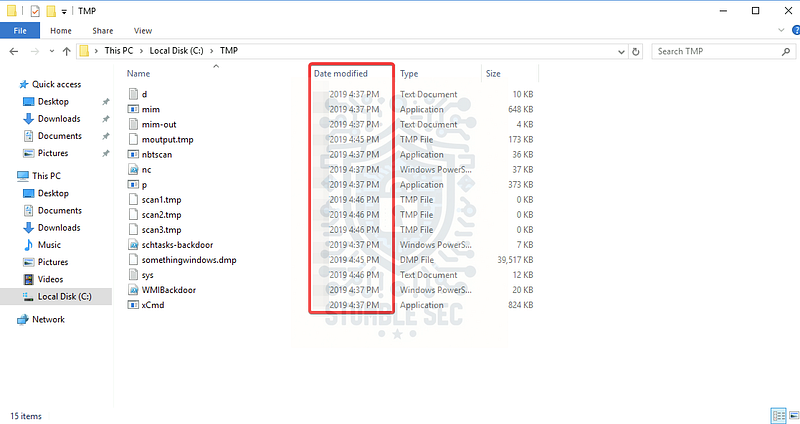
This information is crucial for understanding the timeline of the attack and properly scoping our investigation.

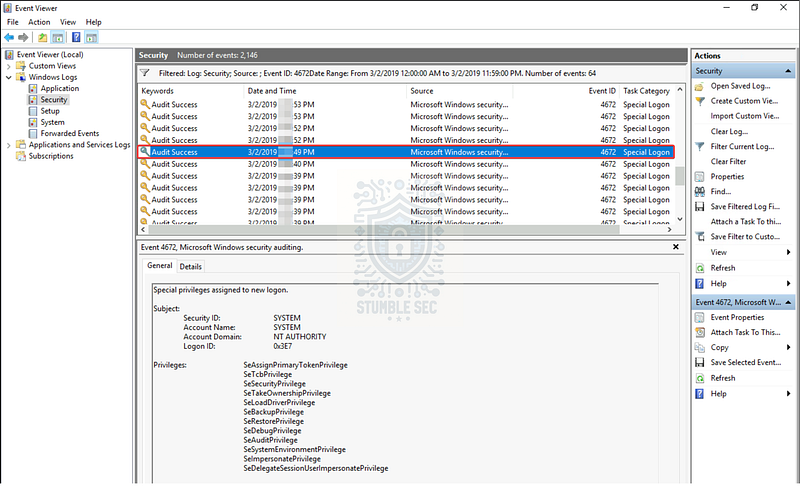
Question 11: During the compromise, at what time did Windows first assign special privileges to a new logon?
Now that we have scoped the date of the attack, we can start to narrow down our searches. To uncover the answer to Question 11, let’s return to the Windows Event Viewer searching for Event ID 4672, or “special privileges assigned to a new logon.”
According to Microsoft Learn, this event “generates for new account logons if any of the following sensitive privileges are assigned to the new logon session.”
To find these events, perform the following steps in the Event Viewer:
- Select “Windows Logs” > “Security”.
- Press “Filter Current Log…” in the right column.
- Click the drop-down menu for “Logged” and select “Custom Range”.
- In the “From” and “To” boxes, select “Events On” and select the date of the attack. Use the time ranges from 12:00:00 AM to 11:59:00 PM to display all events for the date, then press OK.
- Type “4672" in the Event ID field, then press OK.
Filtering the Event Viewer for Event ID 4672 on the date of the attack
Based on the question, your immediate instinct might be to look at the first event in the list, but spoiler that is incorrect. Let’s take a quick look at the question hint to narrow this down a bit.

Armed with the clue, we can now locate the correct event and corresponding time stamp, determining when Windows first assigned special privileges to a new logon during the compromise.

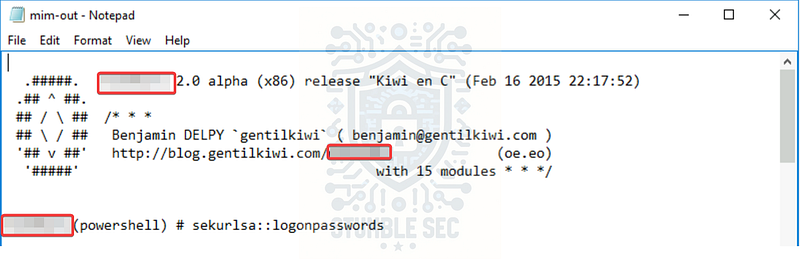
Question 12: What tool was used to get Windows passwords?
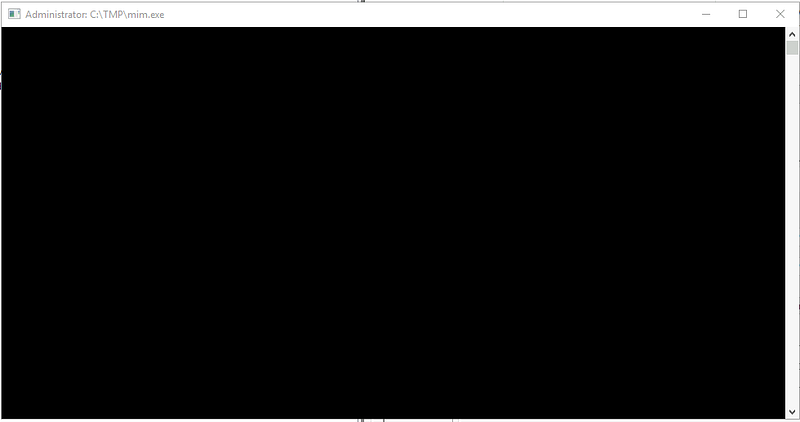
You may have noticed throughout our investigation that a command prompt window keeps popping up randomly, right? You may have also seen another suspicious task in Task Scheduler or an alarming executable in the staging folder C:\TMP.
If not, let’s take a closer look at the window where we’ll observe a familiar file path: C:\TMP\mim.exe
To determine the nature of this file, we can collect the file hash and check it against external threat services. Use the following PowerShell command to gather the file hash:
get-filehash C:\TMP\mim.exe
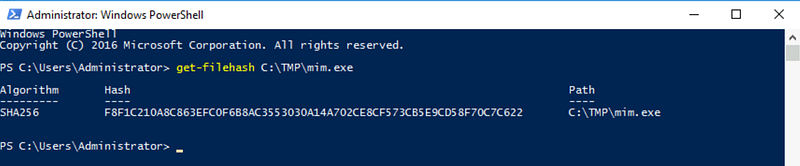
Then, we can take this hash and submit it to a service like VirusTotal to evaluate the sample.
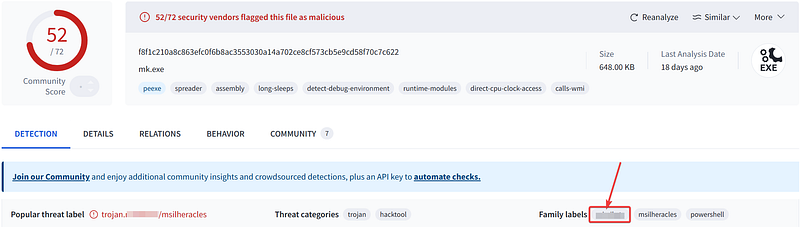
https://www.virustotal.com/gui/file/f8f1c210a8c863efc0f6b8ac3553030a14a702ce8cf573cb5e9cd58f70c7c622
After confirming that the file is malicious, check the “Family labels” to determine what tool the sample is. If you’d prefer a simpler approach, another option is to open the tool’s output text file, mim-out from the directory. This will reveal which tool created the output and allows us to see what password hashes were exposed.
https://attack.mitre.org/software/S0002/
By following these steps, we’ve identified the tool used to dump the Windows credentials and gathered more information about the attack.

Question 13: What was the attackers external control and command servers IP?
Now that we understand what method the attacker used for credential access, we’ll need to learn more about their infrastructure and discover the IP of their command and control server. I’ll admit that I spent far too much time digging through the scripts, event logs, and other artifacts on the system, so I’ll give you the short version of what worked.
Since the victim device does not have a live internet connection, we’ll have to rely on artifacts on the system to piece together this information. One place we can check is the Windows hosts file, which performs manual IP address to hostname mappings, even overriding a DNS server. The file can be located at:
C:\Windows\System32\drivers\etc\hosts

After examining the hosts file, we notice some strange entries, indicating that the attacker attempted to prevent the victim’s device from navigating to VirusTotal (whoops!), updating Sophos anti-malware products, and reaching Microsoft Update. Something sticks out here though. Most of these entries are for the local loopback IP address or a private IP address, but two entries are mapped to a public IP address. This anomaly is enough to warrant further investigation.
For the purposes of this walkthrough, we’ve found the answer — the public IP addresses in the hosts file likely belongs to the attacker’s command and control infrastructure.

Question 14: What was the extension name of the shell uploaded via the servers website?
To discover the answer to Question 14, let’s focus on a clue in the question itself: “shell uploaded via the servers website.” This tells us that the compromised device is also acting as a web server. In Windows, the IIS service typically stores the web server assets in the folder C:\inetpub\wwwroot.
By examining this directory on the compromised system, we’ll discover three potentially malicious files.
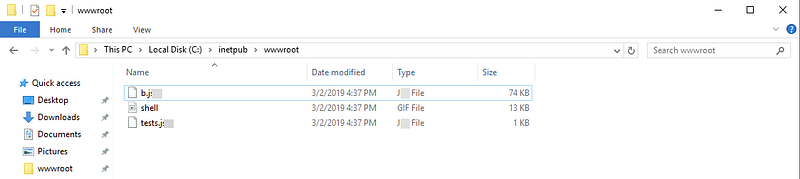
Capturing the file hashes, we’ll pivot back over to VirusTotal to gather some additional intelligence to determine if we’ve identified WebShells (T1505.003) uploaded by the attacker for persistence.
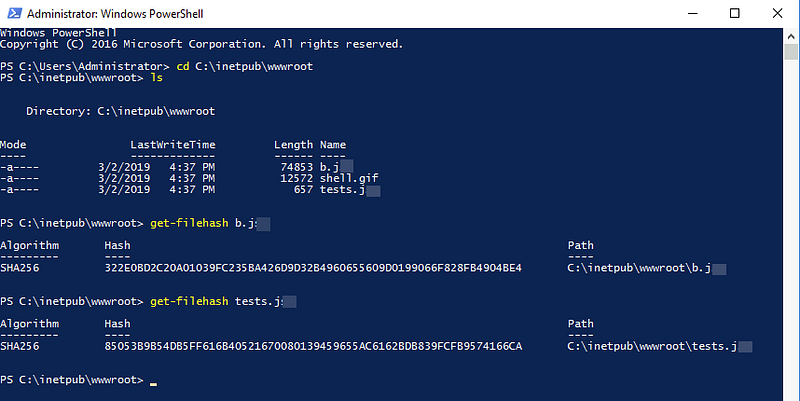


https://www.virustotal.com/gui/file/85053b9b54db5ff616b40521670080139459655ac6162bdb839fcfb9574166ca
Using VirusTotal, we can analyze the file hashes to confirm if these files are indeed malicious WebShells. The file extension of the shell uploaded via the server’s website will be revealed through this analysis.

Question 15: What was the last port the attacker opened?
To determine the last port the attacker opened, we’ll turn our focus to searching for activity related to network ports. Specifically, we’ll assess the Windows Firewall rules to check if the attacker made any modifications to grant access through the firewall.
Instead of blindly reviewing the firewall rules, let’s work a little smarter by auditing the event log again to check for any changes during the time of the attack.
To find Windows Firewall rule changes in the event log, follow these steps:
- Navigate to Event Viewer > Applications and Services Logs > Microsoft > Windows > Windows Firewall with Advanced Security > Firewall.
- Filter for “Events On” the date of the attack so that we can review the changes.
While there many events captured, most look benign and expected for a Windows system — except one that sticks out due to the rule name and the user account that modified the rule.
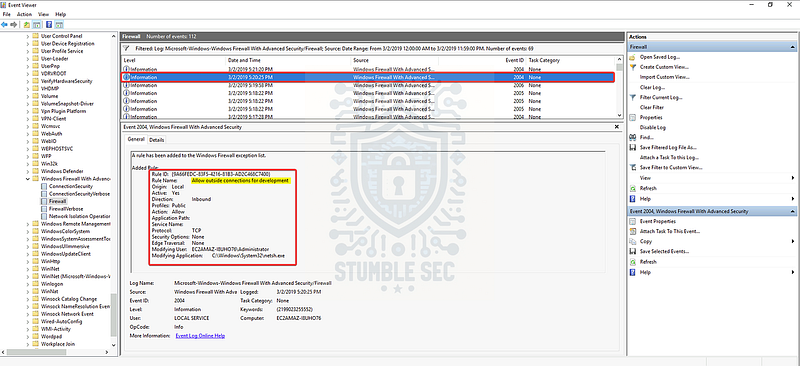
Identifying a new Windows Firewall rule with the Event Viewer
Next, let’s locate this rule in Windows Firewall with Advanced Security options by navigating to Inbound Rules. This console can be accessed by pressing the Windows “start” button and typing in “firewall.”
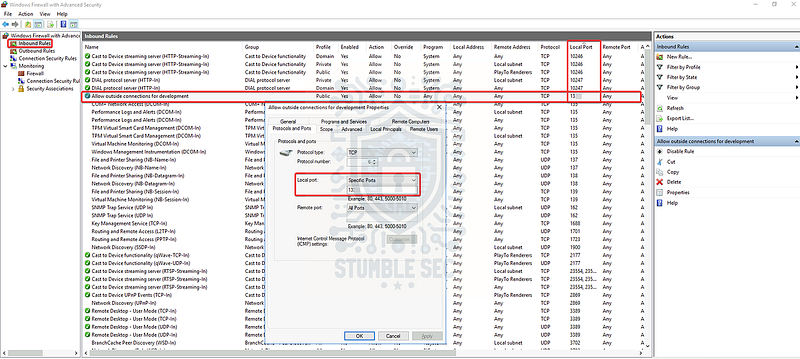
Validating the new firewall rule in the Windows Firewall interface
Once we’ve located the rule that we discovered in the event logs, we can check the local port that was opened on the firewall by the attacker and identify the last port they opened.

Question 16: Check for DNS poisoning, what site was targeted?
We’ve made it to the last question for our investigation — great job! Fortunately, we’ve already stumbled across the answer for Question 16 during our analysis of the hosts file back in Question 13.
The answer we’re looking for is the host name entry associated with the command and control IP address we discovered. This entry indicates the site targeted by DNS poisoning.
By reviewing the hosts file again, we can confirm the targeted site and understand how the attacker manipulated DNS settings to redirect traffic to their command and control server. Now let’s wrap up this investigation!

Conclusion:
Mission accomplished! Throughout this investigation, we combed through the Windows Event Logs to determine what users accessed the system and correlated event data during the timeframe of the attack. Using Registry Editor and Task Scheduler, we discovered the attacker’s methods of persistence and found evidence of payloads executing on logon and at scheduled intervals. Finally, we uncovered further evidence of the attack in the Windows Hosts File and File Explorer which we enriched using threat intelligence from VirusTotal.
Now that we have scoped the attack and completed our objectives, let’s close out this walkthrough of the Investigating Windows!
A big thank you to TryHackMe, for the fun and realistic challenge! This was an excellent opportunity for me to practice hands-on-keyboard analysis of a Windows environment to manually perform the investigation. It was a great lesson in the fundamentals of DFIR and promoted a creative analysis of the available artifacts to discover the answers to the questions. Awesome stuff!
Thanks for your support and partnering on this investigation. If you found this walkthrough helpful, don’t forget to give it a clap! Your feedback really is invaluable and it pumps me up to support your security journey. Cybersecurity is a team sport and we’re in this together!
Until next week’s challenge — stay curious and be safe out there!

Tools & References:
-Challenge Link: https://tryhackme.com/room/investigatingwindows
-MITRE ATT&CK — Boot or Logon Autostart Execution: Registry Run Keys / Startup Folder (T1547.001): https://attack.mitre.org/techniques/T1105/
-MITRE ATT&CK — Scheduled Task/Job: Scheduled Task (T1053.005): https://attack.mitre.org/techniques/T1053/005/
-Microsoft Learn — schtasks commands: https://learn.microsoft.com/en-us/windows-server/administration/windows-commands/schtasks
-Microsoft Learn — 4624(S): An account was successfully logged on: https://learn.microsoft.com/en-us/previous-versions/windows/it-pro/windows-10/security/threat-protection/auditing/event-4624
-VirusTotal — f8f1c210a8c863efc0f6b8ac3553030a14a702ce8cf573cb5e9cd58f70c7c622: https://www.virustotal.com/gui/file/f8f1c210a8c863efc0f6b8ac3553030a14a702ce8cf573cb5e9cd58f70c7c622
-MITRE ATT&CK — Mimikatz (S0002): https://attack.mitre.org/software/S0002/
-MITRE ATT&CK — Server Software Component: Web Shell (T1505.003): https://attack.mitre.org/techniques/T1505/003/
-VirusTotal — 322e0bd2c20a01039fc235ba426d9d32b4960655609d0199066f828fb4904be: https://www.virustotal.com/gui/file/322e0bd2c20a01039fc235ba426d9d32b4960655609d0199066f828fb4904be4
-VirusTotal — 85053b9b54db5ff616b40521670080139459655ac6162bdb839fcfb9574166ca: https://www.virustotal.com/gui/file/85053b9b54db5ff616b40521670080139459655ac6162bdb839fcfb9574166ca