Introduction:
Welcome to my weekly walkthrough! If you’ve stumbled across this blog while looking for a detailed guide to the ShellShock Attack blue team challenge from LetsDefend, you’re in the right place.
For this challenge, we’re putting on our incident response hats and investigating a potential attack against a vulnerable web server. We’re given a single network packet capture (.pcap) file and tasked with uncovering what happened. Through a combination of packet analysis, HTTP stream inspection, and a little background research, we’ll identify the target operating system, enumerate the web server software, and uncover the exact command an attacker attempted to execute through a Shellshock exploit.
This brief challenge serves as a great introduction to both Wireshark and the infamous Shellshock vulnerability. During our time together, we’ll learn how to filter network traffic, inspect HTTP requests and responses, analyze HTTP headers, and recognize some of the telltale indicators of a Shellshock attack. While the investigation itself is straightforward, it provides a practical example of how network packet captures can help us identify malicious activity and reconstruct an attacker’s actions. Sounds like fun, right? Let’s go!
Thanks for reading and going on this investigation with me!
This write-up is for educational purposes only. All intellectual property related to the challenge belongs to the respective owners LetsDefend.
Challenge Scenario:
You must to find details of shellshock attacks
Question 1: What is the server operating system?
Let’s jump right into this investigation and check out the challenge file, shellshock.pcap.
This is a network packet capture file that contains packet-level data, allowing us to “go deep” into the network protocols and learn more about the attack.
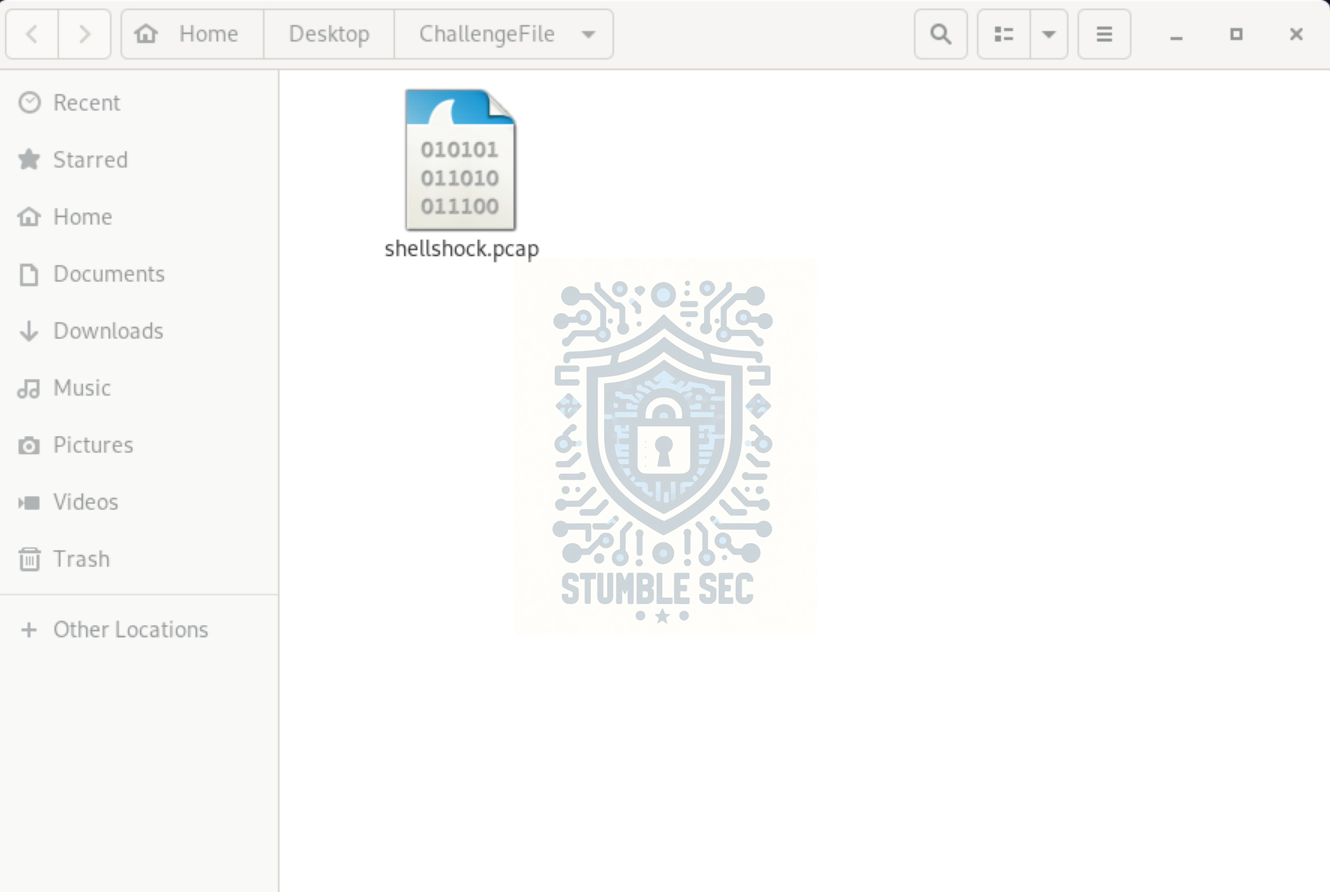 Overview of the challenge artifact
Double-click the PCAP, which will open in Wireshark, already installed in the LetsDefend VM. Before we start digging through Wireshark, let’s orient ourselves by doing a bit of background research on what Shellshock is.
According to an excellent blog post by Cloudflare, Shellshock is an arbitrary code execution vulnerability in the Bash shell that was publicly disclosed waaaaay back in 2014. The vulnerability allows attackers to execute Bash commands through specially crafted HTTP requests on vulnerable web servers by prepending the payload with the string () { :; }; and appending commands that execute on the underlying operating system. You can use your imagination, but this is real bad.
This research gives us some important details for our investigation. Specifically, that commands may be delivered through HTTP requests and that the malicious string () { :; }; is a strong indicator of an attempted Shellshock exploit.
Let’s put this knowledge into practice and see if we can identify the operating system of the attacked server. To do this, we’ll use Wireshark’s display filters:
- Filter on
http - Two packets should match. Right-click Packet 11 and select Follow > HTTP Stream
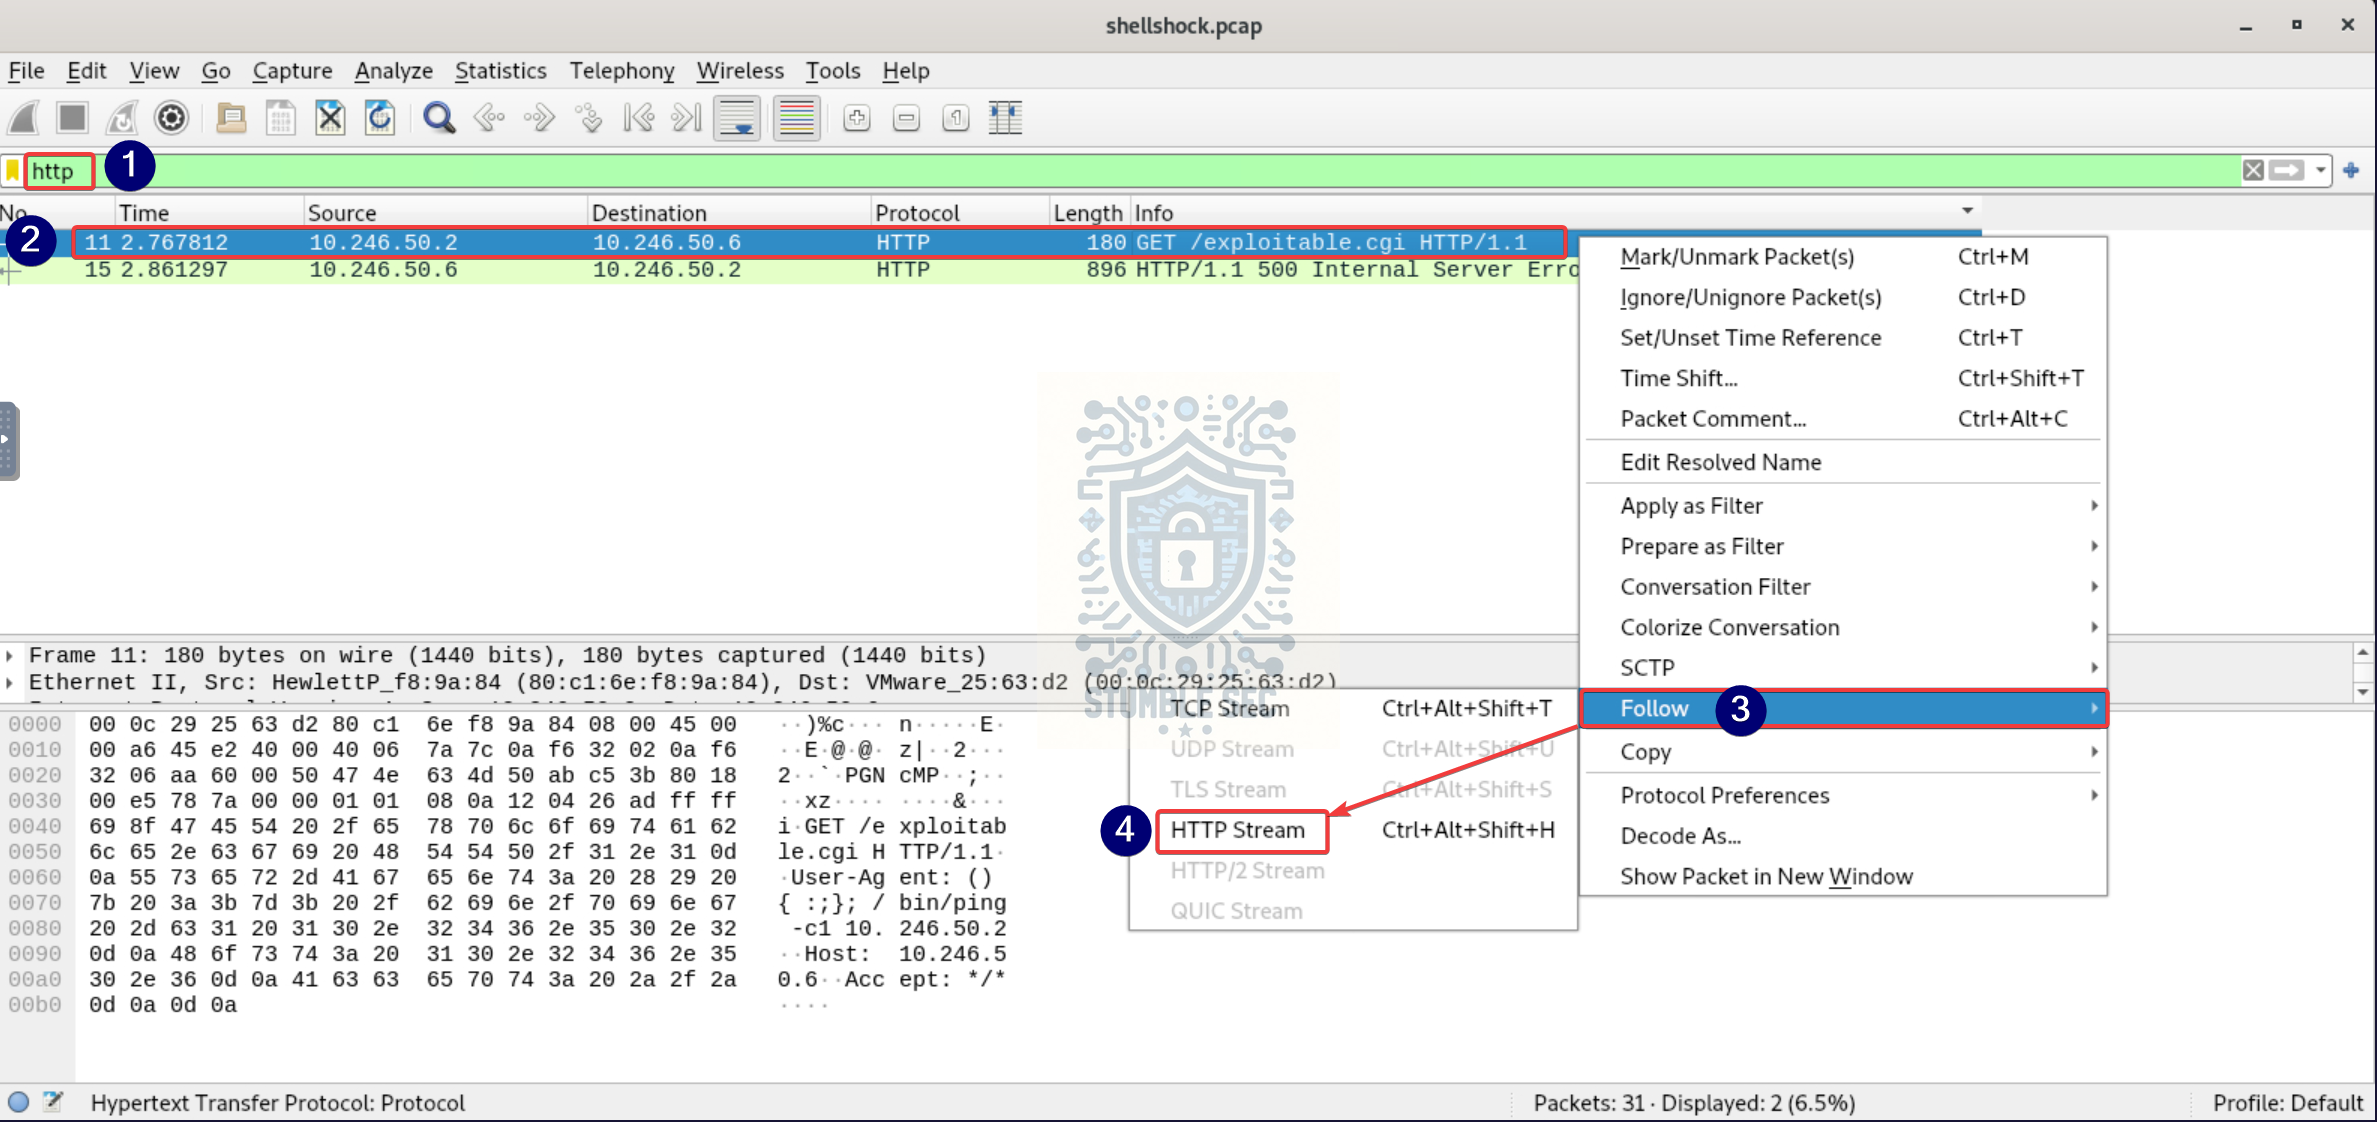 Wireshark: Following the first HTTP stream
- Once the stream opens, we can inspect the request and response contents. In the HTTP response, an HTML
<address>tag reveals valuable information about the underlying web server.
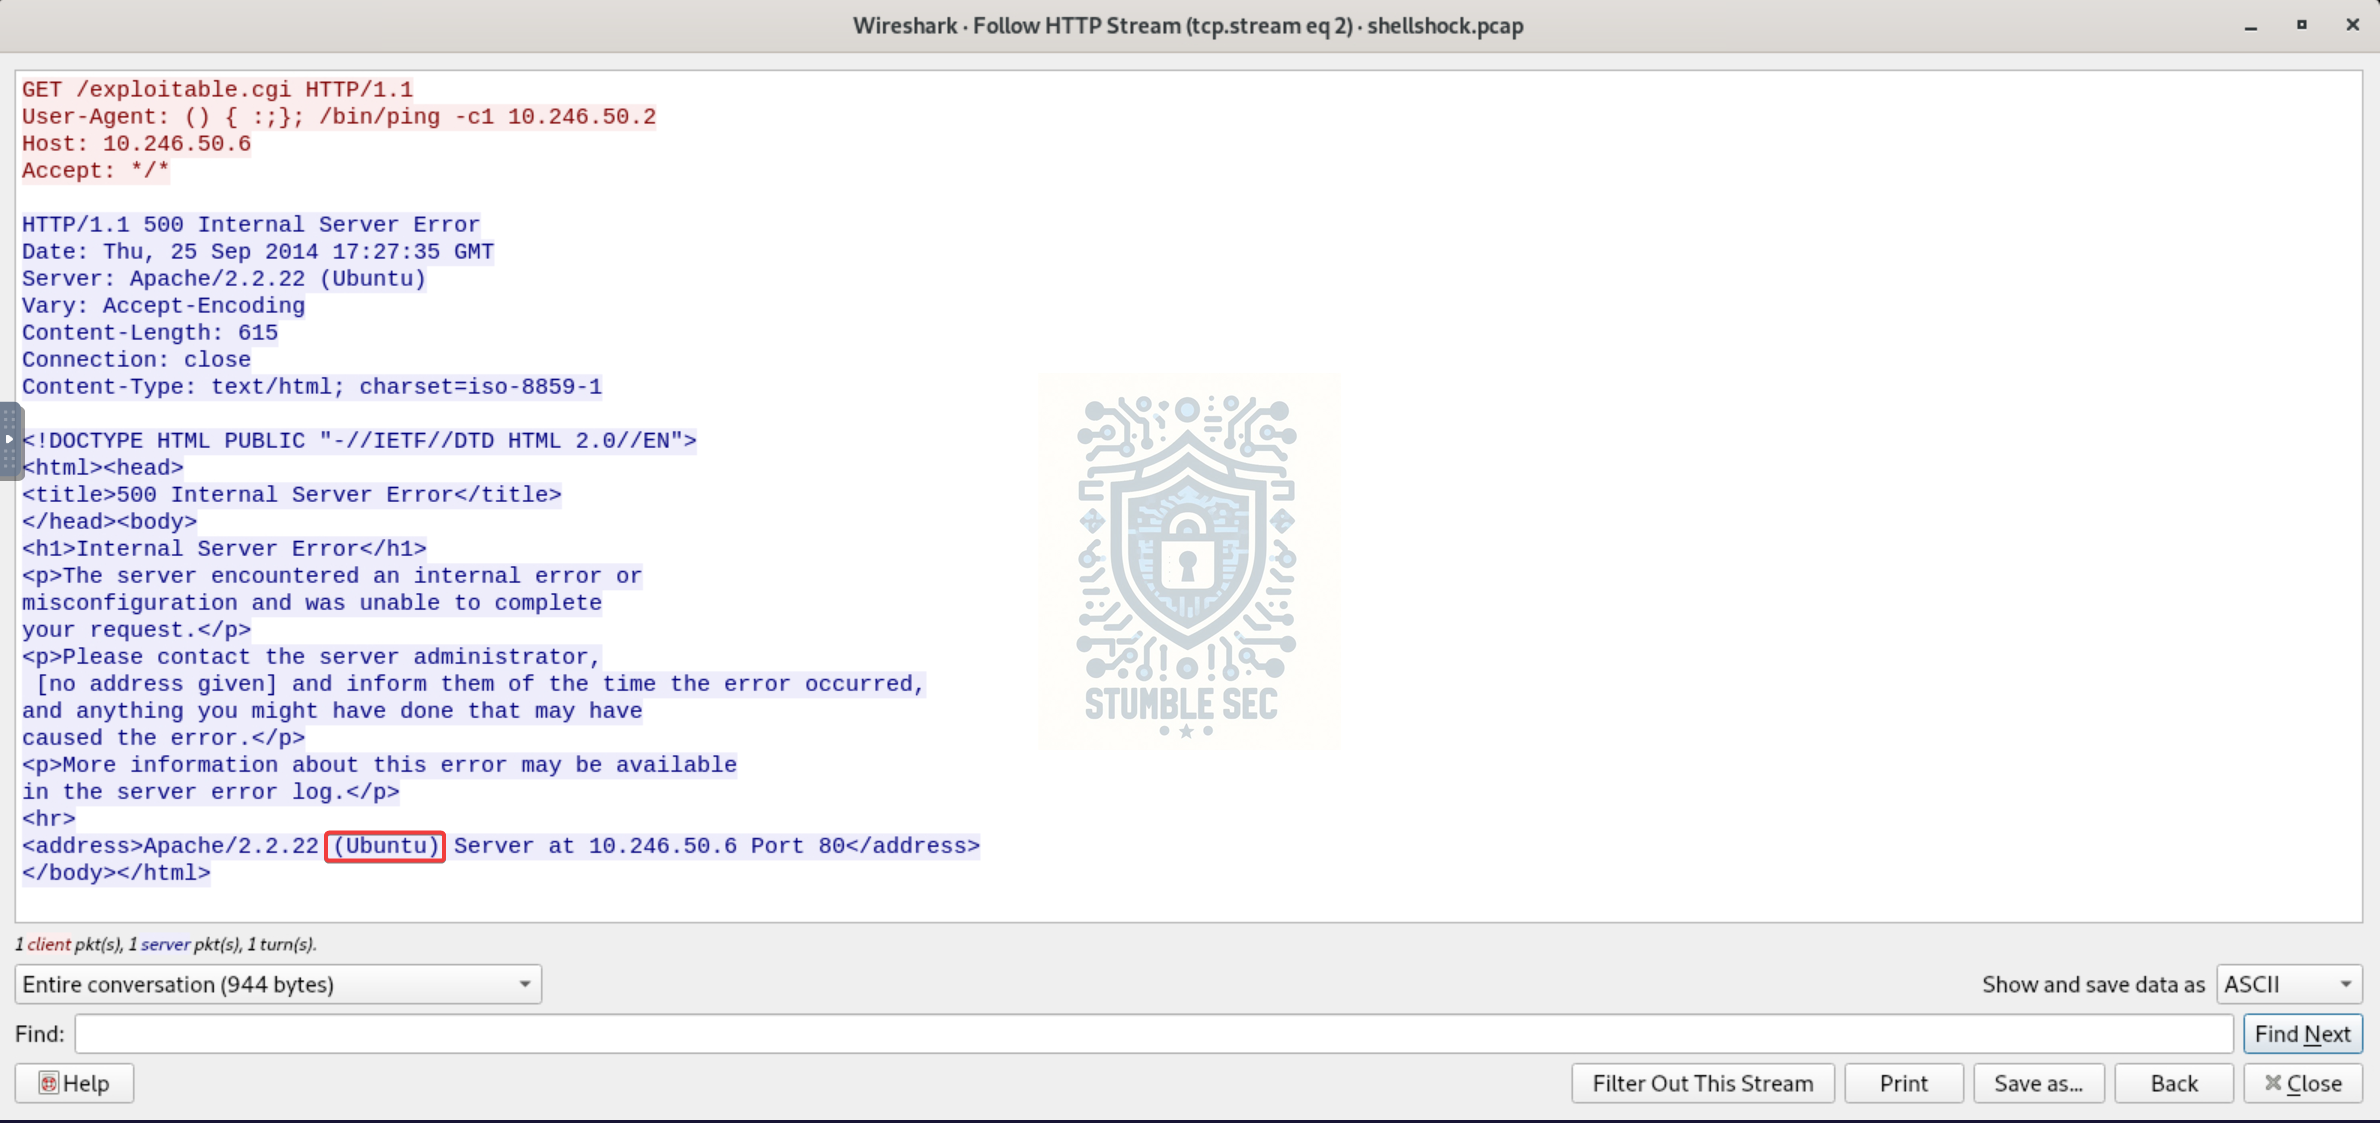 Wireshark: Identifying the server OS from the HTML in the response
Nice! The server appears to be running the Linux distribution Ubuntu. Since Shellshock targets the Bash shell, identifying that the web server runs Linux makes it more plausible that it could be vulnerable to this attack.

Question 2: What is the application server and version running on the target system?
Next, we need to extract the other important detail from the HTML <address> tag: the web server software and version.
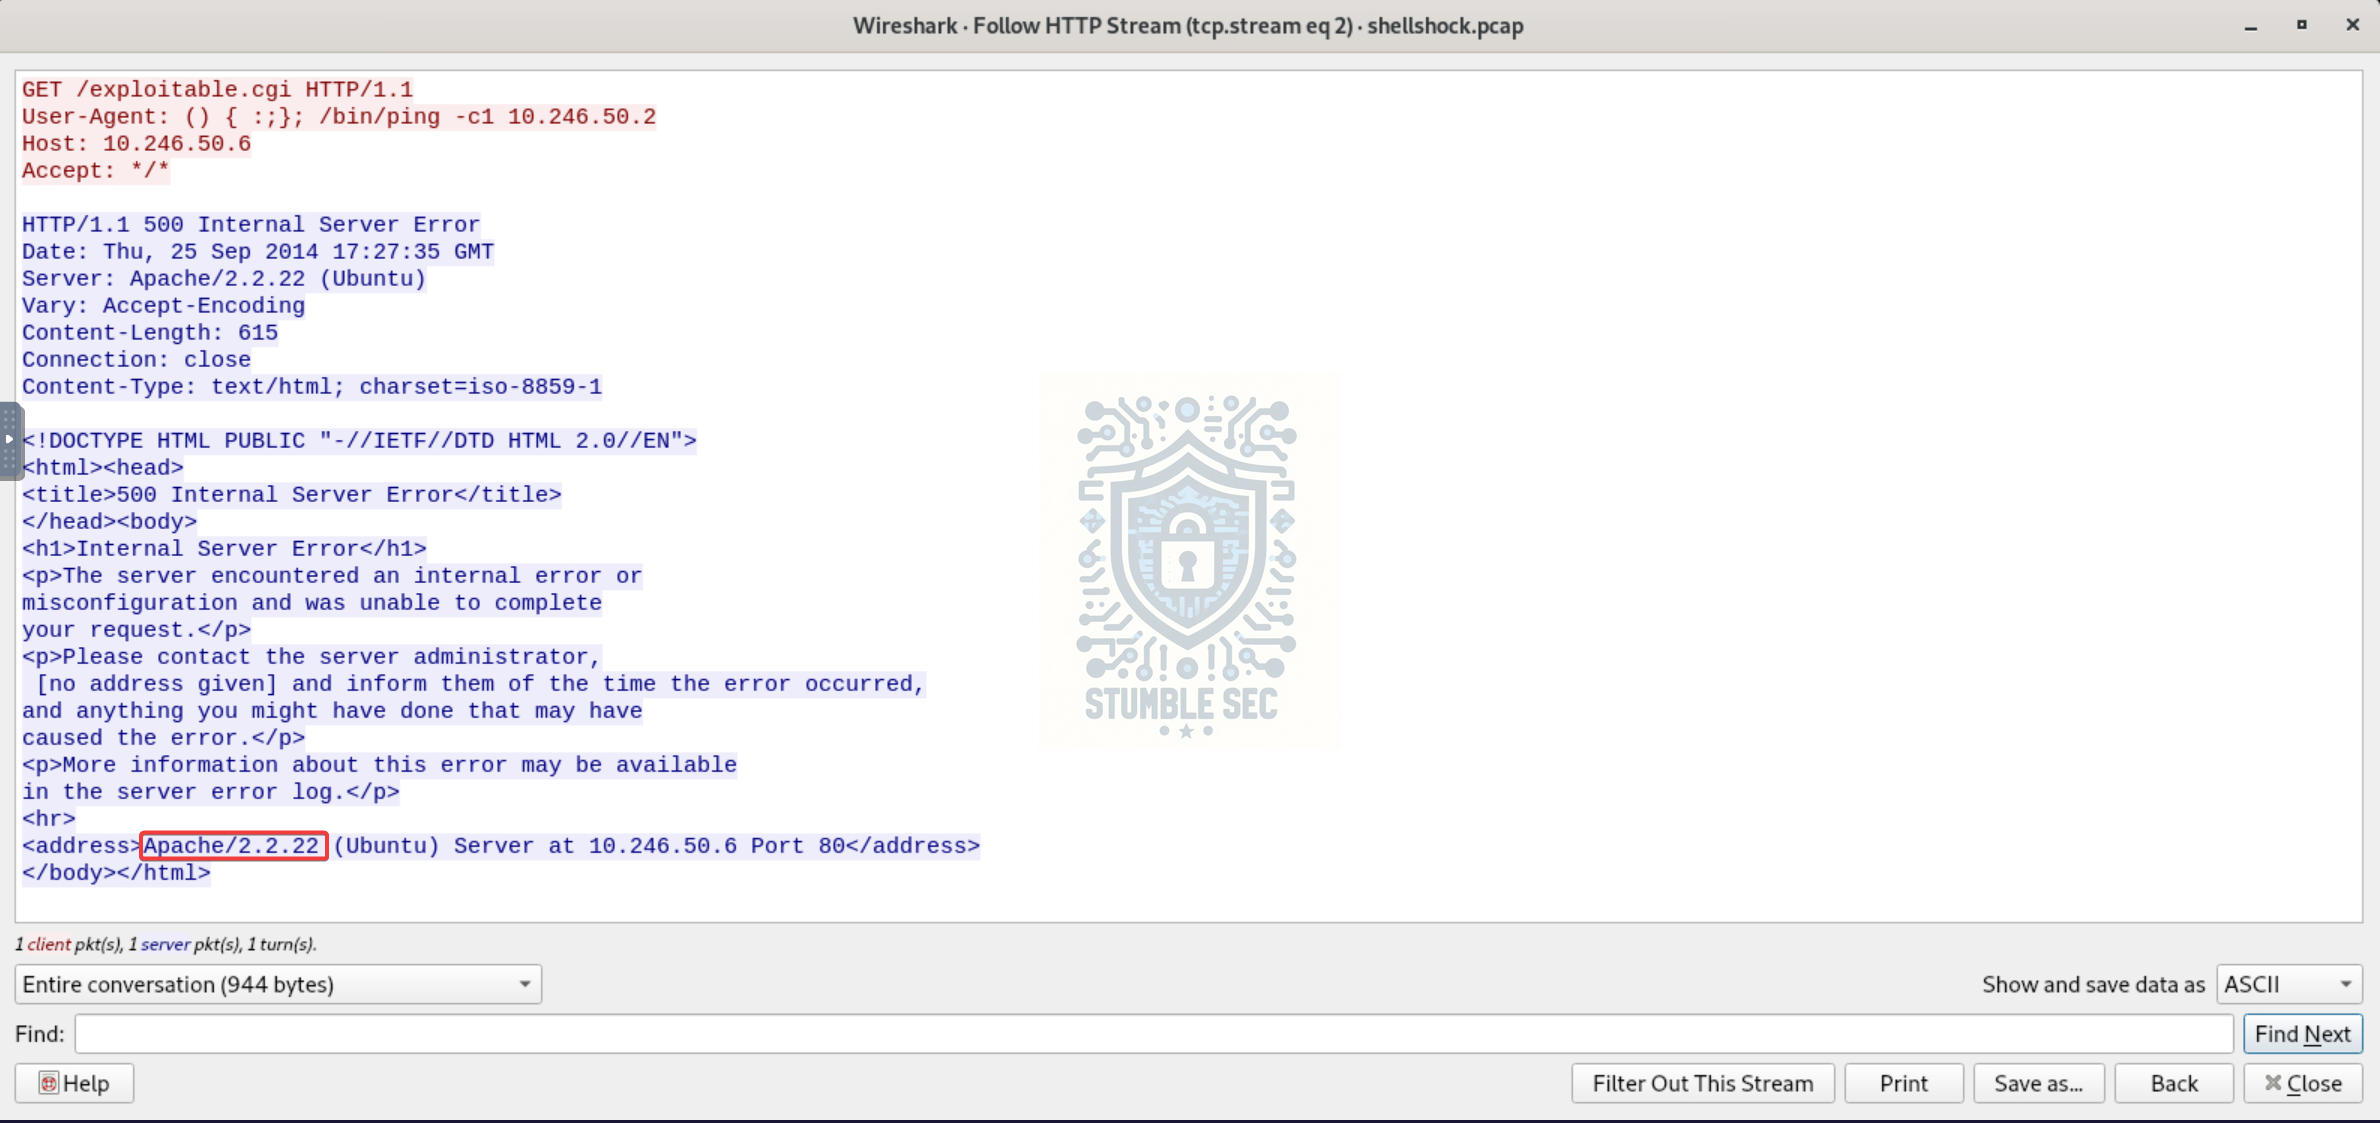 Wireshark: Identifying the web server and version
From our analysis of the HTTP stream, we can see that the server is running Apache/2.2.22.
This is another useful piece of data. Knowing the web server version helps establish the age of the target environment and can provide additional context during an investigation like additional unpatched vulnerabilities.

Question 3: What is the exact command that the attacker wants to run on the target server?
To answer the third and final question, we need to identify the exact command the attacker attempted to run on the target server. Remember from our research that specially crafted HTTP requests can be used to pass commands to a vulnerable web server? This packet capture provides a great example of how that works.
The Cloudflare post describes one method of delivering a Shellshock payload by modifying the User-Agent header with the magic string, which is then passed into Bash by a vulnerable application.
Let’s turn our attention to the User-Agent header in the HTTP request stream we’ve been analyzing in Wireshark.
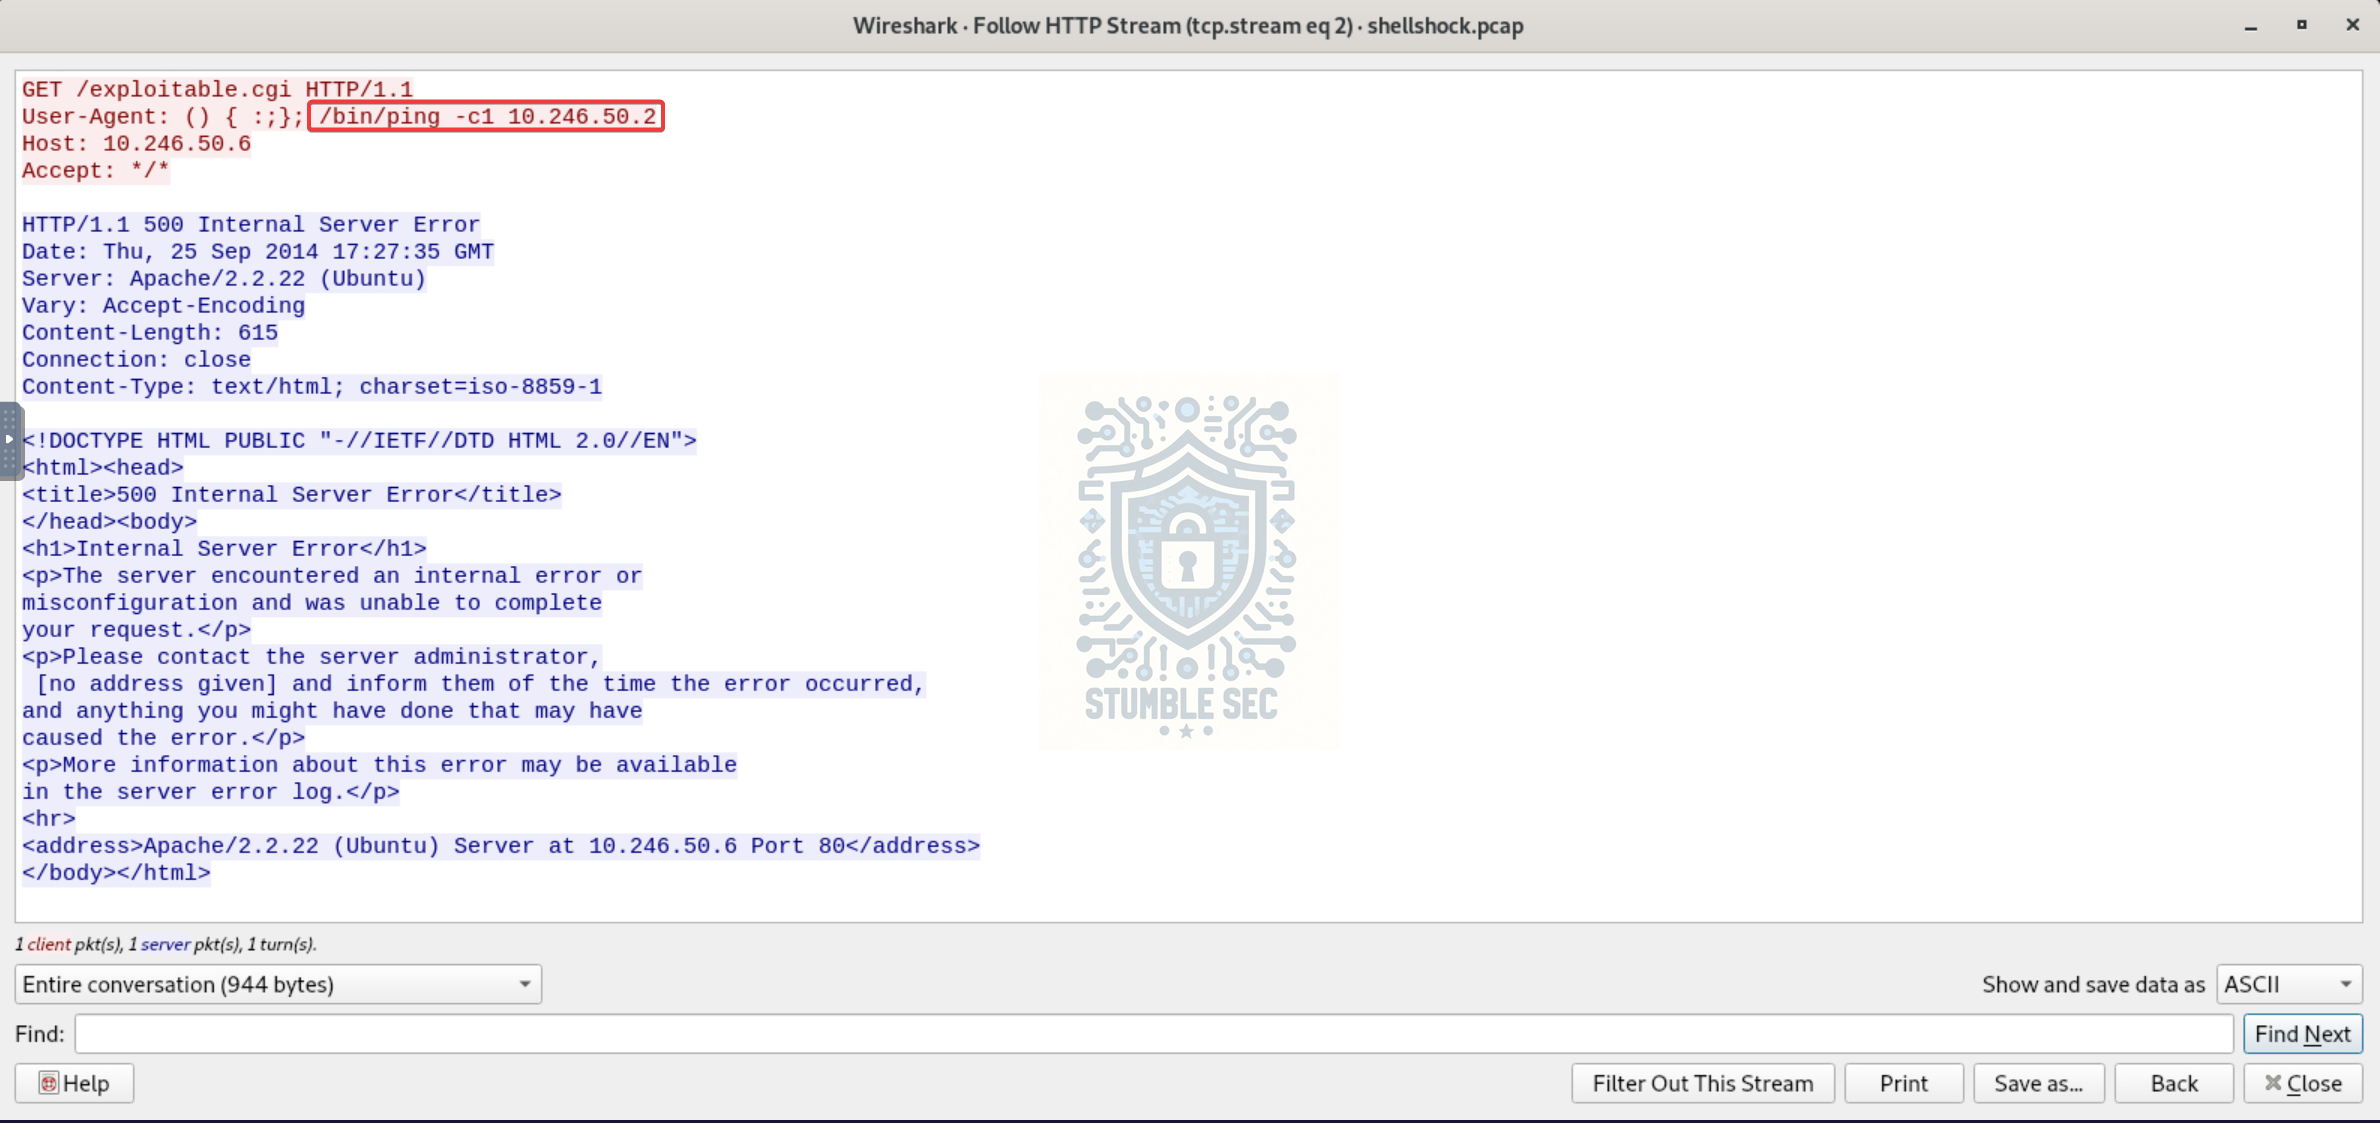 Wireshark: Identifying the command sent by the attacker on the target server
Here, we can clearly see the hallmarks of a Shellshock attack: the magic string () { :; }; followed by a command that the attacker wants the server to execute: /bin/ping -c1 10.246.50.2
This command instructs the system to send a single ICMP echo request to 10.246.50.2. Attackers commonly use commands like this to check if remote code execution is working and that the target server can reach another system under their control.
Now that we’ve learned about the Shellshock attack and examined what it looks like on the packet level, let’s wrap up this brief investigation.

Conclusion:
How fun was that! A big thank you to LetsDefend for another awesome challenge.
Even though this investigation was relatively short, it packed in several fun lessons. Starting with nothing more than a packet capture file, we were able to reconstruct a potential attack against a web server by following the evidence in the network traffic. Along the way, we identified the target operating system, enumerated the web server software and version, and uncovered the exact command an attacker attempted to execute through a Shellshock exploit. Most importantly, we saw how a vulnerability can leave recognizable artifacts in HTTP traffic and how packet analysis can help us piece together what happened.
I chose this challenge for a couple of reasons. First, I needed something a little quicker this week. Second, I’ve been spending more time with Wireshark lately and wanted another opportunity to sharpen my packet analysis skills. This ended up being a perfect fit because it was concise, practical, and focused on core investigative techniques that translate directly to real-world network analysis.
What I enjoyed most about this challenge was learning more about Shellshock itself. Despite being one of those massive, headline-making vulnerabilities a decade ago, it wasn’t one I was particularly familiar with beyond its name and reputation. Digging into how the exploit worked, understanding how attackers delivered commands through HTTP headers, and then seeing those indicators appear directly in a packet capture was a really cool experience. Awesome stuff!
Thanks for your support and partnering on this investigation. If you found this walkthrough helpful — please give it a clap and consider following me! Your feedback is invaluable, and it pumps me up to support your security journey. Remember, cybersecurity is a team sport, and we’re in this together!
Until next week’s challenge — stay curious and be safe out there!
Tools & References:
Challenge Link: https://app.letsdefend.io/challenge/shellshock-attack
Cloudflare - “Inside Shellshock: How hackers are using it to exploit systems”: https://blog.cloudflare.com/inside-shellshock/
Wireshark: https://www.wireshark.org/