
Introduction:
Welcome to my weekly walkthrough! If you’ve stumbled across this blog while looking for a detailed guide to the NTLM Relay blue team challenge from LetsDefend, you’re in the right place.
For this challenge, we’re stepping into the role of a security analyst investigating suspicious activity within an Active Directory environment. What begins as unusual network traffic quickly develops into a potential NTLM relay attack involving SMB authentication, Remote Registry access, and lateral movement between systems.
We’re provided with two primary sources of evidence: a packet capture (traffic.pcapng) and several Windows Event Log artifacts. We’ll bust out Wireshark and Event Log Explorer from the toolbox to examine both network and host-based artifacts.
Using these resources, we’ll identify a suspicious host, analyze NTLM authentication activity, correlate Windows logon events, investigate Remote Registry access, and follow the attacker’s actions as they attempt to access administrative resources on another workstation.
Since NTLM relay is a topic that can become fairly technical, I’ll keep the explanations focused on what matters for the investigation. The goal isn’t just to answer the challenge questions, but to understand why we’re looking for SMB activity, NTLM authentication events, logon records, and administrative share access in the first place.
Sounds like fun, right? Let’s go!
Thanks for reading and going on this investigation with me!
This write-up is for educational purposes only. All intellectual property related to the challenge belongs to the respective owners [LetsDefend]
Challenge Scenario:
During a routine network monitoring session, Sarah, a senior security analyst at Sopranos Enterprises, noticed unusual traffic patterns on their internal network. The traffic appeared to originate from a compromised machine probing multiple systems, suggesting an attempt at lateral movement. It seems the attacker was targeting machines within the Active Directory environment to escalate privileges and compromise additional systems. The security team quickly began investigating, but the full extent of the breach is still unknown. Further analysis of logs and network traffic is required to assess the impact.
NTLM Relay Primer:
Alright, before we dive deeper into the investigation, let’s do a quick high-level recap of how an NTLM relay attack works.
NTLM is a legacy Windows authentication protocol that uses a challenge-response process to verify a user’s identity. Rather than transmitting a password across the network, the client proves it possesses valid credentials by responding to a challenge from the server.
In an NTLM relay attack, an attacker coerces a victim machine into attempting to authenticate to an attacker-controlled resource, often an SMB share. The attacker positions themselves as an adversary-in-the-middle and relays the victim’s authentication messages to another system that accepts NTLM authentication. If successful, the target system treats the attacker as the legitimate user even though the attacker never knows the user’s password. Because the authentication is relayed in real time, there’s no password cracking involved. Instead, the attacker abuses a legitimate authentication attempt to gain access to remote systems, shares, or services.
For an excellent overview of NTLM and NTLM Relay attacks, I’d highly recommend checking out “The Renaissance of NTLM Relay Attacks: Everything You Need to Know” from SPECTEROPS. Great read and it helped inform my own investigation and write-up.
While this challenge isn’t intended to be a perfect representation of every NTLM relay attack, understanding the basics of the attack will help explain the artifacts we’ll be looking for throughout the investigation.
As we analyze the packet capture and Windows event logs, we’ll focus on:
- SMB traffic on port
445 NTLMSSPauthentication activity- Logon events associated with relayed authentication
- Access to remote shares
- Evidence of lateral movement between systems
Keeping this workflow in mind makes it easier to understand why these seemingly separate network and log artifacts are all connected. Let’s go!
Question 1: Which IP address in the network traffic lacks a hostname and is considered suspicious?
Let’s kick off this investigation.
Extract NTLM-Relay.7z. Inside, you’ll find a folder called Logs, which contains several Windows Event Logs, along with traffic.pcapng, a network packet capture file. This means we’ll approach the challenge from two different perspectives: Windows logs and network traffic.
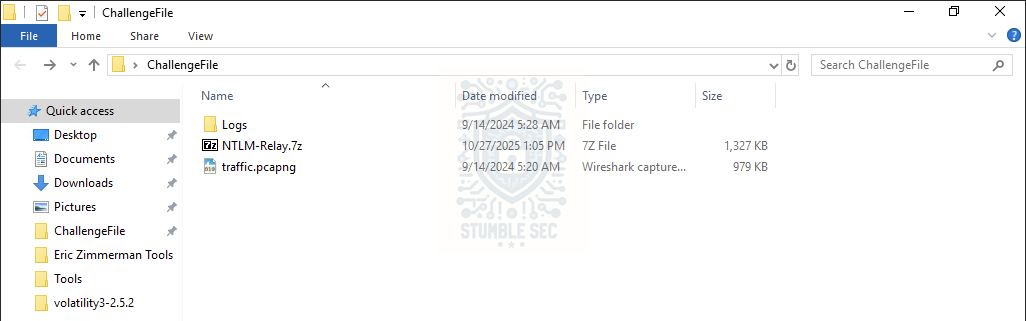 Overview of the challenge artifacts
To answer Question 1, we’ll start with the network traffic in traffic.pcapng. Double-click the file to open it in Wireshark.
To get a quick view of all hostnames contained in the capture, enable Resolve Network Addresses under View > Name Resolution.
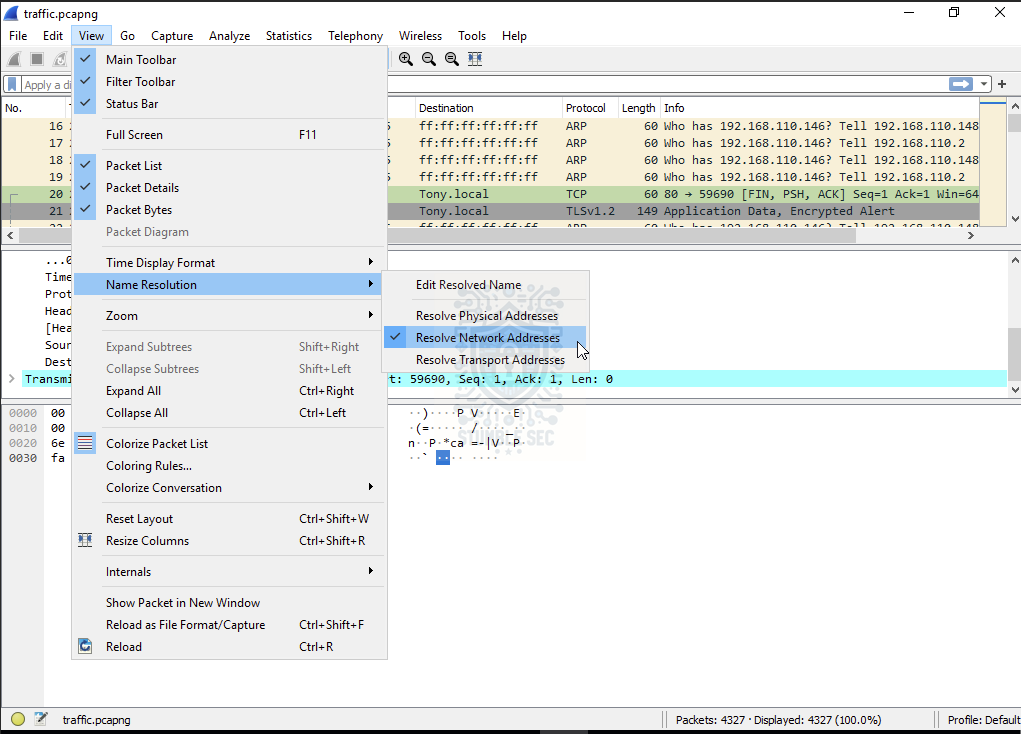 Wireshark: Setting network address resolution
Next, select Statistics > Resolved Addresses. When the window opens, select Hosts from the dropdown menu. This provides a quick overview of the addresses and hostnames observed in the capture.
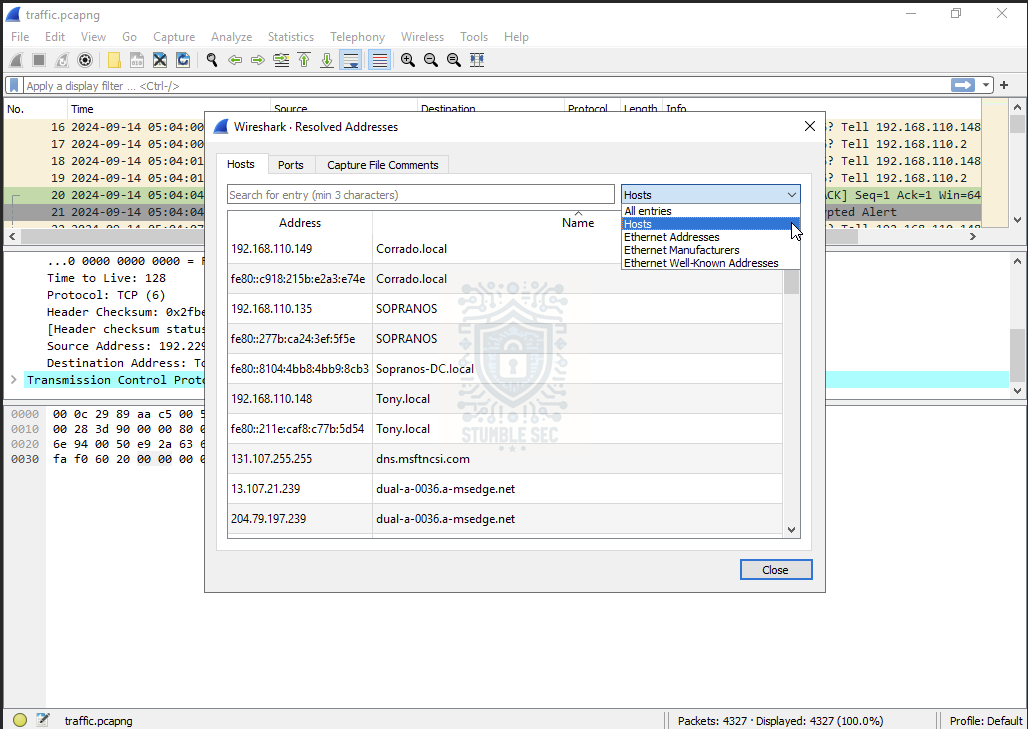 Wireshark: Viewing the observed Hosts addresses
Focusing on the non-routable LAN addresses, the most suspicious entry is SOPRANOS/192.168.110.135, which lacks the .local domain identifier visible on the other internal systems.
This stands out because, while the hostname resembles the organization’s naming convention (username.local), it a little strange. Given the scenario’s focus on lateral movement within an Active Directory environment, a system that differs from expected naming conventions deserves a little more scrutiny.

Question 2: When did the attacker first initiate a network scan within the environment?
Now that we’ve identified the attacker’s IP address, we can pivot and filter the packet capture to determine when the scanning activity began.
|
|
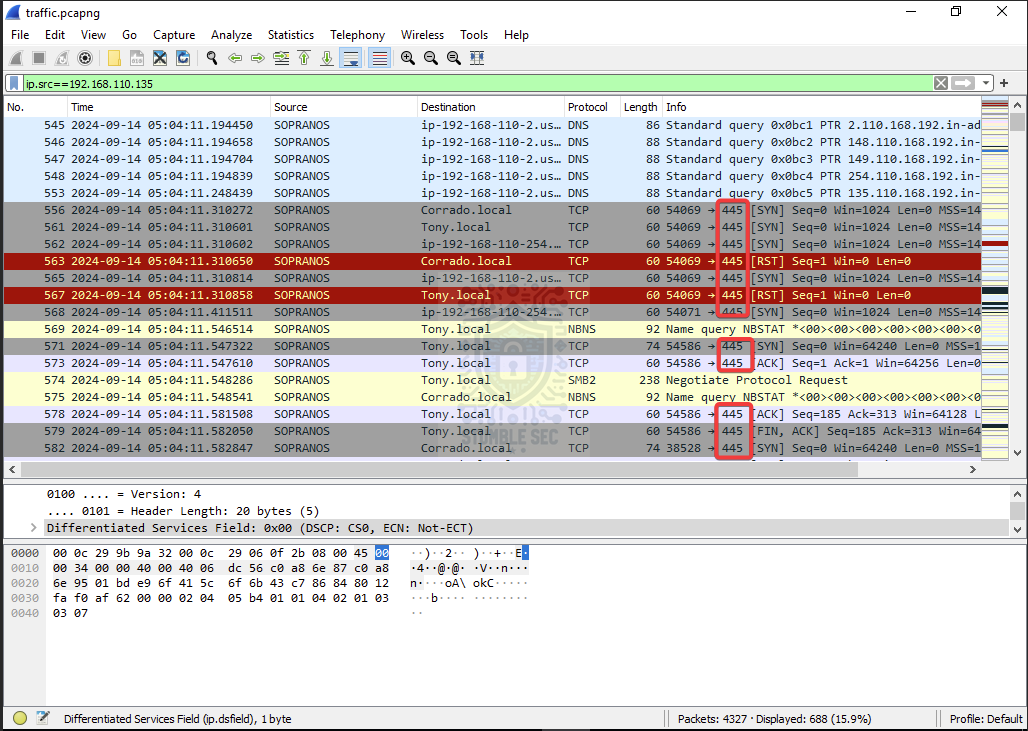 Wireshark: Filtering for traffic with the attacker’s IP as the source
Right away, you’ll notice numerous connection attempts involving port 445. This is the SMB port commonly used for file sharing and other Windows networking functions, making it a critical detail in our investigation. Remember from our brief NTLM relay primer that attackers often attempt to coerce a victim into authenticating to an attacker-controlled SMB service as a relay point.
Let’s refine the filter further so we only view SMB-related traffic.
|
|
This provides a clearer view of the attacker’s SMB-focused activity and helps us identify when the enumeration of SMB services began. Looking at the first matching entry in the packet capture, we can see the earliest observed scan activity occurred at:
2024-09-14 05:04:11
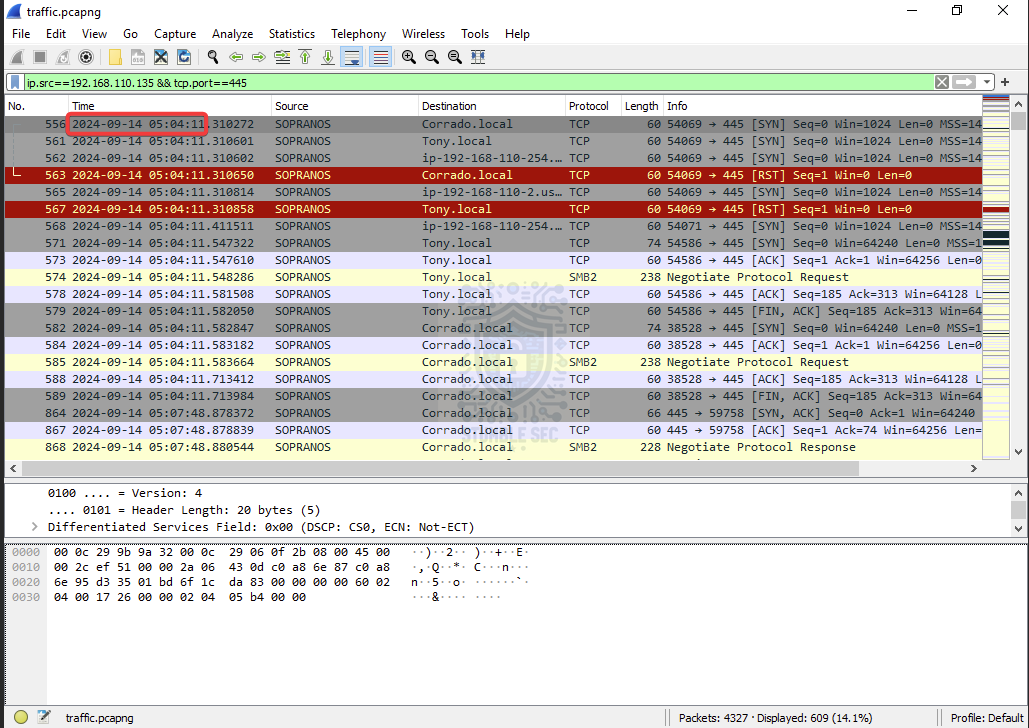 Wireshark: Filtering for traffic with the attacker’s IP as the source bound for port 445

Question 3: What is the hostname associated with the IP address 192.168.110.148?
To answer Question 3, we can return to the Wireshark Resolved Addresses view we used earlier.
From Statistics > Resolved Addresses, select Hosts to view the mapping between observed IP addresses and hostnames in the packet capture.
Viewing the observed Hosts addresses
Reviewing the list, we can see that 192.168.110.148 is associated with the hostname Tony.

Questions 4 & 5:
Understanding the domain structure is crucial for tracking the attacker’s movement within the network. What is the domain name of the current network environment?
Which authentication protocol was used in the NTLM relay attack?
Let’s recap what we know so far. We’ve identified the attacker’s IP address, the targeted network protocol, and another user/device within the environment. Now let’s continue digging into Wireshark to understand the victim’s domain and determine which authentication protocol was used during the NTLM relay attack.
As a quick refresher, attackers often attempt to coerce a victim into authenticating to an attacker-controlled SMB service during an NTLM relay attack.
I’m putting the cart before the horse a bit, but we can answer both Question 4 and Question 5 using the same filter. Apply the following display filter in Wireshark:
|
|
This filter isolates NTLM Security Support Provider traffic observed in the packet capture and gives us the answer to Question 5: NTLMSSP
According to Microsoft Learn:
NTLMSSP, whose authentication service identifier is RPC_C_AUTHN_WINNT, is a security support provider that is available on all versions of DCOM. It uses the NTLM protocol for authentication. NTLM never actually transmits the user’s password to the server during authentication.
To answer Question 4, keep the ntlmssp filter applied and use Wireshark’s search feature. Select the magnifying glass icon, choose String, and change the search area to Packet details. Then enter domain into the search field.
This allows us to quickly locate the domain information contained within the NTLM authentication messages and identify the domain name used in the environment, which is unsurprisingly Sopranos.
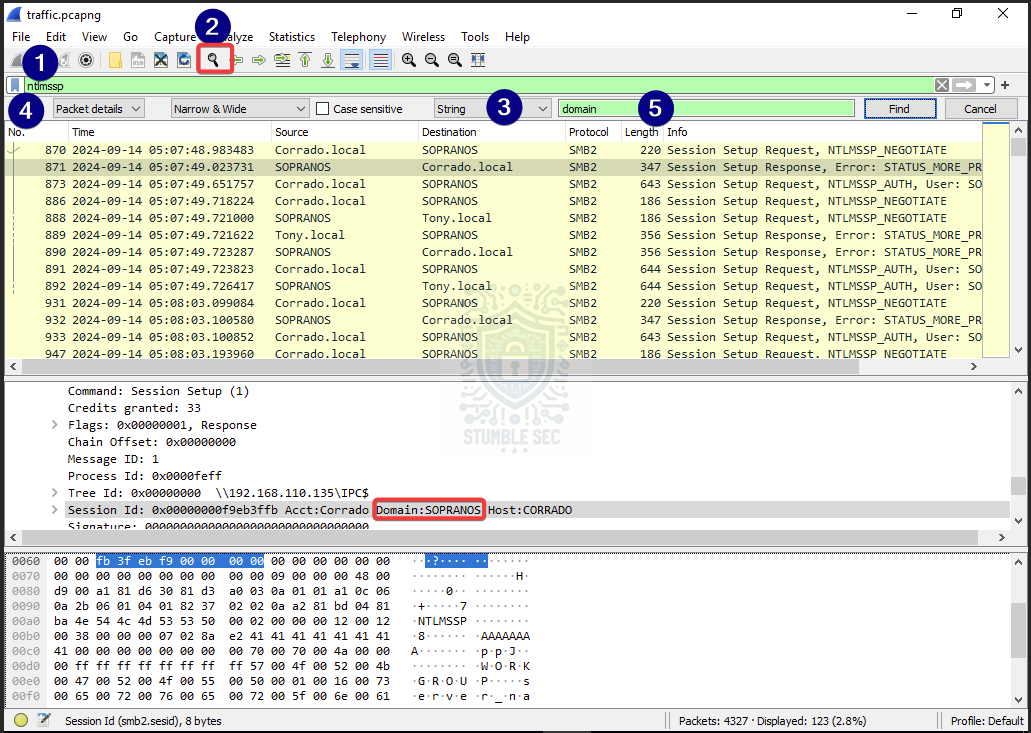 Wireshark: Searching for domain strings in ntlmssp traffic


Question 6: Part of the breach involved stealing hashes from user accounts. Which user account had its hash compromised by the attacker?
Now that we’re homing in on the authentication protocol, let’s return to our filtered traffic.pcapng and focus on the NTLMSSP events. Specifically, we’re looking for NTLMSSP_AUTH messages, which identify the account being used during the NTLM authentication process.
Reviewing the NTLMSSP_AUTH traffic reveals the account, Corrado.
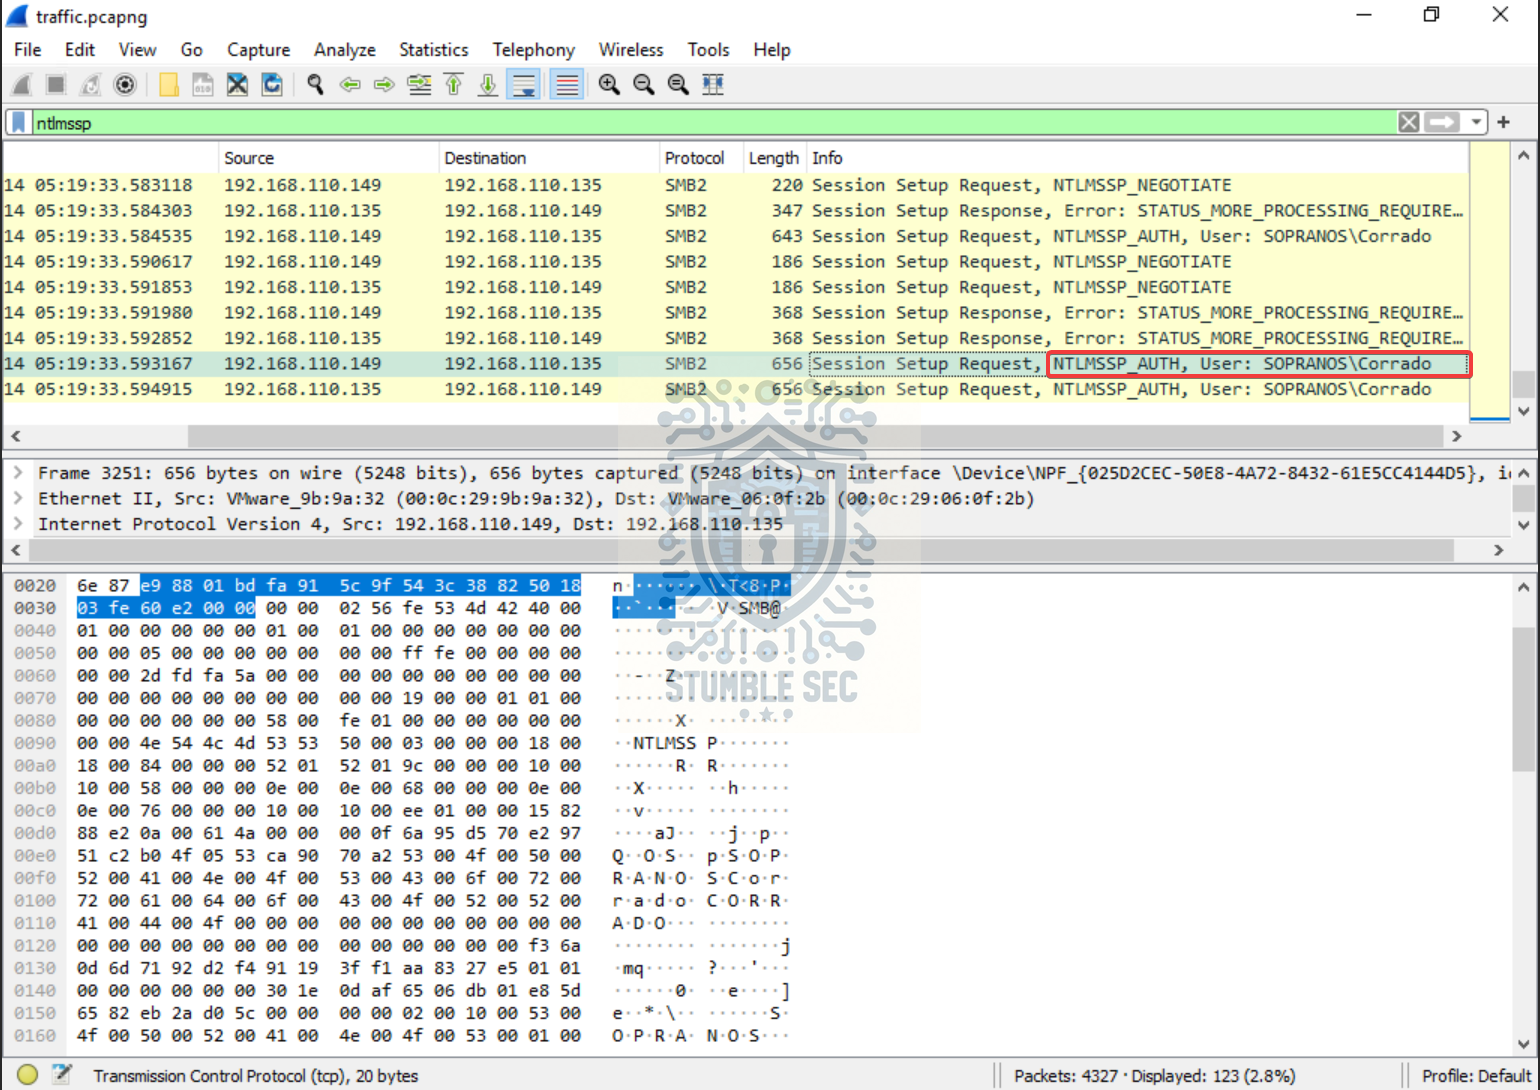 Wireshark: Identifying the compromised user account
One thing worth noting is that the wording of this question is a little tricky. Remember, in an NTLM relay attack, the attacker typically relays a victim’s authentication attempt to another share, server, or service. The phrasing here suggests that a hash was directly stolen, which made me initially think of techniques like password cracking or Pass-the-Hash.
While those are legitimate attack techniques that also abuse NTLM authentication, they’re different from a traditional NTLM relay attack. In this case, the packet capture shows that the Corrado account was involved in the NTLM authentication activity being leveraged by the attacker, so it works for this question.

Question 7: What source port was used to authenticate to the target workstation using the compromised account?
Now that we’ve identified the compromised account, we’ll take this opportunity to pivot to the Security.evtx event log artifact in the Logs folder. This Windows event log contains, among other things, the successful logon events (4624) that we can use to correlate Corrado’s authentication activity to the compromised workstation.
While we could simply double-click the artifact to open it in Windows Event Viewer, let’s take advantage of another excellent tool included in the LetsDefend VM: Event Log Explorer.
Event Log Explorer is a third-party utility with awesome filtering capabilities that can make Windows event log analysis much simpler. To get started, open the application and drag Security.evtx into the window to load it.
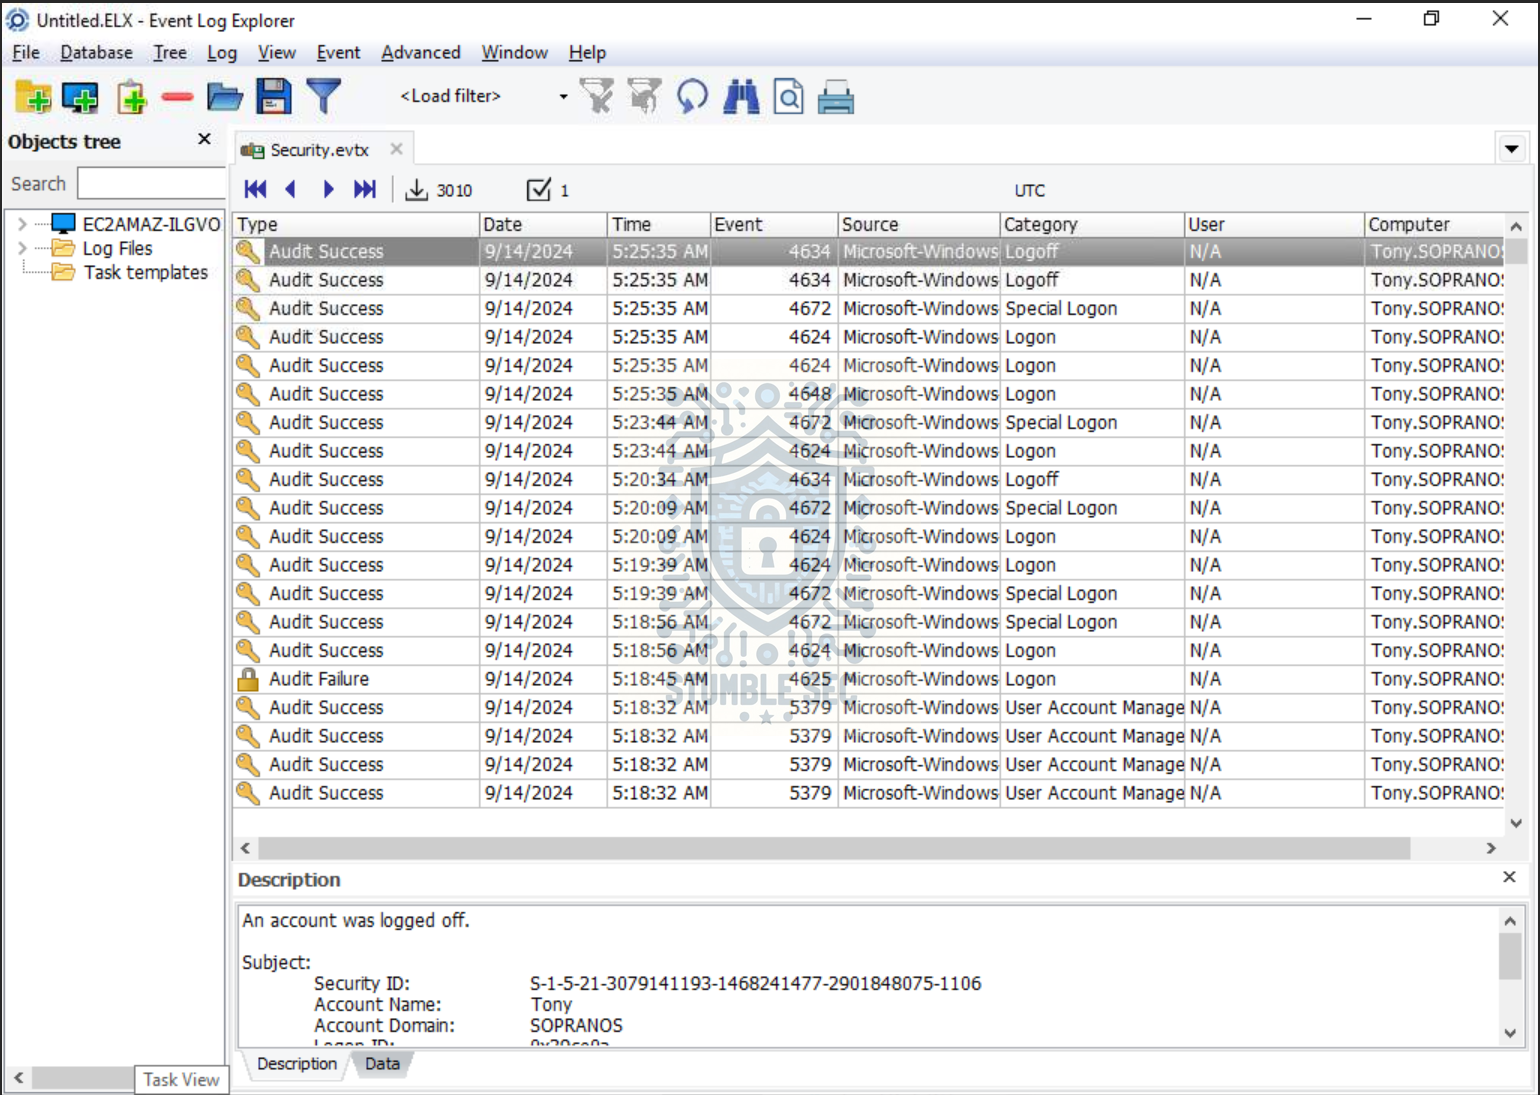 Event Log Explorer: Loading Security.evtx
With the log file loaded, click the filter button and enter 4624 in the Event ID(s) field to focus on successful logon events. Then add Corrado to the Text in description field.
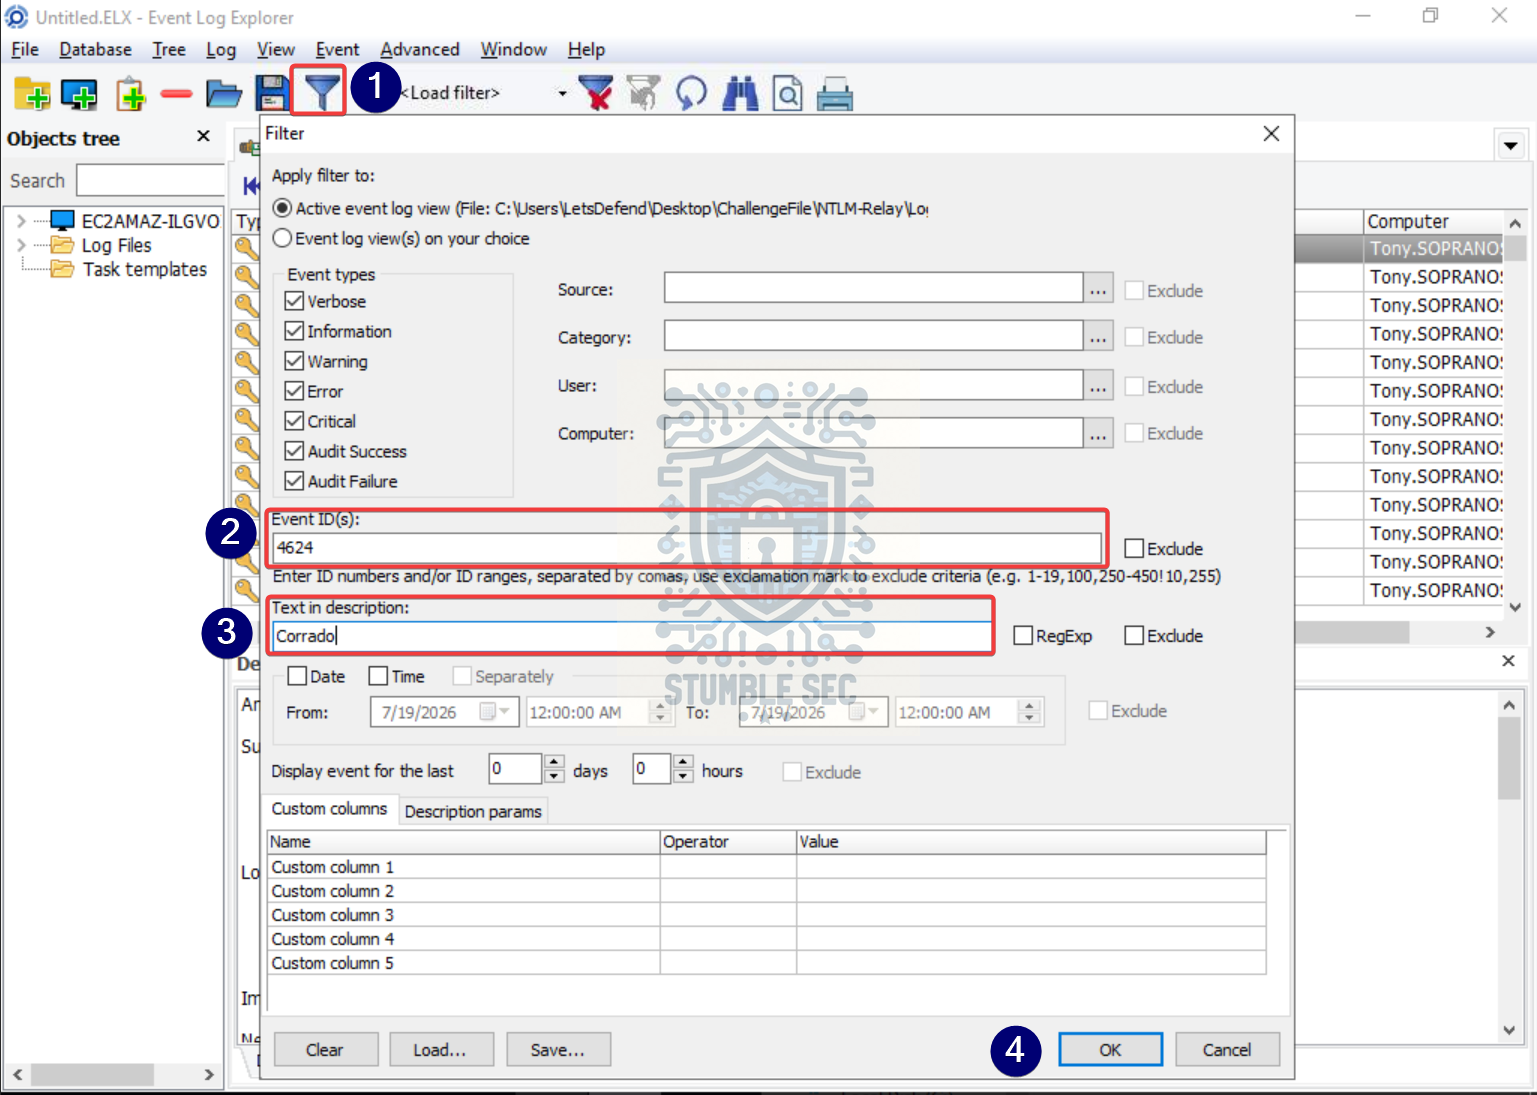 Event Log Explorer: Filtering Security.evtx for 4624 events
This returns a single successful logon event that provides several key insights into the attack.
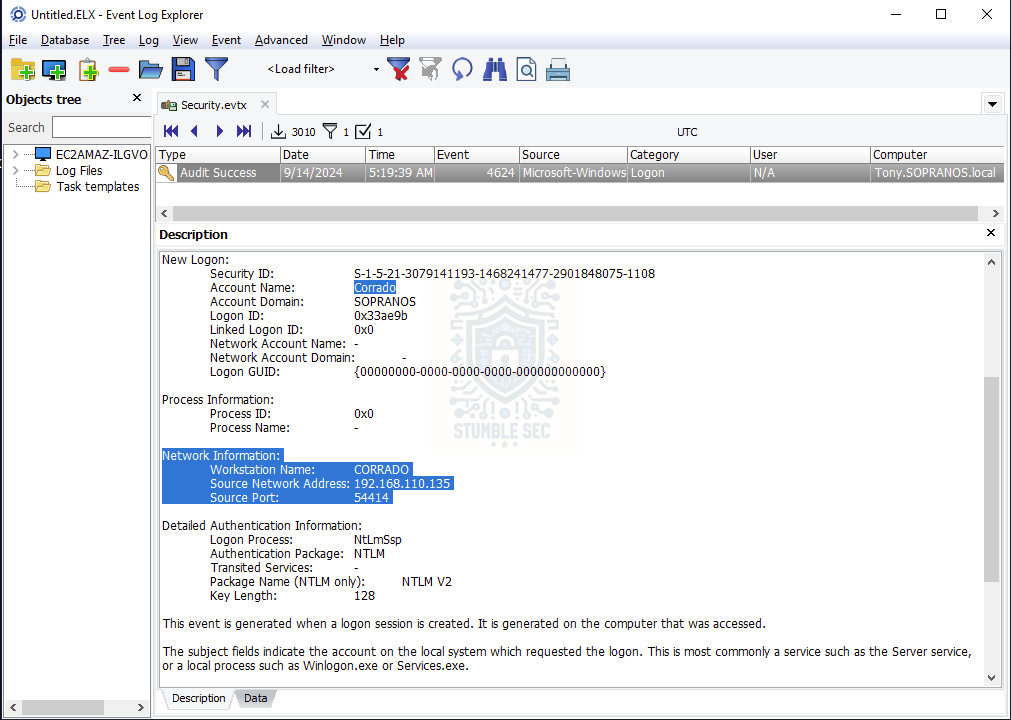 Event Log Explorer: Identifying the source port and IP address of the suspicious login
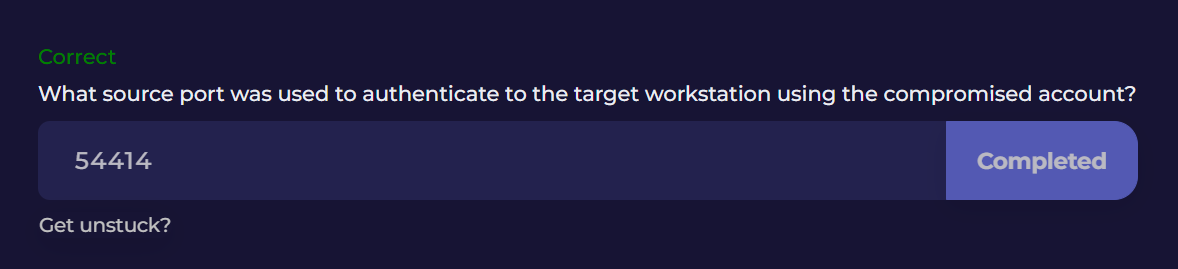
To answer Question 7, we can review the Network Information section of the event and identify the source port as 54414.
More interestingly, notice that the Source Network Address is 192.168.110.135, the attacker’s IP address, rather than 192.168.110.149, which we previously associated with Corrado’s device in the packet capture.
I’m calling this detail out in the context of an NTLM relay attack. The authentication is recorded as Corrado’s account, but the network connection originates from the suspicious host. While this evidence alone isn’t a smoking gun proving NTLM relay activity, it’s a bit sus and aligns with the adversary-in-the-middle behavior discussed earlier, where a victim’s authentication is relayed through an attacker-controlled system to another target.
Let’s keep digging.
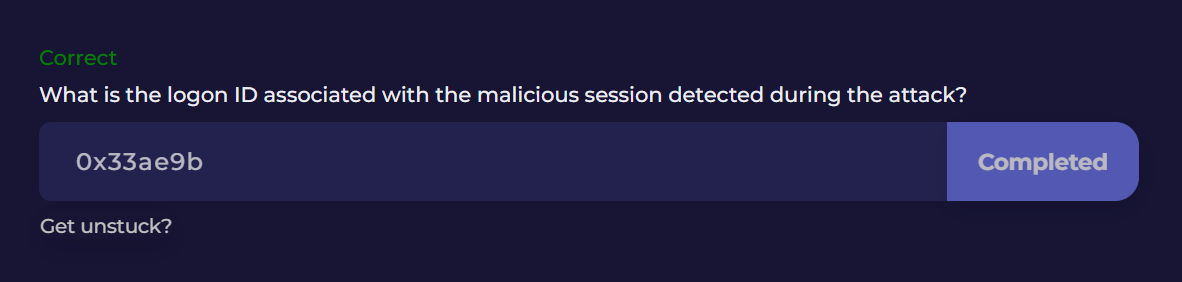
Question 8: What is the logon ID associated with the malicious session detected during the attack?
While reviewing the successful 4624 logon event from the previous question, we can also identify the associated Logon ID.
The Logon ID is located under the New Logon section of the event details and can be useful when correlating related authentication and activity events throughout an investigation. For example, you can use the Logon ID to tie together logon, process creation, privilege use, and logoff events that belong to the same session.
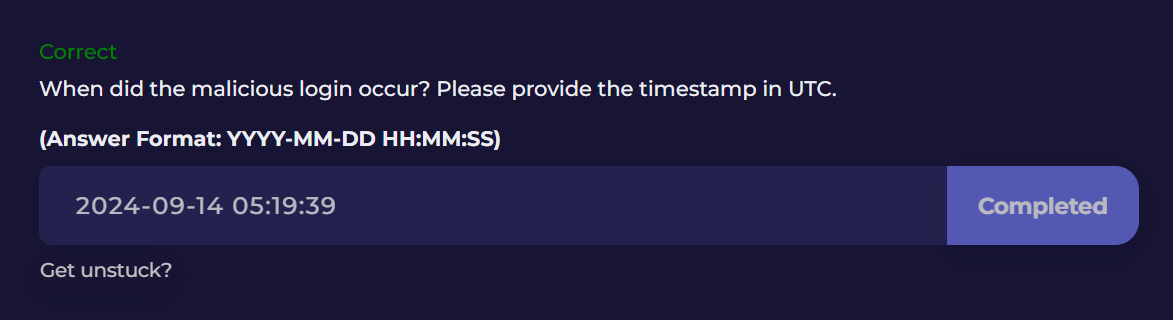
Question 9: When did the malicious login occur? Please provide the timestamp in UTC.
To answer Question 9, we’ll stick with Event Log Explorer. There’s a little trick to finding the login timestamp in UTC.
While the event listing already includes a time column, this typically displays the event using the local system time. Since the question specifically asks for the UTC timestamp, we’ll need to look a little deeper.
Double-click the 4624 logon event, switch to the XML tab, and scroll to the SystemTime field within the event data.
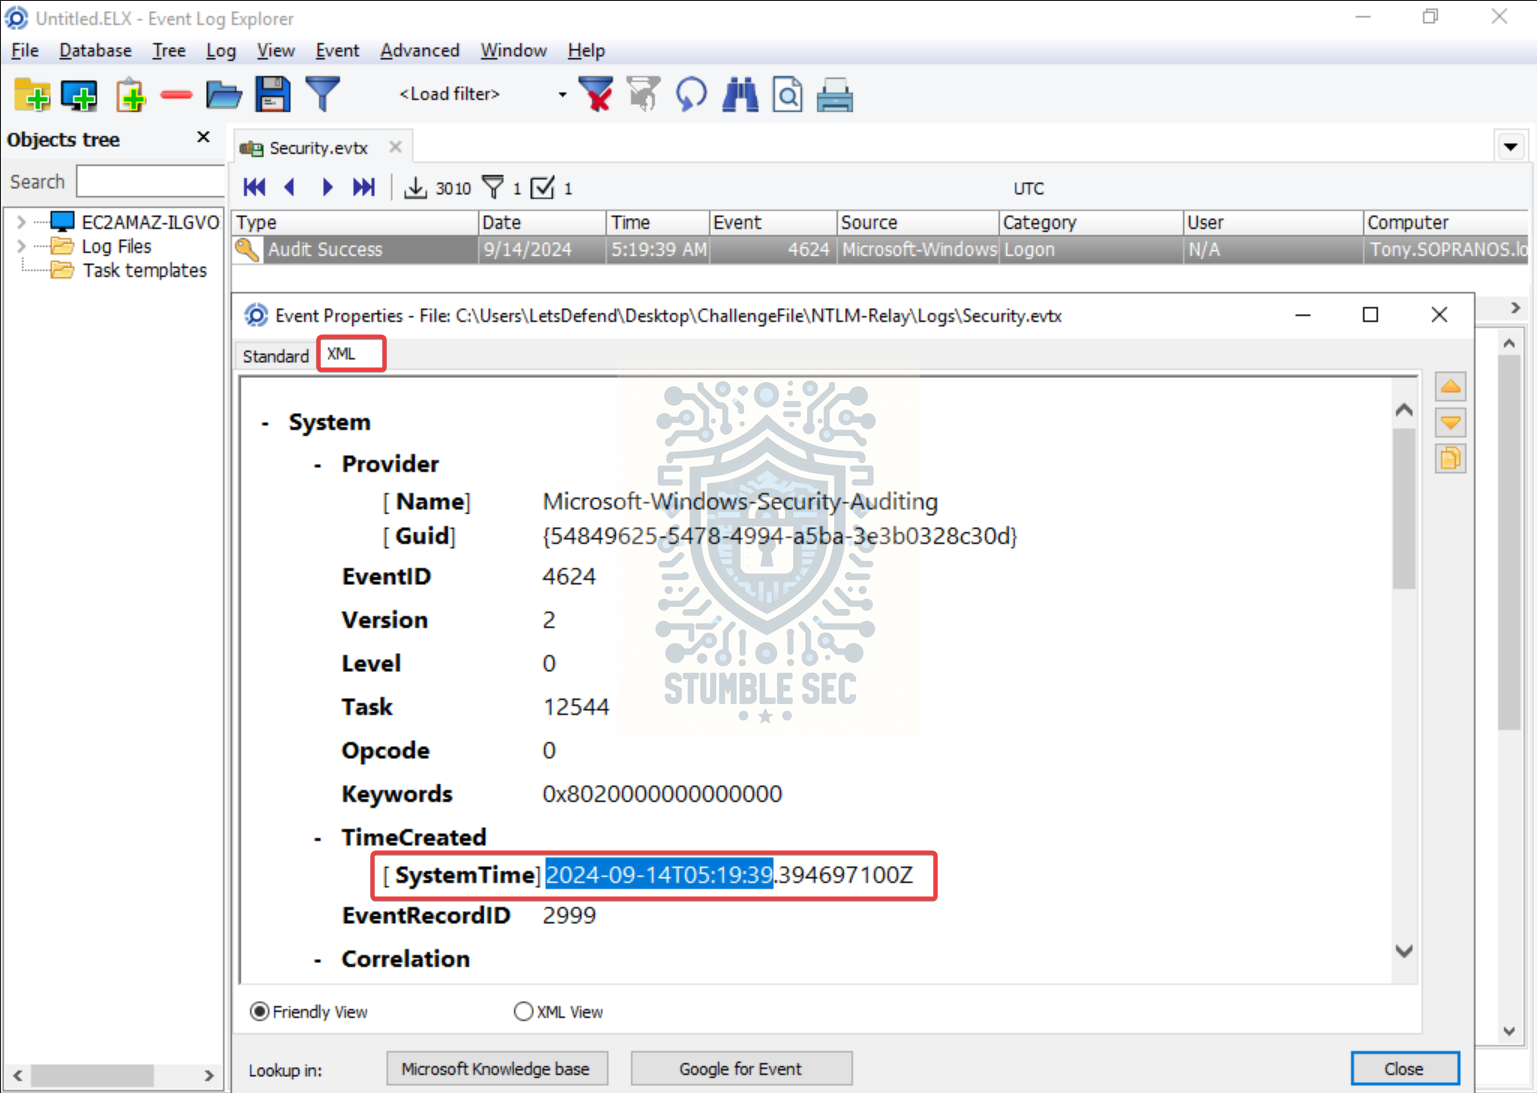 Event Log Explorer: Identifying the UTC timestamp of the malicious login
Question 10: How many failed login attempts were recorded before the attacker successfully logged in?
Let’s pivot away from the successful logon events (4624) and focus on failed logon events (4625).
We’ll use the same process in Event Log Explorer, but this time we’ll update the filter to return only 4625 events and review the resulting logon failures.
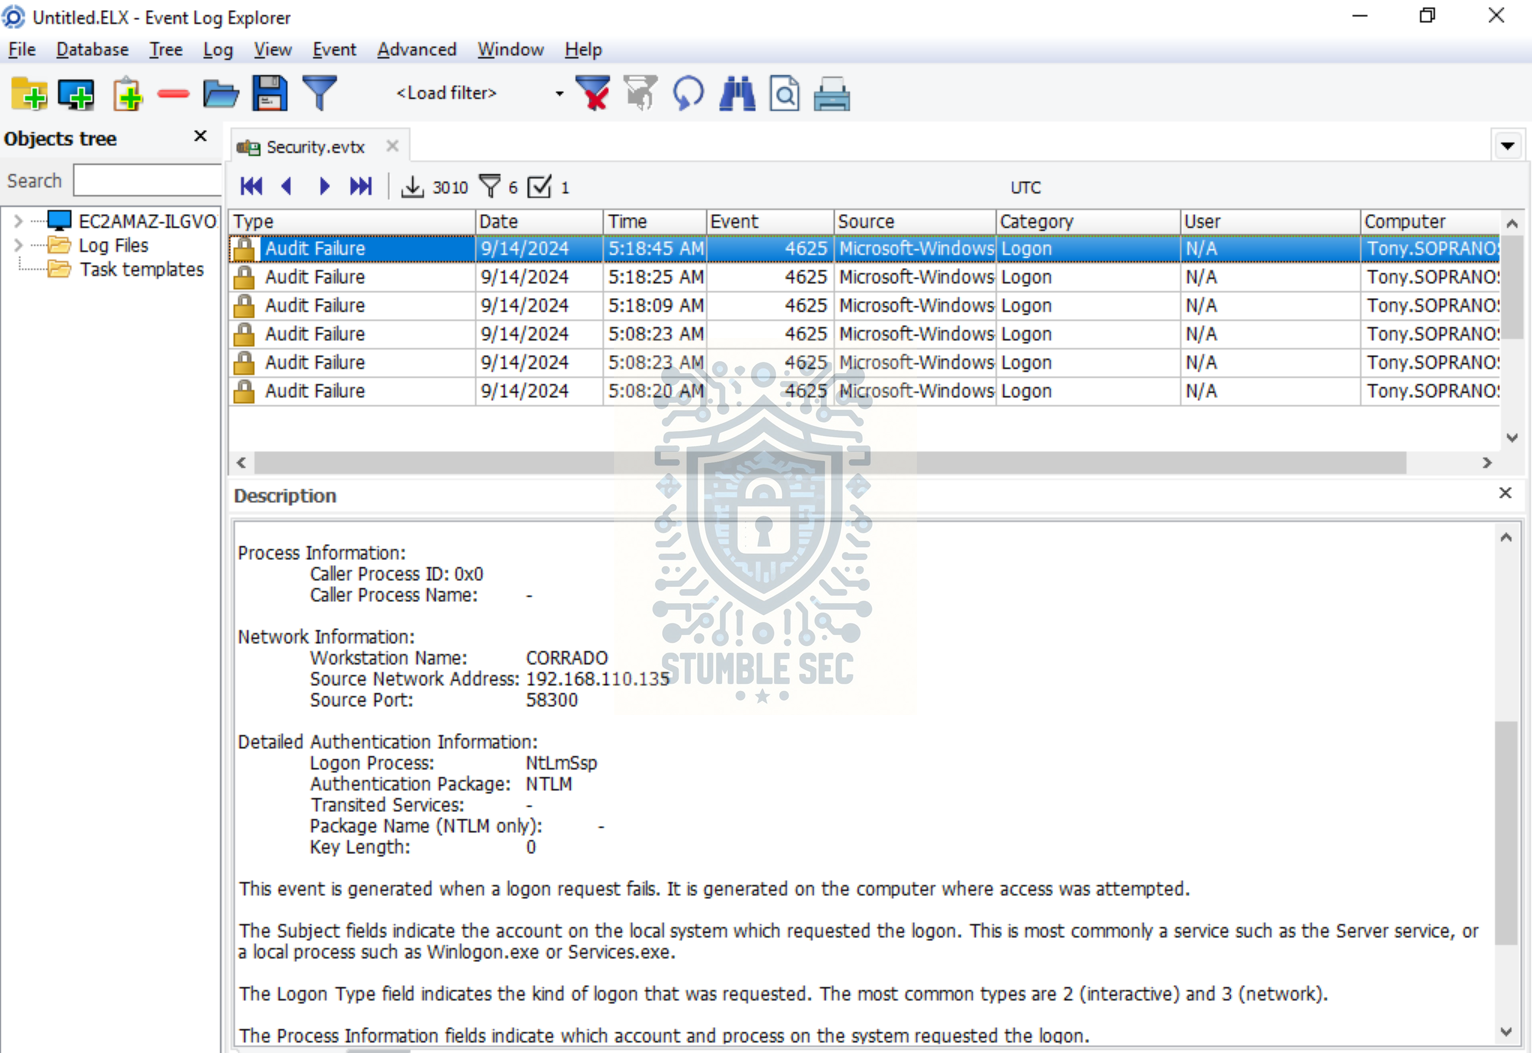 Event Log Explorer: Identifying all logon failures
The results show a total of six failed logon attempts.
Looking more closely at the events, each failed logon originates from the same source network address, 192.168.110.135, and uses NtLmSsp for authentication. This is the same suspicious host we’ve been tracking throughout the investigation. Context, context, context.
Question 11: Which protocol did the attacker use to access the Windows registry remotely?
Let’s jump back over to Wireshark and see if we can identify any remote registry activity. To do that, we’ll spend a minute researching how Windows Remote Registry operations are represented in packet captures.
According to the Wireshark Wiki, the Microsoft Windows Remote Registry Service (WINREG) protocol is used to access the Windows Registry remotely across the network.
Armed with that information, we can apply the following display filter in Wireshark:
|
|
If remote registry activity is present in the capture, this filter will isolate the relevant traffic and allow us to confirm the protocol in use.
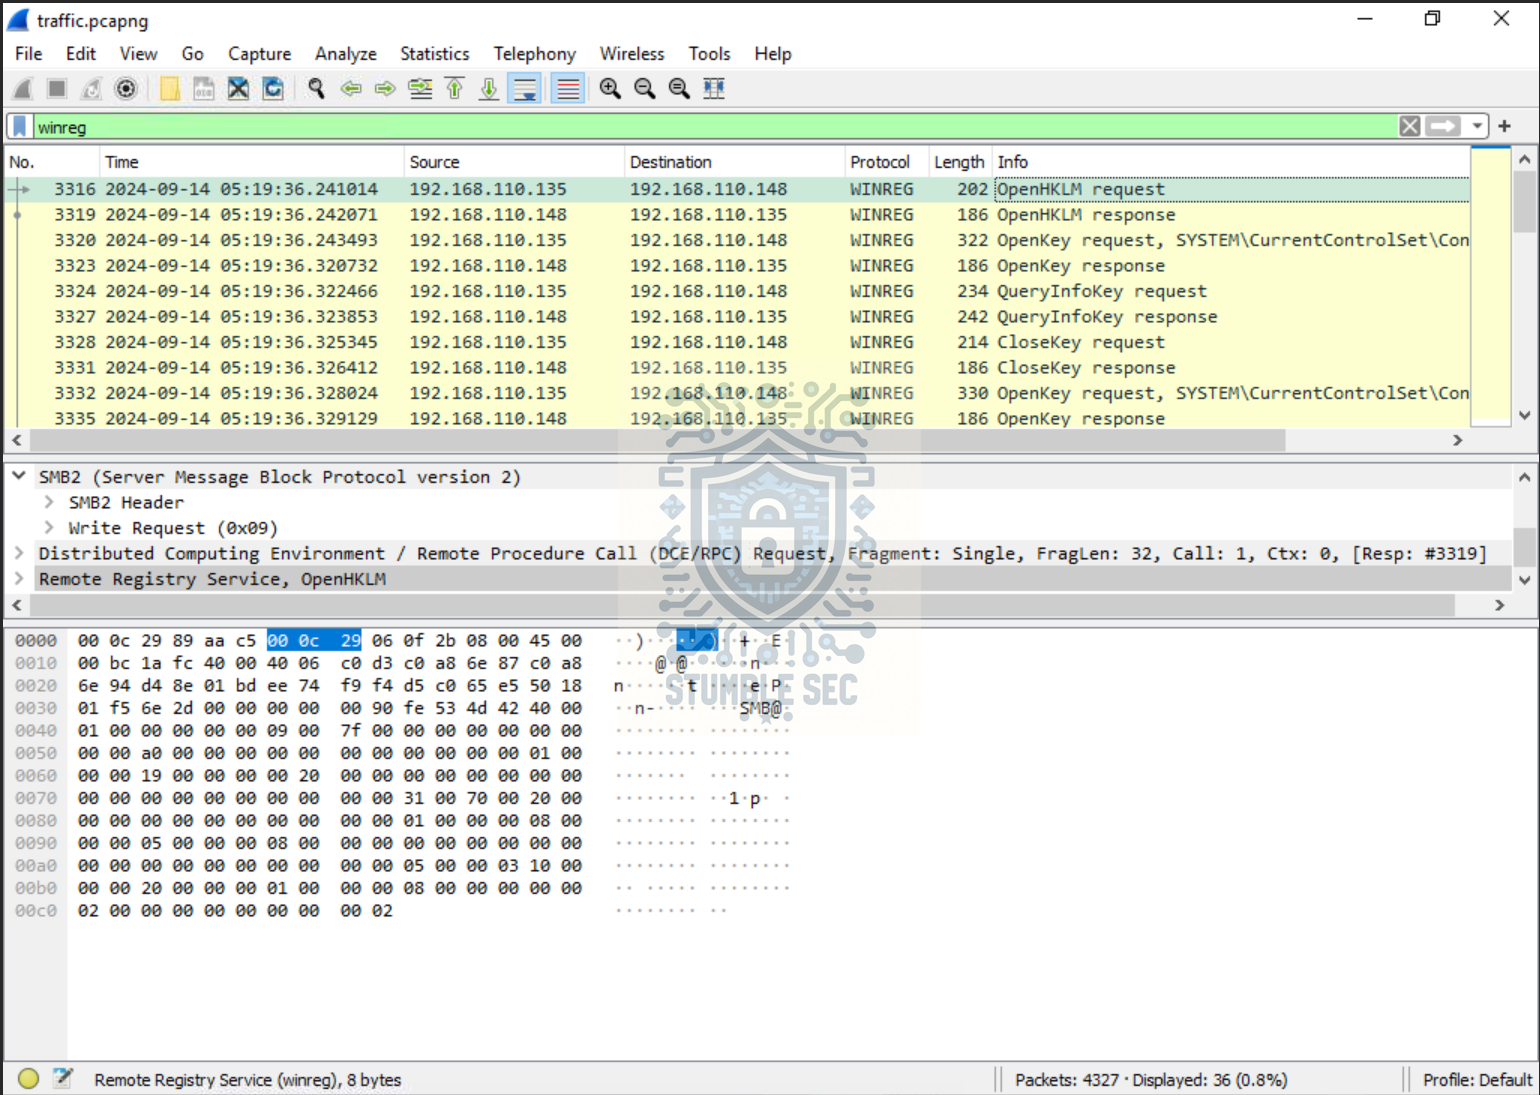 Wireshark: Filtering WINREG protocol traffic
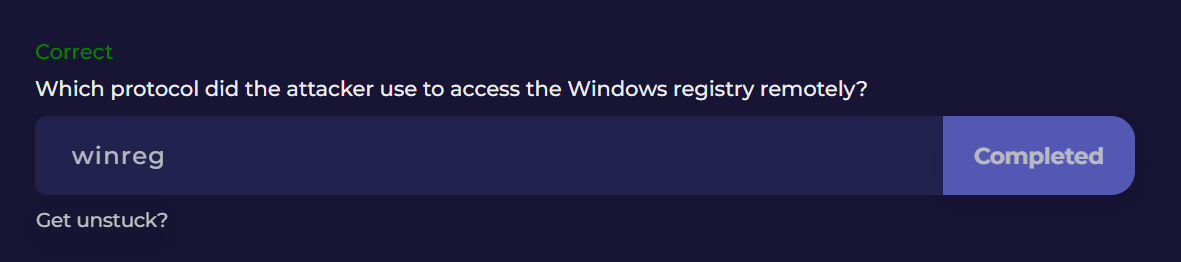
The filtered results show Windows Remote Registry traffic, confirming that the attacker used the WINREG protocol to access the registry remotely.
Question 12: Which registry key was the attacker able to access that is responsible for credential storage?
Next up, we’ll need to identify the specific registry key the attacker accessed through the Remote Registry service.
Back in Wireshark, keep the winreg display filter applied and review the captured Remote Registry activity. Looking through the packets, we’ll eventually find an OpenKey request referencing the following registry path:
|
|
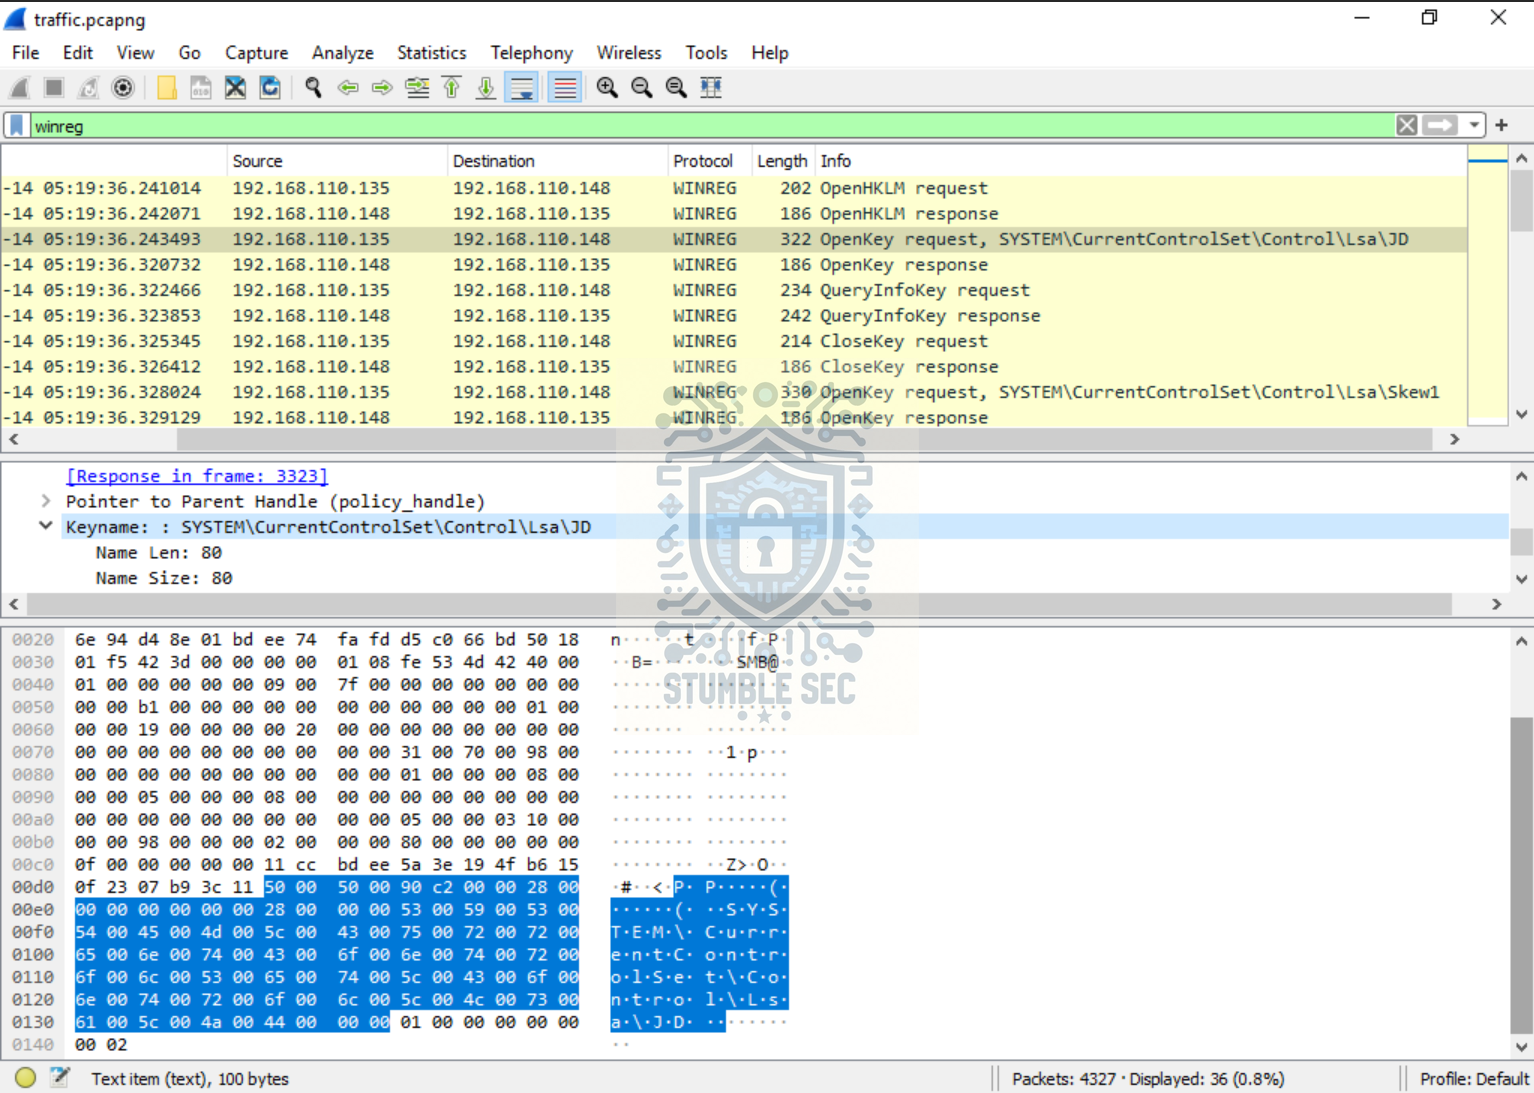 Wireshark: Identifying the remote registry key accessed by the attacker
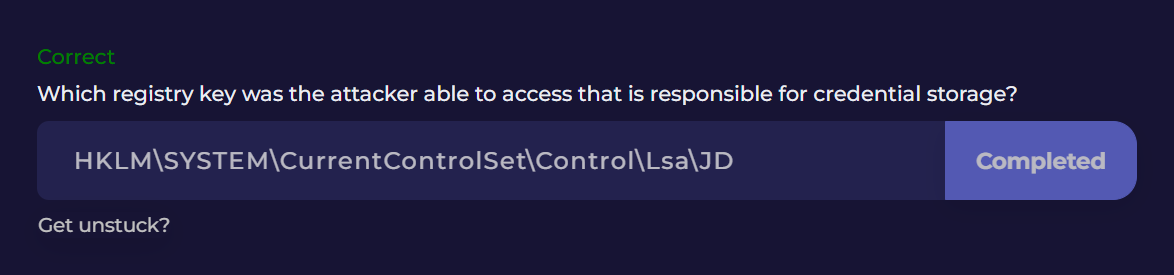
This one is really interesting because it gives us some insight into the attacker’s potential objectives.
The Local Security Authority (LSA) plays a central role in Windows authentication and the protection of credential-related information. When an attacker starts accessing LSA-related registry keys, it can be an indication that they’re attempting to gather authentication material that could be used to expand access or move laterally through the environment.
While the presence of this key alone doesn’t prove credential dumping occurred, it aligns with the playbook associated with tools such as secretsdump.py that are used to dump password hashes and other authentication secrets from Windows systems.
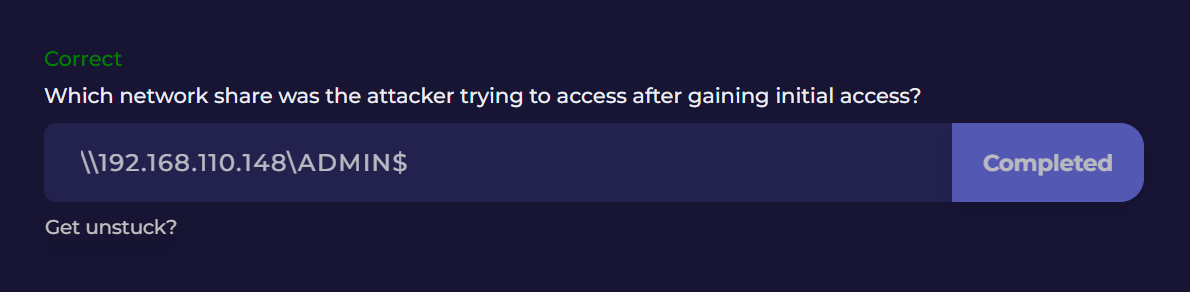
Question 13: Which network share was the attacker trying to access after gaining initial access?
Okay, now we’re starting to see where this attack may have been headed.
Based on the evidence we’ve collected so far, the attacker appears to have leveraged NTLM authentication to gain access to Tony’s device, performed Remote Registry activity against LSA-related keys, and then attempted to access a network share. Let’s see what we can find.
Back in Wireshark, change the display filter to show SMB traffic originating from the suspected attacker host:
|
|
With the filter applied, look for a Tree Connect Response packet. In this capture, turn your attention to packet 3397 indicating access to a network share.
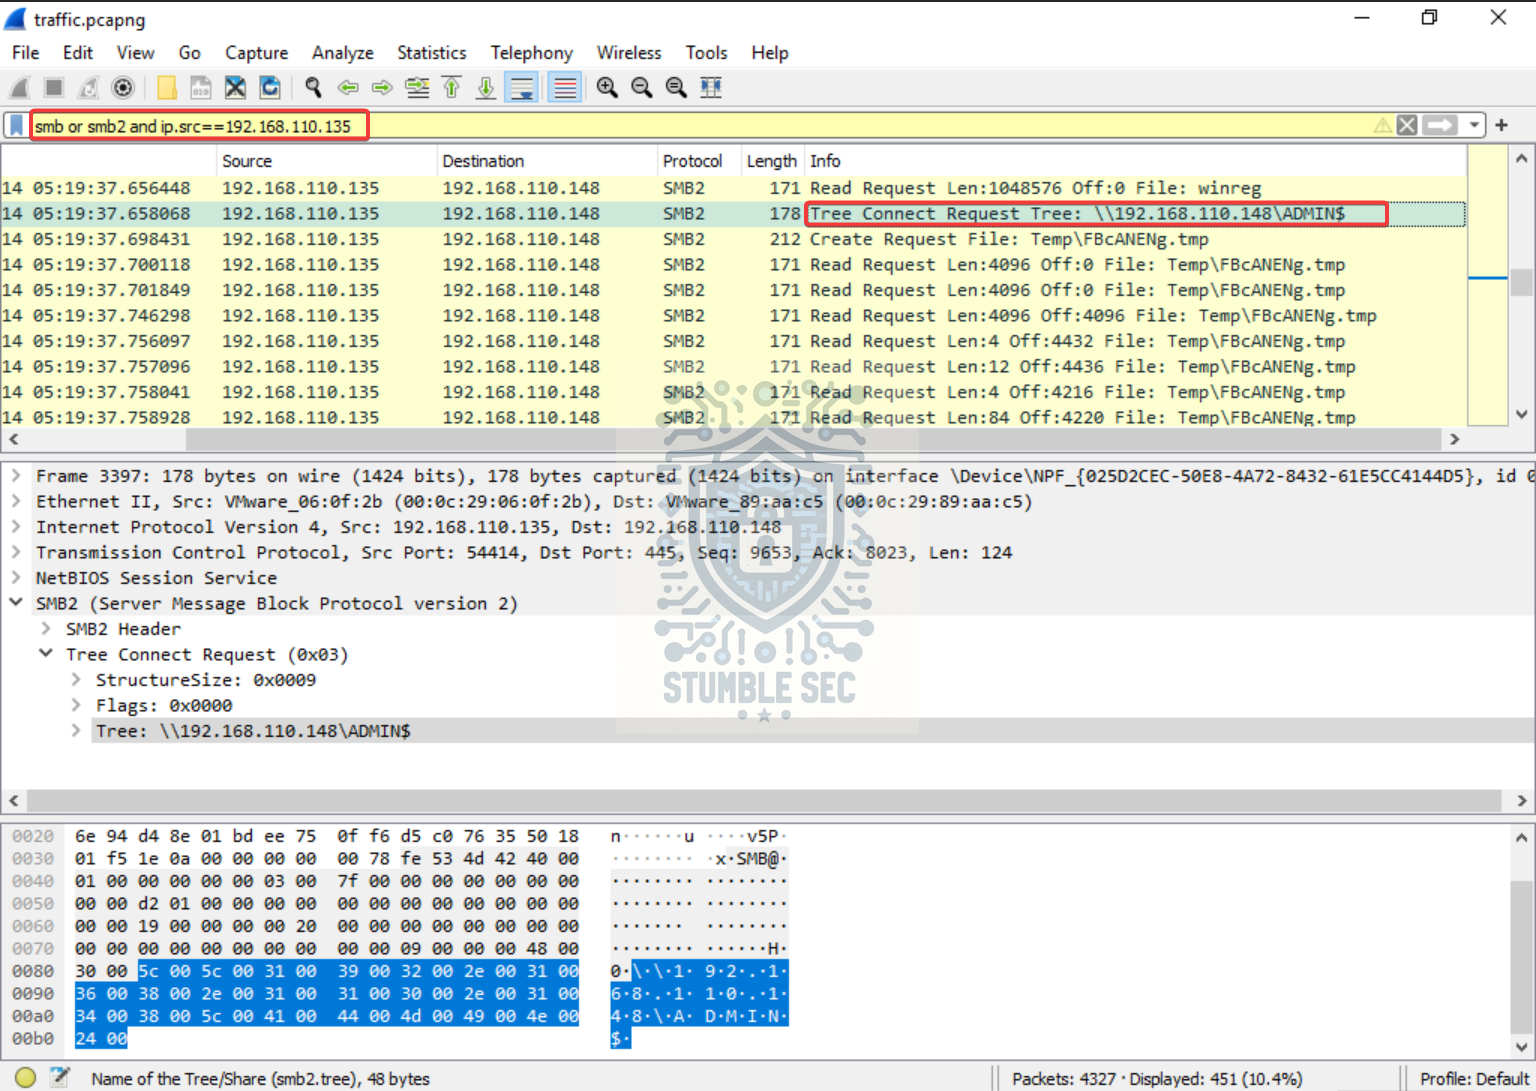 Wireshark: Identifying the network share targeted by the attacker
Reviewing the packet details reveals that the attacker connected to:
|
|
Remember from Question 3 this is Tony’s device. The ADMIN$ share is one of Windows’ classic built-in administrative shares. Users with administrative permissions can use it to remotely access the system’s file structure and perform administrative/malicious tasks.
Taken together with the previous evidence, this suggests the attacker was attempting to leverage administrative access on Tony’s workstation following the authentication activity we observed earlier. Yikes!
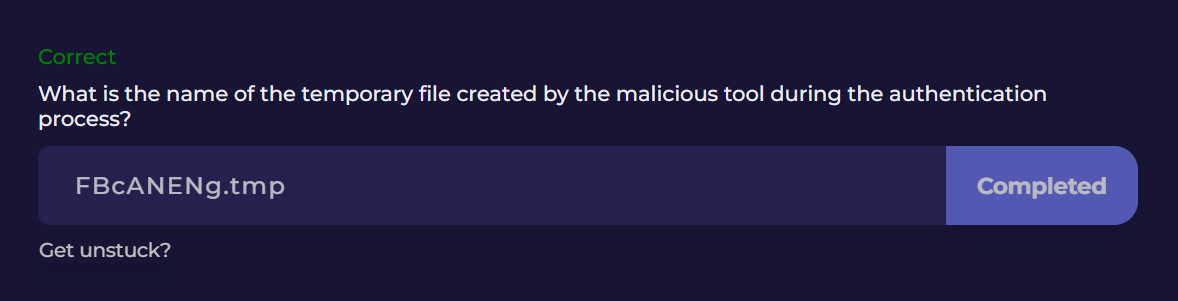
Question 14: What is the name of the temporary file created by the malicious tool during the authentication process?
Continuing our review of the SMB activity, we can look directly below the SMB2 Tree Connect request from the previous question.
A couple packets later, packet 3399 contains a Create Request operation for the following file:
|
|
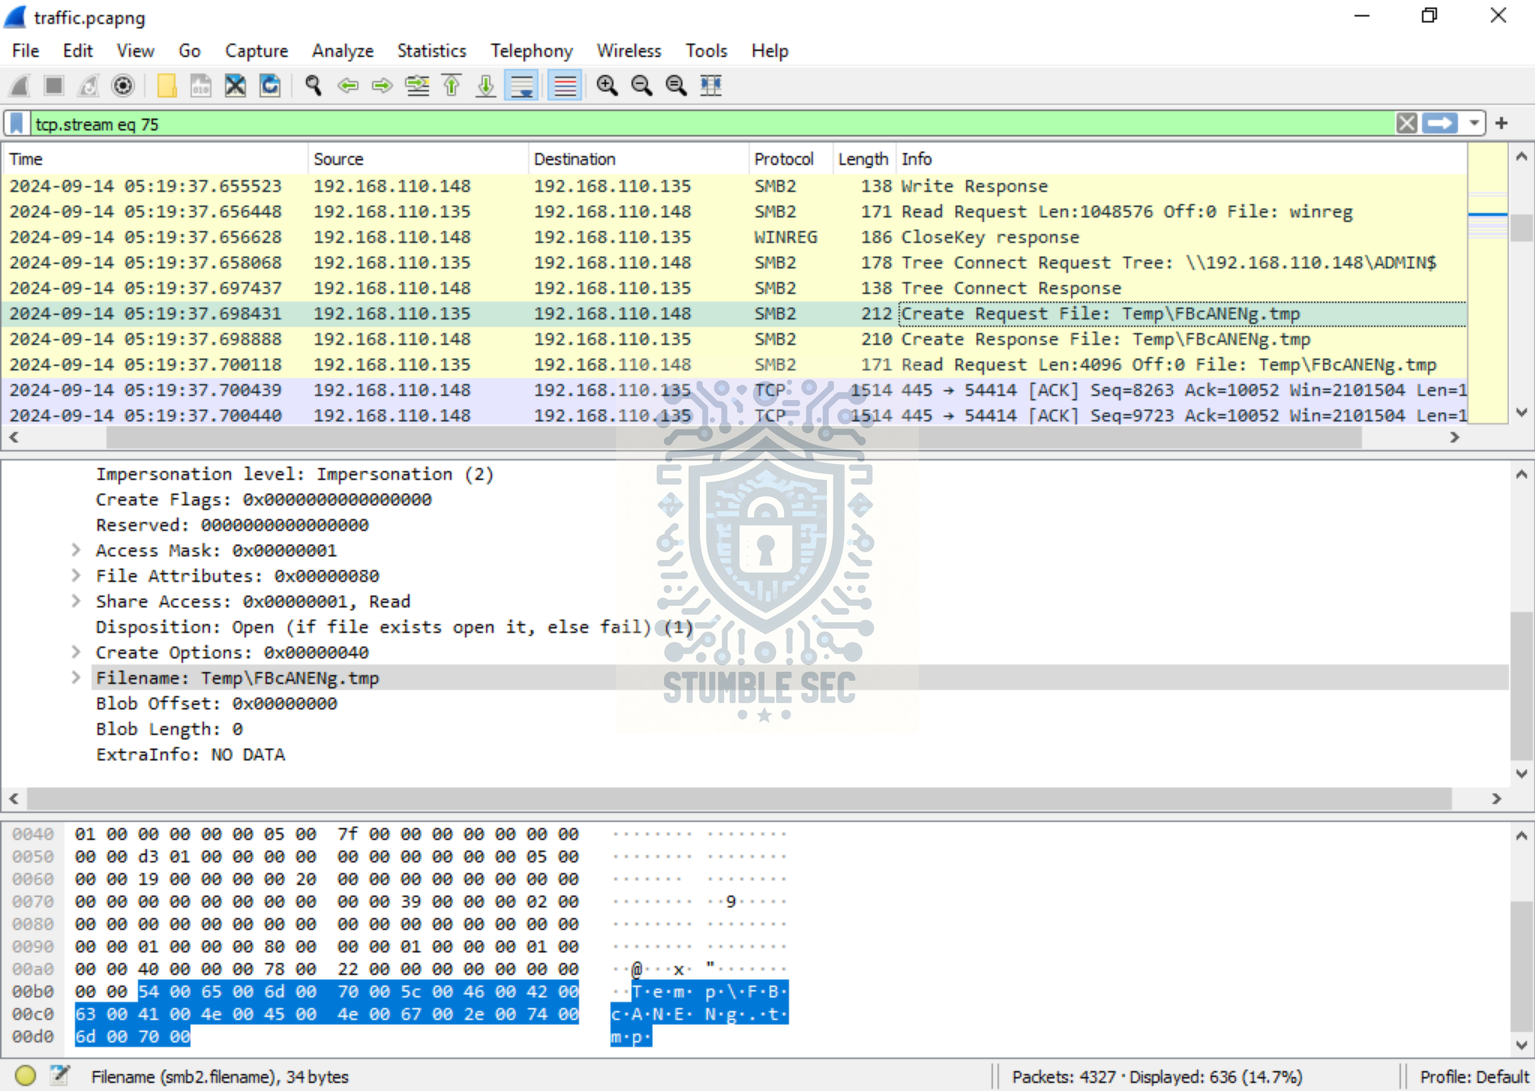 Wireshark: Identifying the temporary file created during the authentication process
This indicates that a temporary file was created on the target system as part of the attacker’s activity.
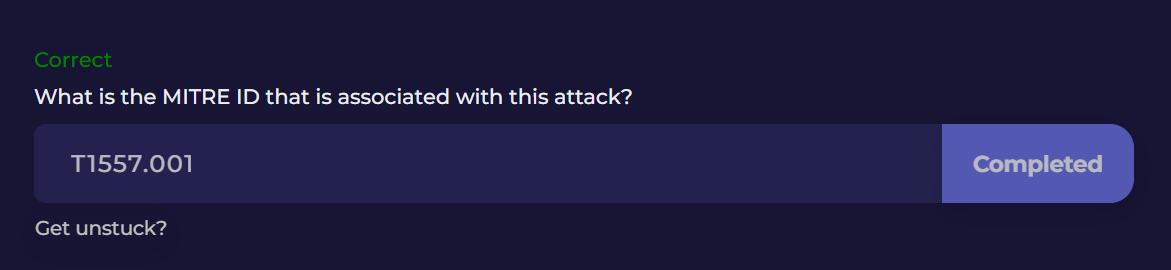
Question 15: What is the MITRE ID that is associated with this attack?
Okay, we’ve made it to the last question in our investigation!
Our final objective is to take everything we’ve uncovered and identify the MITRE ATT&CK technique that most closely aligns with the attacker’s activity.
Throughout the investigation, we observed NTLM authentication activity, evidence suggesting a possible NTLM relay, Remote Registry access, and subsequent access to Tony’s administrative share. While we didn’t identify the exact coercion method used to trigger the authentication attempt, we have enough evidence to identify the closest MITRE ATT&CK technique:
MITRE ATT&CK - Adversary-in-the-Middle: Name Resolution Poisoning and SMB Relay - (T1557.001):
By responding to LLMNR/NBT-NS/mDNS network traffic, adversaries may spoof an authoritative source for name resolution to force communication with an adversary controlled system.[1] This activity may be used to collect or relay authentication materials
Based on the evidence available in the challenge, T1557.001 is the closest ATT&CK mapping because it specifically describes the interception and SMB relay of NTLM authentication to another system.
Awesome job, now let’s wrap up this investigation.
Conclusion:
How fun was that! A big thank you to LetsDefend for another awesome challenge.
This challenge was a great introduction to investigating NTLM relay activity and highlighted how difficult these attacks can be to identify from a single artifact alone. Unlike some investigations where a single log entry immediately tells the story, this one required us to collect evidence from multiple sources and slowly piece together what happened.
Throughout the investigation, we used Wireshark and Event Log Explorer to analyze network traffic and Windows event logs. Along the way, we identified suspicious SMB activity, examined NTLMSSP authentication events, correlated successful and failed logons, investigated Remote Registry access, and followed the attacker’s actions as they moved toward administrative resources on a target workstation.
Personally, that’s what I enjoyed most about this challenge. There wasn’t a clear smoking gun that immediately screamed “NTLM relay attack.” Instead, we had to combine multiple clues. A suspicious host scanning SMB services. Authentication activity associated with one user but originating from another system. Remote Registry access against LSA-related keys. Administrative share access. Individually, none of these artifacts conclusively prove NTLM relay. Together, however, they begin to tell a much more compelling story.
I chose this week’s challenge because NTLM relay attacks have seen renewed attention in recent years, and I wanted to spend some time better understanding both the attack workflow, and the evidence defenders can use to detect it. The challenge reinforced an important lesson that applies well beyond NTLM relay - investigations in Active Directory environments often need correlation and context. Attackers rarely leave behind a single event that fully explains their actions. Instead, defenders have to connect network traffic, authentication activity, endpoint artifacts, and security logs to understand what’s really happening.
Thanks for your support and partnering on this investigation. If you found this walkthrough helpful, please give it a clap and consider following me! Your feedback is invaluable, and it pumps me up to support your security journey. Remember, cybersecurity is a team sport, and we’re in this together!
Until next week’s challenge, stay curious and be safe out there!
Tools & References:
Challenge Link: https://app.letsdefend.io/challenge/ntlm-relay
SPECTEROPS: “The Renaissance of NTLM Relay Attacks: Everything You Need to Know”: https://specterops.io/blog/2025/04/08/the-renaissance-of-ntlm-relay-attacks-everything-you-need-to-know/
Microsoft Learn - NTLMSSP: https://learn.microsoft.com/en-us/windows/win32/com/ntlmssp
Event Log Explorer: https://eventlogxp.com/
Wireshark Wiki - WINREG: https://wiki.wireshark.org/WINREG
MITRE ATT&CK - Adversary-in-the-Middle: Name Resolution Poisoning and SMB Relay - (T1557.001): https://attack.mitre.org/techniques/T1557/001/