LetsDefend— RegistryHive Challenge Walkthrough
Investigating a Registry Dump with Registry Explorer and RegRipper.

Image Credit: https://app.letsdefend.io/
Introduction:
Welcome to my weekly walkthrough! If you’ve stumbled across this blog searching for a comprehensive walkthrough of the RegistryHive challenge from LetsDefend, you’re in the right place. This week, we’re going deep into investigating the Windows Registry.
Challenge Scenario:
You’re a forensics analyst and have a registry dump. Try to analyze the evidence and answer the questions.
In this scenario, we’re assuming the role of a digital forensics analyst and are provided with a registry dump of a Windows device. Our objective is to analyze the artifacts and determine the answers to several questions to move through our investigation.
To aid in our investigation, we’re going to leverage several tools, including RegRipper and Eric Zimmerman’s Registry Explorer, to view, search, and interpret data within the various registry hives to get a comprehensive view of the system. Since this is my first time testing these tools, we’ll explore multiple ways of finding the information while we discover the various features of the tools, and I’ll explain the approach along the way, making this a great primer into the world of registry forensics!
Sounds like fun, right? Let’s get into it!
And if you find this walkthrough helpful — whether it levels-up your skills, gets you over a stumbling block, or serves as a handy reference — please give it a clap and consider following me for more content like this.
Thanks for reading and going on this investigation with me!
Question 1: What is the Computer name of this machine?
To kick off our investigation, let’s review the available tools and artifacts to orient ourselves with the analysis environment and determine how we want to approach the challenge.
First, let’s take a look at the challenge artifacts in the RegistryHive > Regs directory. We’ll see that the folder contains a dump of the Windows Registry Hives (SYSTEM, SAM, SOFTWARE, SECURITY, etc.) which we’ll need to analyze to tackle the investigation.
Each of these hives contain different keys pertaining to various aspects of the device. Don’t worry, we’ll go into these in more detail later.
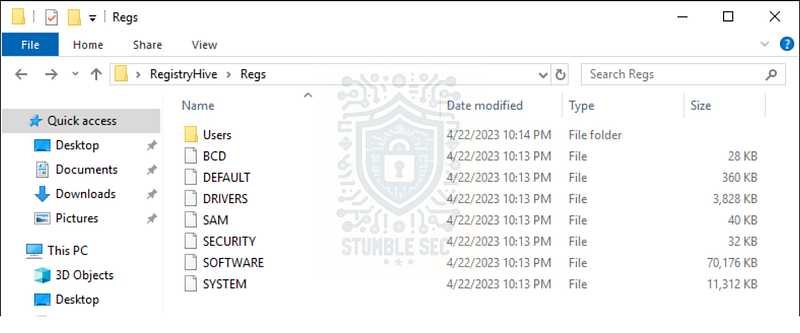
The Registry Hive artifacts
Next, let’s check out the contents of the Tools folder within the analysis environment. Inside, we’ll see that we have access to three tools that are used to parse and view registry hives — very handy, indeed!
- Registry Explorer: Part of Eric Zimmerman’s tool suite. This GUI-based tool is a " # “Registry viewer with searching, multi-hive support, plugins, and more.“2. RegRipper2.8/3.0: Two versions of RegRipper, a registry forensics tool used to extract information from registry hives using plugins. Version 2.8 is no longer maintained, but sometimes different versions of a tool give different outputs…
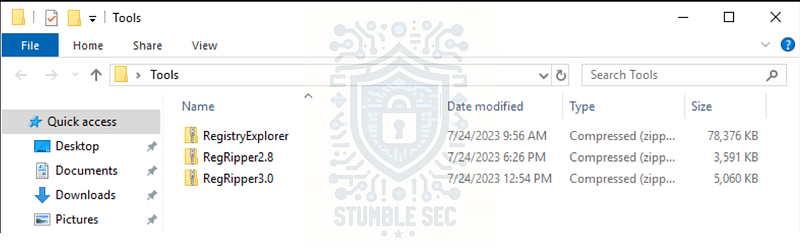
Contents of the Tools folder
Now that we have the background information out of the way, let’s get into the investigation! Our first task is to identify the Computer Name within the registry hives. We can locate this information in the SYSTEM hive, which contains the system’s configuration settings. To view this information, let’s check out Registry Explorer by performing the following steps:
- Extract Registry Explorer and open the application.
- Press
File > Load Hive. - Select the SYSTEM hive from the
Regsdirectory.
Now that we have the SYSTEM hive loaded in Registry Explorer, we can work smarter and leverage the search box and enter " # "
computer name” into the field.

Registry Explorer: Searching the SYSTEM hive for Computer Name
This will take us directly to the correct key within the hive, and we can view the ComputerName value to find the answer to Question 1!

Question 2: What is the last shutdown time for this machine?
Next, we’ll need to determine the last shutdown time for the machine from the artifacts. For this task, we’ll continue using Registry Explorer with the SYSTEM hive.
Instead of using the search field to find this string like we did for the last question, let’s leverage the " # "
Bookmarks” tab. Bookmarks are built into Registry Explorer and flag common artifacts, saving us time hunting. Putting this into practice, we’ll use the following process to find the Windows (Last shutdown time):
- Within Registry Explorer, press " # "
Bookmarks."
- Select the " # "
Common" tab and scroll down to " # "
Windows (Last shutdown time)."
- Selecting this option will navigate you to the correct key containing the value we’re looking for.
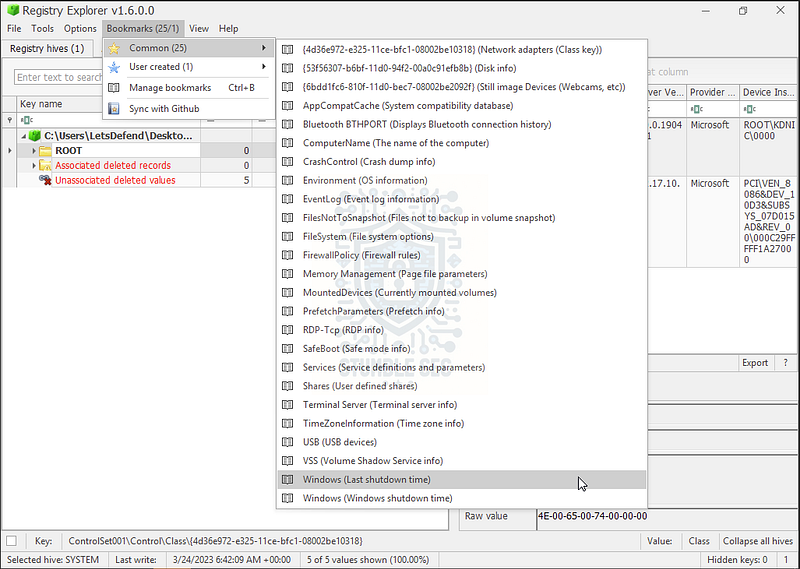
Registry Explorer: Using Bookmarks to Identify the Last Shutdown Time
There’s just one small hiccup. Did you notice that the data isn’t displayed in a readable Date/Time format? There are a couple of ways we can solve this dilemma, covered below.
Option 1: The simple method using the Data interpreter.
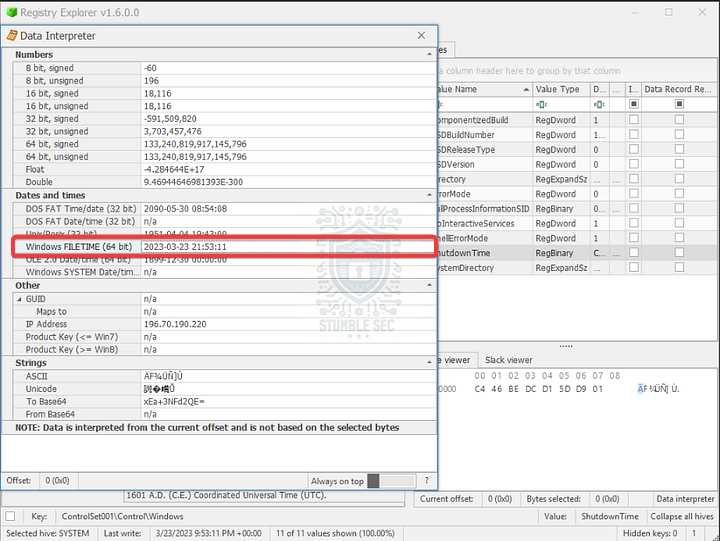
The first way we can approach this is to right-click the ShutdownTime value and then select, **" # "
Data interpreter" **.
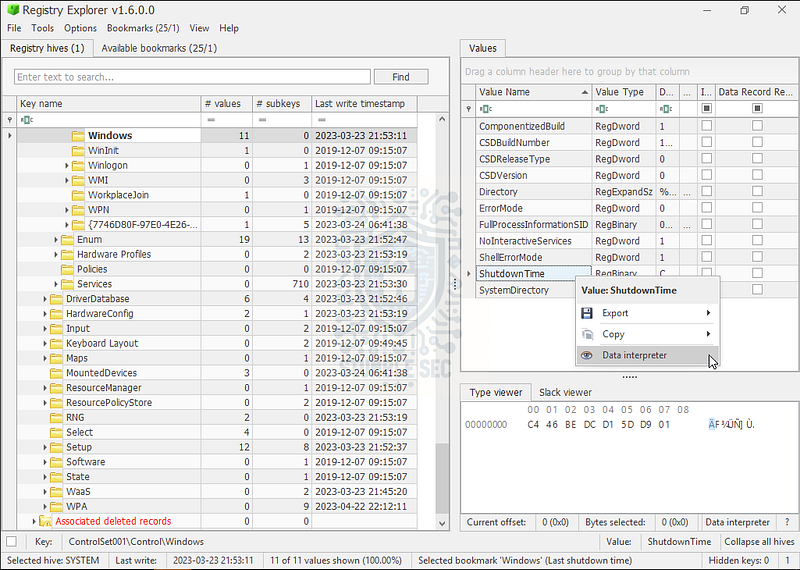
Registry Explorer: Selecting the Data Interpreter
Once the Data Interpreter window opens, we can see the interpreted Windows FILETIME value: 2023-03-23 21:53:11
Option B: Converting the data with CyberChef.
I’ll admit, this was the first approach I took before discovering the data interpreter (read the manual, my friends 😑), but I’m leaving this option here in case you ever run across a scenario where the data interpreter is not available, or you’re just curious.
For this approach, copy the RegBinary data from the " # "
Data" column in Registry Explorer:
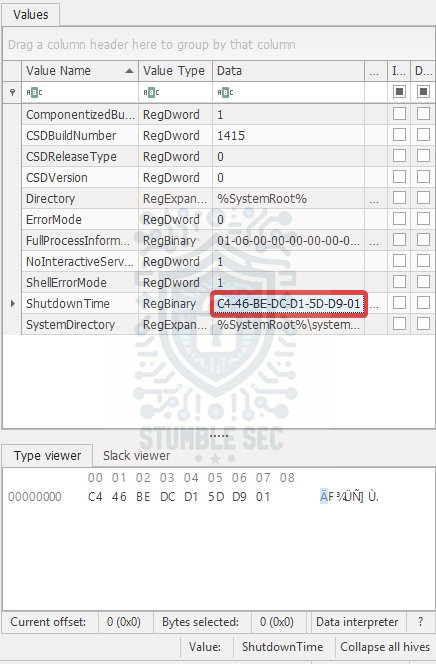
Registry Explorer: The Data of the ShutdownTime
C446BEDCD15DD901
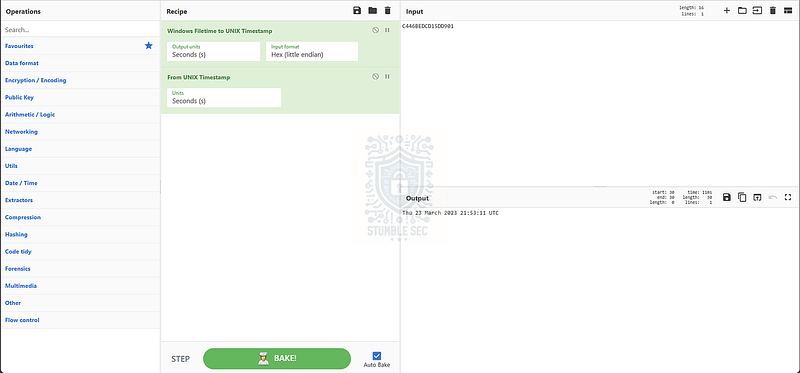
Then, use your web browser to navigate to CyberChef.
- Once you have CyberChef open, paste the data contents into the " # "
input window" .
- Add the " # "
**Windows Filetime to UNIX Timestamp" ** operation to the recipe.
- Ensure " # "
Output units" is set to Seconds (s).
- Select Hex (little endian) as the " # "
Input format" .
- Add the " # "
**From UNIX Timestamp" ** operation to the recipe.
The resulting output will display the expected time format.
CyberChef: Converting the ShutdownTime data
One final trick for answering Question 2: pay no attention to the requested answer format. Instead, copy & paste the Windows FILETIME value exactly as we identified it: 2023-03-23 21:53:11

Question 3: What is the time zone name that the machine uses?
The next task is to identify the time zone used by the machine. Fortunately, we can continue to leverage Registry Explorer’s bookmarks and select the " # "
**TimeZoneInformation" ** option to quickly locate this information.
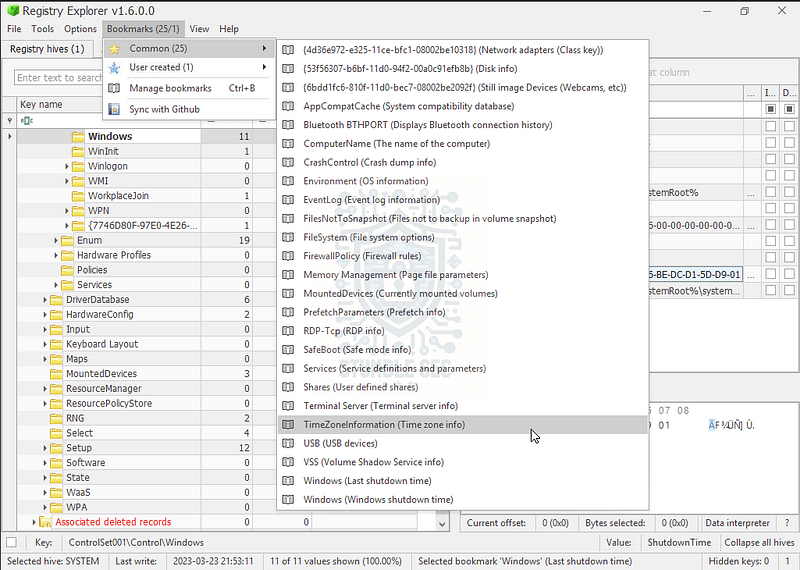
Registry Explorer: Selecting the TimeZoneInformation bookmark
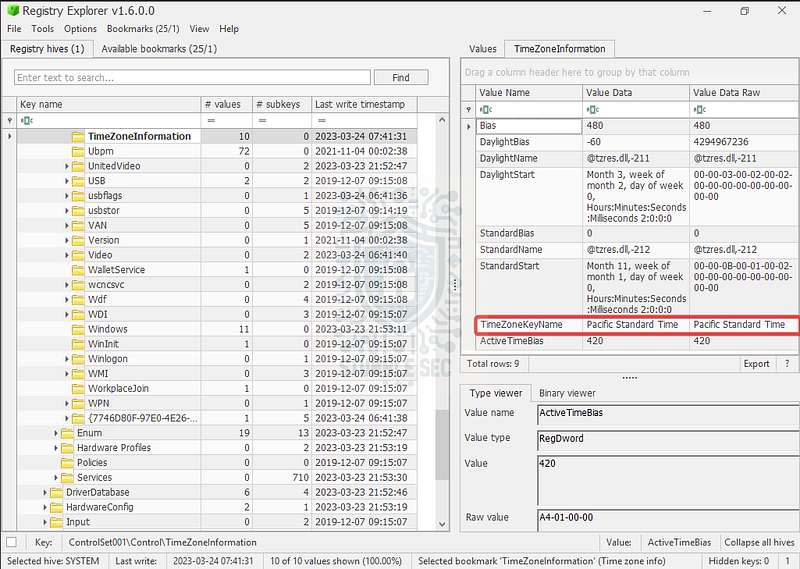
Registry Explorer: Identifying the machine Time Zone

Question 4: What is the IP address of the default gateway?
For Question 4, we’ll need to identify the default gateway IP address of the target system. To locate this information, we’ll leverage the Find tool of Registry Explorer, which we can access by pressing " # "
Tools" and selecting " # "
Find."
We’ll keep the default options and simply enter the string " # “DefaultGateway"into the search box.
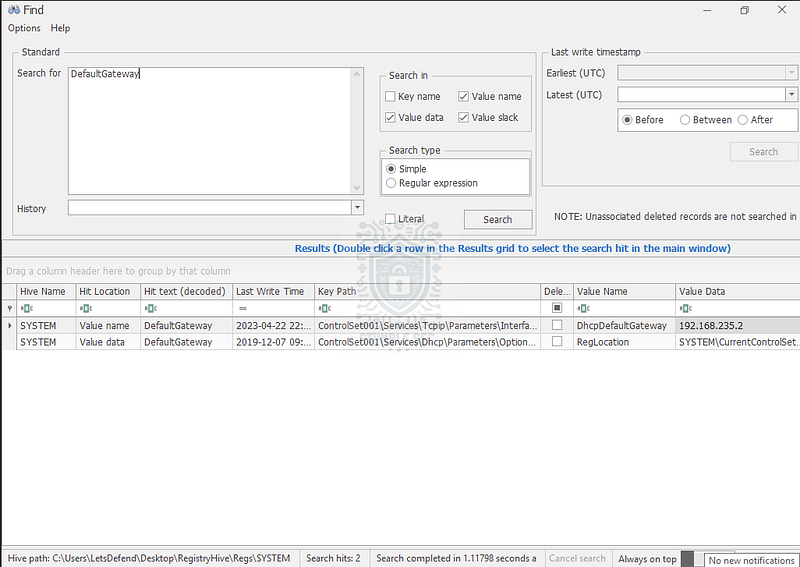
Once we press " # "
Search,”
we’ll see the results in the bottom pane. The first result gives us the DHCPDefaultGateway value for a specific adapter, leading us to the correct answer.

Questions 5 & 6:
What is the last login date for the user " # "
Work" ?
How many logins did the " # "
Work" user have?
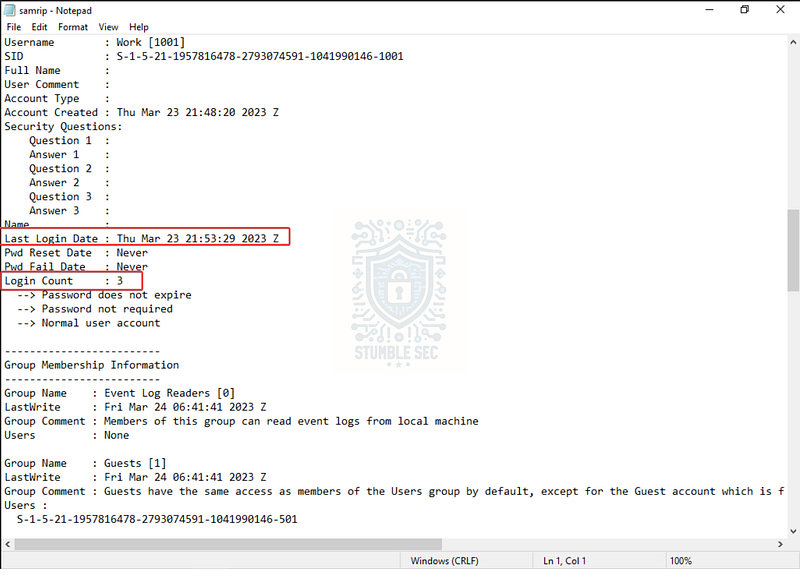
Continuing with our investigation, we now need to determine some activities performed by the user " # "
Work." To find this information, we need to pivot from the SYSTEM hive and load the Security Account Manager (SAM) Hive, which contains user information like username, group membership, and login information.
Once we load the SAM hive with Registry Explorer, we can use the available bookmark to discover information about the users on the subject system. Unfortunately, the view is cramped with the limited screen space within the analysis environment, and this is a good excuse to try out another tool — RegRipper3.0.
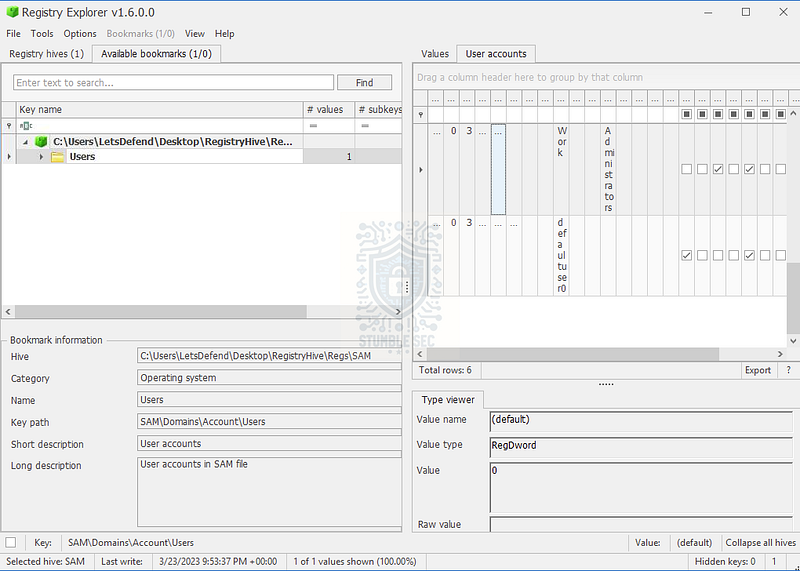
Registry Explorer: Viewing the Users Key from the SAM Hive
Launch RegRipper3.0 (rr.exe) from the Tools folder to access the GUI. Once it opens, select the SAM hive file, specify a path to export the report to, and let it Rip!
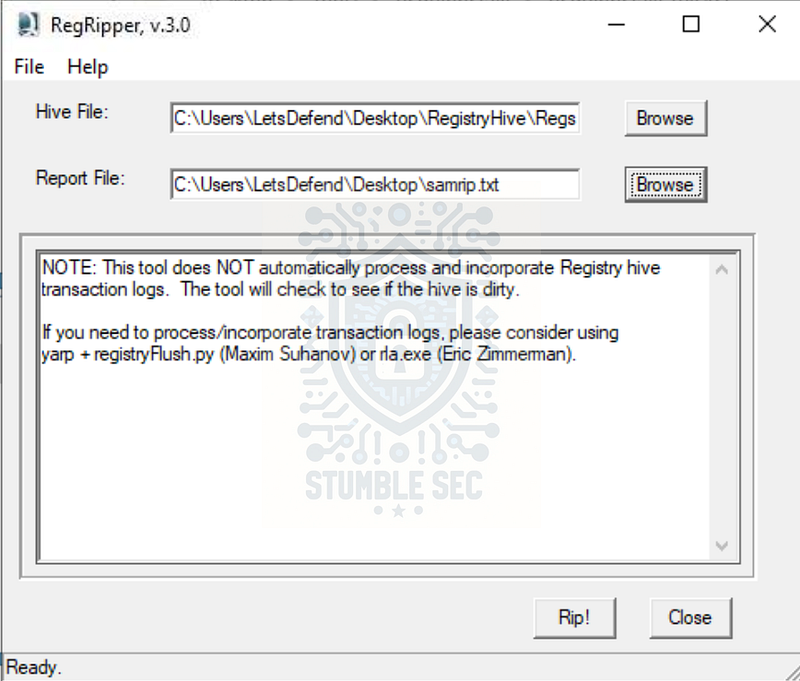
RegRipper Setup
This will produce two output files after the run, which is best explained by SANS:
We’ll want to focus on the first file and search for the username " # "
Work." Once we’ve located the account in the output, we’ll find the answers needed to answer Question 5 & 6.
RegRipper: Output for the SAM hive


Questions 7 & 8:
What is the OS " # "
ProductName" ?
What is the OS " # "
BuildNumber" ?
We’re moving right along now! To answer Questions 7 & 8, we’ll need to discover the " # "
ProductName" and " # "
BuildNumber" of the operating system where the dump was captured. Since this isn’t user account-related, we’ll need to search for another artifact — the SOFTWARE hive. The SOFTWARE hive contains the information, settings, and preferences for software installed on the system, including the operating system.
To answer these questions, let’s jump back into Registry Explorer, load the SOFTWARE hive, and use the available common bookmarks, selecting " # "
CurrentVersion (Windows version information (Windows NT key))" .
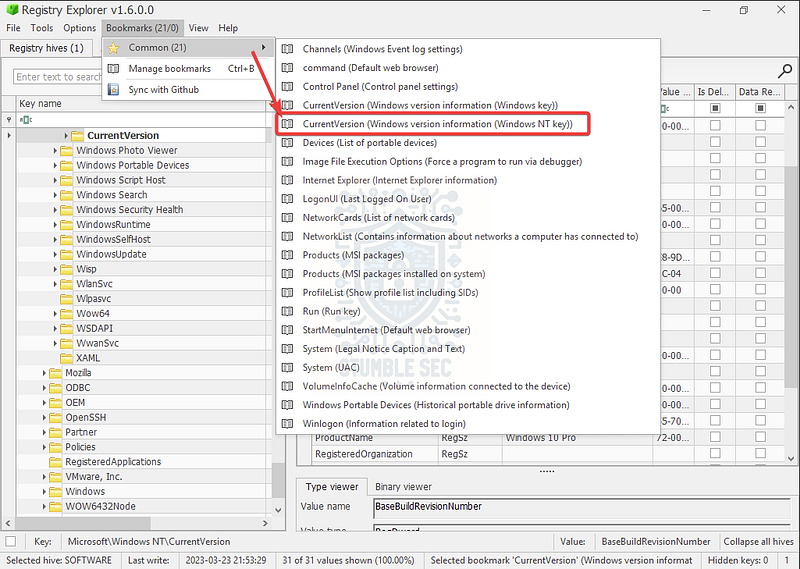
Registry Explorer: Selecting the CurrentVersion bookmark
This will take us directly to the SOFTWARE\Microsoft\Windows NT\CurrentVersion key, which contains information about the Windows version, including the ProductName and CurrentBuildNumber.
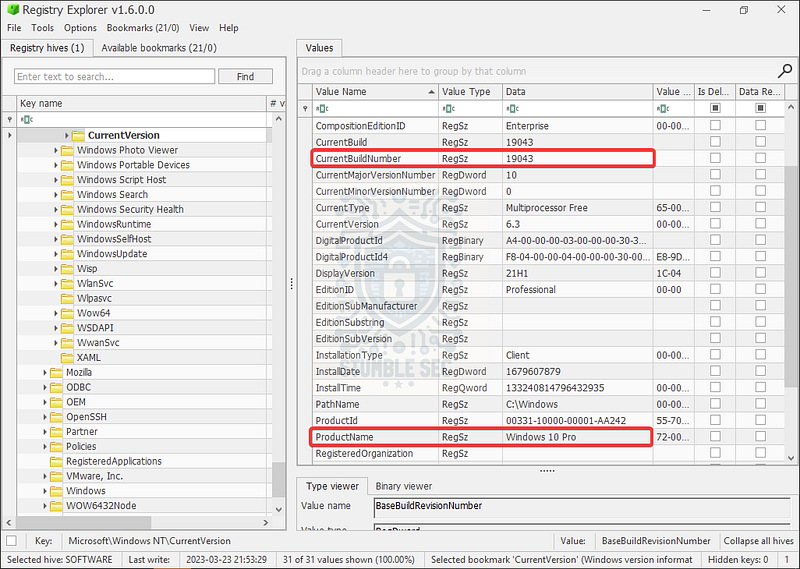
Registry Explorer: Identifying the ProductName & CurrentBuildNumber


Question 9: How many programs run on startup for any user?
To find the answer to Question 9, we’ll need to determine how many programs run on startup for any user. But first, let’s take a step back and understand why autorun applications have the potential to be abused by an attacker.
According to MITRE ATT&CK, a global knowledge base of adversary tactics, techniques, and procedures, a registry run key can be abused for persistence and privilege escalation because " # “adding an entry to the " # "
run keys” in the Registry or startup folder will cause the program referenced to be executed when a user logs in."Boot or Logon Autostart Execution: Registry Run Keys / Startup Folder _Adversaries may achieve persistence by adding a program to a startup folder or referencing it with a Registry run key…_attack.mitre.org
So, it’s important that we check this key to determine if this feature was abused by an attacker or used for benign, normal tasks. We can again leverage the Registry Explorer bookmarks, selecting " # "
**Run (Run key)" ** to take us to the key for the startup programs for all users.
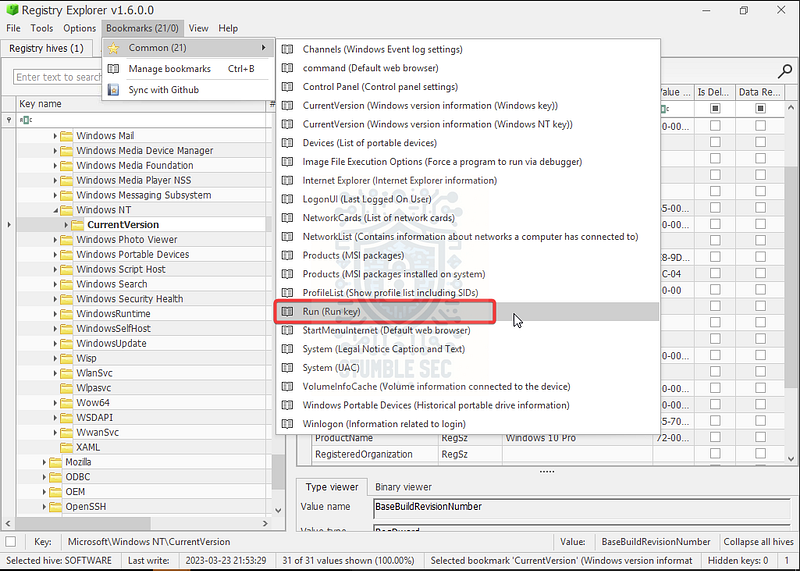
Registry Explorer: Selecting the Run key bookmark
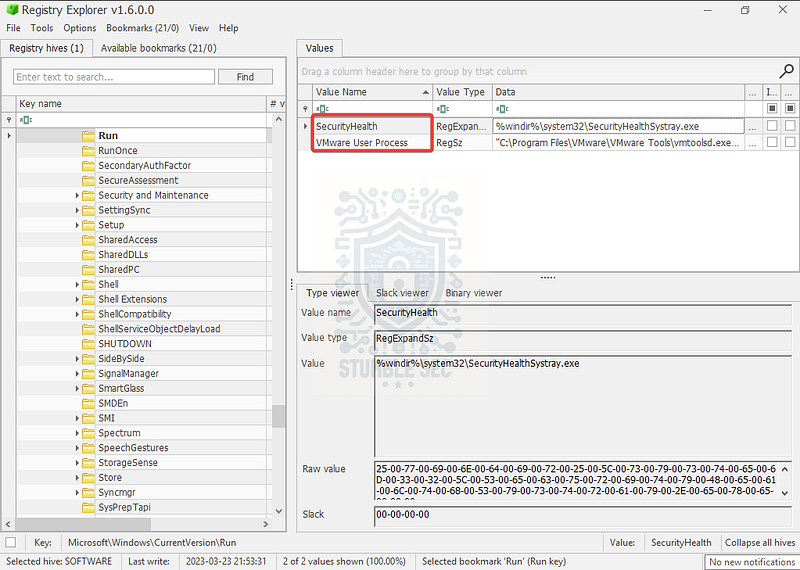
Registry Explorer: Identifying the startup programs
After selecting the bookmark, we can determine that there are two applications set to run on startup for any user. Both programs appear normal and not malicious.

Question 10: What is the last installed app?
To identify the last app installed, we’ll continue with our analysis of the loaded SOFTWARE hive. To locate the correct registry key, we can search within the available bookmarks for the keyword " # “uninstall.“Why would we search for “uninstall"when we are looking for installed apps? This is because information about software installed on the system is contained in the Software\Microsoft\Windows\CurrentVersion\Uninstall key, where we’ll be able to find information about the install dates for the applications. Let’s try it out:
- Press the " # "
Available bookmarks” tab. 2. Enter the string " # "
uninstall” into the search box and press " # "
Find” . 3. Click the key named " # "
Uninstall" . 4. In the right pane, sort the " # "
Timestamp" column to display the most recent results at the top.
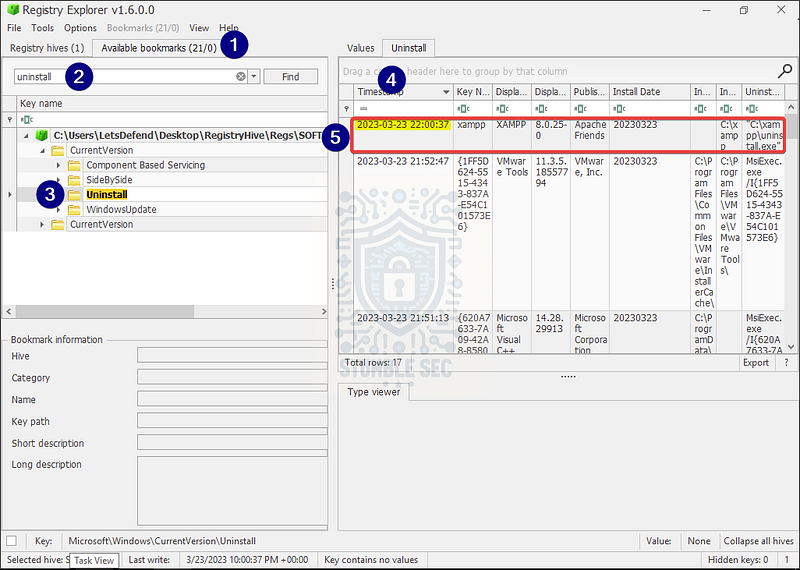
Registry Explorer: Identifying the last installed program by timestamp
After analyzing the results of the Uninstall key, we’ll see that the application XAMPP was the last one installed onto the system.

Question 11: What is the " # "
DefaultGatewayMac" ?
To determine the " # "
DefaultGatewayMac," we’ll take a similar approach to what we used back in Question 4. Continuing with the SOFTWARE hive, we’ll once again leverage Registry Explorer’s find tool and enter the string " # “DefaultGatewayMac"into the search box to locate the MAC address data.
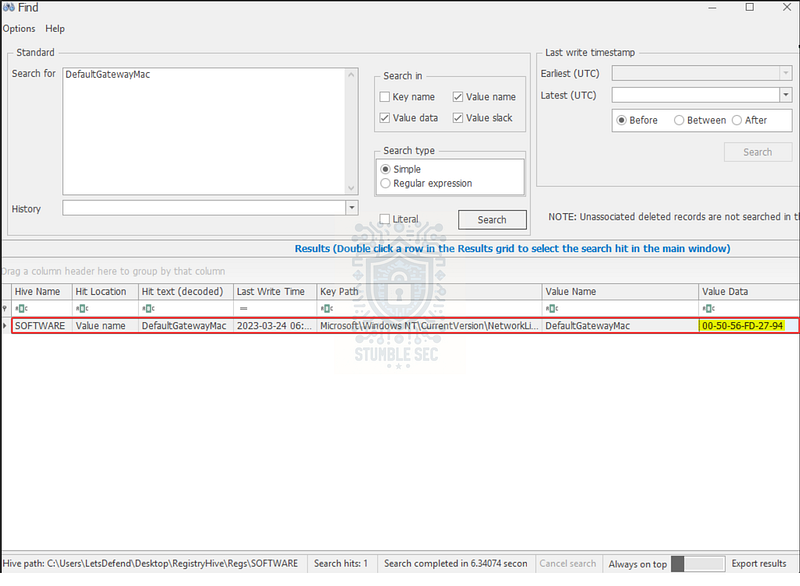
After running the search, we’ll see the results in the bottom pane. The value data provides us with the DefaultGatewayMac entry for the network adapter.

Question 12: What is the Machine SID?
We’ve made it to the final question! Our last task is to determine the Machine Security Identifier (SID) of the device. Let’s do some research and get some context for what we’re looking for. According to an article from Forensafe:
A security identifier (SID) is a unique alphanumeric number that identifies a security principal or a security group. Security principals can be a user account, a computer account, a thread, or a process. SID is generated by the system to identify a particular entity at the time it is created.
Investigating Machine SID _18/07/2022 Monday A security identifier (SID) is a unique alphanumeric number that identifies a security principal or a…_forensafe.com
In addition to the fantastic explanation, the article also discloses the location of this file in the registry:
Machine SID is stored in a security database. The default location is Windows\System32\Config\SECURITY\SAM\Domains\Account registry key.
To save you some time, the unfortunate part is that this is a dead-end lead for the artifacts that we have available to us. So, let’s pivot and refer to the question hint for some guidance:

Remember from all the way back in Question 1 that we noted two versions of RegRipper in the Tools folder? Now we know why. Occasionally, leveraging older versions of tools will change how input is parsed — let’s try out RegRipper2.8 and see what we can find.
While like how we set up the 3.0 version, there are some differences. First, point to the SECURITY hive file which contains security policy and settings information. Then, specify your output directory for the two .txt files. Finally, in the profile drop-down, select " # "
security.”
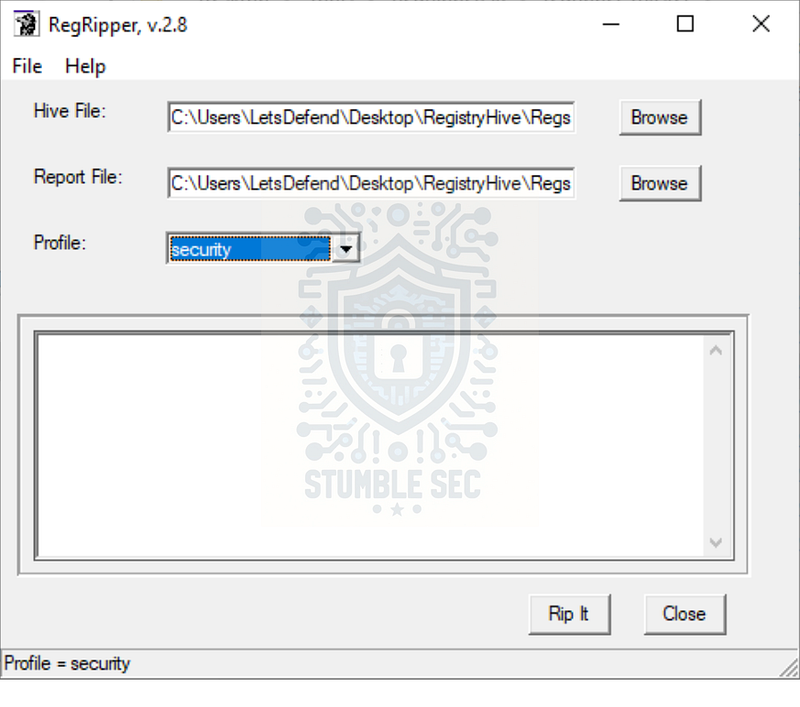
RegRipper2.8: Setup
Once the output file is generated, open it up and we’ll be able to easily locate the Machine SID value that we’re looking for to complete the investigation.
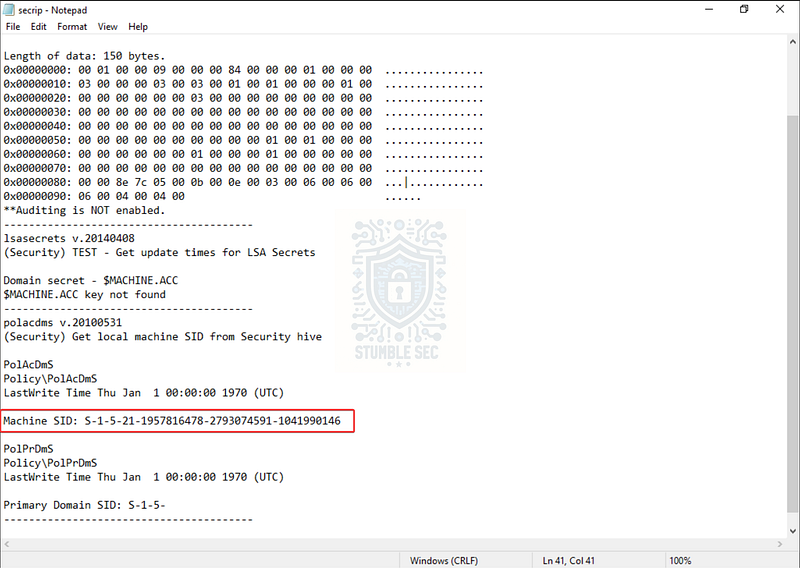
RegRipper2.8 Output: Discovering the Machine SID

Conclusion:

There we have it! By combining Registry Explorer and RegRipper to analyze the provided SYSTEM, SAM, SOFTWARE, and SECURITY registry artifacts, we’ve successfully collected the necessary information from the target computer. We were able to determine valuable information about the device, including the OS, computer name, time zone, and network information. We also learned about user and application activities on the system, giving us a clear view of what the device is and how it’s used — all through the registry. Now that we have scoped the attack and completed our objectives, let’s close out this walkthrough of the RegistryHive challenge!
A big thank you to LetsDefend, for the awesome challenge! This challenge was a great opportunity for me as I am very familiar with the registry but have never had to approach it from a forensics perspective. I knew this experience would help improve my skills and expose me to some of the valuable artifacts available in the registry. The hands-on practice is extremely valuable in the real world. This challenge was also a fantastic opportunity to explore more of Eric Zimmerman’s tools like Registry Explorer. This was an extremely powerful and flexible utility that is now part of my kit. I also had never used RegRipper and was extremely impressed by its ease of use and powerful output. All-in-all, this was a fun way to grow my skills — awesome stuff!
Thank you for your support and partnering up on this investigation. If you found this walkthrough helpful, don’t forget to give it a clap! Your feedback really is invaluable, and it pumps me up to support your security journey. Remember, Cybersecurity is a team sport and we’re in this together!
Until next week’s challenge — stay curious and be safe out there!

Tools & References:
Challenge Link: https://app.letsdefend.io/challenge/registryhive
Registry Explorer: https://ericzimmerman.github.io/#!index.md
RegRipper3.0 — GitHub: https://github.com/keydet89/RegRipper3.0
Microsoft Learn — Registry Hives: https://learn.microsoft.com/en-us/windows/win32/sysinfo/registry-hives
Microsoft Learn — File Times: https://learn.microsoft.com/en-us/windows/win32/sysinfo/file-times
CyberChef: https://gchq.github.io/CyberChef/
SANS Blog — RegRipper: Ripping Registries With Ease: SANS Digital Forensics and Incident Response Blog | RegRipper: Ripping Registries With Ease | SANS Institute
MITRE ATT&CK — Boot or Logon Autostart Execution: Registry Run Keys / Startup Folder (T1547.001): https://attack.mitre.org/techniques/T1547/001/
Forensafe — Investigating Machine SID: https://forensafe.com/blogs/machine_sid.html