HackTheBox — Brutus Sherlock Walkthrough
Investigating a Brute Force Attack Using the auth.log and wtmp log.

Image Credit: https://app.hackthebox.com/sherlocks/Brutus/play
Introduction:
Welcome to my weekly walkthrough! If you’ve stumbled across this blog searching for a comprehensive walkthrough of the Brutus challenge from Hack The Box, you’re in the right place. Imagine this scenario as we step into the shoes of a digital forensics analyst:
Challenge Scenario:
In this very easy Sherlock, you will familiarize yourself with Unix auth.log and wtmp logs. We’ll explore a scenario where a Confluence server was brute-forced via its SSH service. After gaining access to the server, the attacker performed additional activities, which we can track using auth.log. Although auth.log is primarily used for brute-force analysis, we will delve into the full potential of this artifact in our investigation, including aspects of privilege escalation, persistence, and even some visibility into command execution.
The adversary has brute-forced the SSH service on a web server, gained initial access, and we need to investigate how it happened and what else they did with their access to mitigate the threat. Our objective is to analyze the server’s auth.log and wtmp logs to create a detailed timeline of the attacker’s activities, including initial access, privilege escalation, and persistence. To analyze these logs, we’re going to leverage Notepad++ and utmpdump, then enrich our findings by pivoting to MITRE ATT&CK to fully understand the adversary’s tactics and techniques.
Sounds exciting, right? Let’s get dive right into it! If you find this walkthrough helpful — whether it levels-up your skills, gets you over a stumbling block, or serves as a handy reference — please give it a clap and consider following me for more content like this. Thanks for reading and going on this investigation with me!
Question 1: Analyze the auth.log. What is the IP address used by the attacker to carry out a brute force attack?
Okay — let’s jump right into this challenge by opening the first provided artifact, auth.log. For context, auth.log is the server’s authentication log which is a good starting point to identify a brute force attack as we can analyze successful and failed logins.
While there are other ways to approach the initial analysis, for this walkthrough, I’m going to simply use Notepad++ for my approach but feel free to choose any text editor you’d like!
With the artifact open, scroll through the events, and quickly we’ll observe dozens of lines returning Invalid user and Failed password from a single IP address, 65.2.161.68. The large number of failed attempts to access these accounts is indicative of brute force password guessing (MITRE ATT&CK — T1110.001).
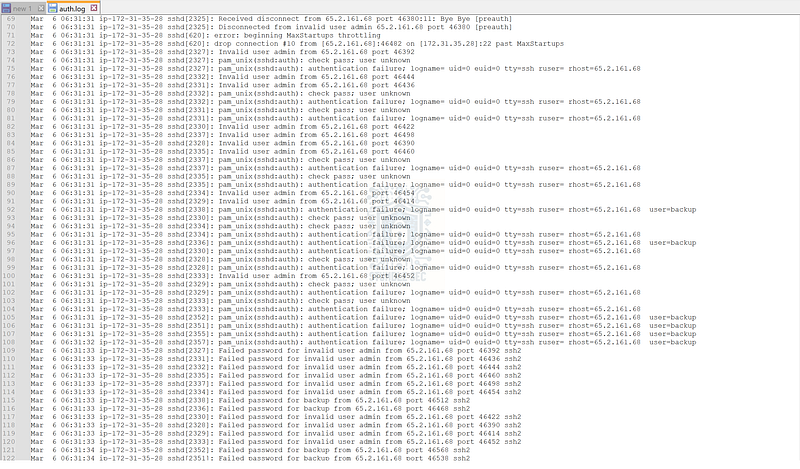
Snippet from auth.log revealing failed username and password guessing attempts.

Question 2: The bruteforce attempts were successful and attacker gained access to an account on the server. What is the username of the account?
Now that we’ve discovered the attacker’s IP address, we’ll need to determine what account they successfully accessed. To do this, we’ll first need to understand what a successful login looks like. For example, toward the top of the log on lines 11–15, we’ll find a successful login for the root user from the IP address 203.101.190.9.

auth.log snippet showing a successful sign-in.
Having this information gives us a couple of strings that we can search for in the logs by using the “find” function to search for “accepted password,” indicating a successful login event. Let’s keep searching to see what other accounts logged in.
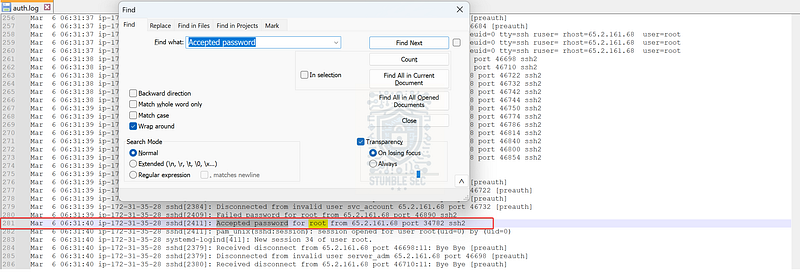
Notice anything suspicious on line 281? The next hit that we’ll locate is another login from the root user, but this time, the connecting IP address is the attacker’s — 65.2.161.68.

Question 3: Identify the timestamp when the attacker logged in manually to the server to carry out their objectives. The login time will be different than the authentication time, and can be found in the wtmp artifact.
From the sign-in records in the auth.log, we’ve started to gather a rough timeline of the attack. However, we need to correlate this with the second log artifact, wtmp, which contains only the successful login/logout events on the system, for a comprehensive picture of the login activity.
The tricky part is that wtmp is a binary log file, so we can’t simply use Notepad++ to read it like we did for auth.log. Instead, we’ll need to leverage a Linux-based tool like last to read it. According to the Ubuntu manpages:
last searches back through the /var/log/wtmp file (or the file designated by the -f option) and displays a list of all users logged in (and out) since that file was created.
If you’re using a Linux-based analysis environment like I am, you’re in good shape. If you’re using a Windows-based environment, you can utilize something like the Windows Subsystem for Linux (WSL) to access this utility. For this walkthrough, I’ll post screenshots from both my REMnux environment and the WSL output for your reference. Let’s try putting this all together, adding in the full timestamps which we can access with the -F argument.
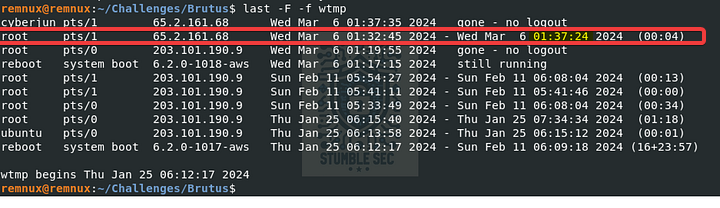
last -F -f wtmp

last command output in REMnux
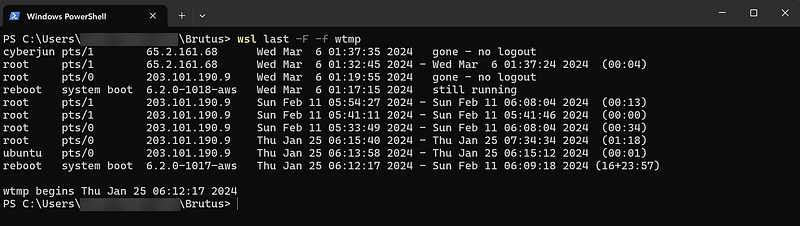
last command using WSL
We’re getting closer but notice that the timestamp doesn’t quite match what we found in auth.log. While we can assume that there’s a mismatch between the system time and the local time, let’s try interpreting wtmp another way using a different utility, utmpdump. According to the manpages, utmpdump is “a simple program to dump UTMP and WTMP files in raw format, so they can be examined.” Let’s try it out and see what we can discover.
utmpdump wtmp
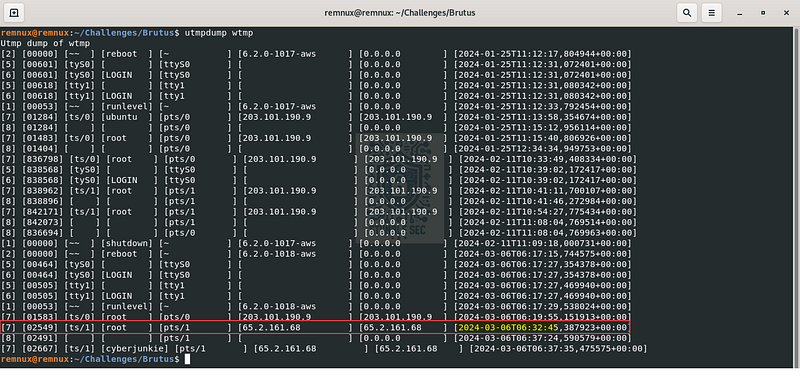
utmpdump in REMnux
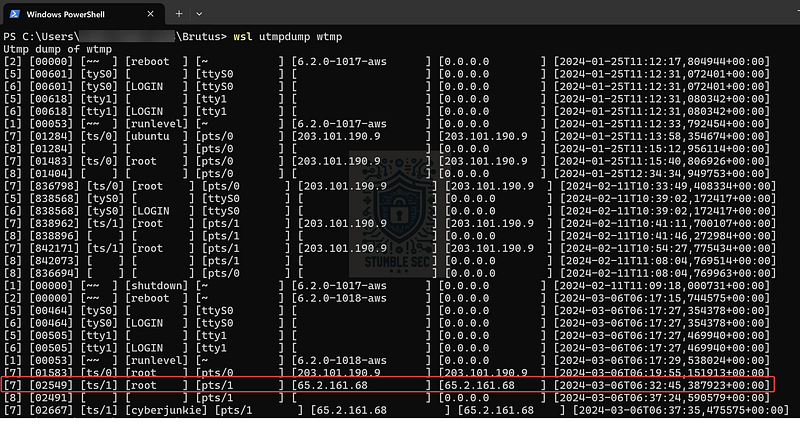
utmpdump in WSL
Bingo! By dumping the wtmp with utmpdump we can locate the correct timestamp for the attacker’s login to the server. Now that we’ve established a firm timeline, let’s proceed with our investigation.

Question 4: SSH login sessions are tracked and assigned a session number upon login. What is the session number assigned to the attacker’s session for the user account from Question 2?
Now that we’ve identified the timestamp of the attacker’s login, let’s find the corresponding timestamp of the SSH session in the auth.log on line 322. Examining the nearby events more closely, we can see that on line 324, the new session is assigned the ID 37.
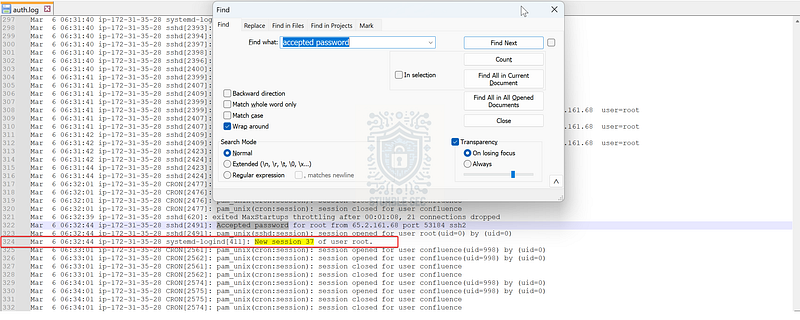
Identifying the attacker’s session ID in auth.log

Question 5: The attacker added a new user as part of their persistence strategy on the server and gave this new user account higher privileges. What is the name of this account?
When analyzing the wtmp in Question 3, you may have noticed another user account other than root present in the logs from the attacker’s IP address — cyberjunkie.
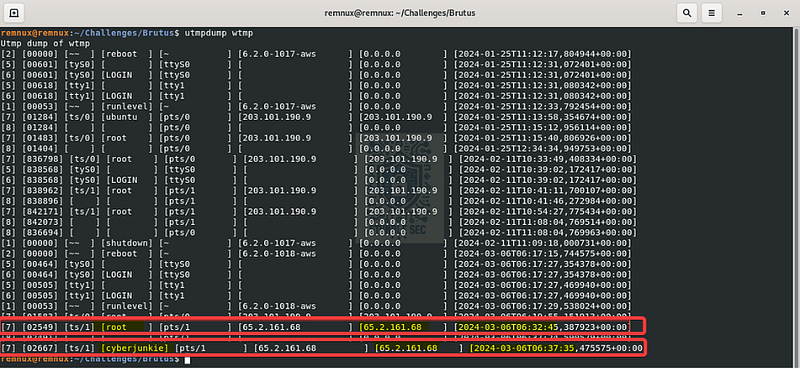
utmpdump in REMnux highlighting a second user account
Let’s double-verify this finding in the auth.log by searching for this username where we can confirm the activity.
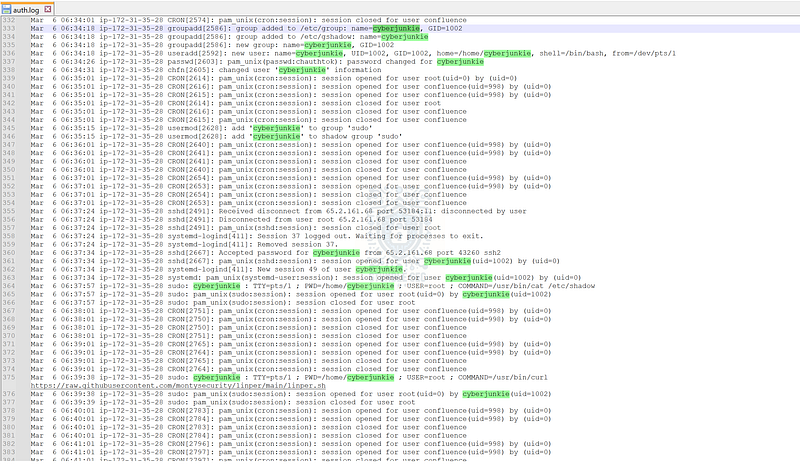
Searching the auth.log for activities from the cyberjunkie account

Question 6: What is the MITRE ATT&CK sub-technique ID used for persistence by creating a new account?
Now that we understand the attacker brute-forced access to the root account and created a second account, cyberjunkie, for persistence, we need to map this technique to MITRE ATT&CK for additional intelligence.
After navigating to the MITRE ATT&CK website, we can evaluate the techniques listed under the persistence tactics. Eventually we’ll stumble across the technique “Create Account” (T1136) which seems to fit. On the page for this technique, we can evaluate the various sub-techniques, such as “Local Account” (T1136.001), leading us to the answer for Question 6.
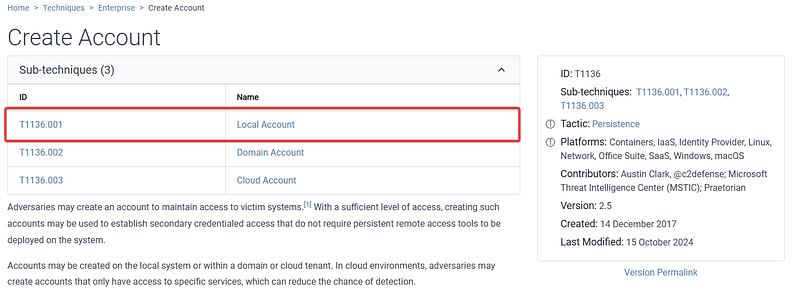
MITRE ATT&CK — Create Account (T1136) — Sub-Techniques
Create Account: Local Account _Adversaries may create a local account to maintain access to victim systems. Local accounts are those configured by an…_attack.mitre.org

Question 7: What time did the attacker’s first SSH session end according to auth.log?
Now, let’s jump back to auth.log and analyze when the attacker’s first SSH session as the root user ended. In the log, we’ll search for “disconnect” events from the attacker’s IP, which we can find on lines 355–359.

auth.log snippet showing SSH session disconnect
For double verification, we also stumbled upon this answer when we used last to read the wtmp log back in Question 3.
Validating the session logout time in the wtmp log

Question 8: The attacker logged into their backdoor account and utilized their higher privileges to download a script. What is the full command executed using sudo?
For the final question of our investigation, let’s continue searching auth.log for activities performed by the cyberjunkie account, focusing specifically on events marked with sudo, or superuser, privileges.
On line 375, we’ll find something interesting: a command string leveraging curl to download a script from a GitHub repository.
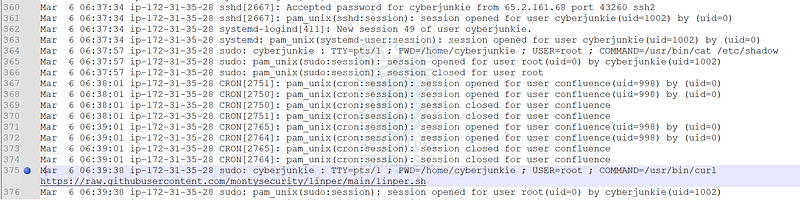
auth.log snippet exposing malicious ingress tool transfer (T1105)
While out of scope for this challenge, the downloaded script seems to be a Linux persistence tool which would allow the attacker to maintain their access to the compromised server. From a defense perspective, having this knowledge gives us an idea of the attacker’s next moves.
However, for the purposes of this challenge the command we found is all we need to answer Question 8 and conclude the investigation. Great job!

Conclusion:
Case closed! Using the server’s auth.log and wtmp logs, we successfully identified the time of the attack, the attacker’s IP address, the compromised account, and their methods of persistence. During the investigation, we turned to MITRE ATT&CK to gain deeper insights into each technique, helping us better understand the adversary’s tactics and techniques. Now that we have scoped the attack and achieved our objectives, let’s close out this walkthrough of the Brutus challenge.
A big thank you to Hack The Box, for another engaging and realistic challenge. I chose this challenge as I was unfamiliar with the wtmp logs and what additional artifacts they contain compared to the auth.log. It was incredibly fun and valuable to learn about these logs and how to read them using last and utmpdump. The hands-on practice will absolutely come in handy during real-world during incident response. Awesome stuff!
Thanks for your support and partnering on this investigation. If you found this walkthrough helpful, don’t forget to give it a clap! Your feedback really is invaluable and helps fuel my commitment to support your security journey. Cybersecurity is a team sport and we’re in this together!
Until next week’s challenge — stay curious and be safe out there!

Tools & References:
Challenge Link: https://app.hackthebox.com/sherlocks/Brutus
Notepad++: https://notepad-plus-plus.org/
MITRE ATT&CK — Brute Force (T1110): https://attack.mitre.org/techniques/T1110/
MITRE ATT&CK — Brute Force: Password Guessing (T1110.001): https://attack.mitre.org/techniques/T1110/001/
Ubuntu Manpages — last: https://manpages.ubuntu.com/manpages/focal/man1/last.1.html
Ubuntu Manpages - utmpdump: https://manpages.ubuntu.com/manpages/focal/man1/utmpdump.1.html
MITRE ATT&CK — Create Account: Local Account (T1136.001): https://attack.mitre.org/techniques/T1136/001/
MITRE ATT&CK — Ingress Tool Transfer (T1105): https://attack.mitre.org/techniques/T1105/