CyberDefenders — SysInternals Blue Team Lab Walkthrough
Endpoint Forensic Investigation of Masquerading Malware using Autopsy, Eric Zimmerman’s Tools, and VirusTotal
Image Credit: https://cyberdefenders.org/blueteam-ctf-challenges/sysinternals/
Introduction:
Welcome to my weekly walkthrough! Are you curious about investigating a malware incident from a forensic disk image? Well you’re in luck — we’re about to tackle the Sysinternals challenge from CyberDefenders!
Sysinternals is a digital forensics and incident response (DFIR) challenge where we will analyze the artifacts of a malware infection from a forensic disk image and gather intelligence on first and second stage executables.
You might be asking yourself " # "
wait, isn’t Sysinternals legitimate_?“and you’d be right! If you don’t know Sysinternals is a fantastic, and not malicious, suite of tools provided by Microsoft. Unfortunately, the victim in this scenario thought they were getting the legitimate tool from Microsoft but instead downloaded and executed some malware masquerading as the legitimate Sysinternals — not good!
To figure out what happened, we’re going to use quite a few utilities from Eric Zimmerman’s tools, Autopsy, and VirusTotal. So, if this sounds interesting to you, you’ve stumbled on the right blog!
In the spirit of learning, I am not going to be revealing any flags in this write-up, so I encourage you to go hands-on and try it for yourself — you got this! Now let’s put on our detective hats and have some fun with forensics!
Thanks for reading along!
Challenge Link: https://cyberdefenders.org/blueteam-ctf-challenges/sysinternals/
Challenge Scenario:
A user thought they were downloading the SysInternals tool suite and attempted to open it, but the tools did not launch and became inaccessible. Since then, the user has observed that their system has gradually slowed down and become less responsive.
As a soc analyst, analyze the artifacts and answer the questions.
Question 1: What was the malicious executable file name that the user downloaded?
Let’s start by unzipping the challenge file; within the archive we have an Encase (E01) forensic image file. This time around, the challenge suggests a couple of tools that are available to open this file type including FTK Imager and Sleuthkit Autopsy. For this walkthrough, I chose to use Autopsy.
Let’s kick off this investigation and launch Autopsy, open a new case, load the challenge file image as the data source, and run the default ingest module options.
After the data source is processed, we’ll be able to browse through the victim’s device image.
Since the user mentioned that they tried to download the Sysinternals suite, we can start by checking out the Downloads folders in the User directory to see if it contains any artifacts that will help us answer Question 1.
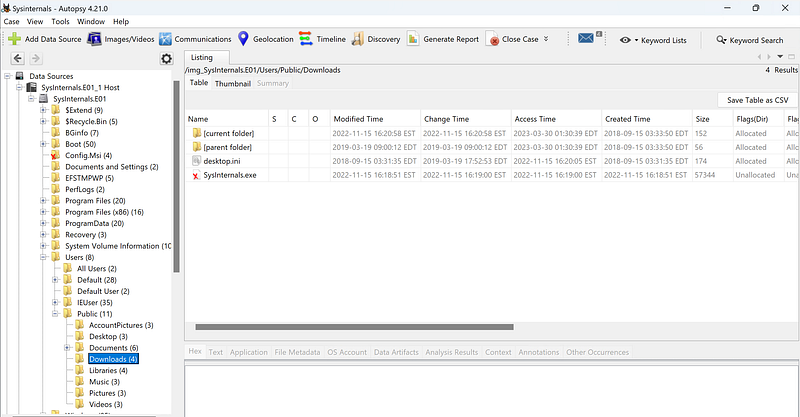
After browsing the Downloads folders, we’ll stumble on an interesting binary, Sysinternals.exe, in the Public downloads folder. Based on the information provided by the user, this seems likely to be the malicious executable we are looking for masquerading as the legitimate Microsoft Sysinternals.

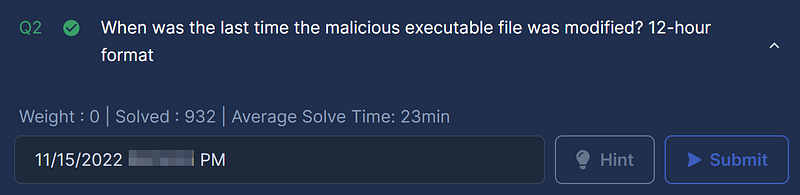
Question 2: When was the last time the malicious executable file was modified? 12-hour format
Since we have a changed time for the suspicious file in the listing pane, this seems like it will be straightforward, but unfortunately, it’s not that simple. Let’s get creative and approach this another way. Another tool suggested for this challenge is AppCompatCacheParser, a utility that is part of the excellent Eric Zimmerman’s tool suite.
Now for some background! The Application Compatibility Cache (AppCompatCache) is used in Windows-based systems to track compatibility with older apps in newer versions of Windows. At first glance, this doesn’t seem that interesting but, from a forensic perspective, it contains some valuable information. For example, according to this Google blog post, the AppCompatCache:
…Stores various file metadata depending on the operating system, such as:
File Full Path
File Size
$Standard_Information (SI) Last Modified time
Shimcache Last Updated time
Process Execution Flag
Okay! Now we’re getting somewhere. So now we just need to figure out how to access this cache. Fortunately, I stumbled across a helpful blog post from SANS which describes this process in some detail:
The first part of conducting ShimCache Analysis is pulling all of the SYSTEM hives from all of machines on the network.
So, putting all of this together, we just need to jump back into Autopsy, extract the SYSTEM registry hive, and parse it with AppCompatParser.
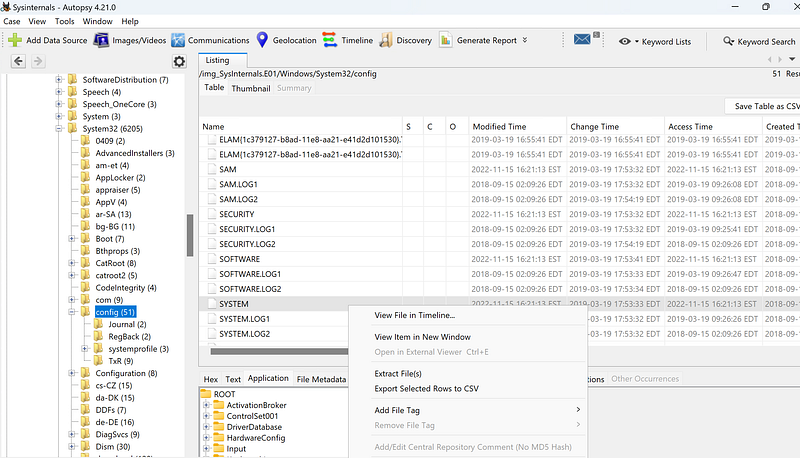
We’ll find the SYSTEM hive in Windows/System32/config — from here we can use Autopsy to extract the file.
Once the file is extracted, we can use the following syntax to parse the file with AppCompatCacheParser with the Windows command prompt.
AppCompatCacheParser.exe -f “PATH-TO-SYSTEM-HIVE” –csv “PATH-TO-OUTPUT-FILE.csv”
Finally, we can check the output and search for " # “sysinternals”— this will show us the Last Modified Time!
Note: For the purposes of this challenge, I am using Eric Zimmerman’s Timeline Explorer, but you can use any CSV viewer that you’d like.
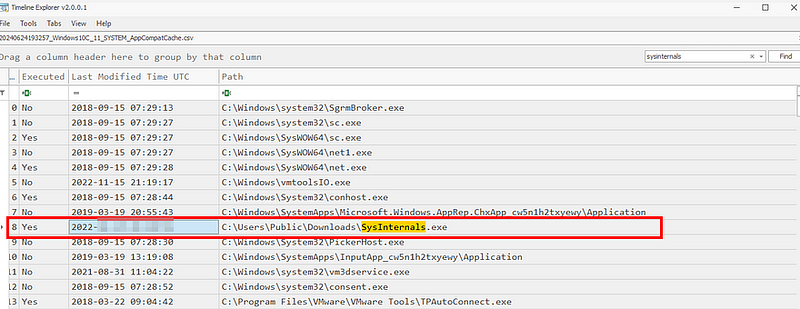
Now before we try inputting this answer, pay special attention to the challenge question — it is looking for the 12-hour format, not the 24-hour time we got from the output.
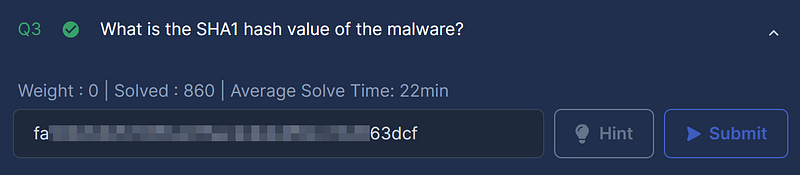
Question 3: What is the SHA1 hash value of the malware?
Now, we need to get the SHA1 file hash of the malicious Sysinternals.exe.
The original plan was to simply extract the file from the Downloads folder, but the file hash didn’t match what the challenge was looking for — so we’ll need a new plan.
Let’s return to the SANS blog that we referenced in the previous question. Scrolling down to the bottom, there is a link describing the next article in the series which covers something relevant for what we need to tackle Question 3 — the Amcache.
Mass Triage Part 5: Processing Returned Files - Amcache _The Amcache.hve file contains information on the executables that were executed on the system. Yogesh Khatri’s blog…_www.sans.org
Let’s check out what the Amcache is all about. According to the blog entry, " # “the Amcache.hve file contains information on the executables that were executed on the system"and " # "
t_he following fields: full path and SHA1 hash.“To do this, we will use another of Eric Zimmerman’s tools, AmcacheParser. But first, we need to extract the Amcache registry hive (Amcache.hve) from the image using Autopsy.
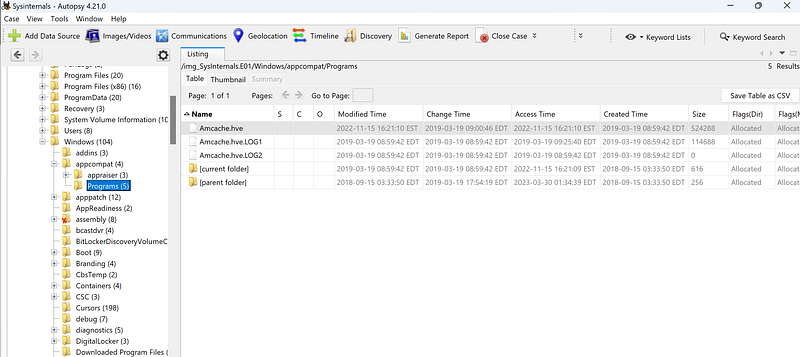
The A_mcache.hve_ is in Windows/appcompat/Programs/Amcache.hve — let’s extract it and parse it!
AmcacheParser.exe -f “PATH-TO-SYSTEM-HIVE\Amcache.hve” –csv PATH-TO-OUTPUT-FILE.csv
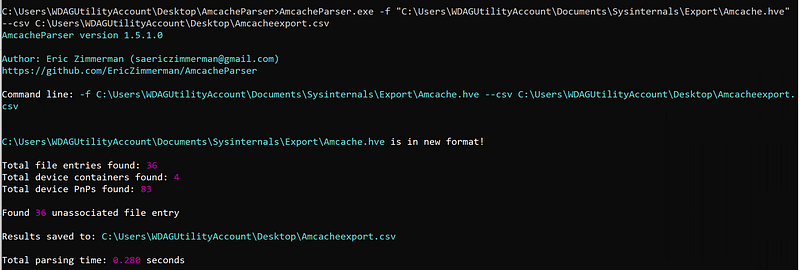
In the output directory we’ll have several files, but we want to focus on Amcache_UnassociatedFileEntries.csv. Once it opens, we’ll _s_earch for " # “sysinternals"which provides us with a handy column with the SHA1 hash of the executable!

Question 4: What is the malware’s family?
Okay! Now that we have found the SHA1 hash of the malware binary, let’s gather some additional intelligence and do some research with VirusTotal so that we can better understand what we are dealing with.
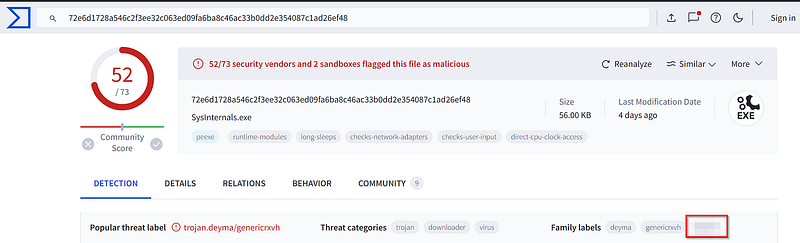
To answer Question 4, we’re going to focus on the family labels for this binary. There are a couple of labels, but we are looking at the third one (at the time of this writing) to answer the question.
Hint: If the family label has changed, check the detection name from Alibaba on VirusTotal.

Question 5: What is the first mapped domain’s Fully Qualified Domain Name (FQDN)?
Now, let’s stick with VirusTotal and pivot over to the Relations tab so that we can see further details of the analysis including the contacted URLs:
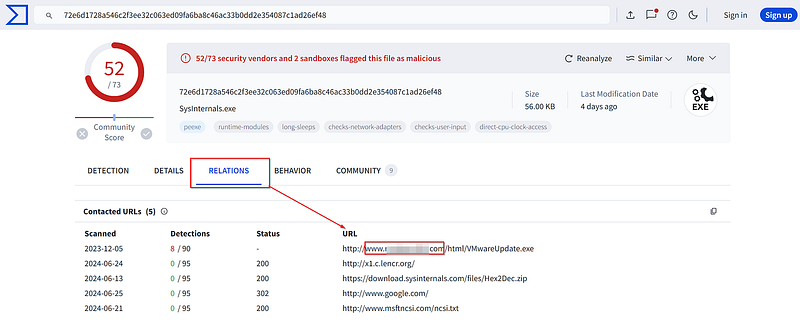
After examining the list, only one of these sticks out as suspicious both in the domain name and the number of detection hits. Let’s enter the first contacted URL’s FQDN and move on to Question 6!

Question 6: The mapped domain is linked to an IP address. What is that IP address?
Well, I thought Question 6 would be simple to discover using VirusTotal or through reverse DNS lookups but neither of these options worked. So, let’s turn to the challenge hint for a thread to follow!

Interesting! The hint is pointing us to the PowerShell command history file.
about History - PowerShell _Describes how to get and run commands in the command history._learn.microsoft.com
Let’s return to our Autopsy case and see what we can discover by navigating to the file path.
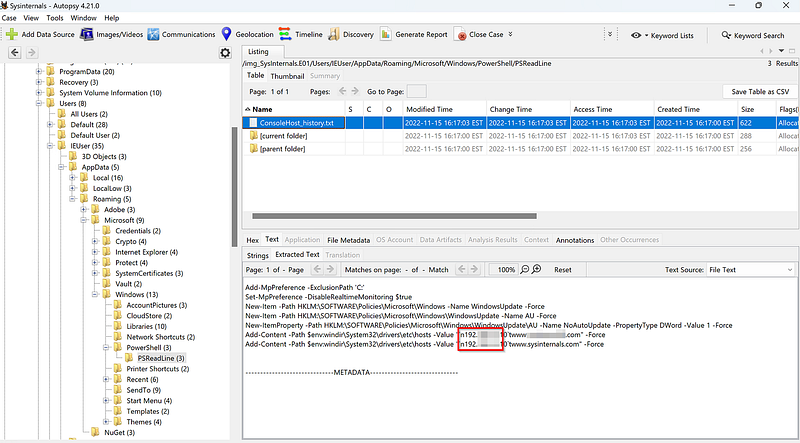
Contents of the PowerShell Command History
Immediately, we see that PowerShell history shows some suspicious commands tampering with Windows Defender. At the bottom of the command history, we can also see that one IP address was added to the Windows hosts file with two different hostnames, the legitimate Sysinternals domain and the malicious one that we found in Question 5. After this modification, both URLs would resolve to the same IP address…
Let’s confirm this by checking the Windows hosts file in the image. You can navigate to it by following the path in the image below:
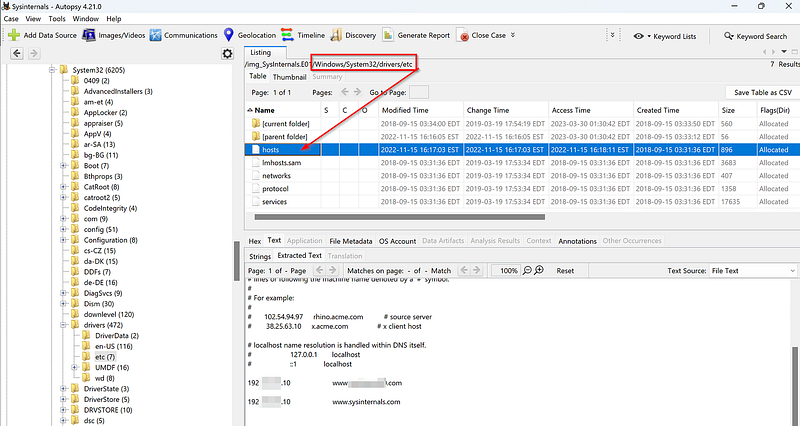
The victim’s Windows hosts file.
Okay, now that we have seen the information in two places let’s submit our answer and move forward with the investigation.

Question 7: What is the name of the executable dropped by the first-stage executable?
Let’s jump back over to our VirusTotal session to continue with our analysis.
This time, we are going to click the Behavior tab and scroll down to the Process and service actions section so we can focus on the Process Tree for the malware binary that we found in Question 1.
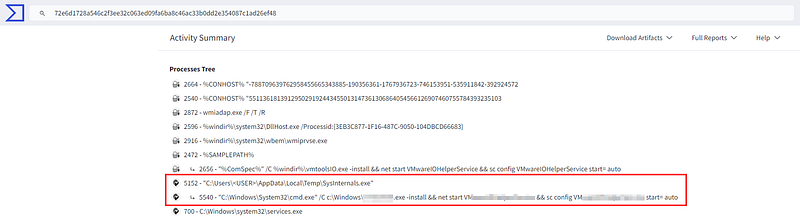
There’s something interesting here — the process tree for the malware binary spawns the Windows command prompt (cmd.exe) and runs an executable file which installs and starts a service, then sets it to automatically start.
The executable file is the " # "
dropped file” that we are looking for to answer Question 7!

Question 8: What is the name of the service installed by 2nd stage executable?
Fortunately, from our research for the previous question with VirusTotal we already discovered the installed service information.
This tactic could be used by a bad actor for Execution, Persistence, or Privilege Escalation within a victim environment. For further reading, I’m including some additional information on these techniques from MITRE ATT&CK if you’d like to know more — fun stuff!
MITRE ATT&CK — System Services: Service Execution (T1569.002)
MITRE ATT&CK — Create or Modify System Process: Windows Service (T1543.003)
Let’s review it again and check our work.

Question 9: What is the extension of files deleted by the 2nd stage executable?
Okay, we’ve made it to the last question for our investigation! Let’s go ahead with some static analysis of the 2nd stage executable that we discovered in Question 7.
From VirusTotal we learned that the binary was executed from the Windows folder. Since we know the file path now, why don’t we try to extract the file from the victim’s image using Autopsy so that we can analyze it?
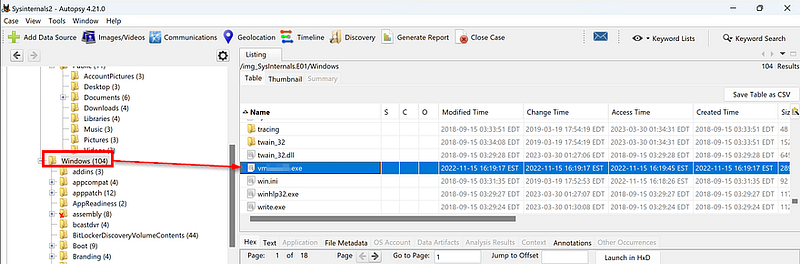
Extracting the 2nd stage executable with Autopsy
Navigate to the Windows folder with Autopsy, right-click and extract the file.
Now that we have our sample, we can start at a high-level and parse the strings stored in the malware.
For some quick background if you are unfamiliar: strings are pieces of data that store information in an application. So, if we are analyzing an application or some code, being able to extract strings can help us as defenders to understand a program’s intent or functionality and could reveal interesting artifacts like IP addresses, URLs, commands, credentials, etc.
While there are a couple of ways we can approach this, we are going to serve poetic justice and leverage the legitimate Sysinternals Strings utility to perform the analysis.
Strings - Sysinternals _Search for ANSI and UNICODE strings in binary images._learn.microsoft.com
Now that we have the Sysinternals Strings downloaded, open the Windows terminal (Command Prompt or PowerShell), and run strings.exe against the 2nd stage executable that we extracted from Autopsy. For this write-up, I also directed the output to a .txt file for easier analysis.
.\strings.exe “PATH-TO-2ND-STAGE-EXPORT” > “PATH-TO-OUTPUT-FILE”
![]()
PowerShell syntax to run Strings.exe
As a starting point, let’s search the output file. We’ll use the installed service name that we found in Question 8 to get us closer to the functions that we want to analyze.
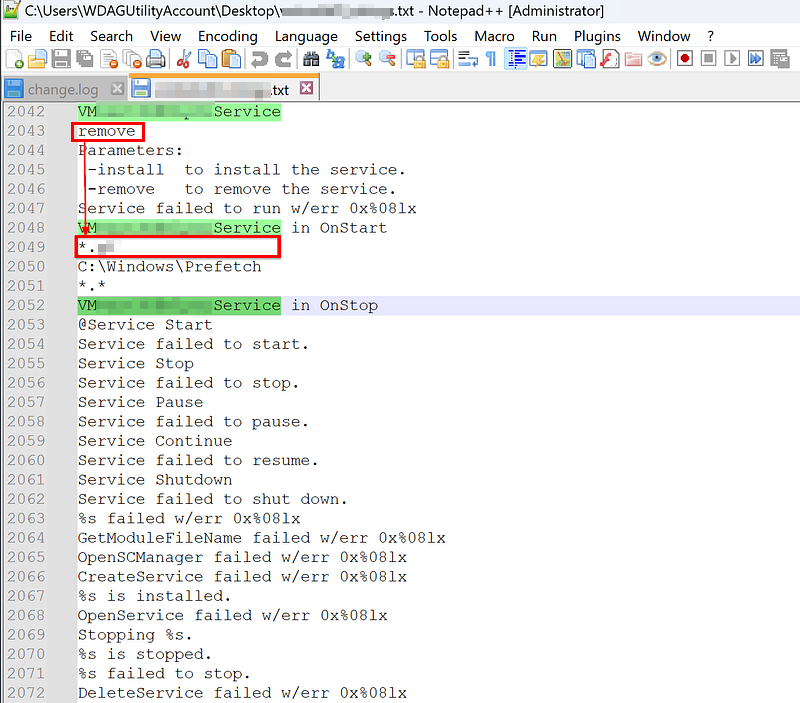
Hey, we already found something interesting — a wildcard string for a specific file extension.
This is a good lead, so let’s pivot back over to VirusTotal so that we can confirm our findings and see if we can discover any file deletion behavior. But first, we need to grab the file hash of the executable that we carved from Autopsy.
Let’s just jump into PowerShell and do a simple get-filehash to get the SHA256 hash of this file so that we can check VirusTotal again.

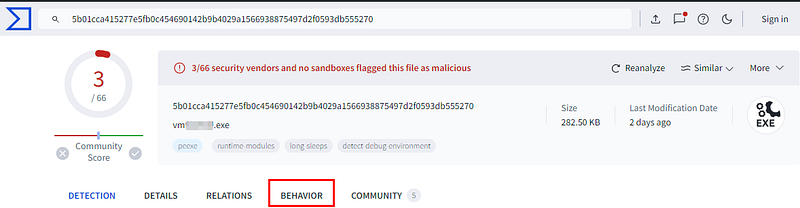
Navigate to the Behavior tab > File System Actions > Files Deleted.
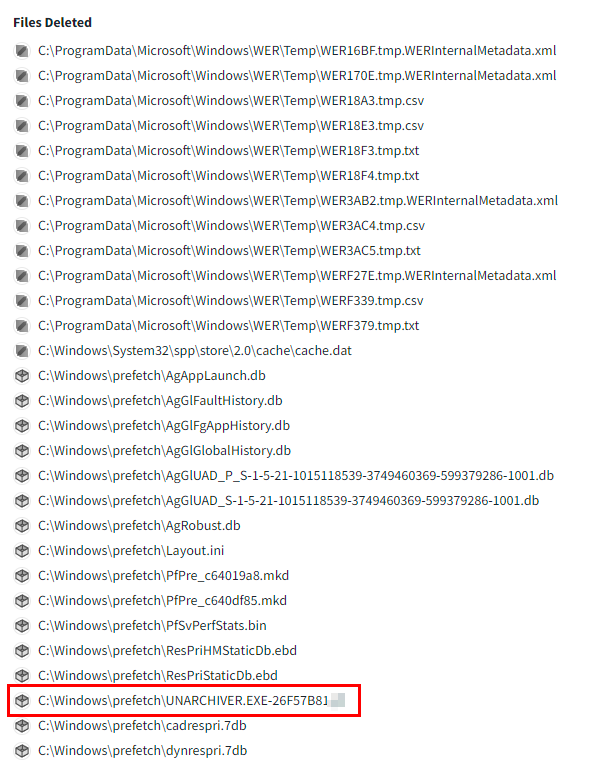
Looking through the VirusTotal report, we see file deletion activity with the same extension that we discovered using Strings. For the purposes of this challenge, we have double-confirmation and high confidence that this is the answer Question 9.

Conclusion:
Mission complete! We successfully completed the listed objectives and analyzed the artifacts on the victim’s system to get through the SysInternals challenge! It’s time for the after postmortem report and to close this case!
A big thank you to CyberDefenders.org for hosting this awesome lab! This lab was more challenging than I expected, and the variety of tools needed to solve the challenges kept me engaged throughout. For my own knowledge gaps and practice, the questions that leveraged Eric Zimmerman’s AmcacheParser and AppCompatCacheParser were extremely valuable. These tools were new to me, but I’ll definitely be adding these to my toolbox going forward.
I hope that you had as much fun as I did and learned something new, too!
Thank you so much for reading along and working through this investigation with me. Until next week — stay curious!
Tools & References:
Microsoft Sysinternals: https://learn.microsoft.com/en-us/sysinternals/
Sleuthkit Autopsy: https://github.com/sleuthkit/autopsy
MITRE ATT&CK (T0849): https://attack.mitre.org/techniques/T0849/
Eric Zimmerman’s Tools: https://ericzimmerman.github.io/#!index.md
Google Cloud Blog (AppCompatCache): https://cloud.google.com/blog/topics/threat-intelligence/caching-out-the-val
SANS AppCompatCache Blog Post: https://www.sans.org/blog/mass-triage-part-4-processing-returned-files-appcache-shimcache/
SANS Amcache Blog Post: https://www.sans.org/blog/mass-triage-part-5-processing-returned-files-amcache/
Microsoft Learn (PSReadline): https://learn.microsoft.com/en-us/powershell/module/microsoft.powershell.core/about/about_history?view=powershell-7.4
VirusTotal (1st Stage Executable): https://www.virustotal.com/gui/file/72e6d1728a546c2f3ee32c063ed09fa6ba8c46ac33b0dd2e354087c1ad26ef48/detection
MITRE ATT&CK (T1569.002): https://attack.mitre.org/techniques/T1569/002/
MITRE ATT&CK (T1543.003): https://attack.mitre.org/techniques/T1543/003/
SysInternals — Strings: https://learn.microsoft.com/en-us/sysinternals/downloads/strings
VirusTotal (2nd Stage Executable): https://www.virustotal.com/gui/file/5b01cca415277e5fb0c454690142b9b4029a1566938875497d2f0593db555270/detection