CyberDefenders: BRabbit Lab Walkthrough
BadRabbit Ransomware Analysis: Correlating Threat Intelligence, Sandbox Reports, and ATT&CK Mapping

Image Credit: https://cyberdefenders.org/blueteam-ctf-challenges/brabbit/
Introduction:
Welcome to my weekly walkthrough! If you’ve stumbled across this post while looking for a detailed guide to the BRabbit blue team lab from CyberDefenders, you’re in the right place. This one drops us straight into incident response mode, where a single convincing phishing email turns into a full-blown ransomware outbreak.
In this scenario, we’re assisting a fictional organization that fell victim to ransomware after an employee opened what appeared to be a routine email from their boss. Familiar logo, familiar email address, and a seemingly harmless attachment. After opening it, the system is compromised, sensitive files are encrypted, and the victim can no longer boot. Yikes.
On paper, the mission is simple. Identify the malware, understand its behavior, learn how it persists, how it communicates, how it damages the system, and where it might have come from. In practice, it’s a lot messier. The twist here is that we’re not always taking the fastest route to the answer. Instead, I intentionally stayed within the constraints of threat intelligence platforms and public sandbox reports.
That means leaning heavily on tools like CyberChef, VirusTotal, Recorded Future Tria.ge, Any.Run, and Malpedia. This isn’t always the most efficient path, but it’s a very realistic one. In real investigations, you’re often correlating CTI, validating what others have already observed, and deciding how much confidence to place in the evidence available, rather than reverse engineering everything from scratch.
As we work through the questions, we’ll bounce between email analysis, file metadata, behavioral reports, ATT&CK mappings, and attribution, sometimes revisiting the same artifacts from different angles. That repetition is intentional. The goal isn’t just to answer the questions, but to introduce different tools, show how they complement each other, and model an investigation workflow that values context over speed.
And hey, if you find this walkthrough helpful, whether it helps you level up your memory forensics skills, gets you over a stumbling block, or just serves as a useful reference, consider following me for more weekly deep dives.
Thanks for reading and going on this investigation with me. Let’s go!
Challenge Scenario:
You are an investigator assigned to assist Drumbo, a company that recently fell victim to a ransomware attack. The attack began when an employee received an email that appeared to be from the boss. It featured the company’s logo and a familiar email address. Believing the email was legitimate, the employee opened the attachment, which compromised the system and deployed ransomware, encrypting sensitive files. Your task is to investigate and analyze the artifacts to uncover information about the attacker.
Setup the Analysis Environment & Extract the Challenge File:
Safety first! When working with lab/challenge files from CyberDefenders (or any educational lab/challenge/range), it’s important to be responsible and stay safe by interacting with potentially malicious files in a dedicated, isolated virtual machine environment. For this challenge I’m using REMnux, a specialized Linux distribution for malware analysis.
To keep this write-up focused, I’m going to skip step-by-step setup directions of REMnux, but if you’d like to set up your own environment, please follow the guide provided by REMnux directly. For reference, I used the virtual appliance method:
Get the Virtual Appliance | REMnux Documentation _The easiest way to get the REMnux distro is to download the REMnux virtual appliance in the OVA format, import it into…_docs.remnux.org
Once you have a safe virtual environment created, updated, isolated, and snapshotted, we can extract the challenge file and start the investigation!
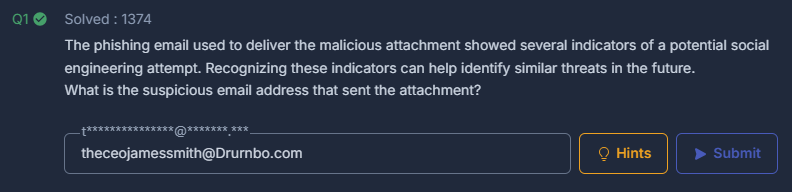
Question 1: The phishing email used to deliver the malicious attachment showed several indicators of a potential social engineering attempt. Recognizing these indicators can help identify similar threats in the future.
What is the suspicious email address that sent the attachment?
Let’s get to it. Our first step is to extract the attachment named Urget Contract Action.zip, which leaves us with our primary artifact, Urget Contract Action.eml.
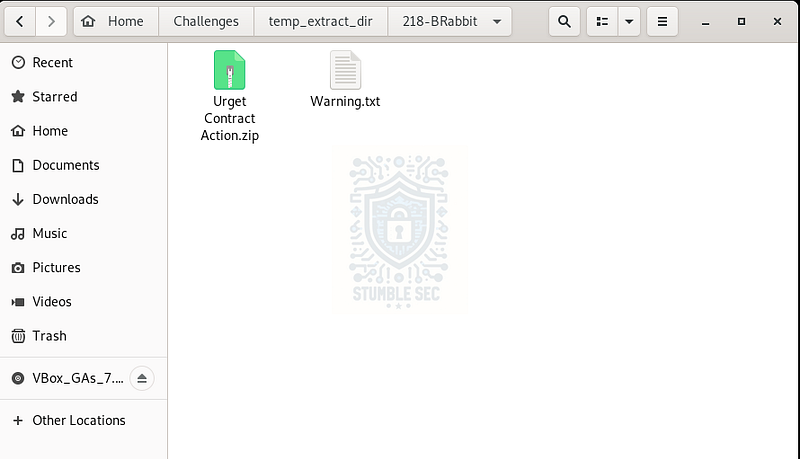
Overview of the Challenge File
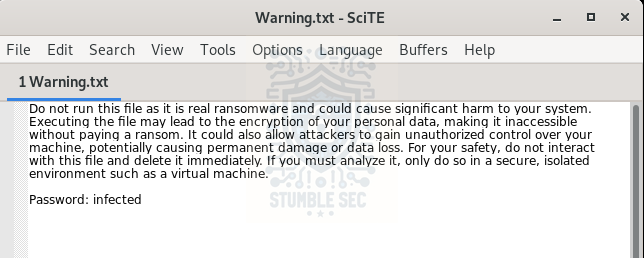
Before opening anything further, you might notice a warning.txt file included with the challenge. This one is important. It explains that we’ll be interacting with real malware samples, so if you skipped the “Setup the Analysis Environment"section, take a moment to pause here and make sure you’re working in a safe, isolated environment and understand the warning issued by the challenge.
Heed the warning
The first thing we need to do is a basic email header analysis. There are a lot of ways to approach this using dedicated mailbox or header analysis tools, but for this writeup, we’ll take a slightly different route and lean on CyberChef. That gives us the flexibility to handle both header analysis and file extraction in one place.
You can use either the online or offline version of CyberChef. With either option, the approach is the same. Drop Urget Contract Action.eml directly into the input window.
To answer Question 1 and identify indicators of social engineering, we can apply the “Extract email addresses” operation to our recipe. This quickly pulls out all email addresses present in the message headers and body, saving us from manually digging through raw header text.
And almost immediately, something stands out.
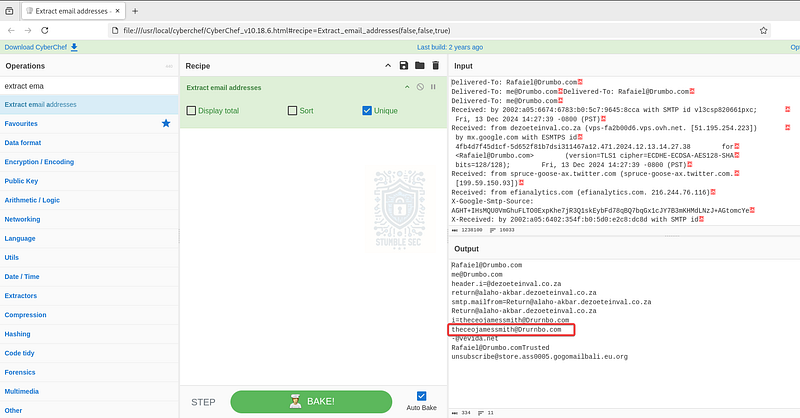
CyberChef: Identifying the suspicious sender address
Instead of coming from Drumbo’s legitimate domain, the sender address uses a fun typo. The domain reads “drurnbo” instead of Drumbo. This kind of typo squatting is a common social engineering tactic, relying on how easily “rn” can visually blend in to look like “m” at a glance. The attacker also leveraged the CEO’s name, adding urgency and legitimacy to the message and increasing the likelihood that the recipient would trust the attachment and open it…which worked!
Question 2: The ransomware was identified as part of a known malware family. Determining its family name can provide critical insights into its behavior and remediation strategies.
What is the family name of the ransomware identified during the investigation?
Next, we need to extract the attachment from the phishing email so we can begin some initial analysis. While it would be much easier to simply open the .eml file in an email client, we can also extract the attachment directly using CyberChef and keep everything inside our current workflow.
To do this, scroll down and identify the section of the email labeled:
Content-Disposition: attachment; filename=“Urgent Contract Action.pdf.exe”
Just below that header, you’ll see a long Base64-encoded blob. That blob is the attachment itself, named Urgent Contract Action.pdf.exe. The filename alone is already doing some social engineering. The double extension strongly suggests an executable file attempting to masquerade as a harmless PDF.
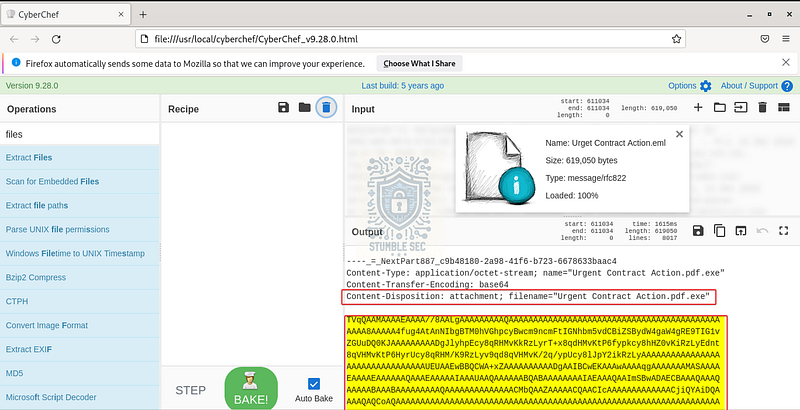
CyberChef: Identifying the attachment as Base64
Keep in mind that the blob is much longer than what’s visible in the screenshot. Make sure to copy the entire Base64 string and then paste it into a new input window within CyberChef.
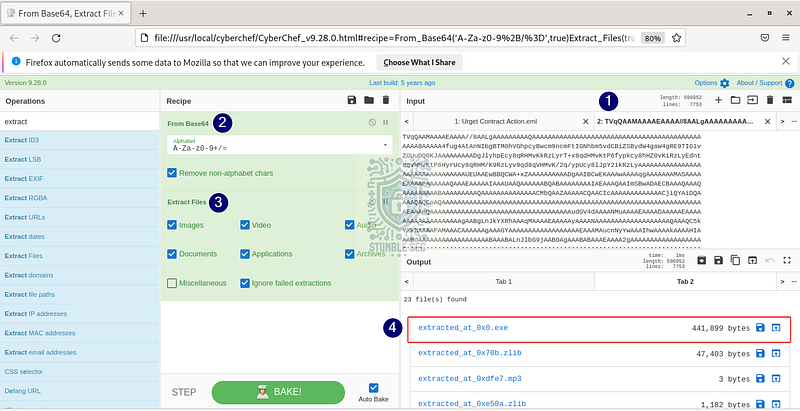
CyberChef: Decoding and extracting the attachment
Once pasted in, add the “From Base64"and “Extract Files” operations to the recipe. This allows us to reconstruct the original attachment directly from the email content. In this challenge, the extracted file appears as extracted_at_0x0.exe. Go ahead and save that file.
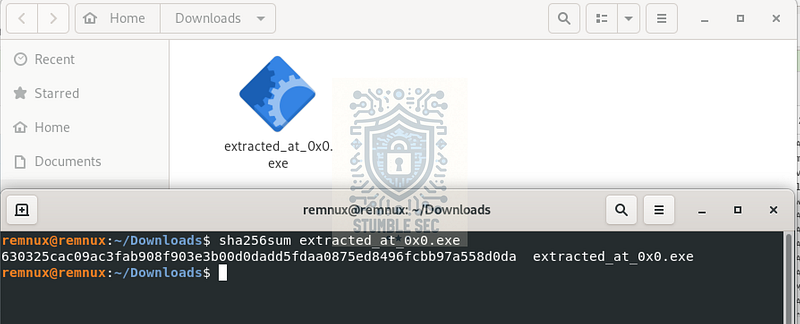
The next step is to grab the SHA-256 hash of the extracted executable. This hash is critical because it gives us a fingerprint that can be used to search threat intelligence platforms for known malware samples.
On a Linux system, we can generate the hash using the following command:
sha256sum extracted_at_0x0.exe
Calculating the SHA256 hash of the ransomware binary
Which produces:
630325cac09ac3fab908f903e3b00d0dadd5fdaa0875ed8496fcbb97a558d0da
With the file hash in hand, it’s time to pivot into external threat intelligence. Copy the hash and submit it to VirusTotal. This sample has been observed before and is flagged as malicious by multiple vendors.
What we care about most for Question 2, though, is the malware family classification: BadRabbit.
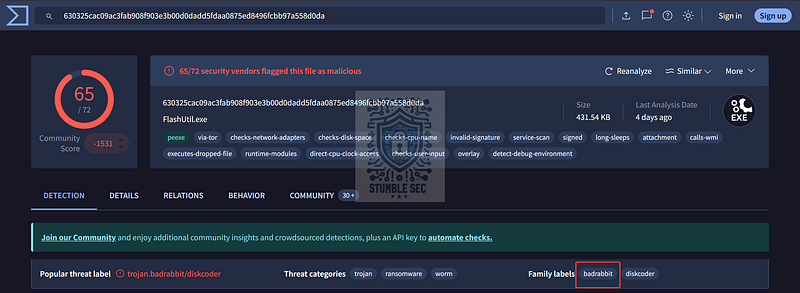
VirusTotal: Identifying the ransomware family
Now that we’ve confirmed the malware family, we can start digging into its behavior and better understand what we’re dealing with.

Question 3: Upon execution, the ransomware dropped a file onto the compromised system to initiate its payload. Identifying this file is essential for understanding its infection process.
What is the name of the first file dropped by the ransomware?
To begin answering Question 3, there’s a good lesson worth calling out. When gathering cyber threat intelligence, you often need to consult multiple sources to paint a complete picture. No single platform tells the whole story. That’s exactly what we’re going to do next.
Let’s take a brief detour away from VirusTotal and highlight another excellent malware analysis and threat intelligence resource: Recorded Future Tria.ge. While much of this behavioral detail is technically available in VirusTotal, it’s easier to visualize and explain using Tria.ge’s sandbox reporting.
Navigate to the Reports tab and submit the BadRabbit hash we collected earlier.
Heads-up, you’ll likely see several results. Go ahead and select a report that matches the same filename as our extracted sample. I’ve linked the exact report I used below to keep things consistent.
badrabbit | 630325cac09ac3fab908f903e3b00d0dadd5fdaa0875ed8496fcbb97a558d0da | Triage _Check this badrabbit report malware sample 630325cac09ac3fab908f903e3b00d0dadd5fdaa0875ed8496fcbb97a558d0da, with a…_tria.ge
Once inside the report, click Tasks and then select behavioral1. From there, scroll down to the Processes section.

Tria.ge: Behavioral report > Processes snippet
This is where things get interesting. The behavioral analysis shows that shortly after execution, the ransomware binary launches rundll32.exe. That process is then used to drop a file named infpub.dat onto the system.
This answers Question 3 for us. The first file dropped by the ransomware during execution is infpub.dat. More importantly, this gives us our next breadcrumb.

Question 4: Inside the dropped file, the malware contained hardcoded artifacts, including usernames and passwords that could provide clues about its origins or configuration.
What is the only person’s username found within the dropped file?
Now that we’ve confirmed the name of the dropped file, let’s jump back over to VirusTotal and look at the dropped files view for the original BadRabbit hash we identified in Question 2. The goal here is to change perspective. By pivoting back to VirusTotal, we can dig deeper into infpub.dat using threat intelligence that complements what we already saw in Recorded Future Tria.ge.
Navigate to the Relations tab and then select Dropped Files. This view is a bit less structured than what we saw in Tria.ge, but with a little digging, we can locate infpub.dat and click into it to start answering Question 4.
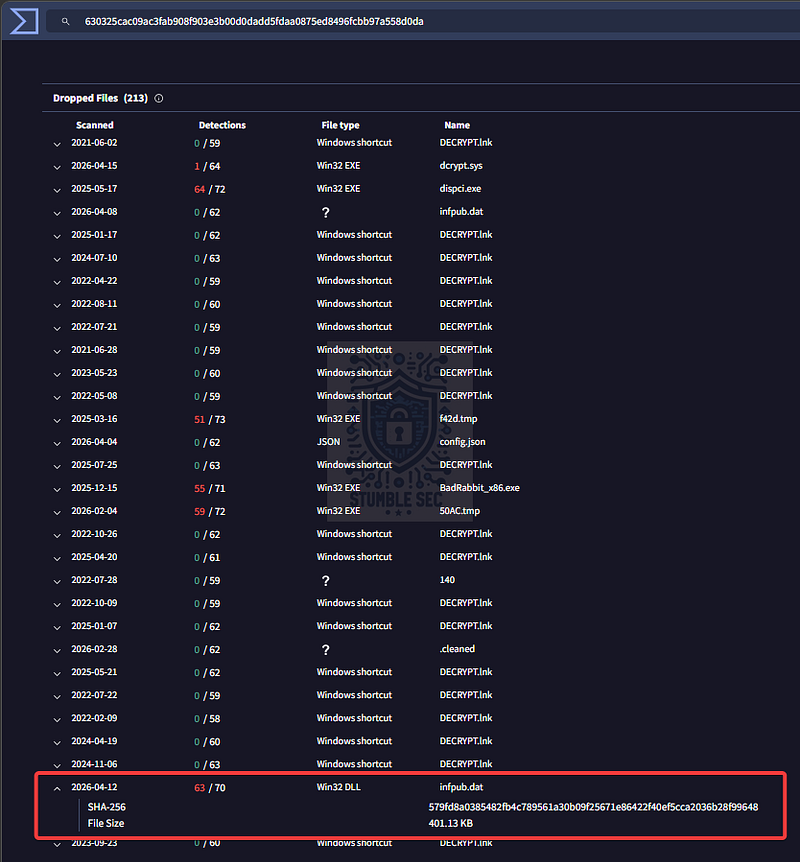
VirusTotal: Identifying the hash of infpub.dat
579fd8a0385482fb4c789561a30b09f25671e86422f40ef5cca2036b28f99648
Once on the VirusTotal page for infpub.dat, we get several analysis options. Before jumping straight into our own static analysis, it’s worth seeing what the community and external researchers have already uncovered.
Head over to the Community tab. This section often contains links to malware write-ups, analyst notes, or external research that can save us time and help validate our assumptions.
VirusTotal: Finding external reporting through the community comments
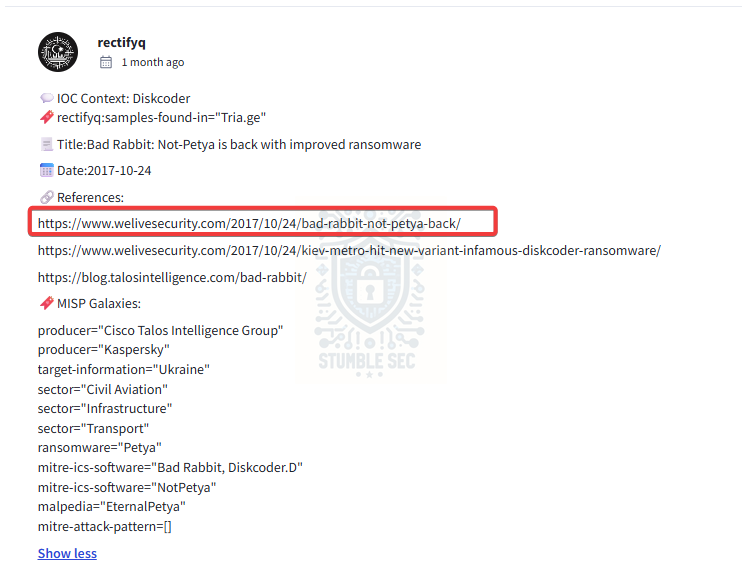
In this case, there’s a particularly helpful link to an analysis published on ESET’s WeLiveSecurity blog. The report provides key insight into BadRabbit’s internal artifacts and behavior, including the use of embedded credentials.
Bad Rabbit: Not-Petya is back with improved ransomware _A new ransomware outbreak today has hit some major infrastructure in Ukraine including Kiev metro. Here are some…_www.welivesecurity.com
" # "
Mimikatz is launched on the compromised computer to harvest credentials. A hardcoded list of usernames and passwords is also present.”
Reviewing the reported credential data, we see several system or service-related account names. However, one username stands out. Unlike generic entries such as guest, administrator, or service-style accounts, there is a single, clearly human username embedded in the file: alex.
That makes alex the only person’s username found within the dropped file, and the answer to Question 4.
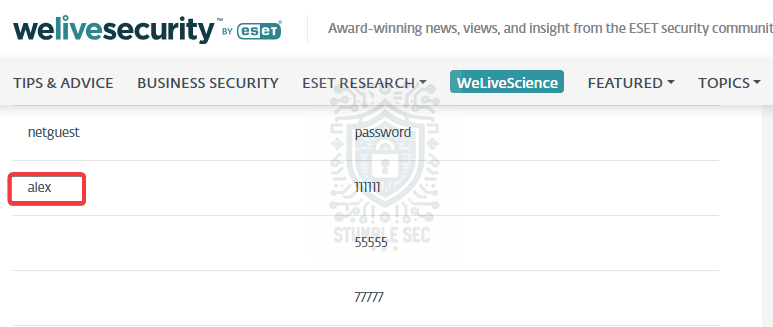
Identifying the username through the ESET report
Question 5: After execution, the ransomware communicated with a C2 server. Recognizing its communication techniques can assist in mitigation.
What MITRE ATT&CK sub-technique describes the ransomware’s use of web protocols for sending and receiving data?
After execution, the ransomware needs a way to communicate with its command-and-control infrastructure. Understanding how it sends and receives data is important, because these techniques often inform both detection and mitigation strategies.
Since we already have the hash for infpub.dat from Question 4, we can pivot to another useful tool to help with this analysis: Any.Run. This interactive sandbox is especially helpful for visualizing network behavior, rather than stumbling through static reports.
Navigate to the Any.Run reports section and search for the hash associated with the dropped file. From the available results, select one of the public analysis runs. For example, the report below matches the same sample and provides clear network data:
Analysis infpub.exe (MD5: 1D724F95C61F1055F0D02C2154BBCCD3) Malicious activity — Interactive… _Interactive malware hunting service. Live testing of most type of threats in any environments. No installation and no…_app.any.run
Once inside the report, turn your attention to the Network Threats tab in the bottom pane. Scroll through the color-coded rows until you reach entries marked as “potentially bad traffic.“This is where things click. The report highlights WebDAV traffic associated with infpub.dat, showing it being used to send and receive data over the network. WebDAV blends into normal-looking web traffic, which makes it attractive for malware trying to avoid detection.
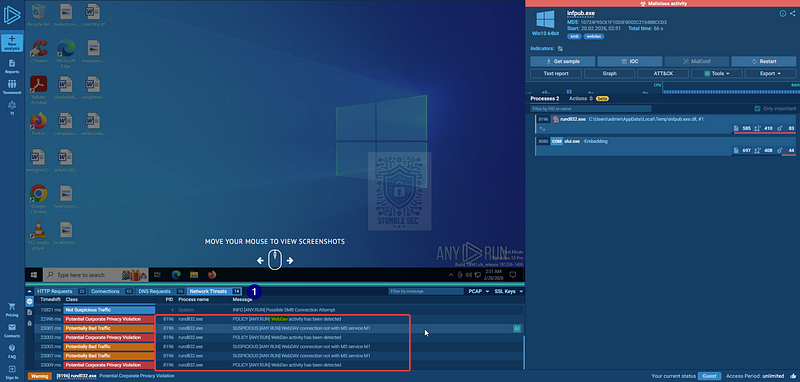
Any.Run: Identifying potentially malicious WebDAV traffic
This behavior maps to the MITRE ATT&CK sub-technique Application Layer Protocol: Web Protocols (T1071.001). This technique describes adversaries communicating over common web-based application protocols in order to blend in with legitimate network activity.
Application Layer Protocol: Web Protocols _Adversaries may communicate using application layer protocols associated with web traffic to avoid detection/network…_attack.mitre.org
That gives us the answer to Question 5. The ransomware’s command-and-control traffic is best described by T1071.001: Application Layer Protocol: Web Protocols.
Question 6: Persistence mechanisms are a hallmark of sophisticated ransomware. Identifying how persistence was achieved can aid in recovery and prevention of reinfection.
What is the MITRE ATT&CK Sub-Technique ID associated with the ransomware’s persistence technique?
Moving right along, we now need to determine how the ransomware maintains persistence on the compromised system. Continuing our pattern of pivoting between tools, let’s revisit the Recorded Future Tria.ge report for the original BadRabbit sample and take another look at the process tree.
After execution and the dropping of infpub.dat, we see a familiar sequence unfold. The malware spawns cmd.exe, which in turn launches schtasks.exe. This is the built-in Windows command-line utility used to create or modify scheduled tasks.
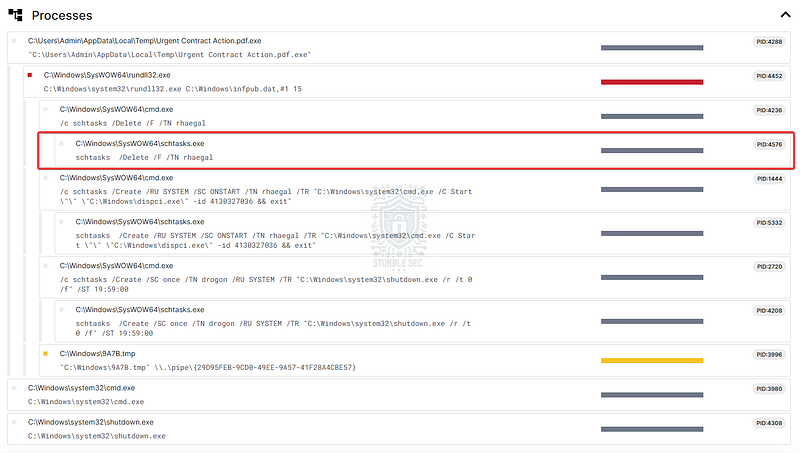
Tria.ge: highlighting scheduled task creation for persistence
That sequence is a strong indicator of a classic persistence mechanism. By creating a scheduled task, the malware ensures it can re-execute automatically, often on a timer or at system startup, without requiring user interaction.
This behavior is documented in MITRE ATT&CK as the sub-technique Scheduled Task/Job: Scheduled Task (T1053.005). With that, we’ve answered Question 6.
Scheduled Task/Job: Scheduled Task _Adversaries may abuse the Windows Task Scheduler to perform task scheduling for initial or recurring execution of…_attack.mitre.org
Question 7: As part of its infection chain, the ransomware created specific tasks to ensure its continued operation. Recognizing these tasks is crucial for system restoration. What are the names of the tasks created by the ransomware during execution?
Now that we’ve confirmed that T1053.005 (Scheduled Task) was used as the persistence mechanism, the next step is to determine the names of the scheduled tasks created by the ransomware. This detail matters, because knowing exactly what to look for can significantly speed up system restoration and cleanup.
Luckily for us, this information is available in the same Recorded Future Tria.ge process tree we used back in Question 6.
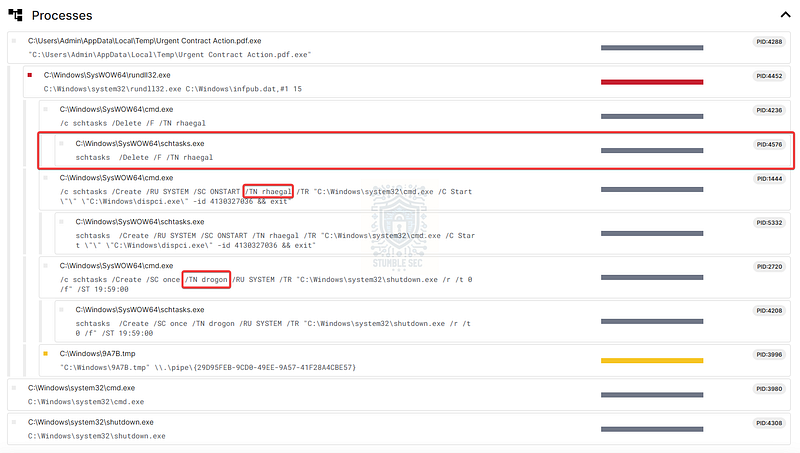
Tria.ge: Identifying the names of the scheduled tasks created by the ransomware
Focusing on the process command-line arguments, we can clearly see both task creation and deletion events involving schtasks.exe. The key field to look for is the /TN argument, which specifies the task name being created or removed.
Looking closely at these entries, two task names jump out. During execution, BadRabbit creates scheduled tasks named Rhaegal and Drogon.
For anyone familiar with Game of Thrones, these names might ring a bell. While the references are fun, they also make these tasks easier to spot during incident response, assuming you know what you’re looking for.
With that, we’ve answered Question 7. The ransomware creates scheduled tasks named Rhaegal and Drogon to maintain persistence.
Question 8: the malicious binary dispci.exe displayed a suspicious message upon execution, urging users to disable their defenses. This tactic aimed to evade detection and enable the ransomware’s full execution. What suspicious message was displayed in the Console upon executing this binary?
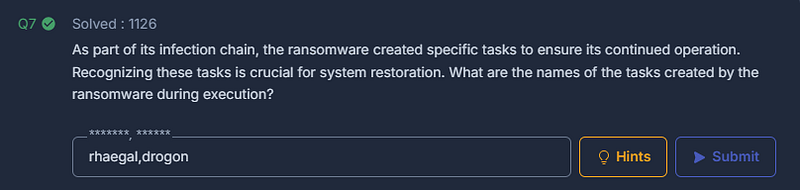
The next step in our analysis is to identify the console message displayed after executing another related malicious binary, dispci.exe. We see this file referenced in the Recorded Future Tria.ge report, but at this stage, we don’t yet have much detail on what it actually does.
Tria.ge: Identifying the process execution of dispci.exe
To gather more context, let’s pivot back to VirusTotal and look at the original BadRabbit sample. Under Relations → Dropped Files, we can locate dispci.exe and identify its file hash:
0f815e2944f12b847e1165517daaab6be67ff4c1daee73b09e8fb3733b974c9f
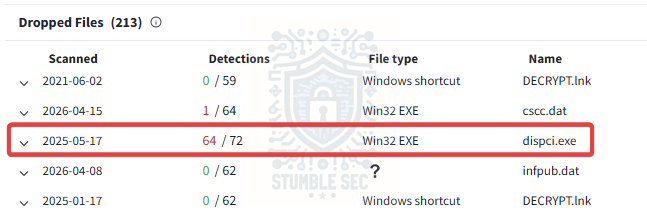
VirusTotal: Identifying the file hash of dispci.exe
With the hash in hand, we have a few options. We could download the binary from a malware repository for hands-on static analysis, move over to an interactive sandbox, or continue leaning on existing threat intelligence reporting.
For this writeup, we’ll stick with VirusTotal and see what’s already available.
Navigate to the Behaviors tab for dispci.exe. From there, select the Zenbox full sandbox report. One of the more useful features of this report is that it captures screenshots of the malware during execution, which can reveal user-facing behavior we might otherwise miss.
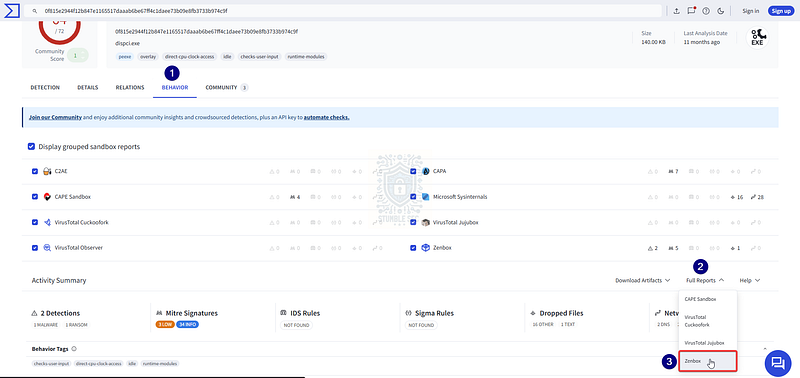
VirusTotal: Opening the Zenbox sandbox report
To illustrate this, select the Zenbox report and scroll down to the Screenshots section at the bottom of the report.
Zenbox: Reviewing execution screenshots
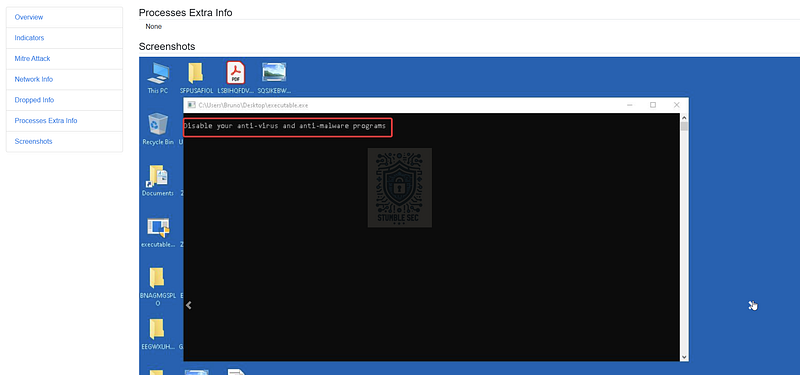
This gives us exactly what we need to answer Question 8. Upon execution, dispci.exe displays the following message in the console:
“Disable your anti-virus and anti-malware programs.“This prompt is another attempt at defense evasion through social engineering. By urging the victim to weaken or disable their security controls, the malware improves its chances of executing fully without being hindered by security tools.
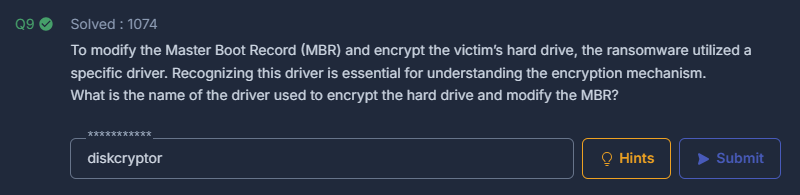
Question 9: To modify the Master Boot Record (MBR) and encrypt the victim’s hard drive, the ransomware utilized a specific driver. Recognizing this driver is essential for understanding the encryption mechanism.
What is the name of the driver used to encrypt the hard drive and modify the MBR?
To answer Question 9, we need to identify the specific driver used by the ransomware to encrypt the victim’s hard drive and modify the Master Boot Record. This driver is a critical part of the encryption chain, because it explains how the ransomware is able to operate at a low level on the system.
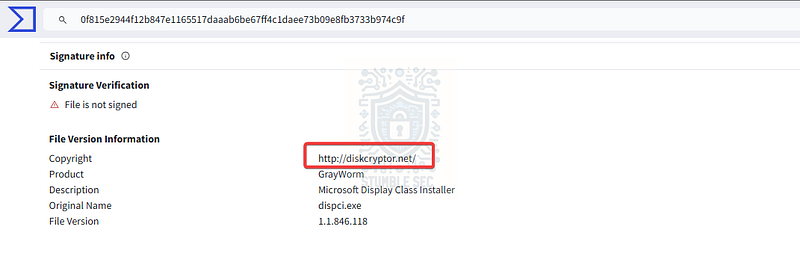
To get there, exit the Behaviors tab and navigate to the Details page for dispci.exe in VirusTotal. This view exposes metadata about the binary.
Under Signature Info → File Version Information, we see that dispci.exe is associated with DiskCryptor. This attribution is reinforced by the metadata copyright information embedded in the binary, which points back to the DiskCryptor project.
VirusTotal: Looking for driver clues on the behaviors tab
According to the project description, “DiskCryptor is an open encryption solution that offers encryption of all disk partitions, including the system partition.“That tells us exactly what we need for Question 9. The ransomware leverages the DiskCryptor driver to perform full disk encryption and modify the Master Boot Record. With that, we can confidently answer Question 9.
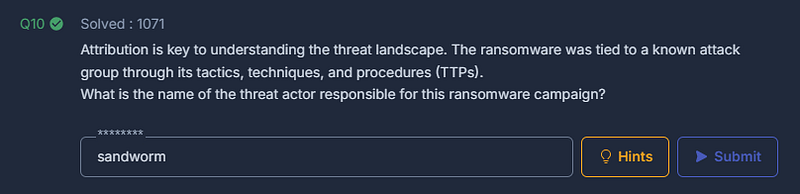
Question 10: Attribution is key to understanding the threat landscape. The ransomware was tied to a known attack group through its tactics, techniques, and procedures (TTPs).
What is the name of the threat actor responsible for this ransomware campaign?
We’re closing in on the end of our analysis, and now it’s time to look beyond tools and techniques and focus on attribution. The question here isn’t about the nitty-gritty details of how the ransomware works anymore, but who is historically tied to this campaign based on shared tactics, techniques, and procedures.
To do that, let’s pivot away from sandboxing platforms and threat execution data and move into a dedicated malware knowledge base: Malpedia.
Malpedia is an excellent resource for tying malware families to known threat actors and for surfacing a ton of great external reporting in one place. From the home page, search for BadRabbit.
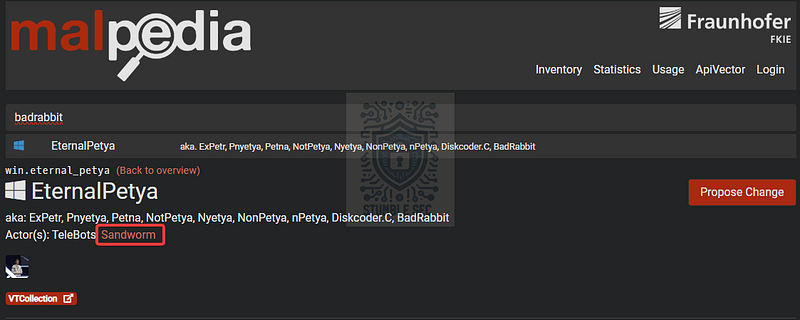
Malpedia: Identifying actors associated with Bad Rabbit
EternalPetya (Malware Family) _According to proofpoint, Bad Rabbit is a strain of ransomware that first appeared in 2017 and is a suspected variant of…_malpedia.caad.fkie.fraunhofer.de
Right away, we can locate the BadRabbit entry, where it’s described as a ransomware family closely related to Petya and NotPetya. This aligns with what we’ve already observed throughout the challenge, especially the disk-level encryption behavior and file hashes.
Scrolling further, Malpedia lists multiple attribution assessments sourced from external intelligence vendors. One threat actor stands out as the most consistently associated with BadRabbit.
Sandworm Team _In October 2020, the US indicted six GRU Unit 74455 officers associated with Sandworm Team for the following cyber…_attack.mitre.org
Sandworm is a well-documented threat group linked to destructive campaigns targeting critical infrastructure and large organizations, and it’s commonly associated with NotPetya and related ransomware operations.
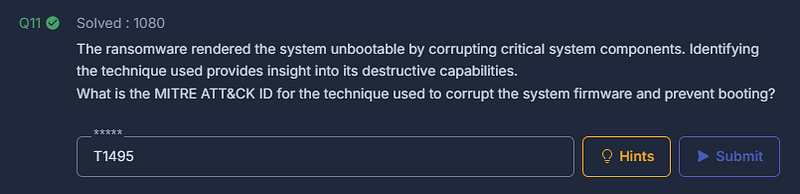
Question 11: The ransomware rendered the system unbootable by corrupting critical system components. Identifying the technique used provides insight into its destructive capabilities.
What is the MITRE ATT&CK ID for the technique used to corrupt the system firmware and prevent booting?
Finally, we’ve made it to the last question. Our closing task is to identify the MITRE ATT&CK technique used by the ransomware to render the victim system unbootable.
From Question 9, we know that DiskCryptor was used to encrypt the hard drive and modify the Master Boot Record. From the question, we can infer that that outcome is that on top of the data being encrypted, the system is left unable to boot normally.
Rather than speculate, let’s check out the MITRE ATT&CK software page for BadRabbit to confirm which Impact technique MITRE themselves associate with this behavior.
Bad Rabbit _Bad Rabbit is a self-propagating ransomware that affected the Ukrainian transportation sector in 2017. Bad Rabbit has…_attack.mitre.org
Looking at the listed techniques, one maps directly to the effect described in the question. Firmware Corruption (T1495) is documented as a technique used to damage critical boot components in order to prevent a system from starting.
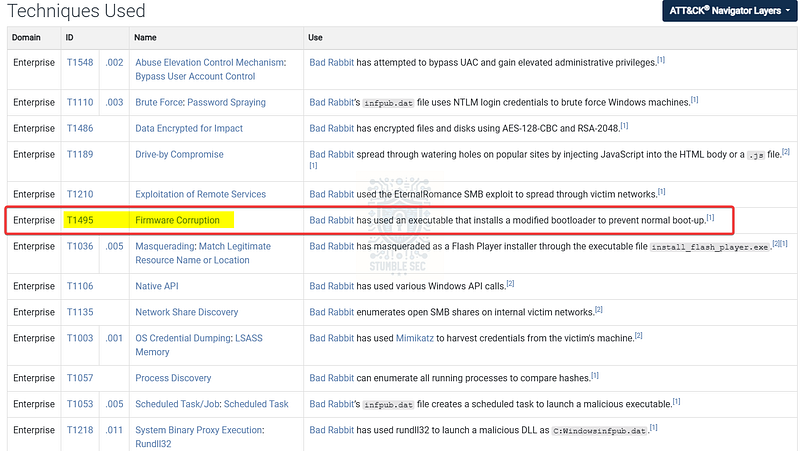
MITRE ATT&CK: Identifying Bad Rabbit destructive impact techniques
MITRE explicitly lists T1495 as an Impact technique associated with BadRabbit, reflecting the ransomware’s ability to overwrite boot-related disk structures and leave systems unbootable. That gives us our final answer.
With that, we’ve completed the analysis, from initial infection through destructive impact and now we can wrap up our investigation.
Conclusion:
So, how fun was that? A big thank you to CyberDefenders for another awesome challenge.
This lab ended up being a good reminder that there’s rarely a single tool, report, or source of truth that magically answers every question. As much as we’d all like a one-stop solution for threat intelligence, the reality is that investigations often turn into a bit of a research slog. Not because the answers are impossible to find, but because they live across multiple platforms, formats, and perspectives.
I’ll be honest, I expected this challenge to go a bit faster. Instead, it slowed me down in a good way. It forced me to stop, pivot between tools, reframe questions, and validate instead of jumping straight to conclusions. It’s a realistic (if frustrating) experience, mirroring how real investigations go, especially when you’re operating under constraints and relying on publicly available intelligence.
From my perspective, the real value here comes from tying different sources together and being exposed to different tools. Interactive sandboxes like Recorded Future Tria.ge and Any.Run gave us a safe way to observe behavior as it unfolded. Static and reports in VirusTotal helped ground and validate those observations with hashes, relationships, and community context. External reporting and curated knowledge bases like Malpedia added context and attribution that raw analysis alone didn’t show. None of these tools were sufficient on their own, but together they painted a much clearer picture.
Thanks for your support and partnering on this investigation. If you found this walkthrough helpful — please give it a clap and consider following me! Your feedback is invaluable, and it pumps me up to support your security journey. Remember, cybersecurity is a team sport, and we’re in this together!
Until next week’s challenge — stay curious and be safe out there!

Tools & References:
Challenge Link: https://cyberdefenders.org/blueteam-ctf-challenges/brabbit/
REMnux: https://remnux.org/
CyberChef: https://gchq.github.io/CyberChef/
VirusTotal: https://www.virustotal.com/
VirusTotal (Urget Contract Action.pdf.exe) — https://www.virustotal.com/gui/file/630325cac09ac3fab908f903e3b00d0dadd5fdaa0875ed8496fcbb97a558d0da
Recorded Future Tria.ge (Urgent Contract Action.pdf.exe): https://tria.ge/251107-yd3m1ahm6v/behavioral1
VirusTotal (infpub.dat) — https://www.virustotal.com/gui/file/579fd8a0385482fb4c789561a30b09f25671e86422f40ef5cca2036b28f99648
VirusTotal (dispci.exe) — https://www.virustotal.com/gui/file/0f815e2944f12b847e1165517daaab6be67ff4c1daee73b09e8fb3733b974c9f
Welivesecurity by Eset — " # “Bad Rabbit: Not-Petya is back with improved ransomware”: https://www.welivesecurity.com/2017/10/24/bad-rabbit-not-petya-back/
Any.Run (infpub.dat): https://app.any.run/tasks/b83b65e0-5717-4e98-9763-32cd281ff023
Disk Cryptor: https://diskcryptor.org/
Malpedia — EternalPetya: https://malpedia.caad.fkie.fraunhofer.de/details/win.eternal_petya
MITRE ATT&CK — Groups — Sandworm Team (G0034): https://attack.mitre.org/groups/G0034/
MITRE ATT&CK — Software — Bad Rabbit (S0606): https://attack.mitre.org/software/S0606/
MITRE ATT&CK — Firmware Corruption (T1495): https://attack.mitre.org/techniques/T1495/