CyberDefenders — Insider Lab Walkthrough
A Linux DFIR Challenge Using FTK Imager and Built-In Logs.

Image Credit: https://cyberdefenders.org/blueteam-ctf-challenges/insider/
Introduction:
Welcome to my weekly walkthrough! If you’ve stumbled across this blog searching for a comprehensive guide to the Insider Lab from CyberDefenders, you’re in the right spot. This challenge is a fantastic introduction to digital forensics and incident response (DFIR) on Linux and provides a solid foundational overview of some of the commonly used logs.
Let’s check out the scenario below:
Challenge Scenario:
After Karen started working for €˜TAAUSAI,’ she began doing illegal activities inside the company. €˜TAAUSAI’ hired you as a soc analyst to kick off an investigation on this case.
You acquired a disk image and found that Karen uses Linux OS on her machine. Analyze the disk image of Karen’s computer and answer the provided questions.
A case of a malicious insider? That’s not good! It’s up to us to search for evidence and uncover what actions Karen took. Fortunately, we are provided with a forensic disk image that we can use to determine exactly what happened.
To perform this investigation, we’re going to leverage FTK Imager, a popular forensics tool used to create and explore disk images of a system. Once inside, we’ll be hands-on and searching through the available artifacts manually to shed some light on what activities were perpetrated by Karen. Sounds like fun, right? Let’s get into it!
And if you find this walkthrough helpful — whether it levels-up your skills, gets you over a stumbling block, or serves as a handy reference — please give it a clap and consider following me for more content like this.
Thanks for reading and going on this investigation with me!
Setup the Analysis Environment & Extract the Challenge File:
Safety first! It’s always important when working with lab/challenge files from CyberDefenders (or any educational lab/challenge/range) to keep yourself protected by performing these tasks in a dedicated, isolated virtual machine environment. For this challenge, I’m using FLARE-VM, " # “a collection of software installations scripts for Windows systems that allows you to easily setup and maintain a reverse engineering environment on a virtual machine (VM)“since you can optionally install FTK Imager during the install.
To keep this write-up focused I’m going to skip the step-by-step setup of FLARE-VM but if you’d like to set up your own environment, please follow the directions provided directly by FLARE-VM on GitHub.
GitHub - mandiant/flare-vm: A collection of software installations scripts for Windows systems that… _A collection of software installations scripts for Windows systems that allows you to easily setup and maintain a…_github.com
Once you have a safe virtual environment created, updated, isolated, and snapshotted, we can extract the challenge file and start the investigation!
Question 1: Which Linux distribution is being used on this machine?
Once the challenge file is extracted, navigate to the c46-FirstHack directory, which contains the FirstHack.ad1 file. The AD1 file is a forensic disk image format created by FTK Imager.
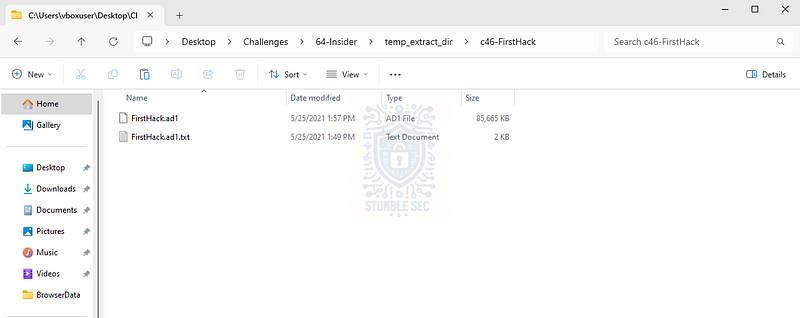
Overview of the Challenge File contents
To work through this challenge, we’re going to rely on analyzing artifacts within the disk image. Our first step is to open FTK Imager within your analysis environment.
Once the application is open, go to File > Add Evidence Item > Image File, and point to the FirstHack.ad1 file.
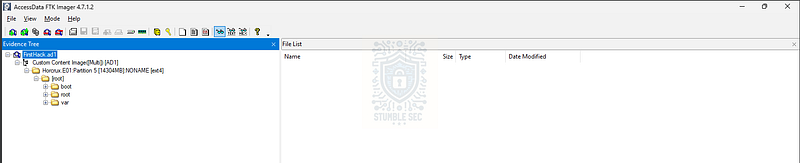
FTK Imager: FirstHack.ad1 loaded
Now that we have the image mounted, we can search for the answer to Question 1. One log we can check to identify the Linux distribution used on the machine is the kern.log located at /var/log/kern.log. This log contains kernel-related logging data, including the OS version being loaded.
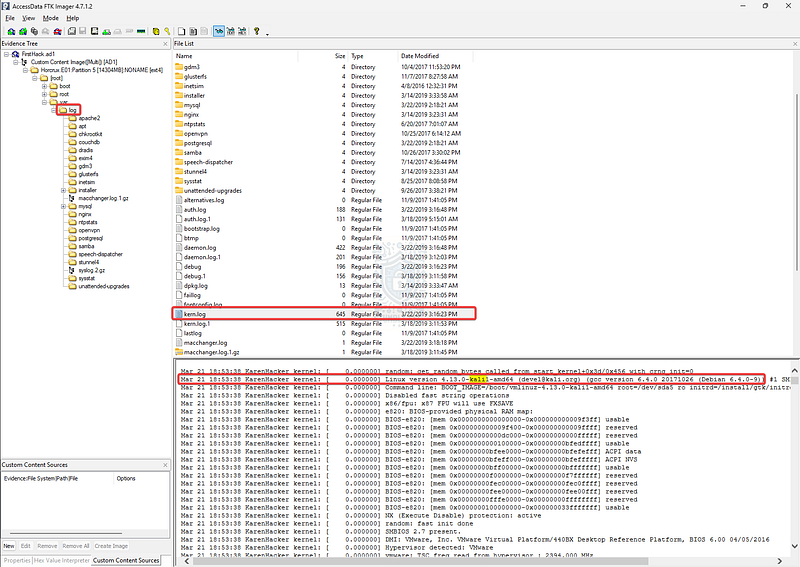
FTK Imager: Identifying the Linux version in the kern.log
This log tells us that Karen is using Kali Linux, a popular penetration testing distribution that you’re likely familiar with if you’re reading this walkthrough.

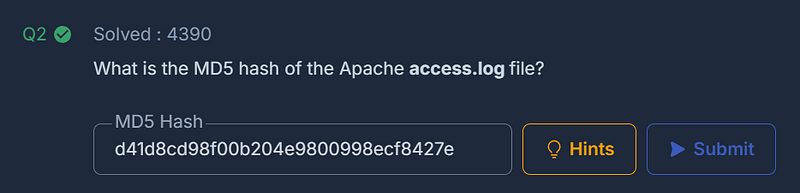
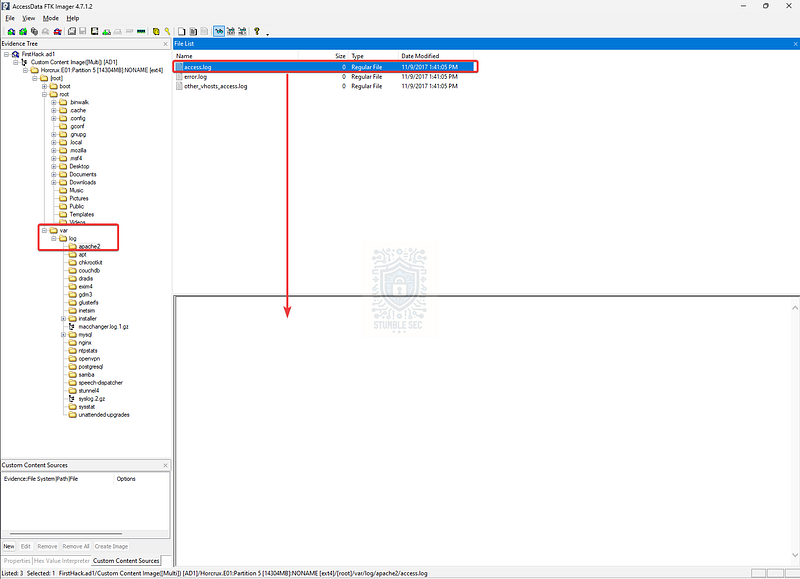
Question 2: What is the MD5 hash of the Apache access.log file?
The next step on our investigation is to determine the MD5 hash of the system’s Apache access.log file.
We’ll locate the access.log within the /var/log/apache2 directory. Once we’ve found it, we can leverage FTK Imager’s Export File Hash List feature by right-clicking the access.log entry. This will generate a CSV file containing the file hashes.
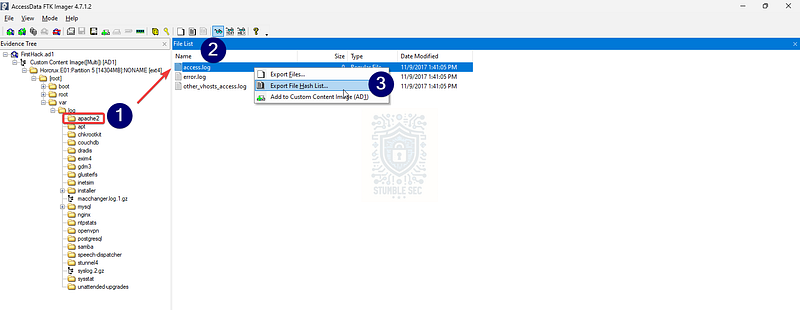
FTK Imager: Exporting the access.log file hash
For example, I opened the CSV file in Visual Studio Code, but any CSV viewer will work. Once you have it open, you’ll be able to collect both the MD5 and SHA1 file hashes.
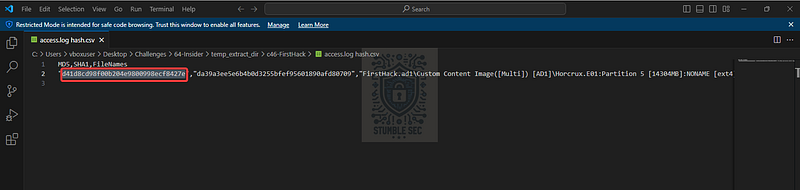
Visual Studio Code: Reviewing the access.log file hash export
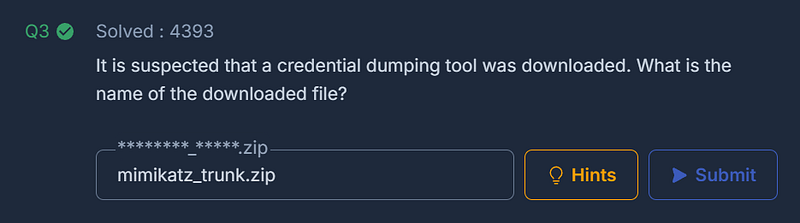
Question 3: It is suspected that a credential dumping tool was downloaded. What is the name of the downloaded file?
Our next task is to determine what credential dumping tool the user downloaded. A good starting point is to check the user’s Downloads directory at /root/Downloads.
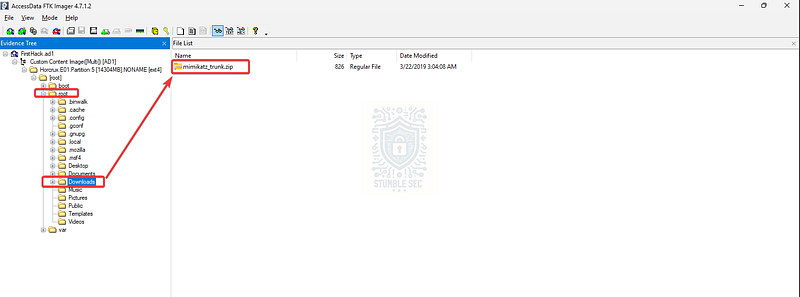
FTK Imager: Surveying the Downloads directory
Inside the directory, we’ll discover a file named mimikatz_trunk.zip. Based on this filename, we can reasonably say that this archive contains the popular Windows credential dumping tool, Mimikatz.
Question 4: A super-secret file was created. What is the absolute path to this file?
To answer Question 4, we’ll need to dig a bit deeper to uncover a " # "
super-secret” file created on the system.
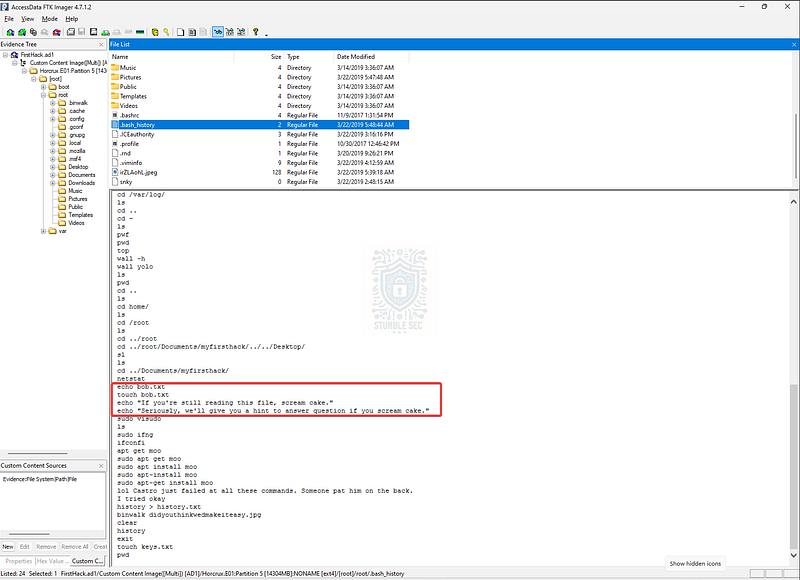
One extremely robust and common source of forensic artifacts on Linux is the .bash_history file. This file stores the commands run within the shell or terminal, making it extremely valuable for providing clues about user behavior on the system. For our purposes, we can check this log by navigating to /root/.bash_history and reviewing the output in the bottom pane.
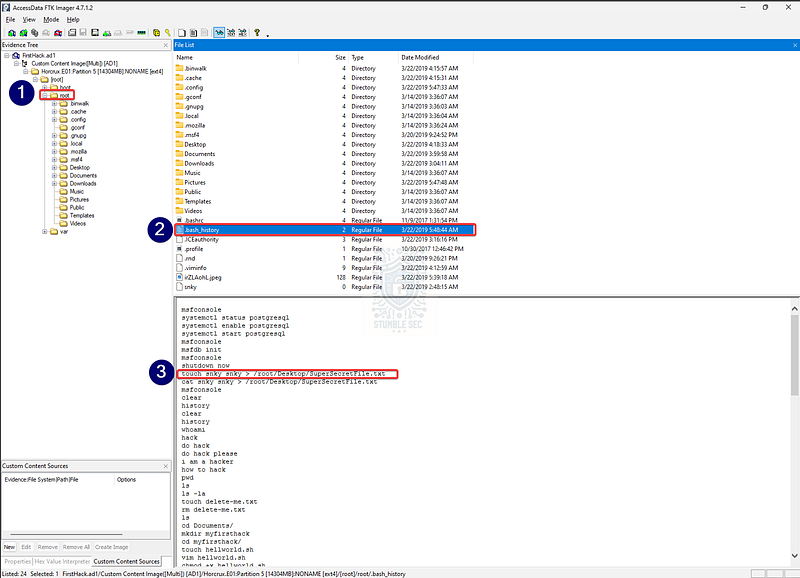
FTK Imager: Checking the contents of .bash_history
Among many other interesting commands, we can see toward the top of the log that the touch command is used to create SuperSecretFile.txt in the /root/Desktop directory. Sneaky indeed!
Question 5: What program used the file didyouthinkwedmakeiteasy.jpg during its execution?
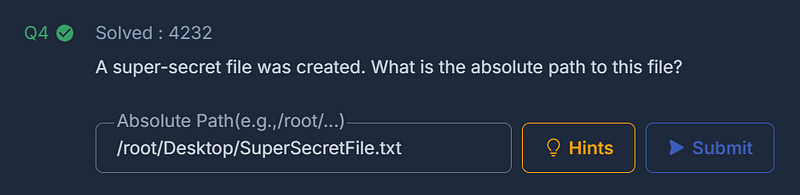
To answer Question 5, let’s continue analyzing the .bash_history file and see if we can stumble across any clues that point us in the right direction.
FTK Imager: Identifying didyouthinkwedmakeiteasy.jpg in .bash_history
Scroll to the bottom of the log and you’ll find a reference to the target file didyouthinkwedmakeiteasy.jpg. Notice the command binwalk next to it? According to the Kali documentation:
Binwalk is a tool for searching a given binary image for embedded files and executable code. Specifically, it is designed for identifying files and code embedded inside of firmware images.
So, in this context, it appears that cautious Karen was checking this image file for the presence of embedded executables using Binwalk.

Question 6: What is the third goal from the checklist Karen created?
To determine the third goal, we first have to locate Karen’s checklist. To do this, we’ll stumble through the usual suspects — common directories like Desktop, Documents, Downloads, Pictures, and so on.
Lucky for us, checking the /root/Desktop folder first reveals two files: mimikatz and Checklist. The first confirms that Karen downloaded the Mimikatz credential dumper we found back in Question 3, and the second contains her checklist.
Select the Checklist and check out Karen’s plans.
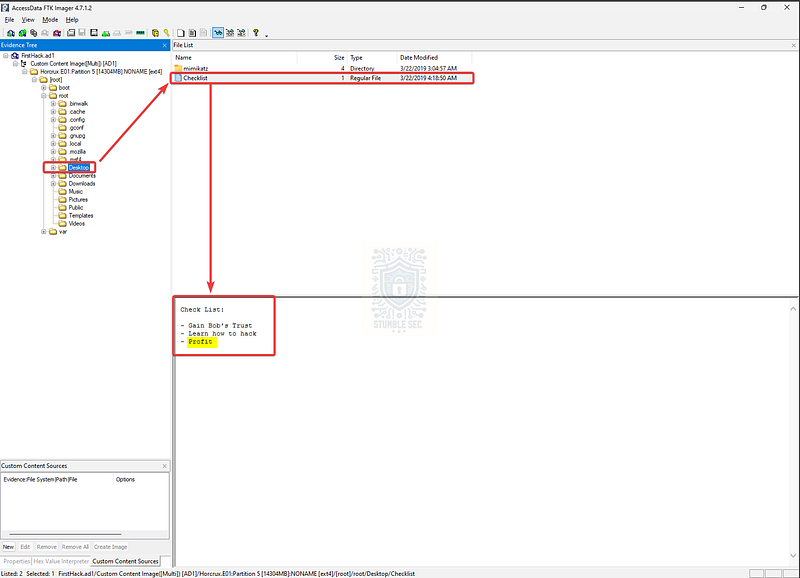
FTK Imager: The location of Karen’s checklist
Question 7: How many times was Apache run?
Remember back in Question 2 when we obtained the file hash of access.log? To answer Question 7, we need to check the contents of the file instead.
Let’s navigate back to /var/log/apache2/access.log. After selecting the file, we see something strange—the log is blank. No problem. This actually tells us something useful: Apache was not run on Karen’s system, so the answer is zero.
FTK Imager: The contents of the access.log
Question 8: This machine was used to launch an attack on another. Which file contains the evidence for this?
For Question 8, we need to determine which other machine Karen’s device attacked. As a starting point, let’s return to the /root/.bash_history file to search for any additional clues.
FTK Imager: Identifying victim clues in .bash_history
Toward the bottom of the log, we see a reference to the name Bob — maybe the same Bob mentioned in the Checklist? Interesting, but not entirely helpful.
But did you notice an oddly named .jpeg file in the /root directory? You can see it in the file list at the same location where we selected the .bash_history. Let’s select it to view the contents…
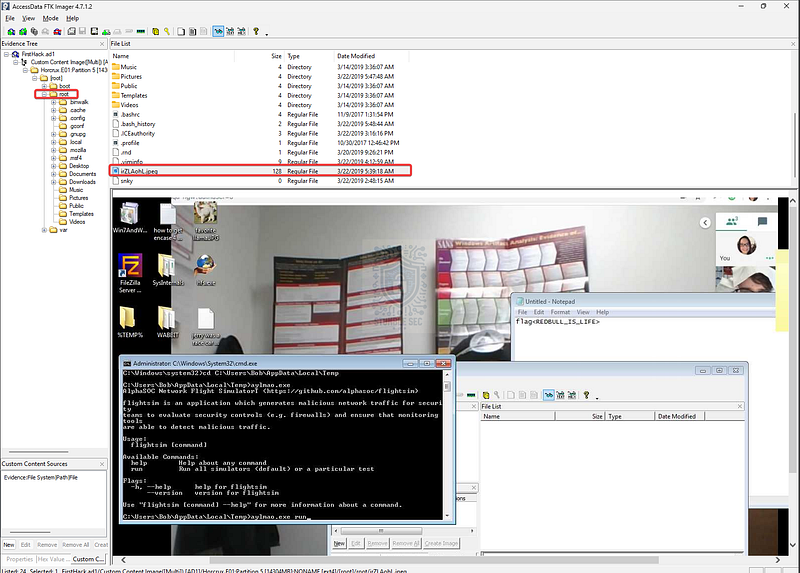
FTK Imager: Evidence of the attack
Bingo! This is a screenshot of Bob’s desktop, which we can determine from the user file path visible in the Windows command prompt window. This strongly implies that Karen had remote access to Bob’s device.
Question 9: It is believed that Karen was taunting a fellow computer expert through a bash script within the Documents directory. Who was the expert that Karen was taunting?
Question 9 tells us that there’s a bash script in the Documents directory that contains the information we’re looking for. Let’s check it out.
Within the directory, there are a couple of scripts, but we want to focus on firstscript_fixed.
Checking out the contents of this simple script, we see some network enumeration tasks, but the final command contains this printed line:
echo “Heck yeah! I can write bash too Young”
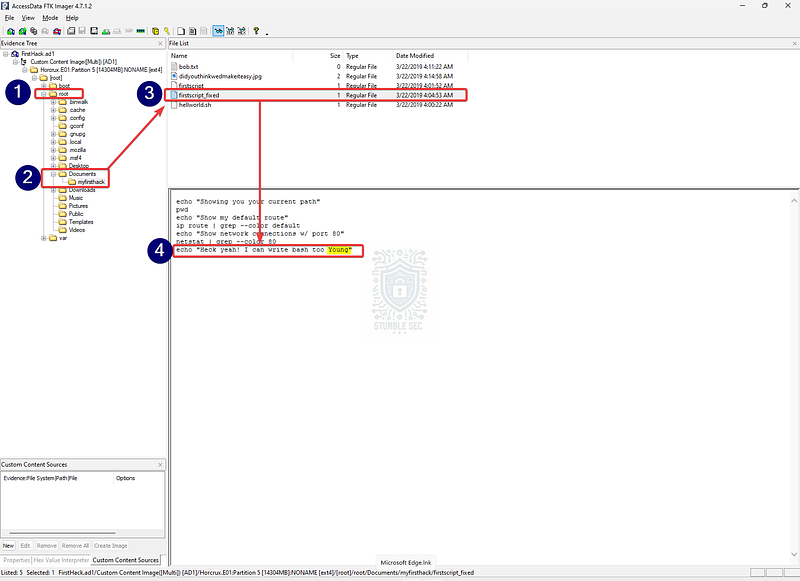
FTK Imager: Karen’s taunt
Based on the boasting nature of this output, we can reasonably guess that Young is the computer expert Karen was taunting.
Question 10: A user executed the su command to gain root access multiple times at 11:26. Who was the user?
For this objective, we can leverage another log — /var/log/auth.log. This file contains the system’s authentication events, including commands elevated using sudo.
Let’s use the find feature within the output window to identify the executed su commands.
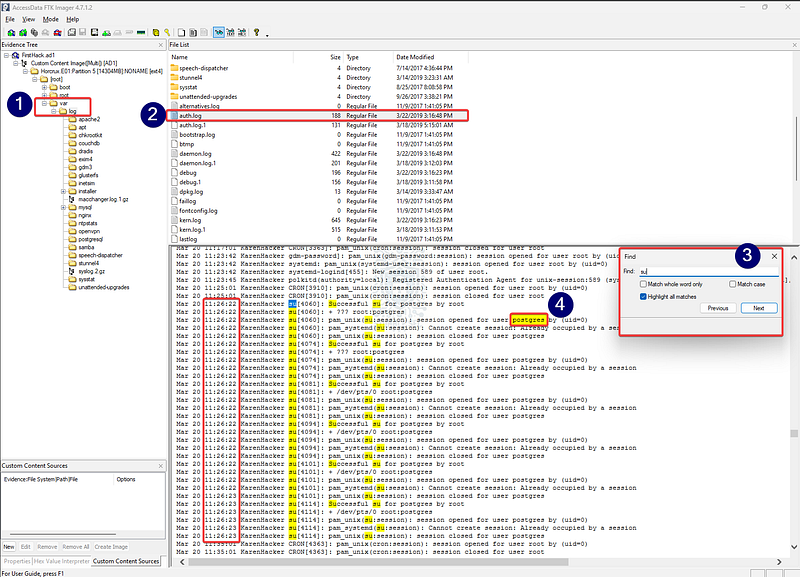
FTK Imager: Finding the su events in auth.log
Now that we’ve found them in the logs and matched the timestamps to the question, we can see that the user postgres was responsible for the command execution.
Question 11: Based on the bash history, what is the current working directory?
For our final question, we’ll return one last time to the .bash_history artifact to determine the current working directory of the terminal.
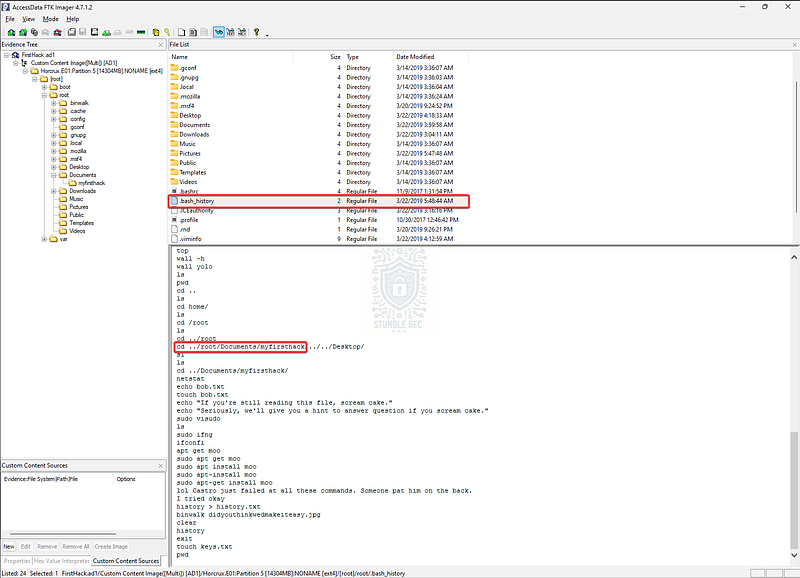
FTK Imager: Finding the current working directory from .bash_history
Easy enough — we can see the bash history shows navigation to the /root/Documents/myfirsthack directory, where we previously stumbled across Karen’s attack tooling.
Awesome job! Now let’s wrap up this investigation.
Conclusion:
There we have it! We’ve successfully analyzed the forensic disk image of Karen’s device through FTK Imager. With access to the image, we were able to move through our investigation, determining several key pieces of evidence, such as the OS distro, the presence of a common credential access tool, a possible motive, a victim, and some of Karen’s associates. Not too bad! Now let’s report our findings back to TAAUSAI and close out this Insider case.
A big thank you to CyberDefenders for a fun and engaging lab. I’ve been brushing up on my Linux forensics skills recently, so I chose this lab to run an investigation without terminal access to the system, instead relying on artifacts available from within a disk image. This was surprisingly effective, and it was interesting to see the Linux file structure from the top-down rather than being in the system directly. It really helped to solidify my working knowledge of Linux artifacts and will definitely be helpful in the field. Awesome stuff!
Thanks for your support and partnering on this investigation. If you found this walkthrough helpful, don’t forget to give it a clap! Your feedback really is invaluable, and it pumps me up to support your security journey. Remember, Cybersecurity is a team sport and we’re in this together!
Until next week’s challenge — stay curious and be safe out there!

Tools & References:
Challenge Link: https://cyberdefenders.org/blueteam-ctf-challenges/insider/
Flare-VM: https://github.com/mandiant/flare-vm
FTK Imager: https://www.exterro.com/digital-forensics-software/ftk-imager
MITRE ATT&CK — Software — Mimikatz (S0002): https://attack.mitre.org/software/S0002/
Kali Documentation — Binwalk: https://www.kali.org/tools/binwalk/