CyberDefenders: RedLine Lab Walkthrough
Volatile Memory Forensics: Tracking Malware Execution, Suspicious Processes, and Attacker Infrastructure with Volatility 3 & REMnux

Image Credit: https://cyberdefenders.org/blueteam-ctf-challenges/redline/
Introduction:
Welcome to my weekly walkthrough! If you’ve stumbled across this blog while hunting for a comprehensive guide to the RedLine Lab challenge from CyberDefenders, you’re in the right place. If you’ve ever wanted to dip your toes into the world of memory forensics, this beginner-friendly challenge is a great place to start.
This lab drops us into an investigation where the only evidence we have is a memory dump. No disk image, no full forensic suite waiting for us. Just one volatile snapshot packed with clues about what happened, which malware was involved, and how the attacker moved through the system. Our job is to explore these threads, make sense of the artifacts, and understand the story. Don’t worry if you’re new to this topic. I’ll share plenty of resources that you can dig into during or after your own analysis.
But even with solid references, good tools make all the difference. For this walkthrough, we’ll rely primarily on Volatility, the popular memory forensics framework that makes analyzing memory dumps feel far more manageable. Once you get comfortable with it, you’ll see just how much information a single memory dump can reveal.
So, whether you’re brand-new to memory forensics or you’re just sharpening your investigative skills, this is a fantastic challenge to tackle. Let’s go!
And, hey, if you find this walkthrough helpful — whether it levels up your skills, gets you over a stumbling block, or just serves as a handy reference — please consider following me to get more content like this.
Thanks for reading and going on this investigation with me!
Challenge Scenario:
As a member of the Security Blue team, your assignment is to analyze a memory dump using Redline and Volatility tools. Your goal is to trace the steps taken by the attacker on the compromised machine and determine how they managed to bypass the Network Intrusion Detection System (NIDS). Your investigation will identify the specific malware family employed in the attack and its characteristics. Additionally, your task is to identify and mitigate any traces or footprints left by the attacker.
Setup the Analysis Environment & Extract the Challenge File:
Safety first! When working with lab/challenge files from CyberDefenders (or any educational lab/challenge/range), it’s important to be responsible and stay safe by interacting with potentially malicious files in a dedicated, isolated virtual machine environment. For this challenge I’m using REMnux, a specialized Linux distribution for malware analysis.
To keep this write-up focused, I’m going to skip step-by-step setup directions of REMnux, but if you’d like to set up your own environment, please follow the guide provided by REMnux directly. For reference, I used the virtual appliance method:
Get the Virtual Appliance | REMnux Documentation _The easiest way to get the REMnux distro is to download the REMnux virtual appliance in the OVA format, import it into…_docs.remnux.org
Once you have a safe virtual environment created, updated, isolated, and snapshotted, we can extract the challenge file and start the investigation!
Question 1: What is the name of the suspicious process?
Let’s kick off this investigation by unzipping the challenge file, 106-RedLine.zip, which contains the artifact we’ll be examining: MemoryDump.mem.
You might be asking yourself what a .mem file actually is and how to read it. That’s exactly the point of this challenge. A .mem file is a raw memory dump of a system and captures a snapshot of its RAM at a specific point in time. This kind of image is a rich forensic artifact that lets us dig into evidence like processes and network activity, among other things.
To explore it, we’ll use Volatility 3, the modern version of the popular memory forensics framework described as “the world’s most widely used framework for extracting digital artifacts from volatile memory (RAM) samples.“I’ll simply refer to Volatility from this point forward. If you’re working in REMnux, Volatility is already included, so you’re good to go.
To start answering Question 1, we need to identify a suspicious process running on the compromised host. A pro tip to get familiar with available modules in Volatility is to check the built-in help:
vol3 -h
For this challenge, we’ll focus on the Windows modules. A reliable starting point for reviewing running processes is windows.pslist:
windows.pslist.PsList Lists the processes present in a particular windows memory image.
Let’s give it a try:
vol3 -f MemoryDump.mem windows.pslist
Once the output loads, we can start examining the process list. Depending on your experience with Windows internals, some entries might look unfamiliar. If you’re unsure which processes are normal or benign, a solid reference is the SANS Hunt Evil cheat sheet, which helps you quickly zero in on anomalous activity.
Hunt Evil _Knowing what’s normal on a Windows host helps cut through the noise to quickly locate potential malware. Use the…_www.sans.org
Back to the results: a few entries stand out as unusual, including Outline.exe, tun2socks.exe, and oneetx.exe. Of these, oneetx.exe (PID 5896) draws the most attention because of its unusually high thread count compared to the other odd ones.
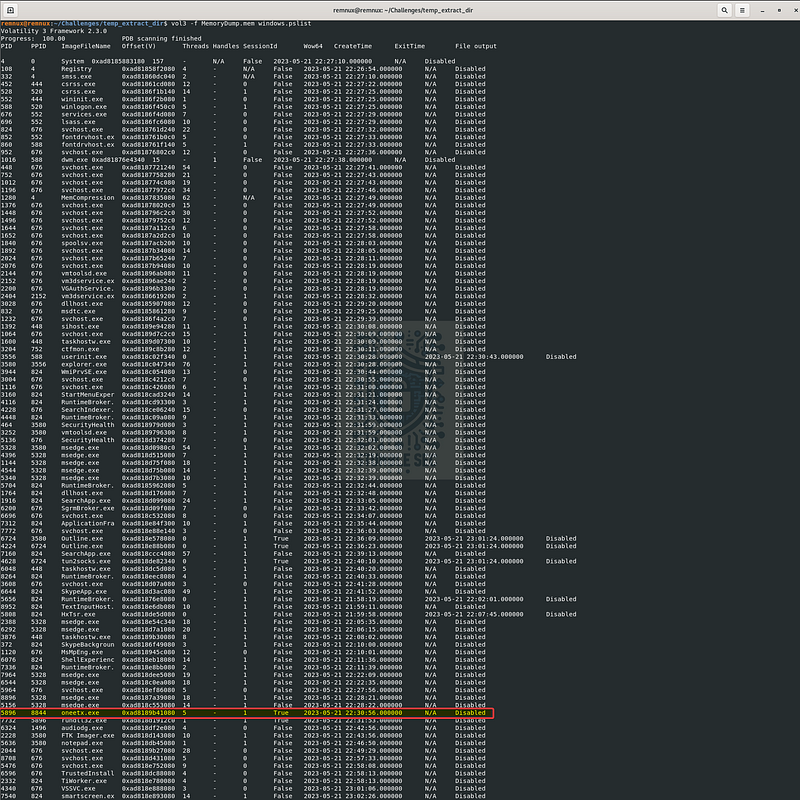
Volatility 3: Identifying a suspicious process with windows.pslist
So, let’s take a quick detour to Google and dig into this binary name. Our search quickly leads us to an excellent post from Stormshield titled " # "
RedLine malware: from a Chrome extension to a large-scale malware campaign.”
It associates oneetx.exe with the RedLine malware family, which also happens to be the name of this challenge. A pretty clear indicator that we’ve found our suspicious process.

Question 2: What is the child process name of the suspicious process?
Now that we’ve identified the suspicious process and its associated process ID (PID), we can refine our search to uncover any child processes spawned by oneetx.exe (PID 5896). To do that, we look for processes with a parent process ID (PPID) of 5896. A simple way to approach this is to run Volatility‘s windows.pslist module again, but this time pipe the output through grep to display only entries containing 5896.
vol3 -f MemoryDump.mem windows.pslist | grep 5896
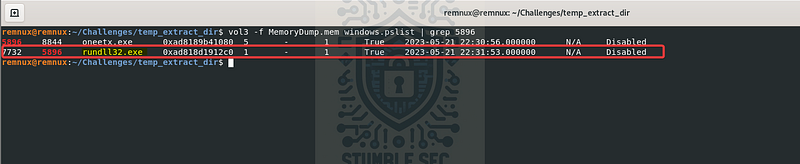
Volatility 3: Using windows.pslist and grep to isolate parent and child processes
Using grep helps us isolate both the parent process and its child. In this case, we discover that rundll32.exe appears as a child process because its PPID matches the PID of oneetx.exe. With that connection established, we now have an additional process earmarked as we move deeper into this challenge.

Question 3: What is the memory protection applied to the suspicious process memory region?
Next up, we need to figure out what memory protection is applied to the memory region used by oneetx.exe. That might sound a little intimidating at first, but we can lean on another Volatility 3 module to handle the heavy lifting for us: malfind.
windows.malfind.Malfind Lists process memory ranges that potentially contain injected code.
Command Reference Mal _An advanced memory forensics framework. Contribute to volatilityfoundation/volatility development by creating an…_github.com
The malfind module helps identify “hidden or injected code/DLLs in user-mode memory”, which makes it especially useful when we’re dealing with malware. For this challenge, all we need to do is specify the PID of oneetx.exe (5896):
vol3 -f MemoryDump.mem windows.malfind –pid 5896
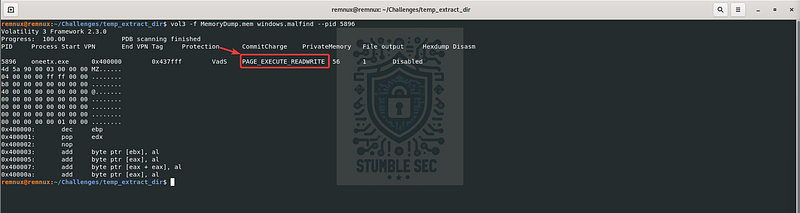
Volatility 3: Identifying memory protection using windows.malfind
Once the output loads, look for the VadS Protection field. This tag displays the memory protection applied to the suspicious region, and it often reveals suspicious execution permissions like PAGE_EXECUTE_READWRITE.

Question 4: What is the name of the process responsible for the VPN connection?
Our next task is to search for a process that’s responsible for a VPN connection. Let’s head back into Volatility‘s windows.pslist output and look for anything that hints at tunneling or proxying behavior indicating VPN usage.
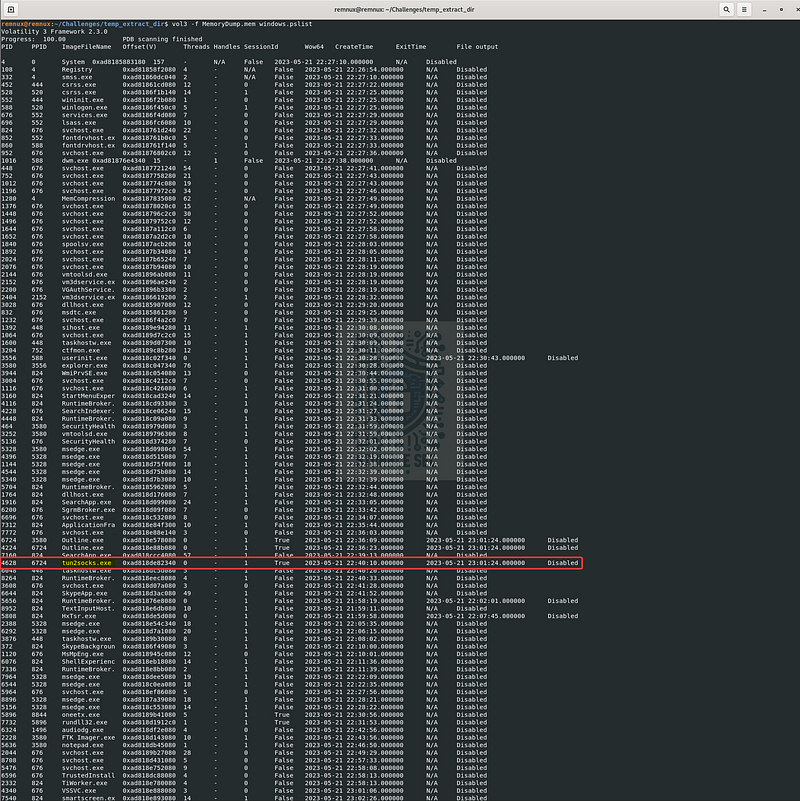
Volatility 3: Identifying a potential tunneling process
While reviewing the process list, you might remember that back in Question 1 we stumbled across a few unusual entries. One of them immediately stood out as something that might support a tunneled connection: tun2socks.exe.
To dig a little deeper, it helps to check out the project’s GitHub page, which describes tun2socks as a tool built on the gVisor TCP/IP stack. Its listed features include universal proxying and support for multiple protocols such as HTTP, SOCKS, Shadowsocks, and SSH. Putting this all together strongly suggests it’s involved with a VPN connection, which lines up with what we’re hunting for.
GitHub - xjasonlyu/tun2socks: tun2socks - powered by gVisor TCP/IP stack _tun2socks - powered by gVisor TCP/IP stack. Contribute to xjasonlyu/tun2socks development by creating an account on…_github.com
Now that we know tun2socks.exe looks promising, let’s determine which process launched it. We already have its parent process ID (PPID 6724), so we can use grep again to quickly determine the related parent process:
vol3 -f MemoryDump.mem windows.pslist | grep “6724”

Ah-ha! By matching the PPID, we discover that Outline.exe is the parent process. This suggests that Outline.exe is the process responsible for the VPN connection, with tun2socks.exe acting as the tunneling component. With a quick Google search, we can confirm that Outline VPN is indeed legitimate software used to create VPN servers. I think we’ve gotten our answer, folks.

Question 5: What is the attacker’s IP address?
All right, now that we know Outline.exe is responsible for handling the VPN connection, it’s time to shift our focus to the network artifacts captured in the memory dump. The goal is to determine whether any of the executables we’ve identified so far show evidence of external communication, starting with oneetx.exe, the malicious process we tracked down in Question 1.
To do this, we can use Volatility‘s windows.netscan module, which scans the memory image for network objects such as TCP connections. Once again, we’ll pair this with grep to dial-in on entries tied to oneetx.exe.
windows.netscan.NetScan Scans for network objects present in a particular windows memory image.
Here’s the combined command:
vol3 -f MemoryDump.mem windows.netscan | grep “oneetx.exe”

Bingo! The output reveals an external IP address associated with this process. Our next step is enrichment, so let’s pivot to threat intelligence and search for the IP in VirusTotal:
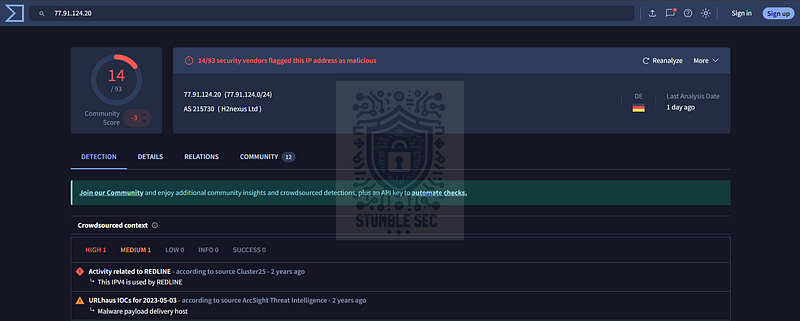
https://www.virustotal.com/gui/ip-address/77.91.124.20
Right away, we can see that this IP address is linked to activity associated with RedLine malware, confirming that we’ve identified the attacker’s IP address.

Question 6: What is the full URL of the PHP file that the attacker visited?
Well, we already have the attacker’s IP address, so why don’t we take this a step further and see if we can uncover any URL activity connected to it? One quick way to do this is to run a simple strings search against the memory dump. Since memory images often contain human-readable fragments of URLs, commands, and other artifacts, this might reveal some new information.
From the terminal, we can use the strings utility and pipe the results through grep to isolate only the results that contain the attacker’s IP address:
strings MemoryDump.mem | grep “77.91.124.20”
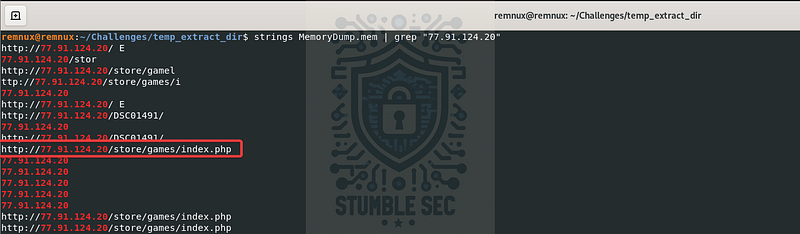
Using strings & grep to identify URLs
From the output, we’ll notice several interesting artifacts, including a full URL that points to index.php. That’s exactly what we need to answer this question!

Question 7: What is the full path of the malicious executable?
Our last objective is to determine the full file path of the malicious oneetx.exe executable on disk. We can approach this question the same way we handled the previous one: by running a strings search against the memory dump. This time, instead of looking for an IP address, we’ll use strings and pipe the results through two grep filters. One looks for the name of the malicious binary (oneetx.exe) and the other searches for the drive label C: since we know we’re working with a Windows system.
strings MemoryDump.mem | grep “oneetx.exe” | grep C:
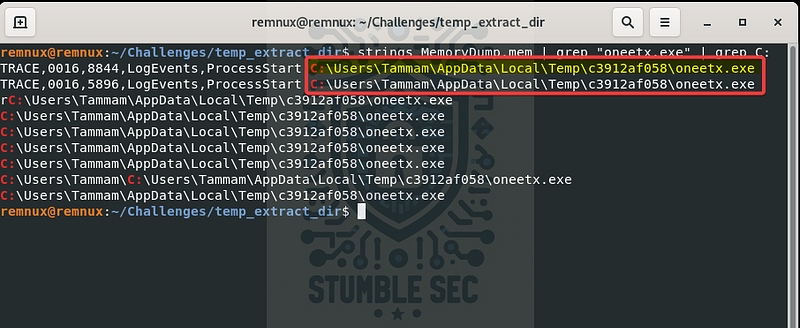
Using strings to identify the malware file path
Nice. The output gives us a clean file path for the oneetx.exe binary, and it points to the AppData\Local\Temp directory. This location often shows up during malware investigations, since it’s a common staging area that attackers abuse for downloading, unpacking, or executing payloads. Now that we’ve double-grepped our way through the last question and solved the full set, it’s time to wrap up this investigation.

Conclusion:
How fun was that! A big thank you to CyberDefenders for another awesome challenge.
This one was another fantastic addition to their catalog, with a tight focus on volatile memory analysis and a beginner-friendly opportunity to get comfortable with the Volatility modules that help uncover meaningful artifacts. Piece by piece, we worked through the investigation, identified and researched a suspicious process, enriched it with threat intelligence, and built a clear picture of the attacker’s command-and-control activity and the malware involved.
I picked this week’s challenge because I wanted to brush up on Volatility. It’s not a tool I use every single day, but it’s always worth staying sharp and adding a few new tricks to your notebook. You never know when you’ll need them. And honestly, there’s something really rewarding about reconstructing an attack from a single forensic artifact. It’s a great reminder of just how powerful memory analysis can be when it comes to uncovering malicious behavior. Fun times!
Thanks for your support and partnering on this investigation. If you found this walkthrough helpful: please give it a clap and consider following me! Your feedback is invaluable, and it pumps me up to support your security journey. Remember, cybersecurity is a team sport, and we’re in this together!
Until next week’s challenge — stay curious and be safe out there!

Tools & References:
Challenge Link: https://cyberdefenders.org/blueteam-ctf-challenges/redline/
REMnux: https://remnux.org/
Volatility Foundation: https://volatilityfoundation.org/
GitHub — Volatility 3: https://github.com/volatilityfoundation/volatility3
SANS Hunt Evil Poster: https://www.sans.org/posters/hunt-evil
Stormshield — " # “RedLine malware: from a Chrome extension to a large-scale malware campaign”: https://www.stormshield.com/news/malware-redline-chrome-extension-large-scale-malware-campaign/
Volatility Command Reference: https://github.com/volatilityfoundation/volatility/wiki/command-reference
Volatility Command Reference Mal: https://github.com/volatilityfoundation/volatility/wiki/Command-Reference-Mal
GitHub — Tun2Socks: https://github.com/xjasonlyu/tun2socks
VirusTotal — C2 IP: https://www.virustotal.com/gui/ip-address/77.91.124.20