CyberDefenders — Oski Lab Walkthrough
A Cyber Threat Intelligence Challenge Using VirusTotal, Tria.ge, Any.Run, & MITRE ATT&CK.

Image Credit: https://cyberdefenders.org/blueteam-ctf-challenges/oski/
Introduction:
Welcome to my weekly walkthrough! If you’ve stumbled across this blog searching for a comprehensive guide to the Oski Lab from CyberDefenders, you’re in the right place. This challenge is a fantastic introduction to cyber threat intelligence (CTI) and leveraging online analysis platforms to perform research and gather indicators of compromise — let’s check out the scenario below.
Challenge Scenario:
The accountant at the company received an email titled " # "
Urgent New Order" from a client late in the afternoon. When he attempted to access the attached invoice, he discovered it contained false order information. Subsequently, the SIEM solution generated an alert regarding downloading a potentially malicious file. Upon initial investigation, it was found that the PPT file might be responsible for this download. Could you please conduct a detailed examination of this file?
In this challenge, the victim received a suspicious PowerPoint file and executed it. Assuming the role of a Security Analyst, our SIEM solution fired an alert about a potentially malicious file on the victim’s workstation — not good! It’s up to us to analyze the file hash using online cyber threat intelligence (CTI) and malware analysis services to determine if the file is a known-malicious artifact and learn more about the nature of the attack.
What’s in our toolkit for this investigation? We’ll start with the popular VirusTotal as a jumping-off point. From there, we’ll explore additional sources of information by pivoting to Recorded Future’s Triage and the dynamic analysis platform Any.Run. During our investigation, we’ll enrich our findings by mapping the observed tactics, techniques, and procedures to the MITRE ATT&CK matrix.
Sounds like fun, right? Let’s get into it!
And if you find this walkthrough helpful — whether it levels-up your skills, gets you over a stumbling block, or serves as a handy reference — please give it a clap and consider following me for more content like this.
Thanks for reading and going on this investigation with me!
Setup the Analysis Environment & Extract the Challenge File:
Safety first! When working with lab/challenge files from CyberDefenders (or any educational lab/challenge/range), it’s important to be responsible and stay safe by interacting with potentially malicious files in a dedicated, isolated virtual machine environment. For this challenge I’m using REMnux, a specialized Linux distribution for malware analysis.
To keep this write-up focused, I’m going to skip step-by-step setup directions of REMnux, but if you’d like to set up your own environment, please follow the guide provided by REMnux directly. For reference, I used the virtual appliance method:
Get the Virtual Appliance | REMnux Documentation _The easiest way to get the REMnux distro is to download the REMnux virtual appliance in the OVA format, import it into…_docs.remnux.org
Once we have a safe virtual environment created, updated, isolated, and snapshotted, we can extract the challenge file and start the investigation!
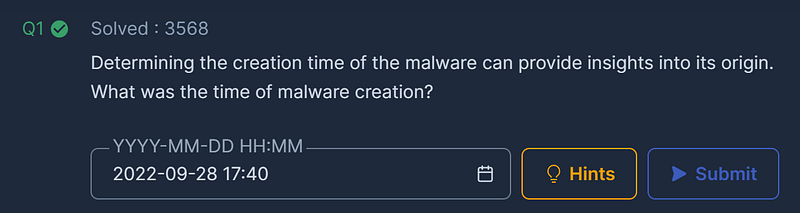
Question 1: Determining the creation time of the malware can provide insights into its origin. What was the time of malware creation?
Let’s dive right in! Start by extracting the downloaded challenge file archive. Inside, you’ll find the directory temp_extract_dir containing hash.txt.
This file contains our target — the unique file hash of the potentially malicious " # "
PowerPoint" file that triggered the SIEM alert. Using this file hash, we can start gathering intelligence about the file from online threat analysis platforms.
12c1842c3ccafe7408c23ebf292ee3d9
For our first steps, let’s pivot out to the popular online malware analysis platform VirusTotal. Head to the VirusTotal website and paste the malware file hash into the search box. This gives us a high-level overview of the corresponding file. We can see that the sample has already been submitted to the platform and is detected as malicious by a majority of the antivirus vendors that have scanned it. Good start!
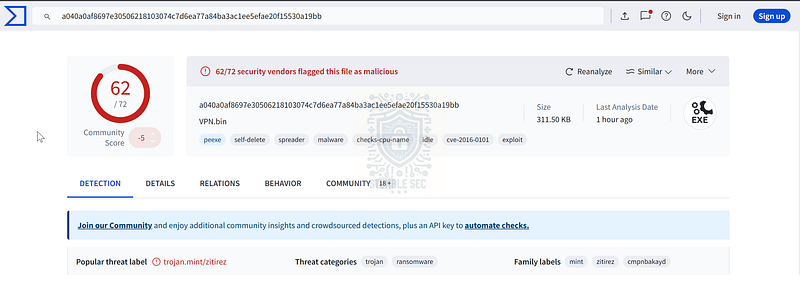
VirusTotal: Detections Tab
To answer Question 1, we need to uncover the creation time of the malware. In VirusTotal, navigate to the Details tab and locate the Creation Time value under the History section. This value reflects the time the sample was compiled and can be helpful when building a timeline of how a malware attack unfolds. It’s worth noting that this timestamp can be spoofed, so don’t rely on it for complete accuracy.

VirusTotal: Identifying the sample’s creation time within the Details tab
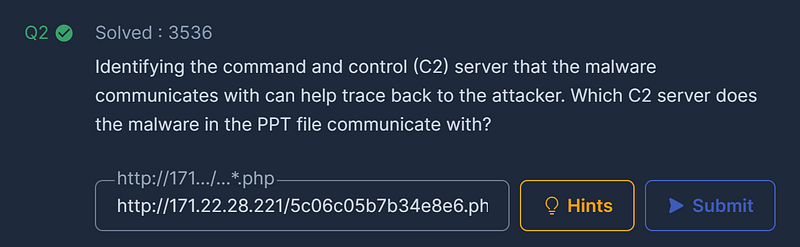
Question 2: Identifying the command and control (C2) server that the malware communicates with can help trace back to the attacker. Which C2 server does the malware in the PPT file communicate with?
Moving right along, we now need to determine any URLs that the malware communicates with. This could indicate a command and control (C2) channel that the malware connects to.
To locate this information, click the Relations tab in VirusTotal and focus on the Contacted URLs section. Each entry here represents a URL the malware has attempted to reach. We can click on each one to pivot to its own VirusTotal entry and dig deeper.
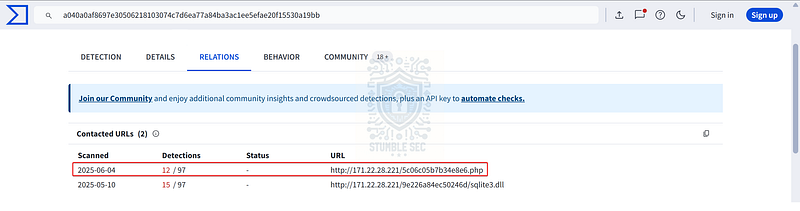
VirusTotal: Identifying Contacted URLs
For example, by clicking the URL ending in .php, we can enrich the data by reviewing the Crowdsourced Context section. This often includes community-contributed insights, and in this case, it tells us that this is the C2 URL.

VirusTotal: Identifying a C2 IoC
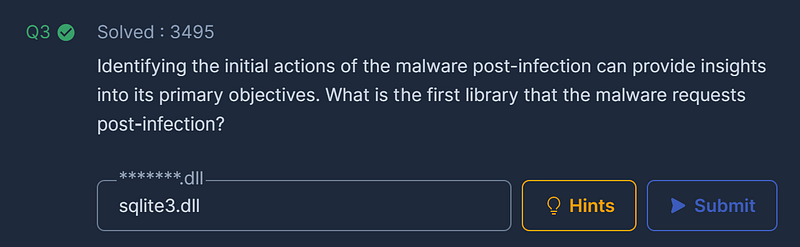
Question 3: Identifying the initial actions of the malware post-infection can provide insights into its primary objectives. What is the first library that the malware requests post-infection?
Our next task is to identify the library requested from the C2 server. Based on the Contacted URLs we identified in Question 2, we already have some idea of what it might be. But to be thorough, and to explore the data from a different angle, let’s stick with VirusTotal and check the Behavior tab, which documents the detailed results of the dynamic analysis performed by VirusTotal.
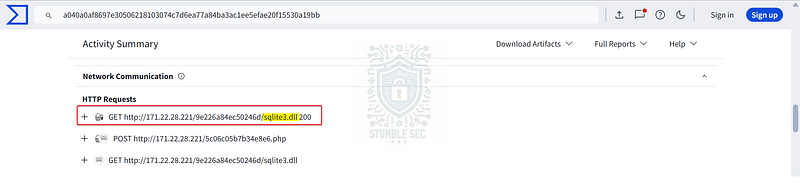
VirusTotal: Identifying the requested library
Scroll down to Network Communication > HTTP Requests. Here, we’ll see an HTTP GET request for a DLL file: sqlite3.dll, hosted on the C2 URL. Since a DLL file is a library file, and the status code is 200 (successful), this evidence strongly suggests that we’ve found the answer to Question 3.
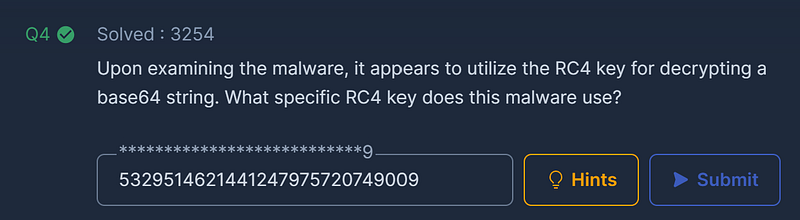
Question 4: Upon examining the malware, it appears to utilize the RC4 key for decrypting a base64 string. What specific RC4 key does this malware use?
To answer Question 4, let’s pivot from VirusTotal and search the file hash against another threat intelligence platform — Recorded Future Tria.ge.
Leveraging another platform is a solid strategy to get a fresh perspective on the analysis. Sometimes this reveals new information that isn’t available elsewhere.
In this case, we’re looking to identify the RC4 key used to decrypt a specific base64-encoded string within the malware payload. Searching the Tria.ge reports, we can find this easily. First, navigate to the Reports section and input the malware sample file hash into the search field:
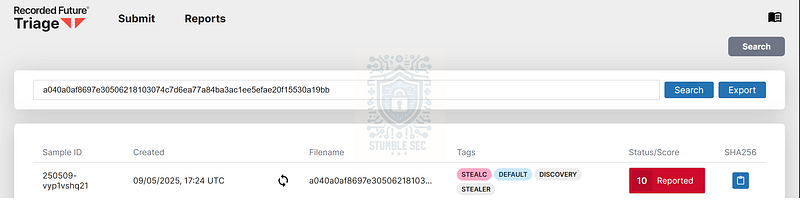
Recorded Future Triage: Searching for the malware file hash
Then, select the first report to view the results of the analysis. Inside the report, check out the Malware Config section, which provides a high-level overview of strings extracted from the malware.
stealc | a040a0af8697e30506218103074c7d6ea77a84ba3ac1ee5efae20f15530a19bb | Triage _Check this stealc report malware sample a040a0af8697e30506218103074c7d6ea77a84ba3ac1ee5efae20f15530a19bb, with a score…_tria.ge
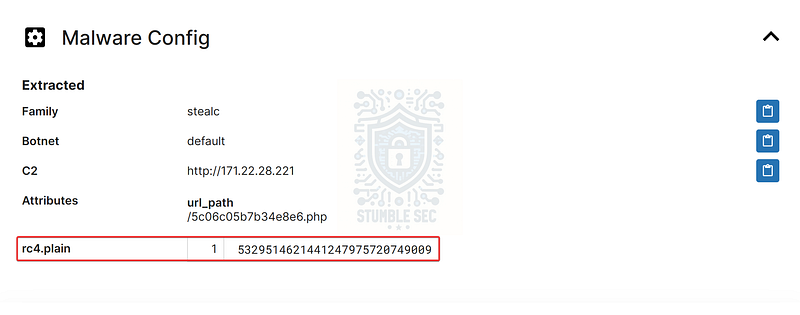
Recorded Future Triage: Identifying the RC4 key from the report
Using this method, we can find the RC4 key and complete Question 4.
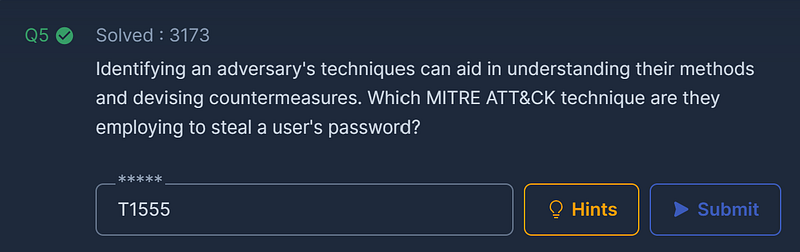
Question 5: Identifying an adversary’s techniques can aid in understanding their methods and devising countermeasures. Which MITRE ATT&CK technique are they employing to steal a user’s password?
Moving right along, we now need to identify the specific technique this malware uses to steal a victim’s password, as it relates to the MITRE ATT&CK knowledge base.
For this task, let’s explore a third service — Any.Run. This is an interactive sandbox and malware analysis tool with robust reporting capabilities. But first, if we submit the malware hash to Any.Run, you might notice that there are dozens of reports to sift through, each with varying levels of detail.
Let’s work a little smarter and try to cross-reference a report from the VirusTotal Community tab comments. This way, we can pivot from one platform to another as we collect intelligence about the malware. Jump back to VirusTotal and check out the comment posted by ANY_RUN:
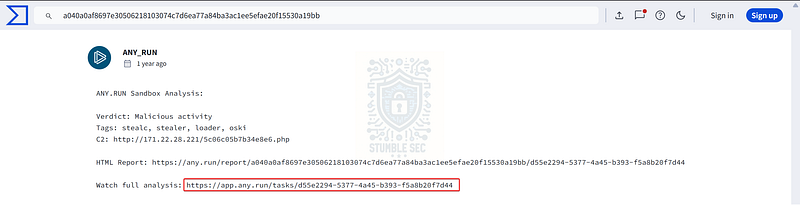
VirusTotal: Comment linking to the Any.Run report: https://app.any.run/tasks/d55e2294-5377-4a45-b393-f5a8b20f7d44
Now that we’ve found a matching report from VirusTotal, we can access the corresponding report directly on Any.Run — awesome! From here, we just need to view the MITRE ATT&CK mappings for the sample by pressing the handy ATT&CK button.
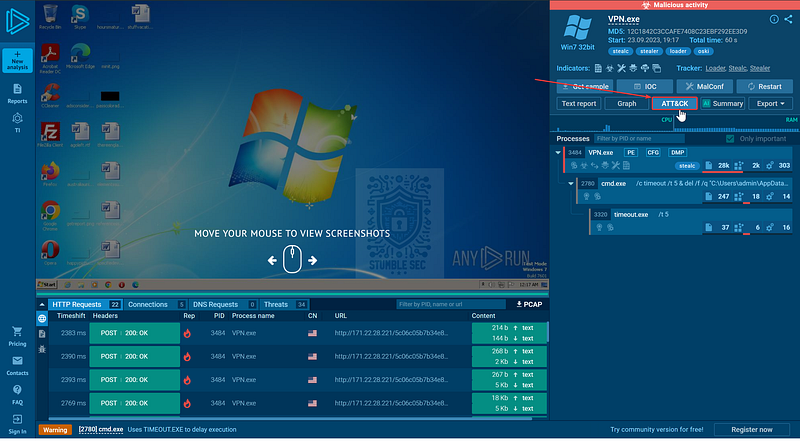
Any.Run: Locating the ATT&CK button
To answer Question 5, recall that we’re looking for a password-stealing function, which falls under the Credential Access tactic. While there are a few possibilities, we can determine through process of elimination that the technique in question is Credentials from Password Stores (T1555).
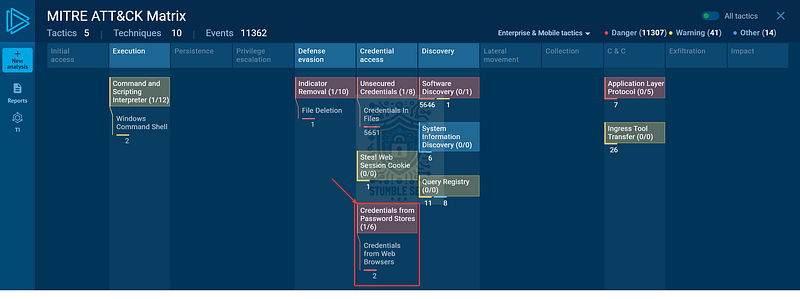
Any.Run: Identifying the MITRE ATT&CK technique
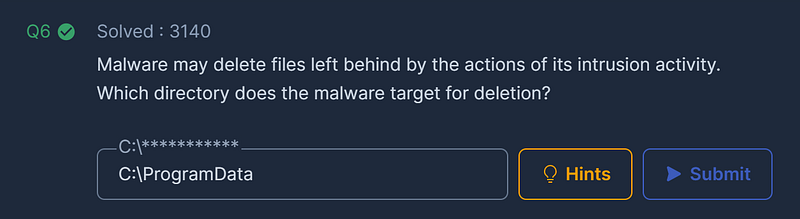
Question 6: Malware may delete files left behind by the actions of its intrusion activity. Which directory does the malware target for deletion?
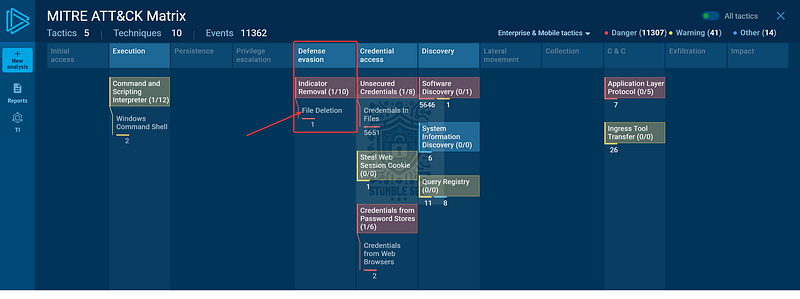
Let’s stick with the MITRE ATT&CK matrix from Any.Run. This time, we’re looking for the directory deleted by the malware.
First things first: we can leverage our knowledge of the attacker’s techniques to identify the specific Defense Evasion sub-technique— Indicator Removal: File Deletion (T1070.004).
Any.Run: Identifying the MITRE ATT&CK defense evasion technique
Clicking the technique brings us to the details window, which displays evidence of the technique as performed by the malware.
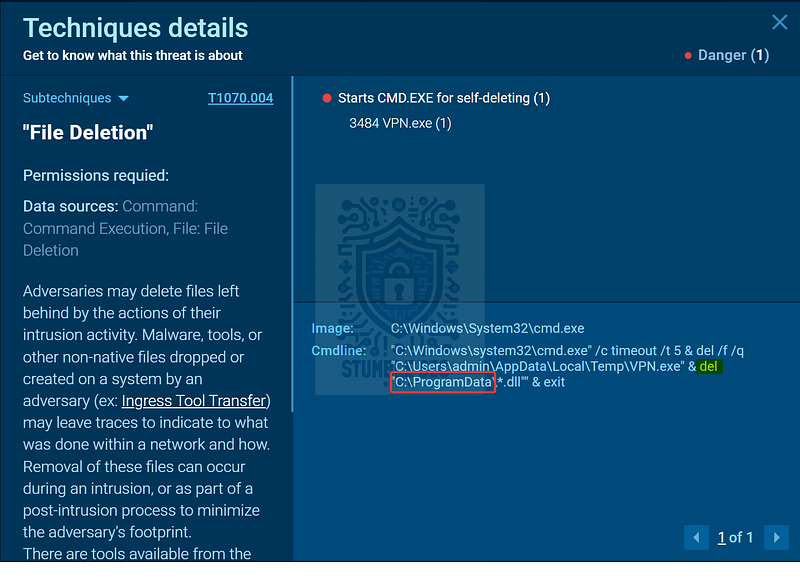
Analyzing the cmdline field reveals a command to delete (del) all .dll files, specifically targeting the C:\ProgramData directory. This is a good indicator that the malware is cleaning up after itself.
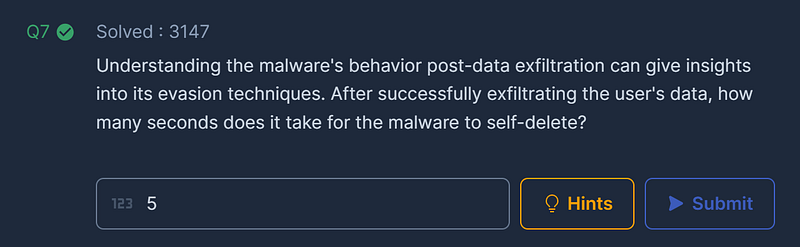
Question 7: Understanding the malware’s behavior post-data exfiltration can give insights into its evasion techniques. After successfully exfiltrating the user’s data, how many seconds does it take for the malware to self-delete?
For our final task in this lab, let’s take a closer look at the file deletion technique. We already identified some cleanup activity in Question 6, so now let’s examine the full command to identify the timeout period.
In this case, we’re looking for a delay which indicates how long the malware waits before deleting itself. We can see this clearly in several locations within the Any.Run report, including the Technique Details section or right on the Overview page.
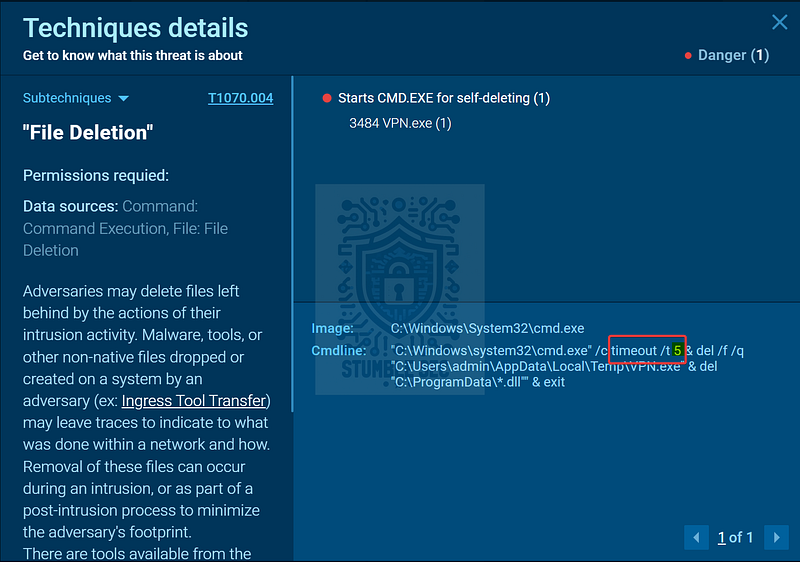
Any.Run: Identifying the timeout value from the technique details
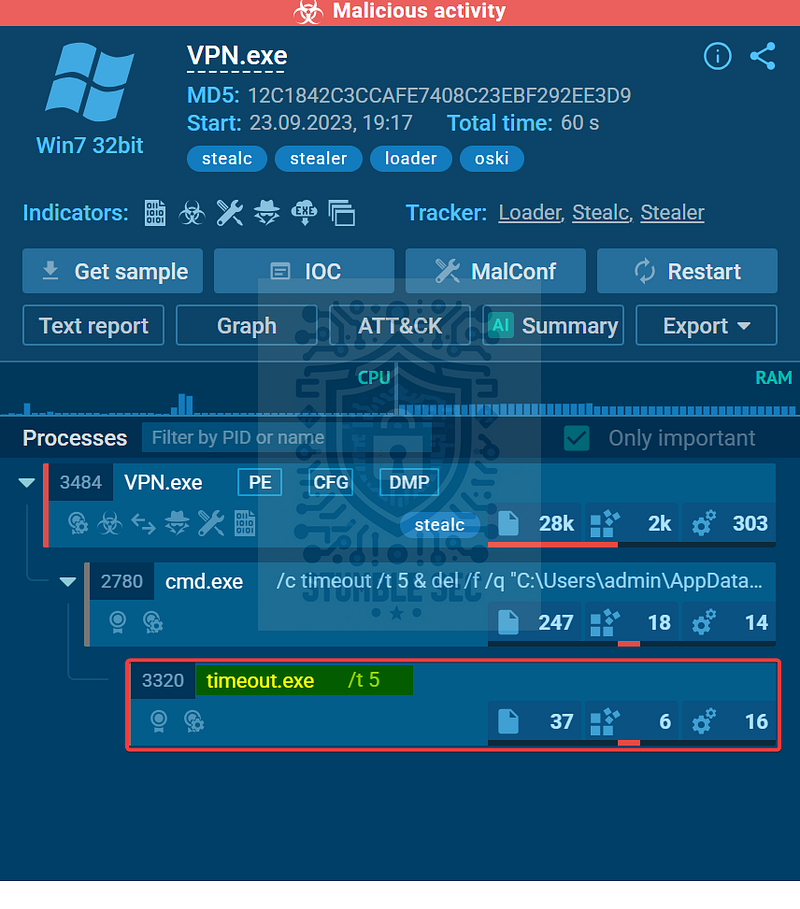
Any.Run: Identifying the timeout value from the report overview
The command includes a timeout value of 5 seconds, showing us that the malware pauses briefly before its self-deletion routine.
Now that we’ve determined the number of seconds, let’s submit the answer and wrap up this investigation!
Conclusion:
There we have it! Starting with the file hash of a suspicious file, we successfully used our threat intelligence skills to determine that the PowerPoint file is indeed malicious — time to start our remediation! By pivoting to online threat intelligence and malware analysis services, we’ve uncovered much more about the nature of this file, including how it operates and what the impact of executing it could be.
Now that we’ve completed our objectives, let’s close out this walkthrough of the Oski Lab!
A big thank you to CyberDefenders for another engaging lab. I always keep threat intelligence challenges in the rotation because regular practice and learning what tactical information is available is such a valuable real-world skill. Having hands-on time with a variety of services is a great way to start building better defenses and equipping yourself with a stronger working knowledge of threats you might encounter.
I found it incredibly engaging that there was no single source that could provide all the answers for this lab — it required pivoting to several services to paint the full picture. Awesome stuff!
Thanks for your support and partnering on this investigation. If you found this walkthrough helpful, don’t forget to give it a clap! Your feedback really is invaluable, and it pumps me up to support your security journey. Remember, Cybersecurity is a team sport and we’re in this together!
Until next week’s challenge — stay curious and be safe out there!
Tools & References:
Challenge Link: https://cyberdefenders.org/blueteam-ctf-challenges/oski/
REMnux: https://remnux.org/
VirusTotal: https://www.virustotal.com/
Any.Run: https://app.any.run/tasks/d55e2294-5377-4a45-b393-f5a8b20f7d44
Recorded Future Tria.ge: https://tria.ge/250509-vyp1vshq21
MITRE ATT&CK — Credentials from Password Stores (T1555): https://attack.mitre.org/techniques/T1555/
MITRE ATT&CK — Indicator Removal: File Deletion (T1070.004): https://attack.mitre.org/techniques/T1070/004/