Blue Team Labs Online — Reverse Engineering — A Classic Injection Challenge Walkthrough
A Malware Analysis Challenge Using Ghidra and ProcMon

Image Credit: https://blueteamlabs.online/
Introduction:
Welcome to my weekly walkthrough! If you’ve stumbled across this blog searching for a comprehensive guide to the Reverse Engineering — A Classic Injection challenge from Blue Team Labs Online, you’re in the right place. This challenge is a fantastic introduction to malware reverse engineering using both static and dynamic analysis techniques — let’s check out the scenario below.
Challenge Scenario:
Analyse the attached EXE sample and find answers to the following questions. Note: The EXE uses shellcode generated by the Metasploit attack framework. Make sure you analyse the sample in contained environment (we recommend a virtual machine where internet access is disabled).
For this challenge, we’re provided a malicious executable file generated by Metasploit. Our job is to dig into the binary to understand what the malware is capable of and how it works.
To perform this investigation, we’ll gather information about the malware and its capabilities by performing static code analysis using Ghidra. Once we’ve learned more about how the malware functions, we’ll pivot to dynamic analysis by executing the malware and capturing system activity for further inspection. By combining both techniques, we’ll build a comprehensive understanding of how the malware operates.
Sounds like fun, right? Let’s get into it!
And if you find this walkthrough helpful — whether it levels-up your skills, gets you over a stumbling block, or serves as a handy reference — please give it a clap and consider following me for more content like this.
Thanks for reading and going on this investigation with me!
Setup the Analysis Environment & Extract the Challenge File:
Safety first! It’s always important to heed the warning when working with lab/challenge files from BTLO (or any educational lab/challenge/range) to keep yourself protected by performing these tasks in a dedicated, isolated virtual machine environment.
For example, I’m using FLARE-VM for this challenge: “a collection of software installations scripts for Windows systems that allows you to easily setup and maintain a reverse engineering environment on a virtual machine (VM).”
To keep this write-up focused I’m going to skip a step-by-step setup of FLARE-VM, but if you’d like to set up your own environment, please follow the directions provided directly by FLARE-VM on GitHub.
GitHub — mandiant/flare-vm: A collection of software installations scripts for Windows systems that… _A collection of software installations scripts for Windows systems that allows you to easily setup and maintain a…_github.com
Once you have a safe virtual environment created, updated, isolated, and snapshotted, we can extract the challenge file and start the investigation!
Question 1: What is the name of the compiler used to generate the EXE?
Let’s kick off our investigation! First things first: unzip the challenge file archive, then unzip the inner .ZIP file to expose the sample, analyseme.exe.

File Explorer: The location of the malware sample.
To answer Question 1, we need to determine the compiler used to generate the executable. For this task, we can use a file identification tool like PEiD, which comes bundled with Flare-VM. This is a good first step in any malware reverse engineering workflow to learn more about the binary and inform the next investigative steps.
After opening PEiD, drag the analyseme.exe file into the application to perform the analysis.

PEiD: Identifying the compiler
At the bottom of the window, we’ll see Microsoft Visual C++ 8 — this is the name of the compiler used to create the executable.

Question 2: This malware, when executed, sleeps for some time. What is the sleep time in minutes?
Now that we’ve identified the compiler, it’s time to jump into a disassembler and start statically analyzing the sample.
For this task, we’ll use Ghidra, another tool built into Flare-VM. Now, full disclosure — I have little experience with Ghidra outside of a lab or two. So, for some background on what Ghidra is, let’s refer to the project’s GitHub before we stumble through this together:
Ghidra is a software reverse engineering (SRE) framework created and maintained by the National Security Agency Research Directorate. This framework includes a suite of full-featured, high-end software analysis tools that enable users to analyze compiled code on a variety of platforms including Windows, macOS, and Linux. Capabilities include disassembly, assembly, decompilation, graphing, and scripting, along with hundreds of other features.
Now, let’s launch Ghidra. When it starts up, we’ll create a project, drop in the analyseme.exe, and let Ghidra perform the initial analysis. Once that’s completed, we’ll have the symbol tree displayed on the left, the listing contents in the center, and the decompile window on the right.
To answer Question 2, we’re looking for a sleep function to determine how long the malware sleeps after execution. To orient ourselves, let’s search the program text for "sleep" by pressing Search, then Search Program Text, and entering sleep in the Search For field.
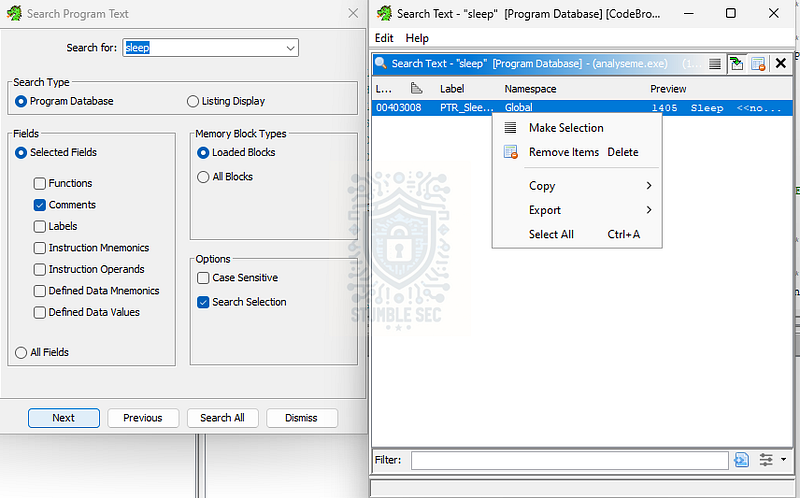
Ghidra: Searching for the references to sleep
Selecting the entry in the search takes us directly to the referenced pointer in the listing window. Notice the DWORD dwMilliseconds? Keep that in mind. Next, let’s figure out where this is referenced by clicking FUN_00401220:00401252 (R) which I’ve highlighted below.
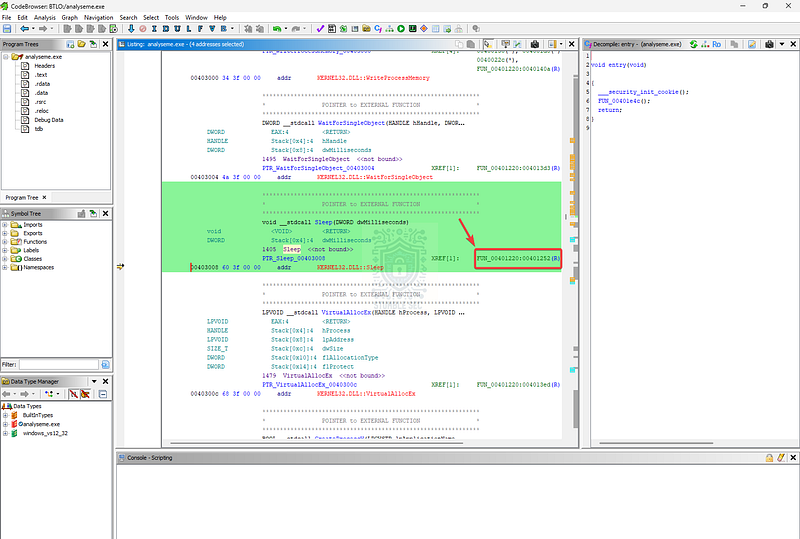
Ghidra: Clicking the associated function
Now, focusing on the decompile window on the right-hand side of Ghidra. Here we see a value of [Sleep(180000)](https://learn.microsoft.com/en-us/windows/win32/api/synchapi/nf-synchapi-sleep).
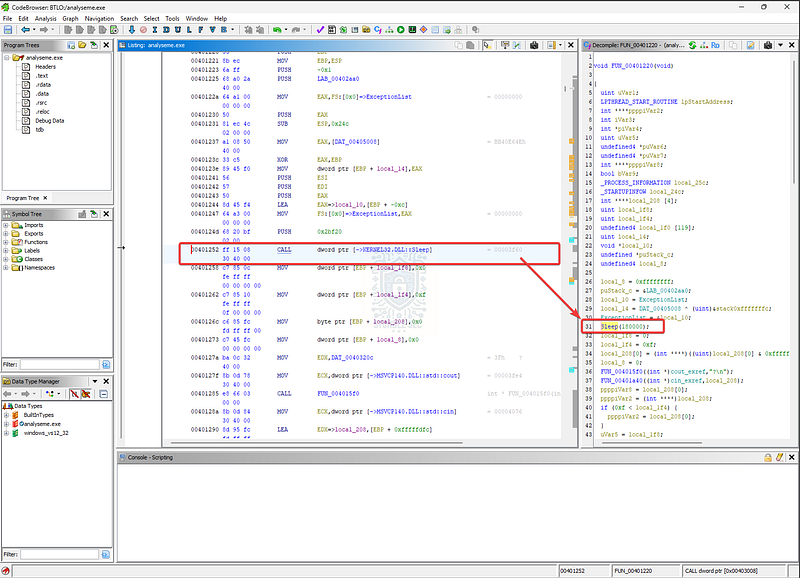
Ghidra: Identifying the sleep value
Recall the DWORD dwMilliseconds we flagged earlier? All we have to do now is convert 180000 milliseconds to minutes, and we’ve got our answer:
180000 milliseconds = 3 minutes
Question 3: After the sleep time, it prompts for user password, what is the correct password?
For our next task, we need to discover the correct password required to execute the malware after the sleep time we found in Question 2. This likely means we’re looking for an if statement that checks for a specific password.
One way to approach this is to use Ghidra to search for text strings in the application that might indicate a hardcoded password. To do this, press Search > String Search to get an overview of strings that appear in the binary. But first, let’s change the minimum length from 5 to 3 — just in case the password is shorter than 5 characters because, security 😋.
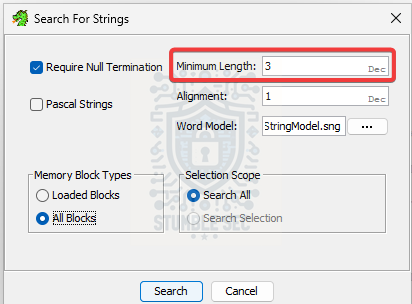
Ghidra: String search interface
After reviewing the results, we’ll stumble on an interesting string, btlo, with the label DAT_00403210 — this sticks out as a bit odd.
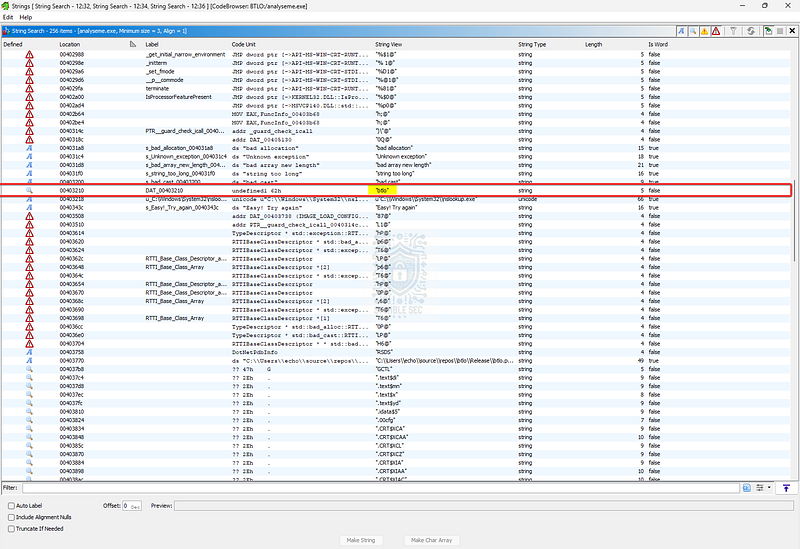
Ghidra: Identifying interesting string
Clicking the string brings us back to FUN_00401220, where we previously identified the sleep timer. In the decompile window, it seems this string is tied to an if statement, leading us to the conclusion that this is probably the correct password.
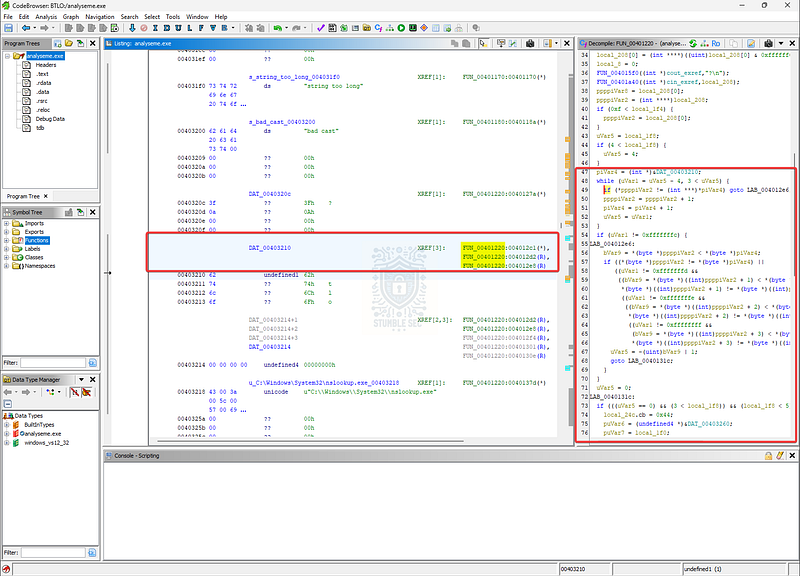
Ghidra: Analyzing the location of the string in the function
This is only a lucky guess approach since we don’t know for sure that this is the password we’re looking for just yet. We’ll validate this later in the challenge when we execute the malware, but we can submit the flag to check our work.

Question 4: What is the size of the shellcode?
Keep scrolling down in FUN_00401220 and we’ll discover a call to VirtualAllocEx on line 106. According to Microsoft Learn, the VirtualAllocEx function reserves a memory region within the virtual address space of a target process. Given the context of this investigation, it seems likely this could be used for process injection.
If you’re unfamiliar with this technique, I’ll include a short description from MITRE ATT&CK: T1055 — Process Injection:
Process injection is a method of executing arbitrary code in the address space of a separate live process. Running code in the context of another process may allow access to the process’s memory, system/network resources, and possibly elevated privileges.
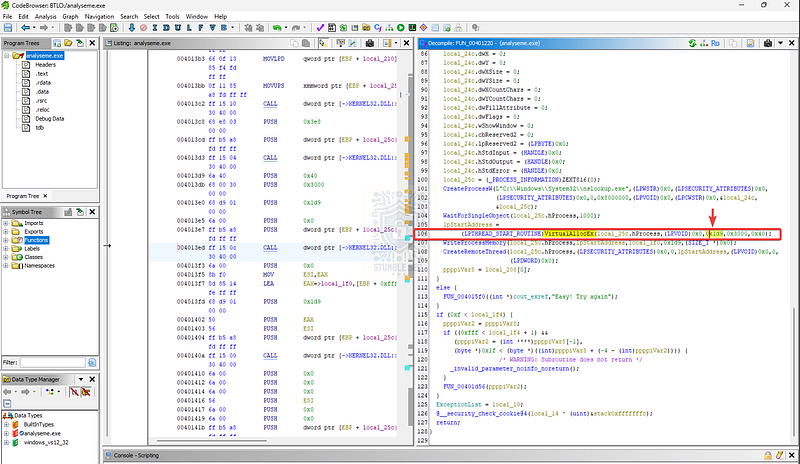
Ghidra: Identifying the shellcode size
This question feels a little out of order since we’ll learn more about the method of shellcode injection and the victim process in the next couple of questions.
For the purposes of Question 4 we’ll need the decimal value of the memory allocation. Hover over the hex value 0x1d9 to see the automatic conversion — which is 473.

Question 5: Shellcode injection involves three important windows API. What is the name of the API Call used?
We got a little ahead of ourselves while investigating Question 4 and spoiled the fun. Question 5 confirms we’re looking at shellcode injection, and now we need to determine which API call is used to perform it.
Let’s pull back and lean on the reference link provided by BTLO for the challenge:
CreateRemoteThread Shellcode Injection | Red Team Notes _Injecting shellcode into a local process._www.ired.team
This is an excellent reference point to help explain what we’re seeing: injecting shellcode into a remote process using [CreateRemoteThread](https://learn.microsoft.com/en-us/windows/win32/api/processthreadsapi/nf-processthreadsapi-createremotethread). The proof-of-concept payload included in the blog even features something we saw in the last question, creating the VirtualAllocEx to accommodate the shellcode.
Let’s flip back to the sample we’re analyzing in Ghidra. A few lines further down in the code (line 108), we’ll see a reference to this exact API — CreateRemoteThread.
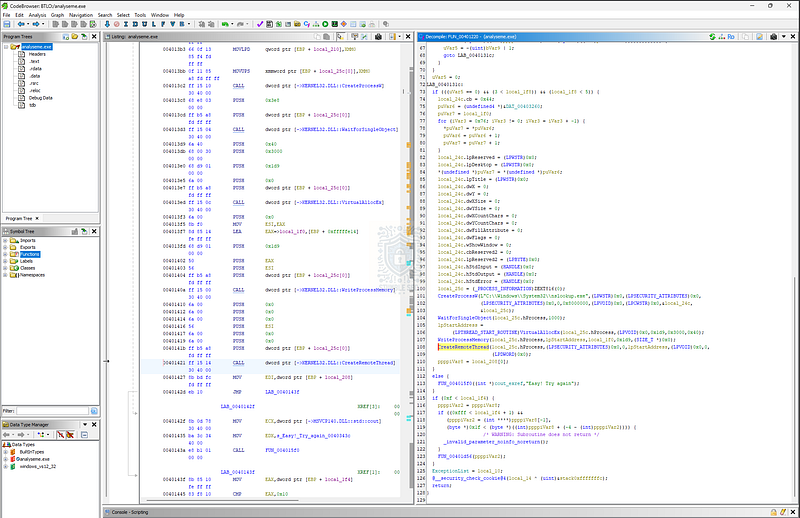
Ghidra: Identifying the shellcode injection API call
This confirms that the sample we’re analyzing matches the technique discussed in the Red Team Notes blog.

Question 6: What is the name of the victim process?
So, let’s put this all together: in Question 4, we determined where the injection happens using the VirtualAllocEx function. In Question 5, we learned how the injection is performed using CreateRemoteThread. The last thing we need to determine is what victim process was injected, right?
For this, jump up to line 101 in Ghidra, where we can see a call to CreateProcessW. The target process being launched is nslookup.exe, a trusted Windows binary. Because it blends into legitimate operations, using it can make malicious activity more difficult to detect. Very sneaky!
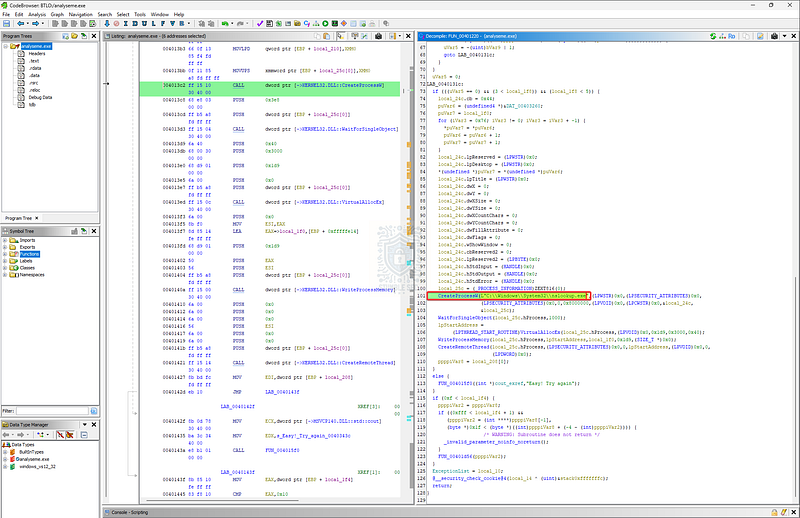
Ghidra: Identifying the victim process
Importantly, this confirms that nslookup.exe is the victim process (the one receiving the injected shellcode).

Questions 7, 8, & 9:
What is the file created by the sample
What is the message in the created file
What is the program that the shellcode used to create and write this file
For our final three tasks, we need to uncover what this malware sample does after execution. To do this, we’re switching gears — moving away from static analysis in Ghidra to dynamic analysis by actually executing the malware and capturing runtime behavior.
We’ll use Process Monitor (ProcMon) from the Microsoft Sysinternals suite. Process Monitor is “an advanced monitoring tool for Windows that shows real-time file system, Registry, and process/thread activity.”
Using this utility helps us collect insights into what the malware does upon execution. First, launch ProcMon and let it run to capture system activity.
Next, double-click and execute the analyseme.exe sample. Immediately, a command prompt window opens with a ?. Remember the sleep timer from Question 2? We need to wait 3 minutes for the malware to continue…
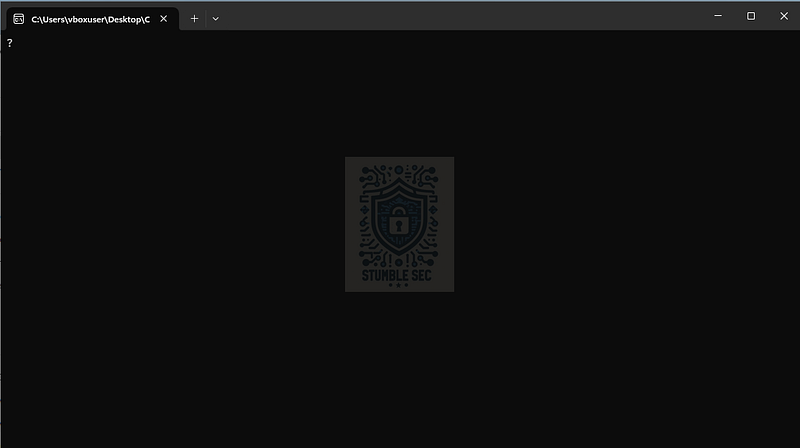
Executing the malware for dynamic analysis
Once the 3 minutes have passed, we’re prompted for a password. Now we can finally validate the password string we identified in Question 3. Once the password is accepted, the window closes.
Inputting the password string into the malware
But what really happened? Let’s turn to ProcMon to see behind the scenes. In the main window, press the Process Tree view button, and search for the parent process analyseme.exe.
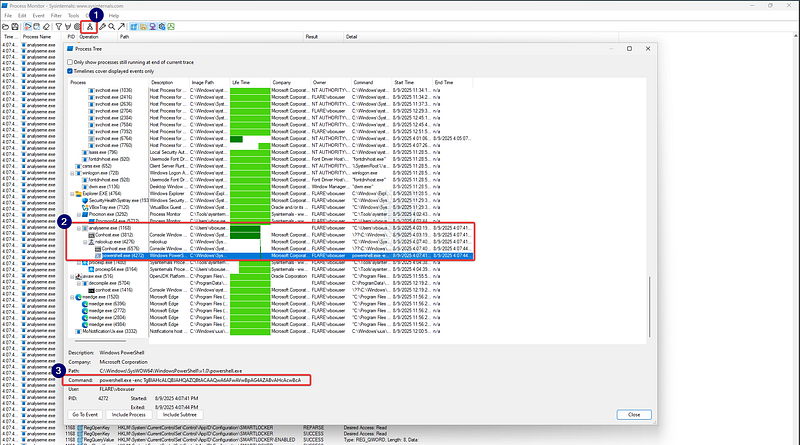
ProcMon: Identifying processes spawned by the malware
We’ll see that the malicious binary spawned a few child processes — including powershell.exe. Clicking the powershell.exe entry reveals an encoded (-enc) command line. Now we need to decode this command to understand what happened.
To decode the PowerShell command line, flip over to CyberChef. I used the version built into Flare-VM, but the online version works just as well.
Once CyberChef is open, paste the encoded command into the input field. Then, from the operations column on the left, add the From Base64 and Remove null bytes operations to the recipe.
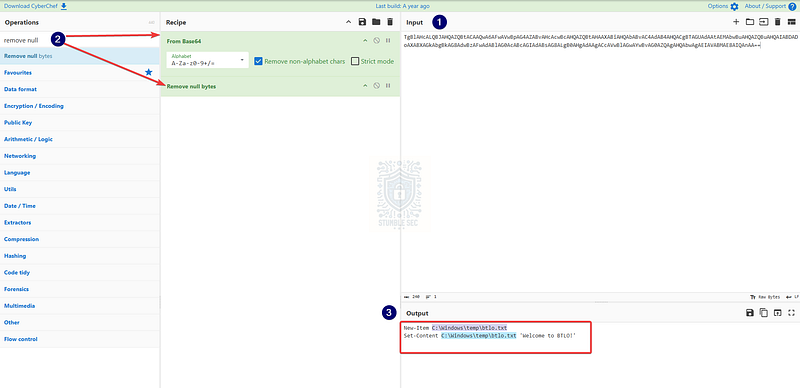
CyberChef: Decoding the PowerShell command line
Once the operation completes, the output window reveals the decoded contents of the command — giving us everything we need to answer the final three questions:
- The shellcode executes
powershell.exe, via theNew-Itemcmdlet to create a new file:btlo.txt - The file is created in the
C:\Windows\Tempdirectory - The message written to the file is: “Welcome to BTLO!”


Conclusion:

There we have it, folks! After performing initial file identification with PEiD, we dove headfirst into Ghidra to run some static analysis and uncover the sleep time, password string, shellcode size, and the process injection technique used by this malware. Once we confirmed it was a shellcode injection, we identified the victim process. From there, we pivoted to dynamic analysis — executing the malware in our analysis environment and capturing system activity with ProcMon. That led us to a PowerShell command that created a file and wrote a message, giving us the final answers we needed.
A big thank you to Blue Team Labs Online for another awesome challenge! Reverse engineering and static malware analysis are weaker spots in my skillset, so I like to keep these kinds of challenges in the rotation to continuously improve. There was some stumbling along the way, but leveraging Ghidra to analyze and decompile malware code is incredibly helpful for building foundational knowledge. While online sandboxes like ANY.RUN are popular for dynamic analysis, it’s always good to learn offline techniques like using ProcMon to dig deeper.
All in all, this was a valuable experience and a fun challenge for the week. Awesome stuff!
Thanks for your support and partnering on this investigation. If you found this walkthrough helpful, don’t forget to give it a clap! Your feedback really is invaluable, and it pumps me up to support your security journey. Remember, Cybersecurity is a team sport and we’re in this together!
Until next week’s challenge — stay curious and be safe out there!

Tools & References:
Challenge Link: https://blueteamlabs.online/home/challenge/reverse-engineering-a-classic-injection-9791a9b784
Flare-VM: https://github.com/mandiant/flare-vm
Ghidra: https://github.com/NationalSecurityAgency/ghidra
Microsoft Learn — Sleep Function: Sleep function (synchapi.h) — Win32 apps | Microsoft Learn
Microsoft Learn — VirtualAllocEx: https://learn.microsoft.com/en-us/windows/win32/api/memoryapi/nf-memoryapi-virtualallocex
MITRE ATT&CK: T1055 — Process Injection: Process Injection, Technique T1055 — Enterprise | MITRE ATT&CK®
Microsoft Learn-CreateRemoteThread: https://learn.microsoft.com/en-us/windows/win32/api/processthreadsapi/nf-processthreadsapi-createremotethread
Red Team Notes — “CreateRemoteThread Shellcode Injection”: https://www.ired.team/offensive-security/code-injection-process-injection/process-injection
Sysinternals — Process Monitor: https://learn.microsoft.com/en-us/sysinternals/downloads/procmon
CyberChef: https://gchq.github.io/CyberChef/