Blue Team Labs Online | Memory Analysis — Ransomware | Walkthrough
A Memory Analysis Challenge Using Volatility 2.6.

Image Credit: https://blueteamlabs.online/home/challenge/memory-analysis-ransomware-7da6c9244d
Introduction:
Welcome to my weekly walkthrough! If you’ve stumbled across this blog while looking for a detailed guide to the Memory Analysis — Ransomware blue team challenge from Blue Team Labs Online, you’re in the right place.
This challenge is a great entry point into the world of memory forensics, process analysis, and threat intelligence. But don’t worry — whether you’re just getting started in incident response or you’ve already built up some muscle memory with Volatility, there’s plenty here to learn.
Let’s check out the scenario to get started:
Challenge Scenario:
The Account Executive called the SOC earlier and sounds very frustrated and angry. He stated he can’t access any files on his computer and keeps receiving a pop-up stating that his files have been encrypted. You disconnected the computer from the network and extracted the memory dump of his machine and started analyzing it with Volatility. Continue your investigation to uncover how the ransomware works and how to stop it!
Yikes! This challenge puts us squarely in the middle of a ransomware investigation. We’ll be using Volatility to analyze the memory dump, identify suspicious processes, extract forensic artifacts, and ultimately confirm the ransomware family involved. Along the way, we’ll pivot to tools like VirusTotal and use command-line utilities to hash and verify dumped binaries.
I’ll walk through each step clearly, and by the end, you’ll have a solid understanding of how to approach similar investigations in the wild. Sounds like fun, right? Let’s get into it!
And if you find this walkthrough helpful — whether it levels-up your skills, gets you over a stumbling block, or just gives you a clearer view of the blue team side of incident response — please give it a clap and consider following me for more content like this.
Thanks for reading and going on this investigation with me!
Setup the Analysis Environment & Extract the Challenge File:
Safety first! When working with lab/challenge files from Blue Team Labs Online (or any educational lab/challenge/range), it’s important to be responsible and stay safe by interacting with potentially malicious files in a dedicated, isolated virtual machine environment. For this challenge I’m using REMnux, a specialized Linux distribution for malware analysis.
To keep this write-up focused, I’m going to skip step-by-step setup directions of REMnux, but if you’d like to set up your own environment, please follow the guide provided by REMnux directly. For reference, I used the virtual appliance method:
[Get the Virtual Appliance | REMnux Documentation _The easiest way to get the REMnux distro is to download the REMnux virtual appliance in the OVA format, import it into…_docs.remnux.org](https://docs.remnux.org/install-distro/get-virtual-appliance?source=post_page--- –d2311959d5f3—
– “https://docs.remnux.org/install-distro/get-virtual-appliance?source=post_page--- –d2311959d5f3—
–”)[](https://docs.remnux.org/install-distro/get-virtual-appliance?source=post_page--- –d2311959d5f3—
–)
Once you have a safe virtual environment created, updated, isolated, and snapshotted, we can extract the challenge file and start the investigation!
Question 1: Run “vol.py -f infected.vmem — profile=Win7SP1x86 psscan” that will list all processes. What is the name of the suspicious process?
Let’s kick off our memory dump investigation. To analyze the contents of the memory dump file, infected.vmem, we’ll use Volatility, a popular memory forensics tool. There are a couple of versions of Volatility: Volatility 2.6 (the original, no longer in active development) and Volatility 3 (in active development).
Overview of the Challenge File Folder
So, which one should we choose? The question is asking us to use the OS profile switch for Win7SP1x86, which tells us we need to use Volatility 2 (which I’ll just call Volatility from here on out). In Volatility 3, OS profiles aren’t needed — it uses a different plugin architecture and auto-detection mechanisms.
One last helpful piece of background: we can access the Volatility command reference on the project’s GitHub, which helps us understand what each command is doing:
Command Reference _An advanced memory forensics framework. Contribute to volatilityfoundation/volatility development by creating an…_github.com
Now that we’ve gotten all our ducks in a row, let’s get to work!
Start by opening a terminal in the folder containing the infected.vmem file and executing the command from the question:
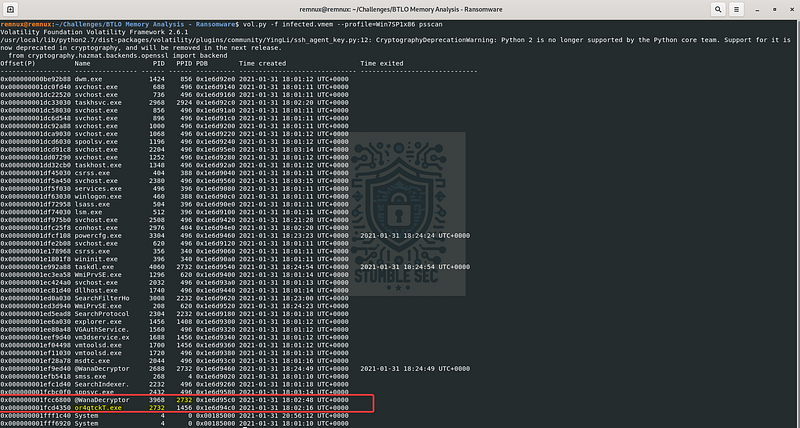
vol.py -f infected.vmem –profile=Win7SP1x86 psscan
This command opens Volatility and parses the infected.vmem image file using the psscan plugin. According to the documentation:
To enumerate processes using pool tag scanning (
_POOL_HEADER), use thepsscancommand. This can find processes that previously terminated (inactive) and processes that have been hidden or unlinked by a rootkit.
The psscan output shows us all processes running on the victim’s system at the time of capture. It might look a little daunting at first, but there are a couple of odd-looking processes in the list:
@WanaDecryptoror4qtckT.exe
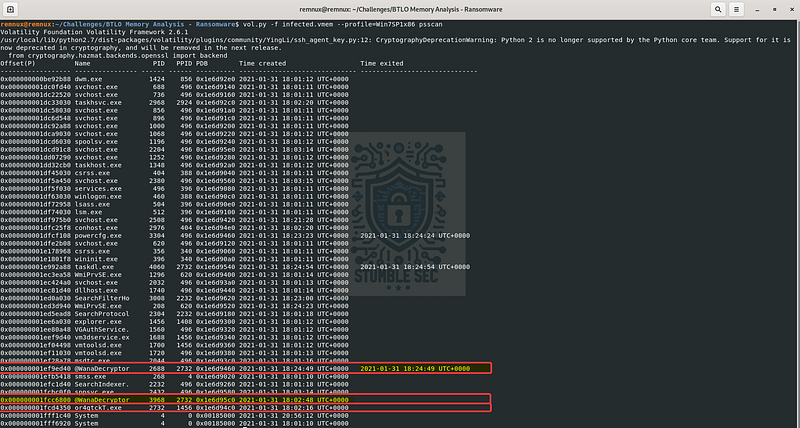
Volatility: Identifying Suspicious Processes with psscan
For the purposes of this investigation, we’ll focus on WanaDecryptor for a couple of reasons:
- The name is similar to a famous ransomware campaign.
- There are two instances: one terminated and one still active.
- The second process is the parent, which we’ll need to answer Question 2.
Questions 2 & 3:
What is the parent process ID for the suspicious process?
What is the initial malicious executable that created this process?
I might’ve spoiled it in the last question, but to answer Question 2, we need to provide the parent process ID (PPID) of the suspicious process from the psscan results. We can identify this by looking at the PPID column for the suspicious process line.
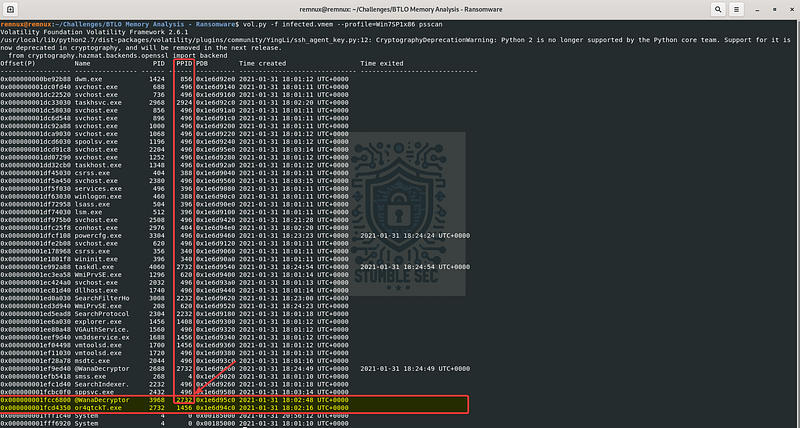
Volatility: Identifying the Suspicious Process PPID
The PPID matches the process ID (PID) of the second suspicious process we identified: or4qtckT.exe. This means it’s the parent process that created the suspicious process from Question 1.
Volatility: Identifying the Suspicious Parent Executable
To answer Question 3, we now know that or4qtckT.exe is the initial malicious executable that spawned the process we flagged earlier which helps to establish the relationship in the attack chain.


Question 4: If you drill down on the suspicious PID (vol.py -f infected.vmem — profile=Win7SP1x86 psscan | grep (PIDhere)), find the process used to delete files
For our next task, we’re going to continue analyzing the output from the psscan plugin. This time, we’re going to leverage grep to display only the entries related to the PID of or4qtckT.exe, which we uncovered in the last question. Here’s the command:
vol.py -f infected.vmem –profile=Win7SP1x86 psscan | grep 2732
The output helps us quickly identify a second child executable: taskdl.exe. It shares the same PPID as the first one. While we don’t yet have further analysis of this binary, the fact that the malicious executable spawned both processes allows us to reasonably guess that this is the process used to delete files.

Volatility: Identifying a Second Process with the Malicious Parent Process
Question 5: Find the path where the malicious file was first executed
Moving right along to Question 5, we’ll need to pivot away from psscan to another module. When determining the right one to use, it can be really useful to pull up Volatility’s help menu and review the options. You can access it with the command:
vol.py -h
Based on the available options, it seems like the cmdline module will fit the bill, as it’s used to “display process command-line arguments.” Let’s give it a try with a quick adjustment to our command. We’ll combine the cmdline function with grep to focus on the malware or4qtckT.exe:
vol.py -f infected.vmem –profile=Win7SP1x86 cmdline | grep 2732

Volatility: Identifying the Malware File Location with cmdline
Awesome! This gives us exactly what we needed — the file path of the executable, right on the “hacker’s” desktop.

Question 6: Can you identify what ransomware it is? (Do your research!)
Now that we’ve identified the malicious executable and its child processes, it’s time to pivot to threat intelligence to figure out what ransomware family we’re dealing with. The approach is straightforward: obtain the file hash for or4qtckT.exe, check VirusTotal, and use the intelligence to confirm the ransomware family.
First, we’ll dump the executable using Volatility’s procdump command, specifying the PID we found in Question 2:
vol.py -f infected.vmem –profile=Win7SP1x86 procdump –pid=2732 –dump-dir OUTPUTDIRECTORY
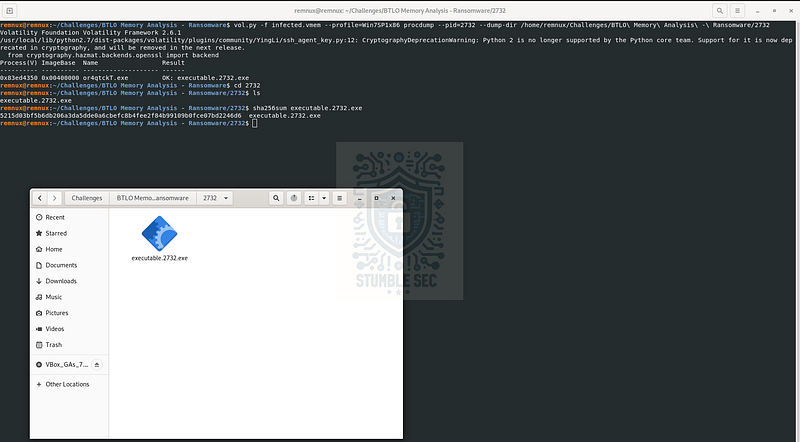
Volatility: Dumping the malicious executable with prodcump & obtaining the file hash
With the executable dumped, we can calculate the SHA-256 file hash using sha256sum command:
5215d03bf5b6db206a3da5dde0a6cbefc8b4fee2f84b99109b0fce07bd2246d6
Next, head to VirusTotal, and input the file hash in the search box. We’ll see immediately that this sample has been analyzed on the platform already and that a majority of vendors have tagged it as malicious.
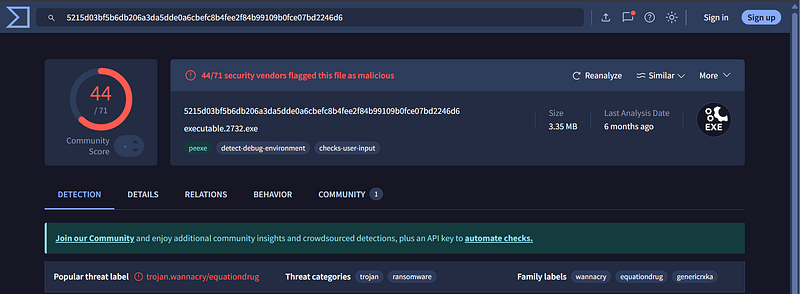
https://www.virustotal.com/gui/file/5215d03bf5b6db206a3da5dde0a6cbefc8b4fee2f84b99109b0fce07bd2246d6
To answer Question 6, we’re interested in the Family and Threat Label tags, identifying this file as part of the WannaCry ransomware family. This lines up with the naming similarity we stumbled on earlier in Question 1, which solidifies the findings.

Question 7: What is the filename for the file with the ransomware public key that was used to encrypt the private key? (.eky extension)
We’ve made it to the final question, and this one asks us to find the filename of the ransomware public key with the .eky extension. This is a little outside the usual scope of the challenge, but .eky isn’t a common file extension. It’s most often associated with the WannaCry ransomware family, which fits with what we found in Question 6.
So, how do we find it? We’ll use another Volatility module: dumpfiles. This lets us check other files cached in memory for the PID tied to the malicious process. The command looks similar to the one we use in Question 6:
vol.py -f infected.vmem –profile=Win7SP1x86 dumpfiles –pid=2732 –dump-dir OUTPUTDIRECTORY
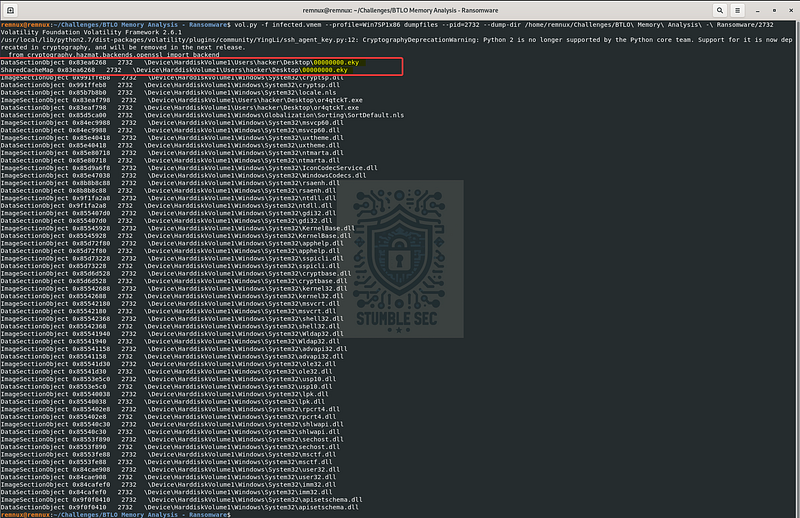
Volatility: Dumping the associated files for the malicious PID with dumpfiles
When we run this command, the associated files dump to the specified directory, and the listing also prints to the console. From that output, we see the first two lines contain the filename 00000000.eky. That’s the key file we need to wrap up this investigation!

Conclusion:
How fun was that? A big thank you to Blue Team Labs Online for putting together another solid challenge.
This investigation was a breezy introduction to Volatility and ransomware behavior. It’s a great example of how memory analysis can reveal the full scope of an attack — from identifying suspicious processes with psscan, to extracting binaries with procdump, and finally confirming the ransomware family via threat intelligence — even when disk artifacts aren’t available.
I chose this challenge to sharpen my incident response workflow and get reacquainted with Volatility, especially in scenarios where ransomware is involved. The investigation pushed me to pivot between modules, apply threat intelligence, do some research about this ransomware, and yes — stumble across clues like the .eky file. Awesome stuff!
Thanks for your support and partnering on this investigation. If you found this walkthrough helpful, don’t forget to give it a clap! Your feedback really is invaluable, and it pumps me up to support your security journey. Remember, Cybersecurity is a team sport and we’re in this together!
Until next week’s challenge — stay curious and be safe out there!

Tools & References:
Challenge Link: https://blueteamlabs.online/home/challenge/memory-analysis-ransomware-7da6c9244d
REMnux: https://remnux.org/
Volatility: https://volatilityfoundation.org/the-volatility-framework/
Volatility — Command Reference: https://github.com/volatilityfoundation/volatility/wiki/Command-Reference#psscan
VirusTotal: https://www.virustotal.com/
VirusTotal — Sample: https://www.virustotal.com/gui/file/5215d03bf5b6db206a3da5dde0a6cbefc8b4fee2f84b99109b0fce07bd2246d6
MITRE ATT&CK — Software — WannaCry (S0366): https://attack.mitre.org/software/S0366/